1
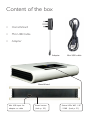
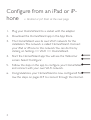
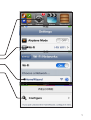
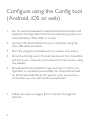
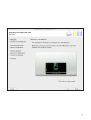
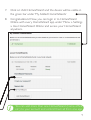
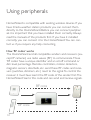
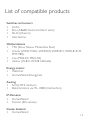
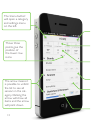
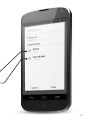
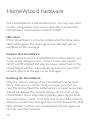
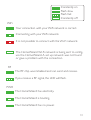
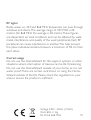
HomeWizard
USER MANUAL
1
Table of Contents
Content of the box................................................................................................ 3
Configure from an iPad or iPhone................................................................ 4
Configure using the Config tool (Android, iOS or web)................. 6
Using the HomeWizard outside of your home..................................... 8
The HomeWizard apps.................................................................................... 10
Software updates.................................................................................................. 11
Using peripherals.................................................................................................. 12
List of compatible products............................................................................ 13
Home screen of the app.................................................................................. 15
Using the app.......................................................................................................... 16
Control the lights.................................................................................................. 18
Setup notifications............................................................................................... 22
Setup actions........................................................................................................... 24
Shared Weather..................................................................................................... 26
HomeWizard hardware................................................................................... 30
Troubleshooting..................................................................................................... 32
Additional information....................................................................................... 34
Content of the box
•
HomeWizard
•
Mini USB Cable
•
Adapter
Adapter
Mini USB cable
HomeWizard
Mini USB input for
adapter or cable
Reset button
(look p. 30)
Status LEDs WiFi / RF
/ PWR (look p. 31)
Configure from an iPad or iPhone ›› Android or pc? Start at the next page
1. Plug your HomeWizard to a socket with the adapter.
2. Download the HomeWizard app in the App Store.
3. The HomeWizard uses its own Wi-Fi network for the
installation. This network is called: ‘HomeWizard’. Connect
your iPad or iPhone to this network. You can do this by
clicking on Settings >> Wi-Fi >> HomeWizard.
4. Start the HomeWizard app. You will see the ‘Welcome’
screen. Select: ‘Configure’.
5. Follow the steps in the app to configure your HomeWizard
and connect with your own Wi-Fi network.
6. Congratulations, your HomeWizard is now configured! Follow the steps on pages 8-9 to connect through the internet.
4
5
Configure using the Config tool
(Android, iOS or web)
1. Go to: www.homewizard.co.uk/downloads. Download and
install the ‘Configuration Tool’ for the operating system you
have (Windows, Max OSX or Linux).
2. Connect the HomeWizard to your computer using the
mini USB cable provided.
3. Start the program and follow the on screen instructions.
4. Once the Config tool is finished, disconnect the HomeWizard from your computer and connect to mains power using
the adapter.
5. Download the HomeWizard app and open it. If the configuration is completed successfully, the HomeWizard will
be found automatically by the app. As soon as you see a
connection, you can add wireless peripherals!
•
6
Follow the steps on pages 8-9 to connect through the
internet.
7
Using the HomeWizard outside
of your home
After you have configured the HomeWizard, the app will
connect with the device through an internal IP address. This will
only work when you are on the same network. If you would
like to use it outside of your home network you can use the
HomeWizard Online service.
1. Go to: www.homewizard.co.uk and click on the section:
‘HomeWizard Online’.
2. Click on ‘Register’ to create a new account.
3. Fill in your name, email address and a password. This password can be different to the one you used with the Config
Tool.
4. Once you have completed the registration form you will be
sent a confirmation email. Open the email and click on the
link.
5. Now you can login on www.homewizard.co.uk and go
to the ‘HomeWizard Online’ section. It will automatically
search for HomeWizards in your network. These will be
visible on ‘Local HomeWizards’.
6. Connect the HomeWizard to your HomeWizard Online
account. You can do this by filling in the HomeWizard
password and give the HomeWizard a name, for example
‘home’ or ‘office’.
7. Click on ‘Add HomeWizard’ and the device will be visible in
the green bar under ‘My Added HomeWizards’
8. Congratulations! Now you can login in to HomeWizard
Online with every HomeWizard app under ‘Menu ›› Settings
›› Use HomeWizard Online’ and access your HomeWizard
anywhere.
i
You can add more than one HomeWizard (home, office,
etc.) to your account and control them all from one app.
9
The HomeWizard apps
After your HomeWizard is configured you can use the
HomeWizard app on different platforms. At the moment we
support: iOS, Android and ‘web’ (HTML5). The app interface is
largely the same on all the platforms; however there are some
small changes because of the operating system.
iOS
For iPhone, iPad and iPod Touch. The navigation of the app is in
line with iOS usability standards (menu/edit keys are upper left
and right on the screen).
Android
For Android smartphones and tablets. Navigation follows
Android standards. In most places in the app you can use a long
press to edit or delete an item using a bar at the top of the
screen.
Web (HTML5)
For all web browsers on a pc or smart phones. Go to http://
app.homewizard.co.uk and login with your HomeWizard Online
account or IP-address. The web app does not support notifications or actions.
10
Software updates
The HomeWizard is updated with new functions regularly. This
is done via a firmware update of the HomeWizard and/or an
update for (iOS, Android or web) app.
Firmware updates
The HomeWizard does periodic checks for firmware updates
via the internet. If there is new firmware you will see a pop-up
in the app asking if you would like to install the new firmware.
App updates
You can update the HomeWizard app through the App Store
(iOS) or Play Store (Android). On most smartphones it is
possible to install it automatically, or request notification when a
new update is available.
The web app is managed on our server, so is updated
automatically. http://app.homewizard.co.uk will always be the
newest version.
i
Subscribe to our newsletter on www.homewizard.
co.uk and get the latest news.
11
Using peripherals
HomeWizard is compatible with existing wireless devices. If you
have Cresta weather station products you can connect them
directly to the HomeWizard. Before you can connect peripherals it is important that you have installed them correctly. Always
read the manuals of the products first. If you have it installed
correctly, you can connect it to the HomeWizard. You can contact us if you require any help connecting.
How ‘RF codes’ works
The HomeWizard and all compatible senders and receivers (except IP cameras) use radio waves (RF) to communicate. Those
‘RF codes’ have a unique identifier and an on/off command or
dim level percentage. Remote controllers, motion detectors,
magnetic sensors, doorbells, etc. send these RF codes and receivers (switches, dimmers, etc.) react to the signal. To control the
receiver it must have learnt the RF code of the sender first. The
HomeWizard ‘learns’ this code and can send and receive signals.
RF CODE
RF CODE
12
List of compatible products
Switches and sensors
• CoCo
• Elro (AB600 ‘Home Comfort’ serie)
• DI-O (Chacon)
• Intertechno
Wetterstations
• TFA (Sinus, Nexus, Meteotime Duo)
• Cresta (WXR-710XL, WXR-810, WXR-815, WXR-815LM,
PMT-980)
• Irox (PRO-EC, PRO-X2)
• Ventus (W-831, W-928 Ultimate)
Energy meters
• Wattcher
• HomeWizard EnergyLink
Awning
• Somfy RTS motoren
• Elektromotors via ITL-1000 (Intertechno)
IP-Cameras
• HomeWizard
• Foscam (SD-versies)
Smoke detector
• HomeWizard
13
The ‘menu button’
will open a category
and settings menu
on the left.
Those three
points give the
position of
the lower row
icons.
The arrow means it
is possible to unfold
the list to see all
sensors in the category. Clicking the
arrow will show all
items and the arrow
will point down.
14
Home screen of the app
Click on the question mark for the ‘help menu’. In many other
screens, this menu will be visible (context related) to slide the
navigation bar to the left
(iOS only).
The upper row icons show
you the awareness sensors.
Click on it to see an overview.
The lower row icons show
you the data from your
weather stations. You can
scroll to the left and the
right to see more sensors.
Use the switch buttons
to control your devices.
The star means
that only the ‘favourites sensors’
will be visible.
Use the slide bar to dim
your lights.
15
Using the app
After the HomeWizard is configured for your wireless network, you can start with adding products (sensors) to your
HomeWizard.
Add a sensor
Go to ‘Menu ›› New sensor’ and select the type of device you
would like to add. The screen will switch, complete any required
fields like ‘name’ and ‘code’ (options depend on the type of sensor). Follow the in-app instructions to complete the pairing.
Edit sensors
The features of each sensor can be edited after you have added
it. You can do this under: ‘Menu ›› Edit sensors ›› Your sensor’.
Setup your favourites
Under ‘Menu ›› Edit sensors’ you can click on a star for every
sensor. By doing this, you are making the sensor a favourite.
This means the switches, dimmers, scenes or Somfy you have
made favourite will be visible as standard in the home screen
of the app and you will not need to unfold a list. For weather
stations you will see the rank from the left to the right on the
lower row on the home screen. Favourites are specific for each
smartphone/tablet and you have to set them up for each device
separately.
16
Sort
You can edit the rank of switches, dimmers, Somfy or scenes.
Select ‘Menu ›› Edit sensors’, click on the three horizontal lines
on the right side of the sensor and drag it up/down. This rank
will be used for the rest of the app. Note: it is not possible to
change the placement of categories. For example: scenes are always above switches & dimmers. Ranking is smartphone specific.
You can setup each device differently.
Language
The language of the app is specific of the language you are using
on the iOS or Android device. You can change the language of
the app by changing the language of your device.
17
Control the lights
...and much more! HomeWizard gives you lots of automation
possibilities.
Setup timers
You can add timers to activate each switch, dimmer, scene or
Somfy at a specific time. Also you can use ‘sun times’, so you can
turn lights on/off at sunrise and sunset. You can set this up under:
‘Menu ›› Edit sensors ›› Your sensor ›› New timer’. In the next
screen you can setup the status and time.
Actions
You can switch lights on/off using awareness sensors (motion
sensors etc.) or weather sensors. With an ‘auto-off ’ timer programmed a device will switch off automatically after a specific
amount of time. Look at page 24 for the settings.
Status of lights
HomeWizard knows and displays the status of all switches controlled through the app. You can make the HomeWizard ‘learn’
more controllers under: ‘Menu ›› Edit sensors ›› Your Sensor
›› Codes’. They will then also be monitored by the app. Please
note, only the first code is sent if you enable/disable a peripheral
through the app.
18
19
Control the lights (2)
Scenes
To control more than one light at the same time you have
to create a ‘scene.’ Go to ‘Menu ›› New sensor ›› Scene’, give
the scene a name and save it. In the next screen you can add
switches and other peripherals. You can also add an IP camera
for ‘scene view’.
Scene view
After you have added a scene it will be visible under ‘Menu ››
Scenes’. You can click on the name of a scene, to control all the
switches individually. This gives you the ability to control different
scenes, switches or rooms quickly. It is also possible to watch the
IP camera while switching lights on/off in the scene.
Control scenes with the senders
In addition to controlling the scene through your smartphone,
HomeWizard gives you the ability to activate a scene with a
remote control – such as a wall switch. You can do this under
‘Menu ›› Edit Sensor ›› Scene ›› Codes’. You can then flick a wall
switch and your scene will activate!
20
21
Setup notifications
With notifications you will receive a message (push-notification)
on your smartphone when a sensor a specific activity is
detected. For example, you can set notifications for someone
pressing the doorbell, the temperature rising above 18 degrees
or a smoke detector going off.
Setup
Go to ‘Menu ›› Notifications’ and click on the plus-button. In
the next screen you can select which sensor you would like to
receive notifications for.
Event: the status of the sensor which gives a notification.
Time: the times between which the notifications will be active.
As well as notifications you can also set up an action (please see
the next page for details).
Edit
Existing notifications are easily enabled/disabled under ‘Menu ››
Notifications’. On iOS click the arrows on the right side of the
notification. On Android, click on the notification and on the
plus or cross symbol in the edit bar.
22
23
Setup actions
Actions give you the option to control peripherals (switches/
dimmers) on the basis of sensor activity. They work the same way as
a notification, but control a device or scene. It makes it possible to
turn on lights when motion is detected or an awning lowering if the
temperature reaches a specific level.
Setup
Go to ‘Menu ›› Actions’ and click on the plus-button. In the next
screen you can select the sensor you will use to control the action.
After this, you can set up the ‘conditions’ as descriptions under
‘notifications’ (Look at the next page).
Click on ‘action’ and select the device or the scene to be controlled.
In the next screen you can set the behaviour:
Action: enable or disable the device/scene
Disable after: disable X-minutes after the device/scene is enabled.
i
24
You can add an action and/or notification to every
condition at the same time.
25
Shared Weather
With shared weather you can see real-time data from weather
stations all over the world, and share your weather data with
others. To enable shared weather you will need at least one
thermometer. All weather sensors you have must be set up as
per the manufacturer’s instructions, otherwise your measurements will be inaccurate.
Activate
Go to ‘Menu ›› Share Settings’ (under ‘Shared Weather’). Enable
‘sharing’ and provide the information (name, location, and thermometer) requested in the app, and then click save.
Watch weather stations
After you have enabled sharing, the map will be visible under
‘Menu ›› Map’. Here you will see an overview of all available weather stations. Click on ‘Featured’ to see one of the featured lists:
United Kingdom, coast, etc. These lists will give you an overview
of measured values in the selected area and are composed by
HomeWizard based on precision and fullness off the weather
stations.
i
26
The preciseness of the location is limited to city level
for privacy reasons.
27
Shared Weather (2)
Favourites
You can ‘Favourite’ weather stations so they are visible more
readily under ‘Featured ›› Favourites’. Go to ‘Featured ›› All
weather stations’ and look for the desired weather station on
the map and select the black pin. If you see more weather
stations in one location, the most complete weather stations will
be visible. Select your desired station. The overview page of this
weather station will be visible and you can make the station a
favourite by clicking the blue star.
Message feed
Under ‘Menu ›› message feed’ you will see the latest messages
HomeWizards users have written via their weather station.
Click on the message to go to the weather station. You can
write a message if you go to the overview page of your own
weather station and click on the Twitter icon. A screenshot of
your weather station will be shared via Twitter along with your
weather station message.
Graphs
Click one of the icons on the overview page of a weather
station to see the graph of the sensor (wind, rain, UV and temperature).
28
29
HomeWizard hardware
The HomeWizard is a self-contained unit - the only wire needed after configuration is the power cable. This is because the
HomeWizard communicates via Wi-Fi and RF.
LED status
If the HomeWizard is correctly configured all the three status
LEDs will be green. The meanings of each LED light will be
explained on the next page.
Displace the HomeWizard
You can easily move the HomeWizard to another place in your
home, simply unplug the unit - move it to the new location
(Wi-Fi and RF optimal) and plug the power socket back in. The
HomeWizard will then automatically reconnect to your Wi-Fi
network. After that, the app can be used again.
Resetting the HomeWizard
Only the network settings of the HomeWizard can be reset.
Once reset you can run the config tool again (p. 6-7). If you
reset the HomeWizard the added sensors or saved sensor data
will not be deleted. The network settings can be reset on the
HomeWizard. Use a small object (pipette, paper clip) to press
the ‘reset button’ - which is the hole next to the USB connector.
Wait five seconds then click again five seconds. Now all the LED
lights will flash red. Then, the HomeWizard will start again and
send his own Wi-Fi network.
30
Constantly on
Flash slow
Flash fast
Constantly off
WiFi
Your connection with your WiFi network is correct.
Connecting with your WiFi network.
It is not possible to connect with the Wi-Fi network.
The HomeWizard Wi-Fi network is being sent to configure the HomeWizard. A set up network was not found
or gave a problem with the connection.
RF
The RF chip was initialized and can send and receive.
If you receive a RF signal, the LED will flash.
PWR
The HomeWizard has electricity.
The HomeWizard is booting.
The HomeWizard has no power.
31
Troubleshooting
The Wi-Fi LED flashes red after configuration with iOS.
• The iPad/iPhone configuration cannot give feedback if the
Wi-Fi password is incorrect or something else is wrong. If
you are getting no connection, try to configure the HomeWizard with the configuration tool (p. 6-7).
The config tool does not find wireless networks after
scanning.
• Check if the router is transmitting in ‘Wi-Fi b/g’ standards,
not ‘n-only’.
• Select ‘connect to hidden network’ and try to manually add
the SSID and password (capital letter sensitive) of your
router.
The config tool gives this message: ‘network may be
incompatible’.
• Is the HomeWizard within range of your Wi-Fi router?
• Is your Wi-Fi password correct?
• To ensure password encryption is not an issue, you can
temporarily ‘open’ your network (no encryption). Then use
the config tool again. If this works enable the password
encryption again, but use a different type of encryption
(WPA/WPA2 with AES/TKIP), then run the config tool
again.
• Select a different Wi-Fi standard (b/g) if your router supports more than one.
32
I would like to setup the HomeWizard on another/new
router.
• Use the config tool again (p. 6-7). All of your added sensors
and sensor data will stay.
The HomeWizard is showing three green lights but I cannot
connection through the app.
• Check the connection settings in the app under ‘Menu ››
settings’. Use HomeWizard Online if you have an account
(look at p. 8-9). If you do not use HomeWizard Online
check your router for the internal IP address the HomeWizard uses, and the IP address given in the app. Make sure
these match and you are connected to the same wireless
network as the HomeWizard.
• If you configured via iOS make sure you have not set the
router with a WEP password. If you have that, change this
to WPA/WPA2 and use the configuration tool again (p.
6-7).
The HomeWizard Online page does not find a HomeWizard.
• Make sure you have connection with the same wireless
network as your HomeWizard. If you are using Access
Points, it can help if you use the same Access Point as the
HomeWizard.
• Make sure your internet connection is working correctly.
• Confirm in the router that ‘access point isolation’ or similar
secured options are disabled.
i
Look for the Knowledge Base on the website for
more detail and help with other subjects.
33
Additional information
Read the instruction in this manual to ensure dangerous situations and incorrect use are prevented. HomeWizard will accept
no responsible for any damage caused by the installation of this
product.
Guarantee
This product has one year (from date of sale) guarantee on
construction and/or manufacturing mistakes. Keep your receipt
as proof of purchase - it acts as your guarantee. If the guarantee
is void if the product is damaged by incorrect installation, usage,
repair/modification by you or a third party, lightning or power
surge.
Disclaimer
We at HomeWizard spend a lot of time on our manual to
give you the most complete and accurate information possible.
Unfortunately we cannot guarantee that all the information is
correct, and as such cannot accept any responsibility for damage,
direct or indirect, caused as a consequence of a visit to our
website and/or the usage of the information contained within it.
Copyright
All rights reserved. No part of this manual can be reproduced
without explicit permission of HomeWizard BV. © 2013 HomeWizard BV.
34
RF signal
Radio waves on 433 and 868 MHz frequencies can pass through
windows and doors. The average range of 433 MHz is 20
metres. On 868 MHz the average is 40 metres. These figures
are dependent on local conditions and can be affected by walls,
metal, interference and quality of the used peripherals. Each RF
peripheral can cause interference in another. The help prevent
this place individual senders/receivers a minimum of 50 cm from
each other.
Correct usage
Do not use the HomeWizard for ‘life support’ systems or other
situations where interruption of devices can be life threatening.
Do not use the HomeWizard outside of your home, as it is not
water proof. There are certain restrictions on using the HomeWizard outside of the EU. Please check the regulations in your
area to ensure the product is sufficient.
Voltage 230V ~50Hz (1 Watt)
Wi-Fi 802.11 b/g
RF 433 & 868 MHz
35
www.homewizard.com
36