1
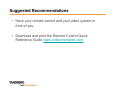
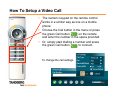
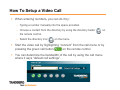
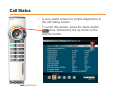
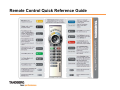
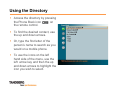
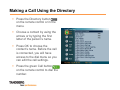
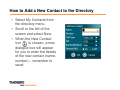
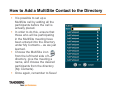
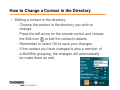
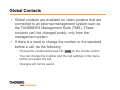
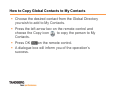
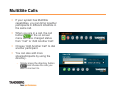
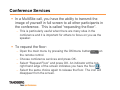
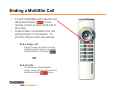
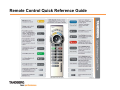
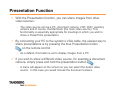
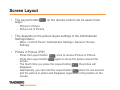
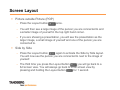
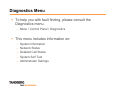
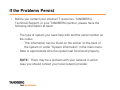
How To Setup & End a Video Call
Suggested Recommendations
Have your remote control and your video system in
front of you.
Download and print the Remote Control Quick
Reference Guide www.videochampion.com.
Remote Control Quick Reference Guide
How To Setup a Video Call
The numeric keypad on the remote control
works in a similar way as one on a mobile
phone:
Choose the Call button in the menu or press
the green Call button
on the remote
and enter the number in the space provided.
Or, simply start dialling a number and press
the green Call button
to connect.
To change the call settings
How To Setup a Video Call
When entering numbers, you can do it by:
– Typing a number manually into the space provided.
– Choose a contact from the directory by using the directory button
the remote control.
– Select the directory icon
on
on the menu.
Start the video call by highlighting “connect” from the call menu or by
pressing the green call button
on the remote control.
You can determine the bandwidth of the call by using the call menu
where it says “default call settings”.
Call Status
A very useful screen for simple diagnostics is
the call status screen.
To enter this screen, press the menu button
once, followed by the up arrow on the
remote control.
How To Answer an Incoming Call
Answering an incoming call is very similar to
answering a call on a mobile phone.
You will get an on screen menu asking you to
“Accept” or “Reject” the call, or you have the option to
place the system in “Do Not Disturb” mode.
– To answer the call, press either the OK button
or
the green call button
on the remote control.
– To reject the call, press the Red button
or select
“Reject”.
– If you do no want to allow incoming calls, choose “Do
Not Disturb”. The system will then automatically reject
all incoming calls.
– NOTE: If the system is set to auto answer, it will
automatically accept incoming calls as long as you are
not in another call.
How To End a Video Call
Push the Red Disconnect button
on
the remote control or select End Call from
the menu.
When the dialogue box for ending the call
appears on the screen
– Push the red disconnect button
on the
remote control one more time, or…
– Push OK to confirm you wish to end the call.
– Press Cancel
if you wish to continue the
call.
Additional Resources
Additional online video sessions can be found at
www.videochampion.com.
To enroll in one of our classes, a complete list of
TANDBERG University courses can be found at
www.tandberg.learn.com.
How to Adjust & Use the Camera
Suggested Recommendations
Have your remote control and your video system in
front of you.
Download and print the Remote Control Quick
Reference Guide from the Resource Center at
www.videochampion.com.
Remote Control Quick Reference Guide
Adjusting the Camera
Using the Remote Control
– When the menu is hidden, the camera can be adjusted using the
arrows.
– If the menu is visible, press the Cancel button
adjust the camera with the arrows.
and then
Using the Menu
– Select menu
, tab over to Camera Control, and then select
Near End Camera Control.
– Use the arrows to move the camera horizontally and vertically.
– The Zoom button
on the remote control can be used to pan
in and out on people and objects.
Far End Camera Control
Using FECC, you can control the camera on the system
you are calling.
– Choose the Camera Control icon in the menu
– Choose the Far End Control icon
– A header on the screen tells you can steer the Far End camera.
You will also have access to the camera presets and video
sources at the other side.
How to Save Camera Positions
You can save preset camera positions to focus on specific people or
objects in a meeting. There are two ways to do this:
– Using the Remote Control
• Use the arrows to move the camera to the desired position.
• Press and hold down one of the number buttons for one second (e.g. 2).
You will receive a message on the screen that the main camera and audio
have been saved to position P2 i.e. button number 2.
– Using the Main Menu
•
•
•
•
Use the arrows to move the camera to the desired position.
Choose “Camera Control” from the menu and then “Save New Preset”.
Enter a preset number from 0-14 and press OK.
Write in the preset name. This will make it easier to identify the presets if
you have more than one.
• Remember to save!
How to Find a Camera Preset
Using the Remote Control
– When you’re in a call, press the number button on the remote
control to access your saved presets. Keep in mind, this only
works when you are in a call.
Using the Main Menu
– Choose “Camera Control” and then “Show Preset”.
– Choose the desired preset by using the arrows on the remote
control and selecting OK.
Additional Resources
Additional online video sessions can be found at
www.videochampion.com.
To enroll in one of our classes, a complete list of
TANDBERG University courses can be found at
www.tandberg.learn.com.
How to Use the Directory
Suggested Recommendations
Have your remote control and your video system in
front of you.
Download and print the Remote Control Quick
Reference Guide www.videochampion.com.
Remote Control Quick Reference Guide
Using the Directory
Access the directory by pressing
the Phone Book icon
on
the remote control.
To find the desired contact, use
the up and down arrows.
Or, type the first letter of the
person’s name to search as you
would on a mobile phone.
To use the icons on the left
hand side of the menu, use the
left arrow key and then the up
and down arrows to highlight the
icon you wish to select.
Making a Call Using the Directory
Press the Directory button
on the remote control or in the
menu.
Choose a contact by using the
arrows or by typing the first
letter of the person’s name.
Press OK to choose the
contact’s name. Before the call
is connected, you will have
access to the dial menu so you
can edit the call settings.
Press the green Call button
on the remote control to dial the
number.
How to Add a New Contact to the Directory
Select My Contacts from
the directory menu.
Scroll to the left of the
screen and select New.
When the New Contact
icon
is chosen, a new
dialogue box will appear
for you to enter the details
of the new contact (name,
number) – remember to
save!
How to Add a MultiSite Contact to the Directory
It is possible to set up a
MultiSite call by adding all the
participants before the call is
actually placed.
In order to do this, ensure that
those who will be participating
in the MultiSite meeting have
been entered into the directory
under My Contacts – as we just
learned.
Choose the MultiSite icon
from the left hand side of the
directory, give the meeting a
name, and choose the desired
participants from the directory
(My Contacts).
Once again, remember to Save!
How to Change a Contact in the Directory
Editing a contact in the directory:
– Choose the contact in the directory you wish to
change.
– Press the left arrow on the remote control and choose
the Edit icon
to edit the contact’s details.
– Remember to select OK to save your changes.
– If the contact you have changed is also a member of
a MultiSite grouping, the changes will automatically
be made there as well.
How to Delete a Contact From the Directory
Deleting a contact in the directory under My Contacts:
– Choose the contact in the directory you wish to
delete.
– Press the left arrow on the remote control and choose
the Delete icon
.
– Confirm by selecting OK.
Global Contacts
Global contacts are available on video systems that are
connected to an external management system such as
the TANDBERG Management Suite (TMS). These
contacts can’t be changed locally, only from the
management system.
If there is a need to change the number or the standard
before a call, do the following:
– Choose the contact and press OK
on the remote control.
– You can change the number and the call settings in the menu
before you place the call.
– Changes will not be saved.
How to Copy Global Contacts to My Contacts
Choose the desired contact from the Global Directory
you wish to add to My Contacts.
Press the left arrow key on the remote control and
choose the Copy icon
to copy the person to My
Contacts.
Press OK
on the remote control.
A dialogue box will inform you of the operation’s
success.
Additional Resources
Additional online video sessions can be found at
www.videochampion.com.
To enroll in one of our classes, a complete list of
TANDBERG University courses can be found at
www.tandberg.learn.com.
Adjusting the Screen Layout
Suggested Recommendations
Have your remote control and your video system in
front of you.
Download and print the Remote Control Quick
Reference Guide at www.videochampion.com.
Remote Control Quick Reference Guide
Screen Layout
To give the best user experience, there are several formats for you to
view images on the screen. These are selected by using the layout button
on the remote control. This button can be used in two ways:
– Picture in Picture
– Picture out of Picture
NOTE: To change your picture layout, use the on screen menu and your
remote control to navigate to:
– Control Panel / General / Screen Settings
Picture in Picture (PIP)
–
–
–
–
–
Press the Layout button
once to receive Picture in Picture.
This is a smaller image of yourself within the main image.
Press the Layout button
again to move the picture around the screen.
The fourth time you press the Layout button
the picture will disappear.
Alternatively, you can hold the Layout button
down for one second and
the picture in picture will disappear regardless of its position on the screen.
Screen Layout
Picture Outside Picture (POP)
– Press the Layout button
once to receive POP.
– You will then see a large image of the person you are connected to and
a smaller image of yourself in the top right hand corner.
– If you are showing a presentation, you will see the presentation as the
larger image, a small image of yourself and an image of the person you
are connected to.
Side by Side
– Press the Layout button
again to activate the Side by Side layout.
You will now see the person you are connected to next to the image of
yourself.
– The third time you press the Layout button
you will go back to a
full screen view. You will always go back to a full screen view by
pressing and holding the Layout button
for 1 second.
Additional Resources
Additional online video sessions can be found at
www.videochampion.com.
To enroll in one of our classes, a complete list of
TANDBERG University courses can be found at
www.tandberg.learn.com.
Conducting MultiSite Calls
Suggested Recommendations
Have your remote control and your video system in
front of you.
Download and print the Remote Control Quick
Reference Guide from the Resource Center at
www.videochampion.com.
Remote Control Quick Reference Guide
MultiSite Calls
If your system has MultiSite
capabilities, you can bring together
participants in different locations in
the same call.
When you are in a call, the call
button
in the on screen
menu will have changed status
from ”Call” to ”Add Another Call”.
Choose ”Add Another Call” to dial
another participant.
You can also add more
sites/participants by using the
directory.
– Simply press the directory button
and choose the site you
wish to connect to.
Conference Services
In a MultiSite call, you have the ability to transmit the
image of yourself in full screen to all other participants in
the conference. This is called “requesting the floor”.
– This is particularly useful when there are many sites in the
conference and it is important for others to focus on you as the
speaker.
To request the floor:
– Open the main menu by pressing the OK/menu button
on
the remote control.
– Choose conference services and press OK.
– Select “Request Floor” and press OK. An indicator at the topright hand edge of the screen indicates you have the floor
.
– Select the same choice again to release the floor. The icon will
disappear from the screen.
Conference Layout
When in a MultiSite call, you have
the choice between the following
screen layouts: Auto Split, 4 Site
CP, 5+1 CP and Voice Switched.
– The automatic screen layout shows
the optimal screen layout based on
the number of sites participating in
the conference.
– The 4 Screen Split shows the last 4
sites that spoke in the conference.
– The 5+1 split shows the participant
who is speaking in the conference
in the large window and the other 5
participants are shown in the
smaller ones.
– The Voice Switched mode shows
the participant who is speaking on
the whole screen.
Ending a MultiSite Call
To end a MultiSite call, pres the red
disconnect button
on the
remote control or select End Call in
the menu.
A list of sites connected to the call
will be shown on the screen. To
end the call you have two options:
– End a single call
• Select the call you’d like to end by
highlighting the contact in question
and pressing the OK button
.
OR
– End all calls
• To disconnect all participants,
simply choose ALL or press the red
disconnect button
twice.
Additional Resources
Additional online video sessions can be found at
www.videochampion.com.
To enroll in one of our classes, a complete list of
TANDBERG University courses can be found at
www.tandberg.learn.com.
Connecting a PC & Sharing a
Presentation
Suggested Recommendations
Have your remote control and your video system in
front of you.
Download and print the Remote Control Quick
Reference Guide www.videochampion.com.
Remote Control Quick Reference Guide
Presentation Function
With the Presentation function, you can share images from other
video sources:
– The video source can be a PC, document camera, VCR, DVD, Auxiliary
camera and of course, the MainCam (the main video source). This
functionality is especially appropriate for meetings in which you wish to
share a PowerPoint presentation.
By connecting your PC to the system’s VGA cable, the easiest way to
share presentations is by pressing the blue Presentation button
on the remote control.
– As a default, this button is set to display images from a PC.
If you wish to show a different video source, for example a document
camera, simply press and hold the presentation button
.
– A menu will appear on the screen so you can select the desire video
source. In this case you would choose the document camera.
Presentation Menu
You can choose to display images from different video sources as either the
main camera image or as a ”DuoVideo” dual stream image.
To send a document camera image as the main stream:
– Select Main Video from the presentation menu.
– Choose the document camera icon and press OK.
To transmit both the document camera and the main camera:
– Choose DuoVideo in the presentation menu.
– Choose the desired DuoVideo source. In this case, select the
document camera. Press OK.
– To end the presentation, press the active DuoVideo source one more
time
Screen Layout
The Layout button
ways:
on the remote control can be used in two
– Picture in Picture
– Picture out of Picture
This depends on the picture layout settings in the Administrator
Settings Menu:
– Menu / Control Panel / Administrator Settings / General / Screen
Settings
Picture in Picture (PIP)
– Press the Layout button
once to receive Picture in Picture.
– Press the Layout button
again to move the picture around the
screen.
– The fourth time you press the Layout button
the picture will
disappear.
– Alternatively, you can hold the Layout button
down for one second
and the picture in picture will disappear regardless of its position on the
screen.
Screen Layout
Picture outside Picture (POP)
– Press the Layout button
once.
– You will then see a large image of the person you are connected to and
a smaller image of yourself in the top right hand corner.
– If you are showing a presentation, you will see the presentation as the
larger image, a small image of yourself and one of the person you are
connected to.
Side by Side
– Press the Layout button
again to activate the Side by Side layout.
You will now see the person you are connected to next to the image of
yourself.
– The third time you press the Layout button
you will go back to a
full screen view. You will always go back to a full screen view by
pressing and holding the Layout button
for 1 second.
Additional Resources
Additional online video sessions can be found at
www.videochampion.com.
To enroll in one of our classes, a complete list of
TANDBERG University courses can be found at
www.tandberg.learn.com.
Simple Fault Finding
Suggested Recommendations
Have your remote control and your video system in
front of you.
Download and print the Remote Control Quick
Reference Guide www.videochampion.com.
Remote Control Quick Reference Guide
Trouble Shooting Tips
Always think simple at first!
–
–
–
–
–
–
–
Does the video system have electricity?
Are all the cables properly connected?
Have you recently moved the video system?
Are the screen and the codec switched on?
Does the remote control have batteries?
What type of software is currently installed on the codec?
Have you tried restarting your system?
• To restart your endpoint, access the control panel by pressing the menu
key
on your remote control. Select “Restart” and push OK.
– Is your ISDN or IP network functioning properly?
• In most cases, if something is wrong with your network, an error message
will be displayed on the startup page.
• Please refer to the user manual that came with your system.
Audio
Problem:
– You cannot hear the people on the other side.
– They cannot hear you.
Solution:
– Make sure the volume is turned up.
• An icon
will be displayed on your screen if the volume is turned off.
– Make sure the microphone is switched on.
• An icon displayed in the top right corner will warn you when your
microphone is turned off
.
• If the microphone is turned off at the far end, a message will appear at
the top of your screen.
Audio
Problem:
– You are hearing an echo.
• The system on the far end will most likely cause the echo you are hearing.
Give the following advice to the participants at the far end:
Solution:
– Talk for approximately 5 seconds so the echo-control function finds its
parameters.
– Make sure that the people on the far end have placed the microphone
1.5 - 2 meters or 4 - 6 feet away from the video system, but close
enough to the people who are talking.
– Ask the people on the far end to turn their volume down.
– Check to see if the echo-control function is turned on at both ends. To
do this access the Control Panel by pushing the Menu button
on
your remote control :
• Control Panel / Administrator Settings / Audio/ Echo Control. Make sure the
echo control is set to ON+NR and not just ON (NR=Noise Reduction)
Picture
Problem:
– There is no picture.
Solution:
– Make sure the screen is turned on.
– Make sure the participants on the far end have selected Main
Camera as their primary video source.
– Ask the participants to press the blue presentation button
on their remote control.
– Ask them to check and make sure all of their cables are properly
connected between their system and the camera.
Picture
Problem:
– You can’t see a picture of yourself (SelfView).
Solution:
– Make sure that the screen is turned on.
– Press the Selfview button
on the remote control to test if
the Main Camera is working.
– Make sure you are not sending any other video streams other
than the Main Camera.
• To do this press the blue Presentation button
on the remote
control. You can also access the main menu, choose presentation,
and confirm the Main Cam is the selected as the main Video
Source.
– Check and make sure all cables are properly connected to the
camera.
Picture
Problem:
– The picture is out of focus, too bright, or too dark.
Solution:
– If the picture is out of focus press the Zoom button
on the
remote control or try gently moving the camera - this will trigger
the auto focus function.
– If the picture is too bright or too dark, you can adjust the
brightness and light settings in the Camera Control / Picture
Control menus. To access these, press the Menu key
on
your remote control.
Picture
Problem:
– The video system does not automatically activate when you pick
up the remote control.
Solution:
– Make sure the screen and system are turned on.
– Make sure all of the cables are properly connected from the
endpoint to the camera.
– Replace the batteries in the remote control.
– Make sure the green light on the front of the camera is on.
Duo Video
Problem:
– You cannot send two video streams at the same time.
Example: You can’t see the speaker and the PC presentation simultaneously.
Solution:
– Make sure you have the “Presenter” option installed on your system.
• Menu / Control Panel / Diagnostics / System Information
– Make sure the secondary video source is properly connected to the
endpoint.
– Check and make sure the system is set to dual monitor support in the
main menu:
• Menu / Control Panel / Administrator Settings / General / Dual Monitors
– Make sure “Presentation Start” is set to auto in the menu:
•
Control Panel / Administrator Settings / Presentation Settings
Diagnostics Menu
To help you with fault finding, please consult the
Diagnostics menu.
– Menu / Control Panel / Diagnostics
This menu includes information on:
–
–
–
–
–
System Information
Network Status
Detailed Call Status
System Self Test
Administrator Settings
If the Problems Persist
Before you contact your internal IT resources, TANDBERG
Technical Support, or your TANDBERG partner, please have the
following information at hand:
– The type of system you need help with and the serial number on
the codec.
• This information can be found on the sticker on the back of
the system or under “System Information” in the main menu.
– Date or approximate time the system last functioned properly.
NOTE: There may be a problem with your network in which
case you should contact your local network provider.
Additional Resources
Additional online video sessions can be found at
www.videochampion.com.
To enroll in one of our classes, a complete list of
TANDBERG University courses can be found at
www.tandberg.learn.com.
Thank you
www.tandberg.com