1
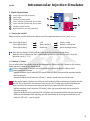
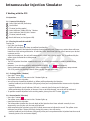
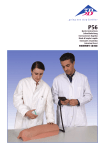
P55
Intramuscular Injection Simulator
English
Thank you for choosing a 3B Scientific product. Please read the user manual carefully before using the
unit to ensure a flawless operation and to enable you to work in a satisfactory way with this product.
Table of contents:
1. Quick Instructions
1.1
Turning the unit on
1.2 T button / C button
1.3 Matrix of the result indicator
1.4
Turning the unit off
3
3
3
4
4
2. Getting started and operation
2.1 Accessories
2.2 Some preliminary remarks
2.3 Power supply
2.4 Inserting and removing the
batteries
4
4
4
4
4
3. Working with the P55
6
3.1 Operation
6
3.1.1 Layout of the display
6
3.1.2 Turning the unit on and off
6
3.1.3 Training mode (T button)
6
3.1.4 Control mode (C button)
6
3.2 Administering an intramuscular
(i.m.) injection into the
upper arm
7
3.2.1 Injection site
7
3.2.2 Disinfection of the skin
7
3.2.3 Intramuscular (i. m.) injection
and removal of the cannula
7
4. Operation and Storage
4.1 Fastening the simulator to a
person
4.2 Tabletop operation
4.3 Storage
2
7
7
7
7
5. General safety precautions
7
6. Frequently asked questions (FAQ’s) 8
6.1 The battery indicator is flashing.
after turning the unit on again,
the indicator is off. but why does
it then light up again?
8
6.2 Why can’t the injection simulator
be turned on again after prolonged
storage?
8
6.3 Which types of batteries are recommended for the injection
simulator?
8
6.4 Can i also operate the injection
simulator with rechargeable
batteries?
8
®
7. Transport and packaging
8
8. Maintenance
8
8.1 Care instructions
8
8.2 Exchanging the silicone skin
8
8.3 Warranty
11
8.4 Request for replacement parts 11
English
Intramuscular Injection Simulator
1. Quick Instructions
1
2
3
4
5
6
7
Status light (red LED) for battery
Start button
T button (training mode)
Status indicator (yellow LED) for T button
Status indicator (yellow LED) for C button
C button (control mode)
Result indicator (red and green LED)
1
7
2
6
3
4
5
1.1 Turning the unit ON
Before using the unit for the first time please insert the supplied batteries (2x AA), (see p. 4/ 2.4).
Info: Status light (battery)
Status light (battery)
Status light (battery)
is off
shows solid red
flashes red
battery is okay
battery is running low
please exchange battery
Press the Start button. All LEDs will now light up for the functional control phase.
When the Status indicator (for the T button) lights up this is a signal that the unit is ready for
operation (see p. 6/ 3.1.2).
1.2 T button / C button
You can select either the training mode or the control mode. Please press the T button for the training
mode and the C button for the control mode.
T In the training mode (T button), you will immediately receive feedback as follows while
administering the injection:
•positive feedback (result indicator (LED green) when you have performed the injection into the
muscle correctly,
•negative feedback (result indicator (LED red) + acoustic signal) when you hit the bone.
®
C In the control mode (C button) you will receive no feedback while performing an injection into the
muscle. The result will be saved and you have to press the C button again to check whether you
have carried out the intramuscular injection correctly or incorrectly. You will receive
• positive feedback (result indicator (LED green)) when you have performed the intramuscular
injection correctly,
• negative feedback (result indicator (LED red)) when you have performed the injection incorrectly.
When you hit the bone while injecting, you will immediately receive negative feedback (result
indicator (LED red) + acoustic signal).
3
Intramuscular Injection Simulator
English
1.3 Matrix of the result indicator
Result indicator
(training mode)
Result indicator
(control mode)
Correct injection/site
green
green
Incorrect injection/site
no signal
red
Not deep enough
no signal
red
Injection into the bone
red
red
1.4 Turning the unit OFF
The unit automatically switches off when it has not been used for a period of two minutes, or can be
manually turned off by simultaneously pressing the T button and the C button.
2 Getting started and operation
2.1 Accessories
• P55 Injection Simulator (upper arm) with humerus stump, (foam) muscle and silicone skin preassembled
• Replacement silicone skin
• Disposable 5 ml syringe
• Injection cannula for intramuscular injections
• AA batteries
• Operating instructions (CD ROM)
®
2.2 Some preliminary remarks
• Place the supplied batteries into the P55 Injection Simulator before first usage. (see 2.4 Inserting the
batteries)
• Please use only the (rechargeable or non-rechargeable) batteries for the P55 Injection Simulator
recommended on page 8 (section 6.3).
• When inserting the batteries, please ensure correct polarity! Incorrectly inserted batteries may damage
the unit!
• The skin of the 3B Scientific injectable upper arm is made of an elastic material (silicone). After
prolonged usage and repeated punctures in the same area it may become necessary to substitute the
skin with the supplied replacement skin. Injections into the simulator should only be performed using
cannula gauges (20 and 21 gauge /0.8, 4 cm long, syringe).
2.3 Power supply
The P55 Injection Simulator is supplied with two 1.5 V, type AA/LR6 alkaline manganese batteries. These
enable an operating time of up to 20 hours. This period may vary depending on the type of batteries used.
2.4 Inserting and replacing the batteries
Pull the felt cover attached at the rear of the injection simulator down at the flap. (see p. 5/ figs. 1 and 2)
Open the cover of the battery compartment and then insert the supplied AA batteries, ensuring correct
polarity, (see p. 5/ figs. 3 and 4).
4
English
Intramuscular Injection Simulator
fig. 1
fig. 2
fig. 3
fig. 4
5
Intramuscular Injection Simulator
English
3 Working with the P55
3.1 Operation
3.1.1 Layout of the display
1 Status light (red LED) for battery
2 Start button
3 T button (training mode)
4 Status indicator (yellow LED) for T button
5 Status indicator (red LED) for C button
6 C button (control mode)
7 Result indicator (red and green LED)
1
7
2
3
6
4
5
3.1.2 Turning the unit ON and OFF
Turning ON
• Press the Start button.
• All LEDs will now flash five times to confirm functionality.
If not, please check if the batteries have been inserted correctly and, if necessary, replace them with new
batteries or fully recharged batteries. If individual LEDs should not light up, please contact your dealer’s
customer service.
• After the function test, the unit will automatically switch into training mode. This is confirmed by the
yellow status indicator for training mode.
Turning OFF
• The P55 Injection Simulator automatically turns off when it has not been used for a period of two
minutes.
• However, it can also be manually switched off by pressing T + C simultaneously.
During prolonged periods of non-usage, please remove the batteries from the battery compartment.
This is to prevent any leaking batteries from causing damage to the unit.
®
3.1.3 Training mode (T button)
• Press the T button T .
• The yellow status indicator next to the T button lights up.
• Now administer the injection.
• You will receive immediate feedback as follows while performing the injection
- positive feedback (result indicator (LED green)) when you have performed the intramuscular injection
correctly,
- negative feedback (result indicator (LED red) + acoustic signal) when you hit the bone.
- When performing the injection at incorrect sites or not deep enough, no result will be indicated.
• To perform another injection in the training mode, please press the T button T again.
3.1.4 Control mode (C button)
• Press the C button C .
• The yellow status indicator next to the C button lights up.
• Now administer the injection.
• The information whether the site and depth of the injection have been selected correctly is now
temporarily saved by the unit, but not yet displayed.
• After completing the injection, press the C button once more to indicate the result. The yellow status
indicator next to the C button will flash during this process. You will receive
- positive feedback (result indicator (LED green)) when you have performed the injection into the muscle
correctly (correct site and correct depth),
6
English
Intramuscular Injection Simulator
- negative feedback (result indicator (LED red)) when you have performed the injection incorrectly
(at wrong sites and/or not deep enough).
• When hitting a bone during the injection you will receive immediate negative feedback (result indicator
(LED red) + acoustic signal).
• To perform another injection in the control mode please press the C button C again.
3.2 Administering an intramuscular (i.m.) injection into the upper arm
3.2.1 Injection site
Intramuscular injections into the muscles of the upper arm are administered at the highest point of the
deltoid muscle (m. deltoideus). To do this, first locate the acromion (point of the shoulder). The injection
(or puncturing) site is located three finger widths (approx. 2’’) below the palpated acromion.
3.2.2 Disinfection of the skin
Please use only normal tap water to disinfect the skin, since ordinary disinfectants may damage the
materials of the model.
3.2.3 Intramuscular (i. m.) injection and removal of the cannula
Intramuscular injections are usually administered perpendicularly (at a 90° angle) to the skin surface.
Now, introduce the cannula into the deltoid muscle as deeply as required (approx. 1-2 cm). To exclude
the possibility that the vessel has been punctured, perform an aspiration. Then, administer the injection
slowly.
When finished, withdraw the cannula with a quick tug. Then, compress the injection site with a sterile pad.
4. Operation & storage
®
4.1 Fastening the simulator to a person
Place the injection simulator at the transition from shoulder to upper arm and attach it to the upper arm
with the fastening strap. To do this, thread the strap through the buckle and pull tight to the desired width,
then press the buckle closed.
4.2 Tabletop operation
Position the injection simulator on a level and non-slippery surface.
4.3 Storage
• The injection simulator is best stored at a dry place at room temperature.
• Do not expose the injection simulator to direct sunlight, since heat over 45°C may cause the material to
deform or become brittle.
• When the injection simulator is not used for a prolonged period of time, it is recommended to remove
the batteries.
5. General safety precautions
•
•
•
•
Keep out of the reach of children!
Do not recharge batteries (LR6) under any circumstances! Risk of Explosion!
Empty batteries must be disposed of in accordance with the national requirements!
Environment: components must be disposed of in accordance with the relevant national environment
regulations concerning the decommissioning and final disposal of the unit.
• Recharge batteries only with a suitable charging set.
• Do not use any powerful chemicals to clean the unit, since these may cause damage to the materials of
the model.
7
Intramuscular Injection Simulator
English
6. Frequently asked questions (FAQs)
6.1 The battery indicator is flashing. After turning the unit on again, the indicator is off. But why
does it then light up again?
This may happen when batteries of different capacities are used. In this case, please replace the batteries
with new ones.
Tip: As a rule, only use batteries of the same type, the same capacity, the same age and the same
manufacturer. Mark “matching” batteries accordingly.
6.2 Why can’t the injection simulator be turned on again after prolonged storage?
Rechargeable batteries are subject to self-discharge, even while the unit is turned off. Self-discharge is
approximately 20% per month. Even disposable batteries run down slightly while the injection simulator
is turned off.
Tip: Remove the batteries from the battery compartment when not using the unit for a prolonged period
of time. This is to prevent that any leaking batteries cause damage to the unit. After the injection simulator
has not been used for a prolonged period of time, only insert freshly recharged batteries or new batteries
into the unit.
6.3 Which types of batteries are recommended for the injection simulator?
We recommend the use of alkaline manganese batteries (type AA batteries or LR6).
Zinc carbon batteries should not be used.
6.4 Can I also operate the injection simulator with rechargeable batteries?
Yes, you can use Ni-MH (nickel metal hydride) or Ni-Cd (nickel cadmium) rechargeable batteries.
You will achieve a substantially longer operation time with Ni-MH batteries than with Ni-Cd batteries.
Tip: Use batteries of the same type, age and manufacturer only.
7. Transport and packaging
®
Please check the shipping and product packaging for any damage. In case of transport damage, please
contact your dealer.
Please keep the original packaging. This special packaging is the best protection for your valuable product
during transport.
8. Maintenance
8.1 Care instructions
The silicone skin of the injection simulator can be cleaned with a mild soap solution. Please do not use any
detergents containing solvents, as these will damage the silicone skin.
8.2 Exchanging the silicone skin
Undo the three snap fasteners located under the stretcher frame on one side of the stretcher frame of the
injection simulator (see p. 9/ fig. 5). To do so, pull the stretcher frame outwards on the left and right at the
grooves in the base housing of the simulator and lift the frame off upwards (see p. 9/ fig. 6).
Attention: Please make sure that the (foam) muscle is not detached from the underlying bone during this
process.
The silicone skin can now be easily removed (see p. 10/ figs. 7 and 8) and substituted by the replacement
silicone skin. The old silicone skin can be disposed of with normal household waste.
8
English
Intramuscular Injection Simulator
fig. 5
fig. 6
9
Intramuscular Injection Simulator
fig. 7
fig. 8
10
English
English
Intramuscular Injection Simulator
8.3 Warranty
The warranty period for the injection simulator is 36 months from the invoice date and shall include
engineering, material and manufacturing defects and the electronic functions of the unit, provided that
the unit has been subjected to normal usage and appropriate maintenance. The warranty shall not cover
parts subject to wear, such as silicone skin, foam core, injection cannula, disposable syringe and batteries.
Within the scope of the warranty claim, 3B Scientific shall not be obliged to pay compensation for damage
caused in the context of or as a consequence of non-authorized persons carrying out or attempting
repairs, modifications or changes, or when the product or any part of it has been damaged by an accident,
unintended usage or misuse.
8.4 Request for replacement parts
• Silicone skin (XP300)
In case of a complaint, please indicate the serial number located at the center of the bottom of the base
housing under the felt cover of the injection simulator.
®
11
P55-03/05-1
®
���� � � � �� � � � �� � � � � � ��� �
3B Scientific GmbH
Rudorffweg 8 • 21031 Hamburg • Germany
Tel.: + 49-40-73966-0 • Fax: + 49-40-73966-100
www.3bscientific.com • [email protected]
© Copyright 2005 for instruction manual and design of product:
3B Scientific GmbH, Germany