1
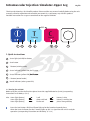
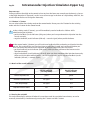
P56
Quick instructions
Schnellanleitung
Instrucciones Rapidas
Mode d’emploi rapide
Instruções resumidas
Istruzioni brevi
Intramuscular Injection Simulator-Upper Leg
English
Thank you for choosing a 3B Scientific product. Please read the user manual carefully before using the unit
to ensure a flawless operation and to enable you to work in a satisfactory way with this product.
Detailed instructions for usage are contained on the supplied CD ROM.
OFF
ON
1
2
C
Training
T
Control
4
5
3
6
7
1. Quick instructions
1
Status light (red LED) for battery
2
Start button
3
T button (training mode)
4
Status indicator (yellow LED) for T button
5
Status indicator (yellow LED��������������
) for
������������
C button
6
C button (control mode)
7
Result indicator (red or green LED)
®
1.1 Turning the unit ON
Before using the unit for the first time please insert the supplied batteries (2x AA) (see operating
instructions on CD ROM p. 4/ 2.4)
Info: Status light (battery) Status light (battery) Status light (battery) is off shows solid red
flashes red
battery is okay
battery is running low
please change battery
Press the Start button. All LEDs will now light up for the functional control phase.
When the Status indicator (for the T button) lights up this is a signal that the unit is ready for operation. (see operating instructions on CD ROM p. 6/ 3.1.2)
English
Intramuscular Injection Simulator-Upper Leg
Error message
Failing to connect the thigh to the control unit or to place the foam core correctly on the bone (e.g. because the thigh formation is dispersed), results in an error message in the form of a triple bleep. After this, the
result indicator flashes red and green alternately.
1.2 T button / C button
You can select either the training mode or the control mode. Please press the T button for the training
mode and the C button for the control mode.
T
In the training mode (T button), you will immediately receive feedback as follows while
administering the injection:
• positive feedback (result indicator (LED green) when you have performed the injection into the
muscle correctly,
• negative feedback (result indicator (LED red) + acoustic signal) when you hit the bone.
C
In the control mode (C button) you will receive no feedback while performing an injection into the
muscle. The result will be saved and you have to press the C button again to check whether you
have carried out the intramuscular injection correctly or incorrectly. You will receive
• positive feedback (result indicator (LED green)) when you have performed the intramuscular
injection correctly,
• negative feedback (result indicator (LED red)) when you have performed the injection incorrectly.
When you hit the bone while injecting, you will immediately receive negative feedback (result
indicator (LED red) + acoustic signal).
®
1.3 Matrix of the result indicator
Result indicator
(training mode)
Result indicator
(control mode)
Correct injection/site
green
green
Incorrect injection/site
no signal
red
Not deep enough
no signal
red
Injection into the bone
red
red
1.4 Turning the unit OFF
The unit automatically switches off when it has not been used for a period of two minutes, or can be
manually turned off by simultaneously pressing the T button and the C button.