1
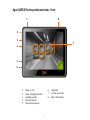
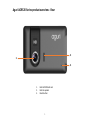
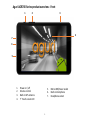
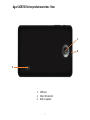
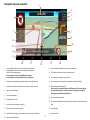
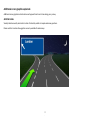
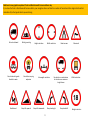
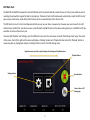
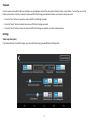
Aguri AGR520 & AGR700 Series
User Manual
www.aguriworld.co.uk
1.
Contents
3. What’s in the box?
4. AGR520 series product overview – Front
5. AGR520 series product overview - Rear
6. AGR700 series product overview – Front
7. AGR700 series product overview - Rear
8. Quick start & installation guide
10. Detailed operating instructions
11. Navigation map view explained
12. Junction view explained
13. Truck and Motorhome & Caravan screen graphics
14. Calculating a route
15. Summary screen explained
16. Setting ‘Home’ and ‘Office’ addresses
16. Last journey & Clear route
17. Multi-stop route generator
21. Using and routing by Favourites
23. Using Recent routes
24. Route by Points of interest
25. Route by nearest Point of interest
27. Route using map
28. Route to junction
28. Route by co-ordinate
28. Recalculate route
29. Recalculate route cont.
30. Environmental settings
31. Setting up your vehicle – Motorhome & Caravan Edition
32. Setting up your vehicle – Truck Edition
33. Tunnel category settings – Truck Edition
35. Brightness
35. Volume
35. Change language
36. Select map view - 2D, 3D or N
36. MPH/KMH – select speed/distance unit type.
36. Location Icon -select an icon to represent your vehicle
36. Lane view
36. Speed trap alert settings
37. Route alarm
37. Alert audio
37. E Speed
37. User speed alert
38. Tight bend alert – Motorhome & Caravan, and Truck Edition
38. Journey history
38. Report mobile speed traps.
38. Live Digital Traffic service
38. Show POI icons on map
39. GPS status
39. Live Digital Traffic
39. Unit version details
40. Mini-drop down menu
41. DVR dash cam operation
44. Connect to and Browsing the internet
45. Updating the mapping
45. Updating the Speedshield speed trap database
46. Registering for Google Play and downloading ‘Apps’
46. Digital Live Traffic services & Mobile speed trap reporting
47. Using Live Digital Traffic services.
48. Using the Mobile speed trap sharing feature.
49. Disposal of Old Electrical & Electronic Equipment
50. Service under warranty
2.
Aguri AGR520 Series
What’s in the box?
1 x Aguri AGR520 PND (portable navigation device)
1 x Micro SD card for DVR player
1 x USB cable
1 x Vehicle charger
1 x Windscreen bracket
1 x Dash mounting disc
Aguri AGR700 Series
What’s in the box?
1 x Aguri AGR700 PND (portable navigation device)
1 x Micro SD card for DVR player
1 x USB cable
1 x Vehicle charger
1 x Windscreen bracket
1 x Dash mounting disc
3.
Aguri AGR520 Series product overview - Front
1
8
2
3
7
4
5
6
1.
2.
3.
4.
5.
6.
7.
8.
Power on / off
Power / charging status LED
Headphone socket
Micro SD card slot
SIM card slot (unused)
4.
USB socket
5” Touch screen LCD
Built-in GPS antenna
Aguri AGR520 Series product overview - Rear
2
1
3
1.
2.
3.
Built-in DVR dash cam
Built-in speaker
Reset button
5.
Aguri AGR700 Series product overview - Front
1
2
3
4
7
6
5
1.
2.
3.
4.
Power on / off
Volume control
Built-in GPS antenna
7” Touch screen LCD
5.
6.
7.
6.
Micro USB/Power socket
Built-in microphone
Headphone socket
Aguri AGR700 Series product overview - Rear
1
2
3
3
1.
2.
3.
DVR Lens
Micro SD card slot
Built-in speaker
7.
Navigation Quick Start Guide.
All Aguri sat navs come preloaded with your choice of UK & Ireland or Pan European mapping plus the Speedshield speed trap database, so
they are ready to use straight out of the box.
1. Insert the SD card provided, in to the SD card slot. This SD card will save all recordings from the built-in DVR dash cam when in operation.
2. Install the device in your car using the windscreen bracket provided. Ensure that the unit has a clear view of the sky and does not interfere
with the vehicle’s controls. Clean the area of the windscreen where you want to mount your unit and then attach the windscreen bracket
making sure that it is securely attached. Finally insert the device in to the windscreen bracket and adjust it so that you can easily view the
display and safely reach the touch screen.
3. Connect the vehicle charger and power on the device by pressing and holding the power button. The device will take a few seconds to boot-up
but will then display a menu of the main features of the device.
User note. If the DVR dash cam is set to automatically start recording as soon as the device is powered in, the DVR app will also launch at this
point. To send this to the background whilst still in Record Mode, press the ‘Menu button’
Do not press the ‘Return/Exit button
or the DVR app will close and it will stop recording.
4. Navigating. To begin navigating, press the ‘Navigation’ button. Please note that it can take a few minutes for the unit to boot-up and then to achieve
a satellite lock the first time you use it. We recommend you stay in a stationary position, in a location where the unit has a clear view of the sky to
ensure the fastest results. Subsequent start-ups will be much faster however and your device will locate satellites within a few seconds when used
regularly. Once satellite lock is achieved, the screen will indicate your current position on the map view displayed.
User note. Truck and Motorhome & Caravan editions only.
If you have the Truck or Motorhome & Caravan edition, an additional screen will be displayed at this point asking you to select your vehicle type. If this
is the first time you have used the device you will need to enter the attributes of your vehicle now. More details are about how to set-up and enter
your vehicle attributes can be found later in this manual. Once your vehicle details have been entered, your device will calculate a route based on the
attributes saved.
5. Calculating a route using a post code or address. Touch the centre of the screen to enter the main menu and select ‘Address’. Enter the post
code and the rest of the address as necessary, until you see the address required appear below the data entry boxes. Press the highlighted
address to continue.
6. Next, a number of ‘Route settings’ will be displayed including Shortest distance, Shortest time, Avoid motorway, Avoid toll and Live Digital
Traffic. Make your selection and press the ‘Calculate’ button.
User note. To use the Live Digital Traffic service, you will need to pair your device with a suitable internet enabled Android Smart Phone. More
information about this feature can be find later in this user manual.
8.
7. A summary screen of your proposed journey will be displayed enabling you to check that the destination address and route
calculated is correct. To proceed immediately, press the ‘Aguri’ logo shown at the top left hand corner of the screen or alternatively,
allow the timer to count down to zero and navigation will start automatically.
8. Next, the map view will be displayed with the start of your route highlighted in blue. You are now ready to start you journey. Drive,
following the highlighted route, the route description boxes displayed and the voice instructions you will hear. The navigation view
will constantly update your current position and road information. If you accidentally take a wrong turn the unit will automatically
re-route as necessary to get you back on track as quickly and safely as possible.
For more information please follow the detailed instructions provided below.
User note. Whilst all Aguri satellite navigation systems have been designed to provide safe and efficient routing they are not a
substitute for driving with due care and attention. The driver is fully responsible for paying attention to road signs, road conditions,
other road users, legal road restrictions, pedestrians and the operation of their vehicle at all times.
9.
Detailed Operating instructions.
Navigation
Power on the unit by pressing and holding the power button on the top left hand side of the unit. The unit will take a few moments to
boot up and will then display a menu of the main features of the device. To launch navigation, press the ‘Navigation’ button.
The following warning message will be displayed:“Please do not attempt to operate your Aguri navigation system whilst driving. Whilst this navigation system has been designed to
provide the most appropriate route for you vehicle it is not a substitute for driving with due care and attention. The driver is fully
responsible for paying attention to all road signs, legal restrictions, road conditions, other road users, pedestrians and the operation of
their vehicle at all times.
Please read the warning and press “Start” if you would like to continue.
User note. Truck and Motorhome & Caravan editions.
If you have a Truck or Motorhome & Caravan edition, you will have the option to select the vehicle type you are currently driving. Please select as
appropriate.
10.
Navigation map view explained.
3
4
5
2
6
7
1
8
14
10
13
11
9
12
19
15
17
16
18
Lane View displays the lane or lanes that you can use or should be
using depending on the vehicle you are driving and the junction or
intersection you are approaching.
Please note that Lane View is only available for motorways,
dual carriageways, and complex and major inner city junctions.
11. Name or number of the road your are currently travelling on.
2.
Visual warning of approaching speed trap, hazard or other legal restriction.
14. Icons showing location of speed traps, hazards and other legal restrictions.
3.
Displays the road name or number of the next road you need to turn on to.
4.
Distance left to destination.
15. Return/back and exit button button.
Please note that if you press this when in the DVR app, you will exit, close and stop
the dash cam from recording. If you want the unit to carrying on recording in the
background, press the Menu button #16 to exit.
5.
Time left to destination.
6.
Estimated time of arrival.
7.
Icon displaying next manoeuvre required.
17. Short-cut to switch between other Apps you may have open on the device at the same
time.
8.
Distance to next manoeuvre required.
18. Increase volume
9.
Speed limit display displays the speed limit of the road you are travelling on.
1.
12. GPS compass. Indicates your current direction of travel.
13. Icon showing current position of your vehicle.
16. Short-cut to main system menu
10. Displays your speed of travel.
19. Decrease volume
11.
Additional screen graphics explained.
Additional screen graphics and instructions will appear from time to time during your journey.
Junction view
Visually indicates exactly what action to take. Particularly useful at complex motorway junctions.
Please note that Junction View graphics are only available for motorways.
12
.
Additional screen graphics explained. Truck and Motorhome & Caravan editions only.
If you have the Truck or Motorhome & Caravan edition, your navigation device will alert to a number of hazards and other legal restrictions that
relate directly to the type of vehicle you are driving.
No trucks allowed
No vehicles with goods
Harmful to water
Double bend
Risk of grounding
Height restriction
No vehicles carrying
explosives
Steep hill upwards
Width restriction
Axle weight restriction
Steep hill downwards
13.
Road narrows
No vehicles or combinations
of vehicles over maximum
length shown
Sharp bend right
Sharp bend left
Side winds
Width restriction
Weight restriction
Calculating a route
There are several ways to calculate a route
Calculate a route using an address or postcode.
Press the middle of the screen to access the “Navigate” menu and then press the “Address” icon. Tap on the box marked “Country” and
either type in the country you require or select the country from the list displayed and press “Next”. If you have the postcode, tap on the
box marked “Postcode”, enter the full postcode and press “Next”. The address you are looking for, or a list of addresses within that
postcode will now be displayed. You can now either select the address directly from the list, or if you want to navigate directly to the
house or building number, you can enter it now. Finally press the “Done” button. If you know the number of the property press the
“House No” icon, enter the details and press the “Done” button.
User note. As an alternative if you do not know the number of a property you can navigate to a point where two roads meet using
the “Intersection” button. Then press the “Done” button.
Route settings
Once you have successfully found the address you would like to navigate to, there are a number of different Route settings you can use
to fine tune the route your device will calculate.
•
•
•
•
Press “Shortest time” to calculate the quickest route.
Press “Shortest distance” to calculate the shortest route to your destination.
Press “Avoid motorways” to create a route avoiding motorways
Press “Avoid Tolls” to create a route avoiding tolls
Live Digital Traffic services
Live Digital Traffic services, provides ‘Live’ traffic information in your area and on and around any routes you might like to travel. If you
choose to select Digital Live Traffic services when calculating a route, the software will evaluate the amount of traffic on the normal
route the device would calculate. If the software discovers that there is a high volume of traffic on that route or that there is a specific
event on that route such as an accident, it will alert you and offer you an alternative route instead. You will be shown both the original
route and the recalculated route, including the distance and estimated travel time for each, so you can determine which route to take.
User note. If you want to use Live Digital Traffic services, you will need to pair your navigation device with an internet enabled
Android Smart Phone. Please note that you may be charged for the mobile data the navigation device uses depending on the mobile
data package you have as part of your Smart Phone contract.
14.
Press the small drop down menu in the top right hand corner to change your start location or add a ‘Via’ point to your journey.
User note. Look out for the small drop down menus that appears on many of the data entry screens. These small drop down menus contain useful
additional options to help you tailor the routes calculated by the device.
Map views
Press the small map icon in the top right hand corner to view the route and destination point on the map.
Once in map view, you can press the small drop down menu displayed in the top right hand corner to change the map view between the navigation
map view, Google Maps and Google Streetview.
User note. You can drag the map around with your fingers and ‘pinch’ and ‘stretch’ the screen to zoom in and out of the map. To return to the Route
settings screen, press the ‘Return’ button at any time
Press “Calculate” to start navigation
Summary screen
The “Summary Screen” will give you the distance to your destination along with the estimated time the journey will take and the estimated time of
arrival. The summary screen will be displayed for approximately 10 seconds and then your device will automatically proceed to the navigation map view
so you can begin navigating. If you want to manually proceed to the navigation map view before the 10 second period has elapsed, press the “Aguri”
logo button positioned to the top left hand corner of the screen.
Further options are available if you press the small menu
icon found at the top right hand corner of the display.
•
•
•
Press “Simulation” to show a simulation of the route
that has been calculated.
Press “Guide” to see a description of the calculated
route turn by turn, road by road.
Press “Avoid road” if you would like to re-calculate the
route avoiding a specific road.
User note. If you want to stop the automatic countdown
at any time, simply tap anywhere on the screen. To
continue with your route at any time, press the “Aguri”
logo button positioned to the top left hand corner of the
screen.
15.
Setting “Home” destination
Press the middle of the screen to access the “Navigate” menu and press the “Home” icon. The first time the “Home” function is used
the screen will display “Set home?” then “Cancel” and “OK”. Press “OK” to proceed. You can set “Home” using one of the following
options “Find address”, “Find by POI”, “Find using Recent routes” and “Save using current location”
To calculate a route to “Home”, press the middle of the screen to access the “Navigate” menu and then press the “Home” icon. The unit
will display details of the destination and the various Route settings available.
Press the small map icon found at the top right hand corner of the screen to view the location on the map.
Press the small menu icon to change or delete the location saved as “Home”. You can also use the small menu to change the start
location or add a ‘Via’ point to your journey. Finally press the “Calculate” button to move to the “Summary screen” and to begin your
journey.
Setting “Office” destination
Press the middle of the screen to access the “Navigate” menu and press the “Office” icon. The first time the “Office” function is used
the screen will display “Set office?” then “Cancel” and “OK”. Press “OK” to proceed. You can set “Office” using one of the following
options “Find address”, “Find by POI”, “Find using Recent routes” and “Save using current location”
To calculate a route to “Office”, press the middle of the screen to access the “Navigate” menu and then press the “Home” icon. The unit
will display details of the destination and the various Route settings available.
Press the small map icon found at the top right hand corner of the screen to view the location on the map.
Press the small menu icon to change or delete the location saved as “Home”. You can also use the small menu to change the start
location or add a ‘Via’ point to your journey. Finally press the “Calculate” button to move to the “Summary screen” and start your
journey.
Last journey or Clear route
The unit stores the last journey you have travelled, so that if you want to go back to that address your do not have to input the details
again. To do this press the middle of the screen to access the “Navigate” menu and then press “Last journey” and a route will
automatically calculated to the last destination selected.
Once a route has been calculated, the “Last journey” icon will be replaced with a “Clear Route” icon. To cancel a route, press the middle
of the screen to access the “Navigate” menu and then press “Clear Route”.
16.
Multi-stop route generator
If you want to visit a number of different locations in one day, it is possible to enter up to sixteen locations and the navigation software
will create the optimum route around all of them. It is possible to create and save up to eight Multi-stop routes in total.
Create a Multi-stop route
Press the middle of the screen to access the “Navigate” menu. Then press the “Multi-stop” icon. At this point the unit allows you to
create a new Multi-stop route, use or amend a saved Multi-stop route or delete a Multi-stop route.
Press the “+” to start creating a Multi-stop route. You will first be prompted to add a Name for your Multi-stop route. Enter the name and
press “Done” to continue.
The device will automatically use your current location or the last location the device was used at to create the start point of your Multistop route. To change this address or location, press the ‘Change’ button. You can find the address you require using one of the following
options:•
•
•
•
•
“Find address”
“Find by favourites”
“Find by POI”
“Find using recent routes”
“Current location”
Once you are happy with the start position you can then enter the details of your first destination. Press “Add” and search for the address
using one of the following options:-
•
•
•
•
•
“Find address”
“Find by favourites”
“Find by POI”
“Find using recent routes”
“Current location”
When you are ready to add another address, press the “Add” button again to enter additional destinations. Once you have added all the
addresses or locations you require, you have two options. Press “Save” to save them in the order you have entered them, or press the
“Sort” button and your device will sort them in to the most appropriate order to route around them.
17.
Editing a Multi-stop route.
It is possible to change the route order, delete any stage of a route and change the route settings. Press the middle of the screen to
access the “Navigate” menu. Then press the “Multi-stop” icon and then press the name of the Multi-stop route you want to edit. Press
and hold one of the stages listed for 2 seconds and then release your finger. The following options will appear on the screen:5
6
4
3
2
1
1.
2.
3.
4.
5.
6.
Delete the selected destination.
Change the final destination. You can choose between final destination and stops.
Move the selected destination up.
Move the selected destination down.
Done button
Use the small drop down menu to change the route settings for that section of your journey
Once you have made your changes press “Done” to save.
Using a Multi-stop route.
To use a saved Multi-stop route press the middle of the screen to access the “Navigate” menu. Press the “Multi-stop” icon, and then
press the name of the Multi-stop you want to use. The device will display the addresses and locations saved in the Multi-stop and
options are displayed enabling you to “Add” additional locations and “Sort” the order of those locations if necessary. Once you are
happy with the contents and order of your route, press “OK”
The unit will then calculate the route to each destination and display a new summary screen with the distance to each destination
along with the estimated duration of the journey to each destination stage. If you want to view the calculated route at this stage, press
“Map”. If you wish to use the Multi-stop route created, press the “Aguri”
17. logo at the top left hand corner of the screen to continue.
User note. If you press one of the stages listed before pressing “Go”, the device will display various options as listed below.
1.
2.
3.
4.
5.
Delete the selected destination.
Change the final destination or choose between final destination and stops.
Move the selected destination up.
Move the selected destination down.
Use the drop down menu to change the route settings for that section of your journey.
Once you have selected to continue with the routes calculated, the unit will return to the Map Navigation View showing your current
position along with a mini summary screen.
Pop-up window confirms current leg and
distance left to go on that leg.
If during your journey you want to cancel a current stage and go to the next stage then press the mini summary box and the message
“Delete current leg ?” will appear. Press “OK” and the unit will calculate the route to the next stage in the Multi-stop from your current
position.
If the unit is turned off and then on again during a Multi-stop journey it will retain the current route and ask you if you want to continue
with the current destination or with the next leg of the Multi-stop route or if you want to cancel the Multi-stop route completely.
.
19.
Sort a Multi-stop route.
Once you have created a Multi-stop route you can arrange the destinations into the most optimum order by using the “Sort” function.
2
3
4
1
5
6
1.
2.
3.
4.
5.
6.
Add an additional destination to your Multi-stop route
Change start address
Save the Multi-stop route generated
Sort Multi-stop into the most efficient/logical order
OK/Proceed button
Return to previous screen
Once the route has been arranged press “Save” then “OK”. The unit will then calculate the Multi-stop route and display estimated
times and distances to each address or location. Press the “Aguri” logo at the top left hand corner of the screen to proceed with your
journey.
20.
Adding and saving a Favourite location.
The unit can store up to 150 locations.
To add a Favourite, press the “+” button displayed at the top right hand corner of the screen. The device will show you the following
methods to find the address:• Find address
• Find by POI
• Find using recent routes
• Save using current location
Select the most appropriate method and follow the on-screen instructions to find and save the address or location you want to store in
your Favourites folder.
Editing or deleting a Favourite
If you would like to edit or delete a Favourite location, press and hold the address until a pop-up window is displayed. The pop-up
window will enable you to rename the Favourite, move the Favourite up or down the list and to delete that particular location from
your Favourites folder.
If you would like to delete all of the Favourites in your list, press the small drop down menu button at the top right hand corner of the
screen and select ‘Delete all’.
21.
Route by Favourites
To navigate to one of your stored locations, press the middle of the screen to access the “Navigate” menu and then press the “Route by
Favourites” icon. Select the Favourite you want to navigate to from the list by pressing it once. Information about your chosen
destination will then be displayed and you can set the “Route settings” you prefer for this journey.
• To start your journey press “Calculate”
• To view the destination point of this route on the map, press the “Map” icon.
• To return to the previous page press the “Return” button.
• To change the start location or add a ‘Via’ point press the small drop down menu displayed at the top right hand corner of the
screen.
Once the calculation is complete the summary screen will be displayed confirming the address you wish to navigate to, your start point,
your distance to the destination, your estimated arrival time , your estimated journey time and any “Route settings” you may have
selected.
Navigation will begin automatically within 10 seconds if you do not touch the screen or you can press the “Aguri” logo to proceed
immediately. If you want to spend more time viewing the Summary screen, tap anywhere on the screen to stop the automatic
countdown.
Further options are available if you press the small drop down menu icon found at the top right hand corner of the display.
• Press “Simulation” to show a simulation of the route that has been calculated.
• Press “Guide” to see a description of the calculated route turn by turn, road by road.
• Press “Avoid road” if you would like to re-calculate the route avoiding a specific road.
Once you are ready to proceed, press the “Aguri” icon to start navigating.
22.
Recent routes
The unit can store details of the last 40 routes that have been calculated so that if you want to return to an address or location you do
not have to enter all the details again.
To calculate a route using this feature press the middle of the screen to access the “Navigate” menu and scroll until you see the
“Recent routes” icon and press it once.
A list of your ‘Recent routes’ will be displayed in chronological order. Use your finger to ‘swipe’ the screen up or down to scroll through
them. Next, select the destination you want to navigate to from the list and press it once. Information about your chosen destination
will then be displayed and you can set the “Route settings” you prefer for this journey.
• To start your journey press “Calculate”
• To view the destination point of this route on the map, press the “Map” icon displayed at the top right hand corner of the screen.
• To return to the previous screen press the “Return” button.
• To change the start location or add a ‘Via’ point press the small drop down menu displayed at the top right hand corner of the
screen.
Once the calculation is complete the summary screen will be displayed confirming the address you wish to navigate to, your start
point, your distance to the destination, your estimated arrival time , your estimated journey time and any “Route settings” you may
have selected.
Navigation will begin automatically within 10 seconds if you do not touch the screen or you can press the “Aguri” logo to proceed
immediately. If you want to spend more time viewing the Summary screen, tap anywhere on the screen to stop the automatic
countdown.
Further options are available if you press the small drop down menu icon found at the top right hand corner of the display.
• Press “Simulation” to show a simulation of the route that has been calculated.
• Press “Guide” to see a description of the calculated route turn by turn, road by road.
• Press “Avoid road” if you would like to re-calculate the route avoiding a specific road.
• Once you are ready to proceed, press the “Aguri” icon to start navigating.
23.
Deleting a Recent route
If you would like to delete a Recent route, press and hold the address you would like to remove from the list, until a pop-up window
appears. The window will display the address you are about to delete with the options “Cancel” and “OK”. Press “OK” to delete the
destination or “Cancel” to return to the list of Recent routes.
If you would like to delete all of the routes in the Recent routes folder, press the small drop down menu displayed at the top right
hand corner and select ‘Delete all’
Route by POI (Points of interest)
You can calculate a route to destinations such as a hotel or restaurant using the database of points of interest which come preloaded on the unit.
To navigate using this function press the middle of the screen to access the “Navigate” menu. Next, ‘swipe’ the screen with your
finger, until you see the “Route by POI” icon and press it once. Press “Country” to select the required country, then press “City” and
enter the name of the city using the keyboard. As you type in the city name the unit will prompt you with a list of possible matches.
If you see a match in the lower window, press this with your finger.
Next press “Category” and enter the category type you require using the keyboard. If you do not know the category type you can
scroll up and down through the options by ‘swiping’ the screen with your finger. Once you find the correct category type press it
once to select it.
Now press “Name”. If the name of your POI is displayed in the lower window press it once to select it. As an alternative you can start
to type the name to narrow down the options and then select it. Information about your chosen destination will then be displayed
and you can set the “Route settings” you prefer for this journey.
• To start your journey press “Calculate”
• To view the destination point of this route on the map, press the “Map” icon displayed at the top right hand corner of the screen.
• To return to the previous screen press the “Return” button.
• To change the start location or add a ‘Via’ point press the small drop down menu displayed at the top right hand corner of the
screen.
24.
Once the calculation is complete the summary screen will be displayed confirming the address you wish to navigate to, your start point,
your distance to the destination, your estimated arrival time , your estimated journey time and any “Route settings” you may have
selected.
Navigation will begin automatically within 10 seconds if you do not touch the screen or you can press the “Aguri” logo to proceed
immediately. If you want to spend more time viewing the Summary screen, tap anywhere on the screen to stop the automatic
countdown.
Further options are available if you press the small drop down menu icon found at the top right hand corner of the display.
• Press “Simulation” to show a simulation of the route that has been calculated.
• Press “Guide” to see a description of the calculated route turn by turn, road by road.
• Press “Avoid road” if you would like to re-calculate the route avoiding a specific road.
Once you are ready to proceed, press the “Aguri” icon to start navigating.
Route by nearest POI
This function will help you to find the POI’s near to your current location or POIs around an alternative location. To navigate using this
function press the middle of the screen to access the “Navigate” menu. Next, scroll until you see the “Route by nearest POI” icon and
press it once. Your current location or the last location that the device was powered on at, will be displayed, with a list of all POIs
displayed in distance order, shown in the window below.
To fine tune the list of POIs displayed or to find a particular POI, press the “All categories” button and ‘swipe’ the screen up or down to
scroll through the various options available. Once you have found the option you require, press it once to select it. All POIs available
within this category will be displayed in distance order from your current location or the location displayed.
If you would like to look at POIs near to a different location, press on the address box displayed at the top left hand corner of the screen.
A list of options will be displayed enabling you to find the alternative address you require. Once you have located the address, a new list
of POIs will automatically be displayed in the window below. The POIs displayed will be in distance order from the new address you have
selected.
25.
To fine tune the list of POIs displayed around the new address, or to find a particular POI, press the “All categories” button and ‘swipe’ the
screen up or down to scroll through the various options available. Once you have found the option you require, press it once to select it.
All POIs available within this category will be displayed in distance order from the new location displayed.
Once you have found the location or address you require, press it once. Information about your chosen destination will then be displayed
and you can set the “Route settings” you prefer for this journey.
• To start your journey press “Calculate”
• To view the destination point of this route on the map, press the “Map” icon displayed at the top right hand corner of the screen.
• To return to the previous screen press the “Return” button.
• To change the start location or add a ‘Via’ point press the small drop down menu displayed at the top right hand corner of the screen.
Once the calculation is complete the summary screen will be displayed confirming the address you wish to navigate to, your start point,
your distance to the destination, your estimated arrival time , your estimated journey time and any “Route settings” you may have
selected.
Navigation will begin automatically within 10 seconds if you do not touch the screen or you can press the “Aguri” logo to proceed
immediately. If you want to spend more time viewing the Summary screen, tap anywhere on the screen to stop the automatic countdown.
Further options are available if you press the small drop down menu icon found at the top right hand corner of the display.
• Press “Simulation” to show a simulation of the route that has been calculated.
• Press “Guide” to see a description of the calculated route turn by turn, road by road.
• Press “Avoid road” if you would like to re-calculate the route avoiding a specific road.
Once you are ready to proceed, press the “Aguri” icon to start navigating.
26.
Route by map
This function allows you to navigate to a destination by selecting any road on any area of the map. To navigate using this function press the
middle of the screen to access the “Navigate” menu and scroll until you see the “Route by map” icon.
The screen will then show a section of the map. You can zoom in and out of the map by ‘pinching’ and ‘stretching’ the screen with your
fingers, as well using your finger to move the map around until you find the location you are looking for.
When you see the location you require, press on the road on the map with your finger and the name of the road, together with the
coordinates will be displayed at the top of the screen. Press the “tick” button to proceed.
User note. It is easier to select the road you are looking for by ‘zooming’ more closely in to the map.
Once you have pressed the “tick” button, information about your chosen destination will be displayed, together with the Route settings
you can select for this journey.
• To start your journey press “Calculate”
• To view the destination point of this route on the map, press the “Map” icon displayed at the top right hand corner of the screen.
• To return to the previous screen press the “Return” button.
• To change the start location or add a ‘Via’ point press the small drop down menu displayed at the top right hand corner of the screen.
Once the calculation is complete the summary screen will be displayed confirming the address you wish to navigate to, your start point,
your distance to the destination, your estimated arrival time , your estimated journey time and any “Route settings” you may have
selected.
Navigation will begin automatically within 10 seconds if you do not touch the screen or you can press the “Aguri” logo to proceed
immediately. If you want to spend more time viewing the Summary screen, tap anywhere on the screen to stop the automatic countdown.
Further options are available if you press the small drop down menu icon found at the top right hand corner of the display.
• Press “Simulation” to show a simulation of the route that has been calculated.
• Press “Guide” to see a description of the calculated route turn by turn, road by road.
• Press “Avoid road” if you would like to re-calculate the route avoiding a specific road.
Once you are ready to proceed, press the “Aguri” icon to start navigating.
27.
Route to junction.
This function allows you to navigate to a specific junction. To navigate using this function press the middle of the screen to access the
“Navigate” menu and scroll until you see the “Route to junction” icon.
Enter the Road number followed by the junction number and a map view of the junction will be displayed. Tap the screen to pinpoint
exactly where you want to navigate to and select ‘Continue’ from the ‘Quick menu’ to proceed.
Route by coordinate
To navigate to a destination using a coordinate press the middle of the screen to access the “Navigate” menu. Scroll until you see the
“Route by coordinate” icon and press it once.
Enter the coordinate using the key pad and then press “OK”.
There are three different formats you can use when entering the coordinate:
Degrees, Minutes and seconds (DD0,MM`SS.s”)
Degrees, Minutes (DD0,MM.mmm`)
Decimal Degrees (DD.dddddo)
User note. When entering the Longitude you must ignore the minus (-) symbol. The degree symbol must be used for this function to
work.
After pressing “OK” the location of the coordinates will be shown on the map. If they are correct, press the “tick” button and then follow
the on screen instructions to calculate a route.
Recalculate route
You have the option to recalculate your route if you want to avoid certain roads. However this facility is only available once you have
calculated a route. If the “Recalculate route” icon is greyed out this means a route has not been entered and the option will not be
available.
To recalculate a route, press the middle of the screen to access the “Navigate” menu and press the “Recalculate route” icon. You can then
choose how you want to recalculate your route from the options displayed.
28
.
Avoid road
If you know the road number or name you want to avoid then select this option. Press “Avoid road” and the unit will show you details
of your route and a list of the road names and numbers to be used. Use the up and down arrows at the right hand side of the screen to
see more details.
Next, select the road you want to avoid by pressing it once and the route will be recalculated and displayed on the screen. The original
route is shown in blue and the new route in yellow. Select your preferred route by pressing the appropriate coloured button at the
bottom of the screen.
Once you select a route the unit will automatically switch to the Navigation Map View screen and start to navigate. Note that the
summary screen and route options will not be displayed at this time.
Avoid by distance
This function allows you to avoid several roads from the calculated route so that you can re-calculate the route over a defined distance,
ranging from 1 mile to a maximum of 100 miles.
To use this function press the “Avoid by distance” button and the screen will show a distance ‘slider’. Use your finger to adjust the
slider to the required distance and press the “Calculate” button. The route will be recalculated and displayed on the screen. The
original route is shown in blue and the new route in yellow. Select your preferred route by pressing the appropriate coloured button at
the bottom of the screen.
Once you select a route the unit will automatically switch to the Navigation Map View screen and start to navigate. Note that the
summary screen and route options will not be displayed at this time.
Clear Avoid Road - Alternative name ‘Clear recalculated route’
If you do not want to use the alternative route and you want to return to the original calculated route then press the “Clear
recalculated route” button and the original route plotted by the unit will be restored.
29.
Device settings
The “Device settings” menu allows you to customise the operation of your unit. To enter “Device settings” press anywhere on the screen
to enter the menu and then press the “Device settings” button found at the top right hand corner of the screen.
Setting up vehicle parameters for car, truck, motorhome and caravan.
Car - Environmental settings
By entering the Environmental settings of your vehicle, your navigation system will be able to calculate routes avoiding any areas such as
Low Emission zones where you may not be able to travel, depending on the vehicle you are driving.
To enter the Environmental settings of your vehicle in “Car” mode, press the middle of the screen to access the “Navigate” menu and
press the “Device settings” button at the top of the screen to access the “Device settings” menu. Next, press the “Car” icon in and enter
the details requested. If you are unsure what the settings for your vehicle are, please consult the vehicle manufacturer’s handbook or
contact your local dealer.
About Environmental settings or Low Emission Zones (LEZ’s)
Low emission Zones (LEZ’s) are areas or roads where the most polluting vehicles are restricted from entering. This means that vehicles
are banned, or in some cases charged, if they enter the LEZ when their emissions are over a set level.
Vehicle emissions are classified by Euro Standards (1-6) for the vehicles that they affect. In many cases another factor is whether or not
the vehicle has a particulate filter or catalytic converter. Before you travel into a LEZ, you need to find out the emissions standard of your
vehicle.
All LEZ’s affect heavy duty goods vehicles (usually over 3.5 tonnes Gross Vehicle Weight (GVW)), and most buses and coaches (usually
defined as over 5 tonnes GVW). Some LEZ’s also affect vans, cars and motorcycles.
Most LEZ’s operate 24 hours a day, 365 days a year, with some of the Italian LEZ’s currently the only exceptions to this rule.
30.
Motorhome & Caravan edition.
To enable the unit to calculate a suitable route you need to input certain attributes, such as the height, width and weight of your vehicle. You can
create and save the settings for up to 10 different vehicles.
Press the middle of the screen to access the menu and press the “Device settings” button at the top of the screen, followed by the
“Caravan/Motorhome” icon.
Name - Enter the vehicle name here
Height - Enter the vehicle height here
User note. Ensure that this includes any items such as roof boxes or TV antennas
Length - Enter the vehicle length here
Width - Enter the vehicle width here
Weight - Enter the vehicle weight here
User note. When entering information on a caravan, the maximum values for height, length, width and weight must also include the details of the
vehicle towing the caravan. For example the wing mirrors of a car may be wider than the caravan being towed. Also please ensure that the
combined weight of the vehicle and caravan is used.
Weight per axle: Enter the vehicle weight per axle here
Vehicle type: This can be either fixed axle or trailer
Fixed Axle: Standard setting for fixed axle vehicles
Trailer: There are specific traffic regulations for a vehicle towing a caravan. There are some roads where it is not allowed to tow a vehicle, and these
roads will be avoided if you select this setting.
31.
Truck
To enable the unit to calculate a suitable route you need to input certain attributes, such as the height, width and weight of your vehicle. You can
create and save the settings for up to 10 different vehicles.
Press the middle of the screen to access the menu and press the “Device settings” button at the top of the screen, followed by the “Truck” icon.
Basic settings
Name - Enter the vehicle name here
Height - Enter the vehicle height here
Length - Enter the vehicle length here
Width - Enter the vehicle width here
Weight - Enter the vehicle weight here
Weight per axle - Enter the vehicle weight per axle here
Enter truck type
Truck - The standard setting for a fixed axle truck.
Trailer - There are specific traffic regulations for trucks with trailers. There are some roads where trucks with trailers are not allowed, and these
roads will be avoided if select this setting. You can choose between the following options:Truck with no trailer, Truck with 1 trailer, Truck with 2 trailers, Truck with 3 or more trailers or semi or tractor with 1 or more trailers.
Load type
None – normal
Hazardous – Hazardous goods that are not explosive or harmful for water.
Explosive and Flammable
Harmful for water
32.
Enter Tunnel Category if applicable to your vehicle.
ADR Tunnel Codes
Select one of the applicable tunnel codes. Please note that ‘Normal’ is selected by default.
The tunnel category codes consist of an individual letter from “A” to “E” this will be indicated by the use of road signs and/ or signals. Restrictions
will not apply to category “A” tunnels as these are unrestricted and do not require any signage.
A basic explanation of tunnel codes.
Tunnel category A or Normal
B Most restrictive - Passage forbidden through tunnels of category B, C, D and E
B1000C
- Carriage where the total net explosive mass per transport unit exceeds 1000 kg: Passage forbidden through tunnels of category B,
C, D and E; does not exceed 1000 kg: Passage forbidden through tunnels of category C,D and E
B/D - Tank carriage: Passage forbidden through tunnels of category B, C, D and E; Other carriage: Passage forbidden through tunnels of category D
and E
B/E - Tank carriage: Passage forbidden through tunnels of category B, C, D and E; Other carriage: Passage forbidden through tunnels of category E
Passage forbidden through tunnels of category C, D and E
C5000D
Carriage where the total net explosive mass per transport unit exceeds 5000 kg: Passage forbidden through tunnels of category C, D
and E; does not exceed 5000kg: Passage forbidden through tunnels of category D and E
C/D Tank carriage: Passage forbidden through tunnels of category C, D and E; Other carriage: Passage forbidden through tunnels of category D and E
C/E Tank carriage: Passage forbidden through tunnels of category C, D and E; Other carriage: Passage forbidden through tunnels of category E
D - Passage forbidden through tunnels of category D and E
D/E - Bulk or tank carriage: Passage forbidden through tunnels of category D and E; Other carriage: Passage forbidden through tunnels of category E
E - Least restrictive Passage forbidden through tunnels of category E
NORMAL - Passage allowed through all tunnels (For UN Nos. 2919 and 3331, see also ADR 8.6.3.1)
User note. For mixed loads you should choose the MOST restrictive category. Please see following page for ADR Tunnel Codes Disclaimer.
33.
ADR Tunnel Codes and basic explanation of tunnel codes.
Disclaimer
This content gives general guidance only and should not be regarded as a complete or authoritative statement of the law. The user guide will be
updated to reflect any developments in new legislation or case law.
34.
Brightness
To adjust the brightness, press the middle of the screen to access the “Navigate” menu and then press the “Device settings” button. Scroll until you
see the “Brightness” button and press it once. You can choose from 3 different settings, Auto, Day and Night.
Auto
If “Auto” is selected the unit will automatically switch between the day and night settings. The time the unit switches between day and night is preset and cannot be changed.
Day
You can adjust the day time brightness of the screen as follows. Press “Day” and adjust the brightness of the screen by pressing the + and – buttons.
To save the setting press “OK”.
Night
You can adjust the night time brightness of the screen as follows. Press “Night” and adjust the brightness of the screen by pressing the + and –
buttons. To save the setting press “OK”.
Once you have adjusted both the “Day” and “Night” brightness, select “Auto” and then “OK” to save the setting. If you do not select “Auto” the
screen will not switch between day and night automatically.
Volume control AGR520
To adjust the volume, press the middle of the screen to access the “Navigate” menu and then press the “Device settings” button. Scroll until you see
the “Volume” button and press it once. Increase or decrease the volume by pressing the + or – buttons. To test the volume, press the “Test” button.
To reset the volume to the default setting, press the “Reset” button. Finally Press the “OK” button to save your preferred volume setting.
Volume control AGR700
Use the volume control situated on the top left hand side of the device to adjust the volume.
Language
Use this setting to change the language you require. Press the middle of the screen to access the “Navigate” menu and then press the “Device
settings” button. Next scroll until you see the “Language” button and press it once.
You have a choice of using either TTS (Text to speech) or Voice. TTS uses a computer generated voice but will provide more in-depth descriptions of
the next action you will need to take. For example, instead of saying ‘Turn right’, it will say ‘Turn right on to the A555’
Standard Voice, uses voice commands recorded by a real human, so sound more natural but do not provide the same level of detail.
User note. The voice alerts are set to TTS as standard.
35.
Settings
Press the middle of the screen to access the menu and press the “Device settings” button at the top of the screen. Scroll until you see
the “Settings” button and press it once to enter the general Settings menu.
2D, 3D or North – Select map view.
This option allows you to choose the map view you prefer to have displayed on the screen. The 3D view is the default factory setting.
Make your selection and press the ‘Return’ button to save and exit.
MPH/KMH – select speed/distance unit type.
This option allows you to choose which measurement you want the screen to display. Make your selection and press the ‘Return’ button
to save and exit.
Icon – Select which icon you would like to represent your vehicle on the map.
This option allows you to choose the icon which represents your vehicle as it appears on the screen. You can choose between the
default vehicle icon, a car, a truck or a motorhome. Make your selection and press the ‘Return’ button to save and exit.
Lane view
Lane view will show which lane or lanes you should use at a junction, motorway intersection or exit. This option will only work when a
route has been calculated. Make your selection and press the ‘Return’ button to save and exit.
Speed trap alerts.
Your sat nav is already preloaded with the Speedshield speed trap database but you can still choose whether you want it to alert to speed traps,
mobile speed trap locations, red light cameras, or alert to nothing at all. You can also separately select whether to receive audible and visual alerts
or visual alerts only. Make your selection and press the ‘Return’ button to save and exit.
Hazard alerts – Truck, Motorhome & Caravan Edition only.
This option allows you to choose if you want visual and audible warnings to be emitted as you approach a hazard or legal restriction
such as a weight restriction. Make your selection and press the ‘Return’ button to save and exit.
36.
Route alarm
If you deviate from a calculated route the unit will automatically recalculate a route. To indicate that re-routing is in progress the unit will
emit an audible tone. This option allows you to choose if you want a beep tone to be emitted during recalculation. Make your selection
and press the ‘Return’ button to save and exit.
Alert Audio
There are two different audio tones to choose from. Choose between Tone 1 and Tone 2. Make your selection and press the ‘Return’
button to save and exit.
E Speed
E Speed contains speed limit information on nearly every road in Europe which can be displayed on your unit. You can select the correct
speed limit for your vehicle type as follows:
• Car – Advisory speed limits for a vehicle will be displayed
• Caravan – Advisory speed limits for a vehicle towing a caravan will be displayed
• Motorhome – advisory speed limits for motor homes will be displayed
• Truck 3.5t – 7.5t – Advisory speed limits for this size of truck will be displayed
• Truck 7.5t – 12t – Advisory speed limits for this size of truck will be displayed
• Truck 12t and above – Advisory speed limits for this size of truck will be displayed
Make your selection and press the ‘Return’ button to save and exit.
Note – These are advisory speed limits only and are subject to change. It is the driver’s responsibility to check local speed limits and
abide by local driving regulations.
User speed alert
Set your device to alert if you accidentally exceed the posted speed limit. To set the User speed alert warning use the up and down
arrows to increase or decrease the value over the posted speed limit you would like the device to alert at. For example, if you would like
the device to alert at 5mph over the posted speed limit ie 35mph in a 30mph zone, set the value to ‘5’.
Make your selection and press the ‘Return’ button to save and exit.
37.
Tight bend alert. Truck and Motorhome & Caravan editions only.
You can set the unit to alert you if you as you approach a tight bend. To select this function choose either the “Yes” or “No” button and
press the ‘Return’ button to save and exit.
Journey history
Set your device to record and save the details of each journey you take. Make your selection and press the ‘Return’ button to save and
exit.
Report mobile speed traps
Please note this function will only work if you pair your device with an internet enabled Android Smart phone. See more detailed
instructions later in this manual.
Record and share the locations of Mobile speed traps with other user’s. Make your selection and press the ‘Return’ button to save and
exit.
Live Digital Traffic Service download frequency
Please note this function will only work if you pair your device with an internet enabled Android Smart phone. See more detailed
instructions later in this manual.
As our Live Digital Traffic service uses your Smart Phone’s internet connection on the move, it will need to use your data package. The
more often you choose to connect, the more data will be used, which in turn could cost you more money, depending on the phone
contract you have.
Choose how often you would like your device to connect and then press the “Return” button to save and exit.
Show POI
Use this function to choose which POI (Point of interest) icons you want to display on the map. The default setting shows all POI icons on
the map, but you can choose to display only the ones you want or none at all.
Press the middle of the screen to access the “Navigate ” menu and press the “Device settings” button. Scroll until you see the “Show
POI” icon and press it once. Select the POI’s you would like to display on the map and press the “Return” button to save and exit.
38.
GPS status
This function allows you to check the strength of the unit’s GPS connection at any time. Press the middle of the screen to access the
“Navigate” menu. Press “Device settings” and then scroll until you see the “GPS status” icon and press it once. Your current GPS status
will be displayed.
Live Digital Traffic
Get an overview of the traffic situation in your area or in area where you want to travel.
User note. If you want to use Digital Live Traffic, you will need to pair your navigation device with an internet enabled Android Smart
Phone. Please note that you may be charged for the mobile data the navigation device uses depending on the mobile data package
you have as part of your Smart Phone contract.
Version
Check here for information about your device such as the software and hardware version numbers. Press the middle of the screen to
access the menu and press the “Device settings” button. Scroll until you see the “Version” button and press it once. The following device
information will be displayed.
• Software version – Software version number
• Manage and update maps – Press to check which maps are already installed on your device, to download new ones and update
existing ones.
• Speedshield database - Date the Speedshield speedtrap database was last downloaded
Update over wi-fi only.
Downloading and updating maps can take a reasonably long time and use a lot of data. We recommend that you only perform
updates when your device is connected to the internet by wi-fi. Select ‘Update over wi-fi only’ to ensure your device only updates
maps when connected to wi-fi. More information on how to connect your device to wi-fi can be found later in this manual.
39.
Mini short-cut menu
The Mini short-cut menu can be launched by touching the screen anywhere near the top of the display. The Mini short-cut menu will
open automatically and will be visible for four seconds if no other button is pressed.
4
5
2
1
3
3
6
1. Scroll map
Press the Scroll map icon and you can scroll across the map view on the display by ‘swiping’ the screen with your finger. You can also zoom in and
out of the map using a ‘pinch’ or ‘stretch’ motion with your fingers.
2. 2D, 3D, N
Switch between 2D, 3D or N (North) on-screen map views.
3. Increase or reduce map view magnification
The map on the screen can be magnified or reduced by pressing the + or – buttons.
4. Report and share mobile speed location.
Press this button to report and share the location of a mobile speed trap with other users.
Please note this function will only work if you pair your device with an internet enabled Android Smart phone. See more detailed instructions
about how to pair your Android Smarty Phone later in this manual.
5. Find nearest petrol station
6. Find nearest parking facility
40.
DVR Dash Cam
The AGR700 and AGR520 incorporate a built-in DVR dash cam that will automatically record the view in front of your vehicle as well as
recording all audio within range of the built-in microphone. The device’s built in GPS antenna will automatically record the GPS track of
your journey and all video, audio and trip information can be reviewed directly on the device’s LCD.
The DVR dash cam is set to start recording automatically as soon as your device is powered on, however you must ensure that an SD
card has been installed first. Your device comes as standard with an 8GB SD card, but the device will support up to a 32GB SD card if you
would like to increase the memory size.
To access DVR ‘Playback’ and ‘Settings’, press the DVR dash cam icon on the main menu to launch the DVR app. Next ‘swipe’ the centre
of the screen, from left to right and the device will display a ‘Settings’ button and a ‘Playback’ button. Select the ‘Playback’ button to
review any video or photographs and press ‘Settings’ button to access the DVR settings menu.
Swipe the screen from left to right to display the Settings and Playback buttons
Playback button
Settings button
Record button
Press to take a ‘still’
photograph
41.
Playback
Press to review video and GPS data recorded plus any photographs saved. After pressing the Playback button, select ‘Video’. You will then see a list of
folders in date order. Each file contains the video and GPS track footage recorded and saved on each day the device was used.
• Press the “Play” button to review the video and GPS track footage recorded.
• Press the “Delete” button to delete the video and GPS track footage recorded.
• Press the “Share” button to share the video and GPS track footage recorded by one of the methods shown.
Settings
Video loop time (min)
If you have chosen to record in loops, you can select how long you would like each loop to be.
42.
Image quality
Choose the level of image quality you would like to record in.
User note. If you select a higher image quality, the video recorded will be clearer. However, if the image quality is higher, each video
file recorded will also be bigger and will take up more room on the SD card. As a result older video footage will be over-written more
quickly once the SD card is full.
User note. If you are involved in an accident, it is always advisable to remove the SD card immediately to ensure that the video
recorded of the event is not lost.
Shock sensor sensitivity
Your device is designed to save any video footage it thinks is related to an event or accident. It does this by using a built-in shock sensor
to sense for any impacts or hard breaking. You can adjust the sensitivity of the shock sensor to suit your requirements.
Shock sensor
Turn the built-in shock sensor on and off.
Emergency record
If ‘Emergency record’ is switched on and you are within the DVR App, you can touch the LCD anywhere to automatically save and lock a
section of video recorded to ensure it is protected.
User note. This is not recommended for normal vehicle use.
LCD brightness
Adjust the LCD brightness level when in DVR mode.
Run in background
Set to on, if you would like the DVR to automatically run in the background when you are using the navigation software. Recommended.
43.
Show Record icon
Turn this on and you will see an additional ‘REC’ icon displayed on top of the navigation view when you are using the navigation software.
User note. If switched on, the ‘REC’ icon can obscure some elements of the navigation software. We recommend to switch this off when using the
navigation software, as a blue LED style icon is also displayed at the top left hand side of the top information bar to indicate that the DVR is
recording.
Delete file for record
When set to ‘On’, the DVR app will automatically start to record over the oldest footage on the SD card once the SD card is full. If set to ‘Off’, the DVR
will stop recording once the SD card is full and you will have to manually remove video files recorded to create more space.
We highly recommend that this feature is set to ‘On’ for normal vehicle use.
Preview full screen
Set to ‘On’ to preview and review video using all of your devices screen (this may stretch or distort the image very slightly) Set to ‘Off’ to preview and
review video in exactly the same format it was recorded.
Default settings
Press this to return the DVR software to the default factory settings.
Wi-Fi and internet connection.
The device incorporates built-in Wi-Fi so that you can wirelessly update the maps on your device, download useful apps and browse the internet.
Connecting to Wi-Fi.
Check you are in a location with an internet enabled Wi-Fi connection and that you know the login and password details to enable you to access this
Wi-Fi service.
Power on your device and press ‘Settings’ in the main menu.
At the top of the list you will see ‘Wi-Fi’. Tap the button to the right hand side of the screen to switch Wi-Fi on, the button will change to blue in
colour. Next tap on the word ‘Wi-Fi’ itself to enter the Wi-Fi settings. The device should automatically display a list of Wi-Fi services that are in range. If
no Wi-Fi services are displayed, press the small drop down menu displayed in the top right hand corner and select ‘Scan’ to search for any Wi-Fi
services in range of your device.
When you see the Wi-Fi service you require, press it with you finger to connect. A pop-up box will be displayed prompting you to enter the password.
Enter the password and press “Connect”. Your device will now automatically connect to the internet via the Wi-Fi connection.
44.
Browsing the internet.
Once you have connected to a Wi-Fi service with an active internet connection, you can use your device to browse the internet. Select
‘Internet’ from the main menu and the devices internet browser will be displayed. You can use this internet browser in exactly the
same way you would any other internet browser you would find on a PC, Tablet or Smart Phone.
Updating the maps and the Speedshield speed trap database.
To update the maps and the Speedshield speed trap database, you will first need to register and create an account so that you can use
the Google Play Store services. Creating and setting up a Google account on the device and updating the device’s mapping and speed
trap database is completely free, but you will need to create and add the Google account before you can access these free updates.
From the main menu select “Settings” then scroll down until you see ‘ACCOUNTS’ and press the “Add account” button. From the list
displayed, select ‘Google’ and a new window will appear called ‘Add a Google Account’. If you already have a Google Account select
“Existing”, if you do not have a Google account, press “New”. Follow the on-screen instructions to create and activate your Google
account on the device.
Once you have added a Google account to the device, you will be able to update the maps and speed trap database whenever an
update is available. To check for updates select “Navigation” from the main menu. Once the navigation software is fully open, tap the
LCD to enter the ‘Navigate’ menu and then press the “Device settings” button at the top right hand corner of the screen. Next tap on
the “Manage software” button, where you will see the following options:-
Software version.
The software version number currently installed will be displayed here. Tap to check whether a newer version of the software is
available and update if required.
Map version
The map version number currently installed will be displayed here. Tap to check whether a newer version of the map is available and
update if required.
User note. Please note that the maps can be quite large and can sometimes take quite a long time to download depending on the
speed of your internet connection. We recommend only ever downloading maps when connected to an internet enabled Wi-Fi
connection. It is also recommended that you ensure that your device is fully charged before you start the download or that you
connect it to a 5V USB power source such as a PC or a USB Tablet or Smart Phone charger.
45.
Speedshield database
The version number of the Speedshield database currently installed will be displayed here. Tap to check whether a newer version of the
database is available and update if required.
Update over Wi-Fi only
User note.
note. We
We recommend
recommend that
that you
you select
select to
to ‘Update
‘Update over
over Wi-Fi
Wi-Fi only’
only’ as
as some
some of
of the
the updates
updates are
are quite
quite large.
large. The
The alternative
alternative is
is to
to
User
‘pair’ aa compatible
compatible Android
Android Smart
Smart Phone
Phone with
with the
the AGR700,
AGR700, however
however downloading
downloading maps
maps using
using the
the 3G
3G or
or 4G
4G internet
internet connection
connection on
on
‘pair’
your
Smart
Phone
could
be
expensive
depending
on
the
data
plan
you
have
with
your
Smart
Phone
contract.
your Smart Phone could be expensive depending on the data plan you have with your Smart Phone contract.
Registering for Google Play and downloading ‘Apps’.
If you would like to add additional ‘Apps’ to your device, you will first need to register and create a Google account so that you can use
the Google Play Store. Creating and adding a Google account to the device is completely free, but you will need to do this before you can
download any new Apps to the device.
User
User note.
note. IfIf you
you have
have already
already created
created and
and added
added aa Google
Google account
account to
to the
the device
device to
to enable
enable you
you to
to wirelessly
wirelessly update
update the
the unit’s
unit’s
mapping
and
Speedshield
speed
trap
database,
you
will
already
be
able
to
access
the
Google
Play
Store
and
download
mapping and Speedshield speed trap database, you will already be able to access the Google Play Store and download Apps
Apps and
and
therefore
will
not
need
to
repeat
the
process
outlined
below.
therefore will not need to repeat the process outlined below.
From the main menu select “Settings” then scroll down until you see ‘ACCOUNTS’ and press the “Add account” button. From the list
displayed, select ‘Google’ and a new window will appear called ‘Add a Google Account’. If you already have a Google Account select
“Existing”, if you do not have a Google account, press “New”. Follow the on-screen instructions to create and activate your Google
account on the device.
Once you have added a Google account to the device you will be able to add your own selection of ‘Apps’ to the device. To add a new
‘App’ select ‘Apps’ from the main menu and select the Google ‘Play’ icon.
User note. Your device has a limited amount of memory available for storing and operating additional ‘Apps’. The number of ‘Apps’
you will be able to download and operate on the device will be limited to the unit’s available memory at any given time. If you would
like to check the current available storage on your device, select “Settings” from the main menu and then scroll down and press the
“Storage” button for more details.
46.
Digital Live Traffic services & Mobile speed trap reporting.
Pairing your device with an Android Smart Phone.
Your device has the capability to receive Digital Live Traffic services and also for you to share and receive the locations of mobile speed
traps with other users. These two features operate completely independently of each other but both require that you ‘pair’ a suitable
Android Smart Phone to your device so that it can leverage your phone’s mobile internet connection.
User note. When the device is paired with your Android Smart Phone it will leverage your phone’s mobile 3G or 4G internet
connection. The device will use your phone’s internet connection to send and receive data such as traffic flow information and, if you
use the mobile speed trap sharing system, will send the coordinates of any locations reported by you as well as download the
locations
locations of
of any
any mobile
mobile speed
speed trap
trap sites
sites reported
reported by
by other
other users
users in
in your
your area.
area. Depending
Depending on
on the
the mobile
mobile data
data package
package included
included with
with
your
Smart
Phone
contract,
using
these
features
could
cost
you
money.
We
strongly
advise
that
you
check
what
mobile
your Smart Phone contract, using these features could cost you money. We strongly advise that you check what mobile data
data package
package
is
is included
included on
on your
your phone
phone contract
contract and
and regularly
regularly monitor
monitor the
the amount
amount of
of mobile
mobile data
data used
used by
by our
our device
device whilst
whilst paired
paired with
with your
your
Smart
Phone
to
ensure
that
you
are
aware
of
any
associated
costs
you
may
incur.
Smart Phone to ensure that you are aware of any associated costs you may incur.
To ‘pair’ your Smart Phone with our device, you must first download and install the ‘Aguri Live’ App from the Google Play Store. Using
your Smart Phone, open the Google Play Store App and search for ‘Aguri Live’. Once you have found the App, download and install it on
your Smart Phone. Once installed, check that you have Bluetooth activated on your phone and that your phone is ‘visible’ to other
devices and then open the ‘Aguri Live’ App and switch it to ‘On’.
Next power on your AGR520 or AGR700 and select “Settings” from the main menu. Switch Bluetooth on, by tapping the Bluetooth on/off
button on the right hand side of the screen. When switched on, the button will turn blue.
Tap on the word ‘Bluetooth’ to enter the devices Bluetooth setting. At the top of the screen you will see ‘ANDROID BT. Not visible to
other Bluetooth devices’. Press this once, to change it to ‘Visible to all nearby Bluetooth devices’ plus a timer counting down from 2.00
minutes.
Now, press the “Scan” button in the ‘Aguri Live’ App on your Smart Phone. Your Smart Phone, should quickly display the name of the
device under the header ‘scanned devices’.
Return to the device, ensuring that it is still showing ‘Visible to all nearby Bluetooth devices’ and press the “SEARCH FOR DEVICES”
button found on at the top left hand corner of the screen. The device should now find your Smart Phone and display the name of it
below ‘AVAILABLE DEVICES’. On the device, press on the name of your phone to select it and a window should pop up simultaneously on
the device and your Smart Phone asking you to confirm that the pass key on both devices is the same. Press ‘Pair’ on both devices to
confirm the connection. Your Android Smart phone navigation device should now be successfully paired.
47.
Using Live Digital Traffic services.
Live Digital Traffic services, provides ‘Live’ traffic information in your area and on and around any routes you might like to travel.
Each time you ask the device to calculate a route, you will be given the option of using Live Digital Traffic. If you choose to select Live
Digital Traffic, the software will evaluate the amount of traffic on the normal route the device would calculate. If the software discovers
that there is a high volume of traffic on that route or that there is a specific event on that route such as an accident, it will alert you and
offer you an alternative route instead. You will be shown both the original route and the recalculated route, including the distance and
estimated travel time for each, so you can determine which route to take.
Using the Mobile speed trap sharing feature.
Once paired with a suitable Smart Phone, your device will enable you to report and share the locations of mobile speed traps with
other users.
To report a mobile speed trap, tap the top section of the screen to launch the mini drop-down menu and press the ‘Report mobile
speed trap icon’. Your device will automatically share the location reported with other users. Your device will also automatically receive
any locations reported in the area you are driving, by other users. If you drive past one of these locations the device will automatically
display the audible and visual Mobile speed trap alert as normal.
Report mobile speed trap button
48.
Disposal of Old Electrical & Electronic Equipment - applicable in the European Union.
If you see this symbol on a product or its packaging, it indicates that the product should not be treated as normal household waste. If you
see this symbol on any product or packaging it should be handed over to an applicable collection point for the recycling of electrical
equipment.
By ensuring that this product is disposed of correctly you will help prevent a potentially negative impact on the environment. In addition
the recycling of materials will help to conserve natural resources. For further information about recycling please contact your local civic
office or recycling centre.
49.
Warranty
Please note that to receive technical support or service under warranty, you must first register your unit at
www.aguriworld.co.uk
Having a problem with your Aguri satellite navigation system?
Try visiting the FAQ section at www.aguriworld.co.uk. We find that most issues can be resolved there.
If you are still experiencing problems, your Aguri satellite navigation system comes with a standard 12 month warranty. To return your unit under
warranty please ship it in suitable protective packaging, using Special Delivery or an alternative insured delivery service to:-
Warranty Department
Aguri Limited
Ollershaw Lane,
Marston,
Northwich
Cheshire
CW9 6ER
Please enclose the following information:
(a) Your name, address and a full description of the problem.
(b) A telephone number where you can be reached during business hours.
(c) Your units’ serial number.
(d) A copy of your proof of purchase.
Please note that the warranty will be considered void if the product:Has been dropped or otherwise obviously mistreated.
Has been subjected to heat, moisture or damp conditions.
Has been opened or dismantled.
Has been charged or powered with any cable or charger other than the one supplied.
www.aguriworld.co.uk
50.