1
&)'(($
“Kinovea for Dummies”
')'# $ "%
(&''
!
$
$
$
$
$
$
$
$
$
$
$
# $
$
$
$
# $
('"$
" $
$
$
$
!
$
$
$
$
$
$
$
$
$
$
$
!! $
$
$
$
$
""
$
$
$
$
$
$
$
$
$
$
$
$
$
$
$
$
$
$
$
$
)
*%,
-%.
/%0
('%()
(*%(+
(,%(.
(/%(0
)'%))
)*%),
)-
).%)/
(
!03122)!
" !"!
$! !
!!#
"!! !"! !"! $!
!)!!
#' !"! !!
&!#$&&
!!!!!!!
#!" !!
! !)!!"!!!'
! $!#!
$ $ !!
. !/)
#!# !!'
!+!#" -%!,"!!*
$ %!!!&"!!*
$ !"! ! $!)!! !' !!
%!!! !. !% $/)
!!'! !"!$"!$
& $ - !!!
%!"!!%)%'! !"! !
+!%!,"!!21! $ !21
)$$ $!!! &
!"%!!!!!!
!$! ) $$'!
!&)$$!"%
!!!!!!)"!$!! !
" !!) !'"!1(11(11(31! !!31
' $$!"%!""!)
3
%! "
!
&! !
!
!
!
!
!
!
!
!
!
% &
"
& '! #&
$!
!
!
(! !
!
!
"(
# ( ) * ! + ! , '& " !!
!! !" !"
$! #
/' !
0' &*() 1' * ""&!!'$
() &!"!'* """ $
" "()'
'
' "!"&"
!"!""'
2' &$'
!& ! !'
3' &2 ("%)'
$
"'
4' "%"$$(")+ &#&
&','% "
!'
5' "% "$ &("%
)
&("% )
'
6' $!& !
("% )'
7' "%&1#
' ("% )"%'
' "%$$
$
'
!
"
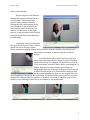
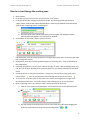
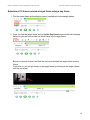
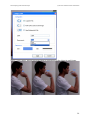
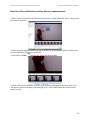
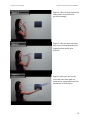
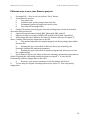
Selection of 10 frames around a target frame using a key frame
1. Find the target frame with navigation cursor (marked with red rectangle below).
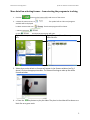
2. Once you find the target frame, click on Add a Key Frame (marked with red rectangle
below) so you can be sure later on which frame is your target frame.
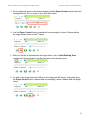
Below is a picture of what it will look like once you selected the target frame as a key
frame.
From now on, you can go directly to the target frame by clicking on the image (shown
with the red arrow).
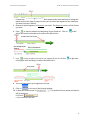
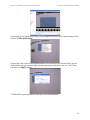
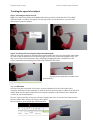
3. Set the playback speed to the slowest speed possible (Speed Control marked with red
rectangle below), so it is easier to work with each frame.
4. Use the Player Control button (marked with red rectangle) to select 5 frames before
the target (target frame is the 6th frame)
5. After you find the 5 frames before the target frame, click on Start Working Zone
(marked with red rectangle) to set the first frame of the working zone.
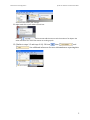
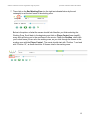
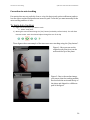
6. Go back to the target frame by clicking on the image (see #2 above), and again using
the Player Control button (marked with red rectangle), select 4 frames after the target
frame.
7. Then click on the End Working Zone (on the right as indicated below by the red
rectangle) to set the last frame of the working zone.
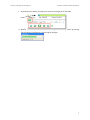
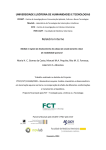
Below is the picture of what the screen should look like after you finish selecting the
Working Zone. Scroll back to the beginning and click on Player Control (see step #6);
every click will bring you to the next frame in the movie. Check the Position, which tells
you in what frame you are at in the working zone, as you click through the frames in the
working zone with the Player Control. The movie should start with “Position 1” and end
with “Position 10,” as there should be 10 frames total in the working zone.
&)'(("
(%
!
"
)%
! "
*%
!#
"$
+%
"
#
$
#"$
(*
"%#$$
'!
$&
#!""
!
"
#
Acceptable formats include: AVI, MPG, MOV, WMV, MP4, MKV, VOB, 3GP, MOD, TOD.
$
%
"$
#
$
%
!
" +.,--' -'!$((4
'!
$ ""'
.'! '#"& ")..'21#/,'02*'
/'(
!'
0'"$(' $$%()3" !*'
-2
),*++"
/"#
"!#"#
%&"
0"
'!
-*".2("
#
'!%&("
#
"
1"$ $
+3
(+)**$
!
"%
$ !
! %
#
%
#
%$ !
&$ !#
$
"
%
&
!'#
*#!
*#
+#
+#
"
!
+)
%(&''#
)"!
)"
"
)' " #$
*' !#$
&
'
+' " !#$
%
,' " /
"/
!
"
-' "
.' ! # $
"
$
"
('
"%#$$ &
&
'
'
(
(
!
%%
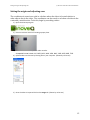
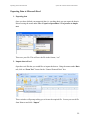
Exporting Data to Microsoft Excel
1. Exporting data
Once you have defined your numerical data (i.e. tracking data) you can export the data in
Kinovea using the menu under File > Export to Spreadsheet > Trajectories to simple
text.
Then save your file. This will save the file in the format, “.txt”
2. Import data to Excel
Open the excel file that you would like to import the data to. Using the menus under Data
tab, click on “From Text” located in the “General External Data” box.
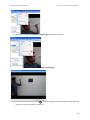
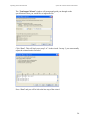
Then a window will prompt asking you to locate the required file. Locate your saved file
from Kinovea and click “Import”
The “Text Import Wizard” window will prompt and guide you through on the
specification of how you would like to import the file.
Click “Next”. This will lead you to step 2 of 3 in the wizard. In step 2, you can manually
adjust the column breaks if needed.
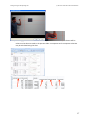
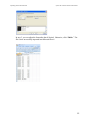
Press “Next” and you will be led to the last step of the wizard.
In step 3, you can adjust the format the data if desired. Otherwise, click “Finish.” The
file is now successfully imported into Microsoft Excel.
%"'*,&'#&),#(%
"#)$%#'&8;9::%0'%"#(#""&'("'&
:0
;0
&!"( )#%(&''## %2&3)4(''#"0
#(* )=#$'#"&/
0
))##" ,
0
#!")#",!&'"' 0
%!""' ,$"',!&'#"')#
0
)#" ,',!&'
<0
)" !"&$%&%)",#(%& '*#%"-#".(%%"'& #*!#'#"
) ("#'%$%%"&0
=0
($$#%'#('$('#%!'&" (
6'%#&7.=."0
>0
($$#%'##%#('$('&=16*&)5)#!$' 70
?0
,!&'*%'#')#.,( ''* &)&#$'#"34
#).#!")#",!&'"' 0
0
&!'#&$%'&'#%" !&%#!',!&'*'"
'&! 0
0
$""'&',$#&) "
"#) #*&,#('#!#,,#(%
%*"&.&'#$*'&.$'&"#!!"'&0
0
$""'&',$#&) ""#'%$%#%!#" , #*&,#('#)*
'#%" !&0
@0
,#(&%'#+$#%',#(%)#&#'',#(%%*"&.&'#$*'&"$'&%
)& #$""')#(&""#'%$%#%!.(&#$'#"34'#&)' .
%!""' ,$"',!&'#"')#0
0
#*)%.,#(%*%''"#!!"'&#"',!&* #&'0
A0
#&)#" ,'#%" .%*!&'"& '#$'#"3.4)#" ,',
!&'0
;?
!#" #25344!,#!$"#$#"
## #/###%##($&###!-!#.
$'&#!""!& !%!##,$"#"#!#!!#!#
"!# #!("",
&#% !!#$##(#!# ###(%&#%!
(!*$"#(!!!&$##"0!#!#!!&"1#%#!$#%,$
(!!#!!!"#$####!(!#$!""!'##
!!# # "#$!!%#!##,
0!!#"$!""!##
#"!,1
# 6+
!!#"$!#" ##*&$"#!##"#%&#
!!")#,#"' *&$"7"###! !#!#063,79
,
"$!# #!!#!" !##!"!'$
$!(($!"$!#",
!"#&!#"# !!##%,!""#-.$###
###"!#&"($#!!
! ## #0*!"$###
58
"!"14233 *" #!"#"!
"0"$*
&") "" "- "!# +."" !("
"!""! #"!*
""" ")-# ".)!""!# " -.*
!") '"$%""" " "!""$
%#""!"" ""( *
!"" "!!%"#&
!#!!$ )%"!%" #*
& """'-7& "" !"."
!"! & " "*# "$$ !
2*6*5&"!""'%"!#! !'!"
# "!%& ""&/
,
0 "#"
" "!'
!"""! -*&!. ")!%
" "'#! !"& "! ""
"*
"! %"'# "
% %! !/** &) 0" $"
""&)%"! !" """
""#""" !!"# !" #"# "*
46