1
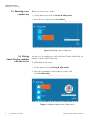
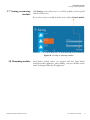
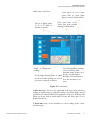
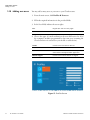
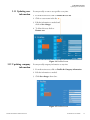
Thermo Scientific™ Smart-Tracker™ PC Software User Guide 327243H02 Rev. A April 2015 Visit us online to register your warranty www.thermoscientific.com/labwarranty IMPORTANT Read this instruction manual. Failure to follow the instructions in this manual can result in damage to the unit, injury to operating personnel, and poor equipment performance. CAUTION All internal adjustments and maintenance must be performed by qualified service personnel. Material in this manual is for informational purposes only. The contents and the product it describes are subject to change without notice. Thermo Fisher Scientific makes no representations or warranties with respect to this manual. In no event shall Thermo be held liable for any damages, direct or incidental, arising from or related to the use of this manual. © 2015 Thermo Fisher Scientific Inc. All rights reserved. Table of Contents Table of Contents Introduction................................................................................................1 Solution overview ..................................................................................1 How it works ..........................................................................................2 Getting started............................................................................................3 Requirements .........................................................................................3 Installing Smart-Tracker ........................................................................3 Using Smart-Tracker.................................................................................4 Creating a company account ..................................................................5 Logging in to the Cloud service .............................................................6 Forgot your password? ...........................................................................6 Recharging your account with voucher credits ......................................6 Entering a new voucher key ...................................................................8 Pairing Smart-Tracker modules with the service ...................................8 Viewing or removing modules ...............................................................9 Renaming modules .................................................................................9 Viewing data uploaded by Smart-Tracker modules .............................10 Adding new users .................................................................................12 Updating user information ...................................................................13 Updating company information ...........................................................13 Introduction Solution overview 1 Introduction 1.1 Solution overview Congratulations and thank you for choosing Thermo Scientific™ Smart-Tracker™. The overall solution is divided into three steps: 1. Start by ordering a Voucher to use Cloud services. Please contact your authorized sales representative to obtain vouchers. 2. Use Smart-Tracker application for PC to create company’s account, add users, and pair all Smart-Tracker modules. 3. Install the Smart-Tracker application onto each smart device to program, start and stop missions, additionally to send data to the Cloud. Note Intermediary users who read your module or modules need not to be added in your Cloud company account. Only those people who program or stop missions need to be users of your company account. This User Guide describes the PC application enabling you to configure and use Cloud services associated with your Smart-Tracker temperature tracking modules. When you read your Smart-Tracker modules with your smartphone or tablet, you can upload temperature readings and other information to the Cloud, where it can be accessed by other users via Smart-Tracker anywhere in world. Figure 1. Thermo Scientific™ Smart-Tracker™ PC Software User Guide 1 Introduction How it works The following features of the Smart-Tracker PC software are described in this User Guide: 1.2 How it works • Company account creation, login, and user management • Pairing Smart-Tracker modules to the service • Viewing mission data uploaded by Smart-Tracker modules • Managing vouchers for accessing the service The Cloud serves as a storage and consolidation platform for data collected from Smart-Tracker modules. When modules are read using the Smart-Tracker smartphone application, data can be uploaded over-the-air by the smartphone to the Cloud. This option is configurable in the application. With the Smart-Tracker PC application, users can log into their accounts on the Cloud, where they can view and download information collected from Smart-Tracker modules. Figure 2. Accessing Smart-Tracker module data via the Cloud from the Smart-Tracker PC application 2 PC Software User Guide Thermo Scientific™ Smart-Tracker™ Getting started Requirements 2 Getting started 2.1 Requirements 2.2 Installing Smart-Tracker To use this Smart-Tracker PC application, you need: • Personal computer with Windows 7 32-bit or higher, or Windows 8 • Recommended screen resolution: 1440 x 900 pixels • 20 MB free disk space • A voucher to activate your Smart-Tracker Cloud services. • 1 or more Smart-Tracker modules and Smart-Tracker software installed on a smartphone or tablet (to upload module data to the Cloud) Start by downloading and installing the Smart-Tracker application. For this, you will need an Internet connection on your computer. 1. Create a folder on your hard drive, such as: C:\Thermo\Smart-Tracker 2. Go to www.thermoscientific.com/smart-tracker 3. Click on the link to download Smart-Tracker PC application. 4. Download the file directly into the folder you created in Step 1 (or copy the file from your regular download folder). 5. Double-click on the icon to start the application. Figure 3. Smart-Tracker PC application in folder Thermo Scientific™ Smart-Tracker™ PC Software User Guide 3 Using Smart-Tracker Installing Smart-Tracker 3 Using Smart-Tracker Here is a summary of the main application screen: Connect: View: Profiles: login screen module readings and information user and company information Pairing: Voucher: About: Assigning modules to the Cloud service managing Cloud credits for General your modules application information Figure 4. Main Application Screen 4 PC Software User Guide Thermo Scientific™ Smart-Tracker™ Using Smart-Tracker Creating a company account 3.1 Creating a company account The first time you connect to the Cloud service, you must create your company account by entering user and company information and a voucher number. Figure 5. Entering account information and voucher number 1. Click Connect on the main screen Create company account 2. Fill the required fields (marked with *). 3. Enter your voucher number (which is sent to you by e-mail after you purchase Cloud service vouchers). 4. Click Create when done. To return to the main screen, click on the back arrow icon, which is present on all screens. Quit the application by pressing the escape key on the main screen, and click on the “X” icon in the lower right-hand corner. Thermo Scientific™ Smart-Tracker™ PC Software User Guide 5 Using Smart-Tracker Logging in to the Cloud service 3.2 Logging in to the Cloud service 1. Click Login on Connect screen. 2. Enter e-mail address and Password. 3. Click Connect. Figure 6. Connect Screen 3.3 Forgot your password? If you can’t remember your password, click on Send my password on the Connect screen shown above. A new password will be sent to the address configured for your account. Note The password will only be sent to a valid user that has already registered with a valid e-mail address. 6 PC Software User Guide Thermo Scientific™ Smart-Tracker™ Using Smart-Tracker Recharging your account with voucher credits 3.4 Recharging your account with voucher credits The Thermo Scientific Cloud is a flexible service that allows you to upload and download data collected by Smart-Tracker modules. As mentioned earlier, you must purchase credits, in the form of a voucher, to create your company account and benefit from Cloud storage and access. Vouchers are valid for a specified period of time, for a specified number of modules. Contact Thermo Scientific or your authorized sales representative for more information. When you purchase credits to recharge your account, you will receive a voucher with information to enter into Smart-Tracker (just as you entered a first voucher number to create your Company account). To see your account’s voucher status: 1. Click Vouchers My voucher Figure 7. Checking current voucher status Thermo Scientific™ Smart-Tracker™ Latest voucher key The number of the last voucher key you entered. Total number of modules The number of Smart-Tracker modules covered by the voucher. Available modules Remaining Smart-Tracker modules that you may pair with the service. Note: If you delete a module from the service, this number increments automatically. Expiration date The date at which the Cloud service expires for the overall pool of modules. The data still remains available after service expiration. PC Software User Guide 7 Using Smart-Tracker Entering a new voucher key 3.5 Entering a new voucher key When you receive a new voucher: 1. On the main screen, click on Voucher Add voucher 2. Enter the new voucher key and click Submit. Figure 8. Entering a new voucher key 3.6 Pairing Smart-Tracker modules with the service You must use the application to add each Smart-Tracker module that you intend to connect to the Cloud service. To add modules to the service: 1. On the main screen, click Pairing Add module 2. Enter the serial number of the module you wish to add, and click Add module. Figure 9. Adding a module to the Cloud service 8 PC Software User Guide Thermo Scientific™ Smart-Tracker™ Using Smart-Tracker Viewing or removing modules 3.7 Viewing or removing modules Click Pairing on the main screen to see all the modules you have paired with the Cloud service. If you wish to remove a module from the service, click on Remove module. Figure 10. Viewing or removing modules 3.8 Renaming modules Thermo Scientific™ Smart-Tracker™ Smart-Tracker module names are assigned with the Smart-Tracker smartphone/tablet application, when defining a mission. Modules names cannot be changed within the PC application. PC Software User Guide 9 Using Smart-Tracker Viewing data uploaded by Smart-Tracker modules 3.9 Viewing data uploaded by Smart-Tracker modules You can use Smart-Tracker to access all the information uploaded to the Cloud by your Smart-Tracker modules. 1. On the main screen, click View and select a Smart-Tracker module from the list. 2. You may scroll through the mission list or use the date filters to display missions started between certain dates. Click Apply to use the selected dates. 3. Click a mission to view complete details. Figure 11. View Screen 10 PC Software User Guide Thermo Scientific™ Smart-Tracker™ Using Smart-Tracker Viewing data uploaded by Smart-Tracker modules Other items on the View: Create reports in CSV or PDF format (files are saved under Reports in Smart-Tracker folder). Choose to display values in °C or °F (click on mission to refresh). View stored data or live (latest) data from modules running in Watch Mode. Graph of temperature readings. List of all temperature readings, events, and alarms with date/time stamp. At the top of the list, you may click on Google Map showing points at which Readings or Events/Alarms to the Smart-Tracker module was read (if show the information you geolocation activated on iPhone). want. Figure 12. View Screen In Live data mode, the list on the right-hand of the screen shows the latest reading in module memory, pushed according to the Watch Mode interval specified in the SmartTracker mobile application (iOS only). Readings with alarms are shown with an alarm symbol. Events and alarm types are not displayed in this list. In Saved data mode, use the checkboxes to show readings and/or events, and alarm types. Thermo Scientific™ Smart-Tracker™ PC Software User Guide 11 Using Smart-Tracker Adding new users 3.10 Adding new users You may add as many users as you want to your Cloud account. 1. From the main screen, click Profiles New user. 2. Fill in the required information in the provided fields. 3. In the Level field, indicate the access rights: User Regular user with view-only rights Administrator User with access to all features 4. Choose the types of e-mail notifications the user shall receive for all of the company’s modules programmed by that same user (assuming the Cloud connection is activated on your mobile or tablet device). Alarms E-mail is sent if an alarm is detected. Mission started E-mail is sent when the mission is started. Mission read E-mail is sent when the mission is read by the Smart-Tracker smartphone/tablet application. Mission stopped E-mail is sent when the mission is stopped. Figure 13. Profiles Screen 12 PC Software User Guide Thermo Scientific™ Smart-Tracker™ Using Smart-Tracker Updating user information 3.11 Updating user information You may modify or remove user profiles at any time 1. From the main screen, click on Profiles User list 2. Click on a user name in the list. 3. Edit the information as needed and click on Save changes. 4. To delete this user, click on Remove user. Figure 14. Profiles Screen 3.12 Updating company information You may modify company information at any time: 1. From the main screen, click on Profiles Company information. 2. Edit the information as needed. 3. Click Save changes when done. Figure 15. Profiles Screen Thermo Scientific™ Smart-Tracker™ PC Software User Guide 13 Important For your future reference and when contacting the factory, please have the following information readily available: License Number: Date Purchased: The above information can be found on the dataplate attached to the equipment. If available, please provide the date purchased, the source of purchase (manufacturer or specific agent/rep organization), and purchase order number. IF YOU NEED ASSISTANCE: Thermo Scientific products are backed by a global technical support team ready to support your applications. We also offer cold storage accessories, including remote alarms, temperature recorders and validation services. Visit www.thermoscientific.com or call: USA/Canada Germany international Sales: Sales: +1 866 984 3766 +49 6184 90 6000 India toll free Germany national toll free Sales: Sales: 1800 22 8374 India Sales: Italy +91 22 6716 2200 China Sales: +800 810 5118 (or) +400 650 5118 +81 3 5826 1616 +61 39757 4300 +43 1 801 40 0 Sales: +358 9 329 10200 Sales: +7 812 703 42 15 Sales: +34 93 223 09 18 Switzerland +32 53 73 42 41 France Sales: +31 76 579 55 55 Spain/Portugal Belgium Sales: Sales: Russia Austria Sales: +32 02 95059 552 Nordic/Baltic/CIS countries Australia Sales: Sales: Netherlands Japan Sales: 0800 1 536 376 Sales: +41 44 454 12 22 UK/Ireland +33 2 2803 2180 Sales: +44 870 609 9203 New Zealand Other Asian countries Sales: Sales: +64 9 980 6700 +852 2885 4613 Countries not listed Sales: +49 6184 90 6000 Thermo Fisher Scientific Inc. 275 Aiken Road Asheville, NC 28804 United States www.thermofisher.com 326831H01 Rev. A


![TSD Series -40C ULT User Manual [EN]](http://vs1.manualzilla.com/store/data/005634658_1-66c9db561a67486106446026c707a26c-150x150.png)


![Cryogenic Freezer - User Manual [EN]](http://vs1.manualzilla.com/store/data/005841262_1-77d7cc3403393239d9b8135bfb24ee2c-150x150.png)