1
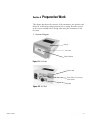
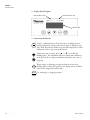
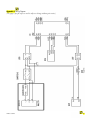
User Manual
Thermo Scientific Digital Drybath
Dry Bath with Advanced Microprocessor Control
Catalog Numbers:
88870001, 88870002
88870003, 88870004
88870005, 88870006
Operation Manual 0000848
Visit us online to register your warranty
www.thermoscientific.com/labwarranty
Preface
Safety Information
Alert Signals
Warning The warning message requires extremely careful operation of a certain step. Failure to
observe the instruction may result in serious personal injury.
Caution Important information is contained in any item and should be carefully read. Failure to
observe the instruction would result in damage or abnormal function of the instrument.
Note Notes alert you to pertinent facts and conditions.
Warning If the Thermo Scientific Digital Drybath is used in a manner not specified by the
manufacturer, the protection provided by the unit may be impaired.
Thank you for selecting Thermo Scientific for your equipment needs.
Your Thermo Scientific Digital Drybath has been designed with functionality, reliability, and safety
in mind. It is your responsibility to use this instrument in conformance with local electrical codes. It
is very important that the user follows installation instructions exactly as written. Do not attempt
operation without this information.
© All rights reserved. Thermo Fisher Scientific reserves the right to modify this manual at any time
without notice. Without prior written consent from Thermo Fisher Scientific, any part of the manual
should not be duplicated, reproduced or translated into any other languages.
MANUAL NUMBER 0000848
0
--
12/3/2014
REV
ECR/ECN
DATE
Thermo Scientific
Original
DESCRIPTION
By
Drybath Incubator
i
Preface
Do You Need Information or Assistance on
Thermo Scientific Products?
If you do, please contact us 8:00 a.m. to 6:00 p.m. (Eastern Time) at:
1-740-373-4763
1-800-438-4851
1-877-213-8051
http://www.thermoscientific.com
[email protected]
www.unitylabservices.com
Direct
Toll Free, U.S. and Canada
FAX
Internet Worldwide Web Home Page
Tech Support Email Address
Certified Service Web Page
Our Sales Support staff can provide information on pricing and give you quotations. We can
take your order and provide delivery information on major equipment items or make
arrangements to have your local sales representative contact you. Our products are listed on the
Internet and we can be contacted through our Internet home page.
Our Service Support staff can supply technical information about proper setup, operation or
troubleshooting of your equipment. We can fill your needs for spare or replacement parts or
provide you with on-site service. We can also provide you with a quotation on our Extended
Warranty for your Thermo Scientific products.
Whatever Thermo Scientific products you need or use, we will be happy to discuss your
applications. If you are experiencing technical problems, working together, we will help you
locate the problem and, chances are, correct it yourself...over the telephone without a service
call.
When more extensive service is necessary, we will assist you with direct factory trained
technicians or a qualified service organization for on-the-spot repair. If your service need is
covered by the warranty, we will arrange for the unit to be repaired at our expense and to your
satisfaction.
Regardless of your needs, our professional telephone technicians are available to assist you
Monday through Friday from 8:00 a.m. to 6:00 p.m. Eastern Time. Please contact us by
telephone or fax.
International customers, please contact your local Thermo Scientific distributor.
ii
Drybath Incubator
Thermo Scientific
Table of Contents
Thermo Scientific
Section 1
Safety . . . . . . . . . . . . . . . . . . . . . . . . . . . . . . . . . . . . . . . . . . . . . . . . . . . . . . .1-1
Section 2
Maintenance . . . . . . . . . . . . . . . . . . . . . . . . . . . . . . . . . . . . . . . . . . . . . . . .2-1
Section 3
Introduction . . . . . . . . . . . . . . . . . . . . . . . . . . . . . . . . . . . . . . . . . . . . . . . . .3-1
Section 4
Features . . . . . . . . . . . . . . . . . . . . . . . . . . . . . . . . . . . . . . . . . . . . . . . . . . . . .4-1
Section 5
Preparation Work . . . . . . . . . . . . . . . . . . . . . . . . . . . . . . . . . . . . . . . . . . . .5-1
Section 6
Operation Guidance . . . . . . . . . . . . . . . . . . . . . . . . . . . . . . . . . . . . . . . . . .6-1
Examination Before Start-Up . . . . . . . . . . . . . . . . . . . . . . . . . . . . . . .6-1
Start-Up . . . . . . . . . . . . . . . . . . . . . . . . . . . . . . . . . . . . . . . . . . . . . . .6-1
Set the Temperature and Time Values . . . . . . . . . . . . . . . . . . . . . . . .6-1
Start and Stop Instrument . . . . . . . . . . . . . . . . . . . . . . . . . . . . . . . . .6-2
Temperature Adjustment . . . . . . . . . . . . . . . . . . . . . . . . . . . . . . . . . .6-2
Section 7
Failure Analysis and Troubleshooting . . . . . . . . . . . . . . . . . . . . . . . . . .7-1
Section 8
Wiring Diagram . . . . . . . . . . . . . . . . . . . . . . . . . . . . . . . . . . . . . . . . . . . . . .8-1
Section 9
Warranty Information . . . . . . . . . . . . . . . . . . . . . . . . . . . . . . . . . . . . . . . . .9-1
Drybath Incubator
iii
During operation, maintenance and repair of this instrument, the
following basic safety notes should be observed. In case of failure to follow
these instructions, the warnings or notes indicated herein, the basic
protection provided by the instrument, its safety criteria of design and
manufacture, and its predicted use range would be impaired. If the
equipment is used in a manner not specified bythe manufacturer, the
protection provided by the equipment may be impaired.
Thermo Fisher Scientific is not responsible for any injury as a result of the
user’s failure to observe the following requirements.
This instrument is for indoor use.
a) The ground connection
To avoid the electric shock, the input power line must be reliably
grounded. The instrument is equipped with the three-pin plug that has the
third pin (the pin connects the ground), therefore, the plug should be used
with the grounded power socket only. This is a kind of safety device. If the
plug cannot be plugged into the power socket, please ask the electrician to
install a correct power socket, so as to make the grounded plug to work for
safety.
b) Servicing and Replacement of Parts
The operator should not take apart the instrument without permission.
Only qualified professionals are allowed to replace elements or adjust
components inside the instrument. Replacement of components while unit
is connected to power and/or turned on is prohibited.
c) Observe voltage/power requirements
Before the instrument is connected with the AC power source, the voltage
of the power source should be the same with the required voltage of the
instrument (a deviation of 10% is allowed). The rated load of the power
socket should not be lower than the requirements of the instrument.
d) The power cord
The instrument should use the power line cord attached to it. If the
power line is destroyed, it must be replaced but not be repaired. The
replacement should be carried out with the power line of the same type
and same specification. No items should be put on the power cord when
the instrument is in operation.
Thermo Scientific
Drybath Incub
1-1
e) Connecting and disconnecting from to power source
The user should hold the plug to remove from power source. When
connecting the plug, user should make sure it has been fully plugged in;
when removing the plug, do not pull the power line forcefully.
f) Placement of the instrument
This instrument should be fixed in a low RH and low dust place away
from water source (e.g. sink or water pipeline) and the room should be
well ventilated, and free of corrosive gas or interference of strong magnetic
field. The instrument should not be placed in a wet or dusty location.
The openings on this instrument are for ventilation circulation and in
order to avoid over-heat of the instrument body they should not be
blocked or covered. When a single set of instrument is used, the interval
between ventilation opening before and after the instrument and its nearest
object should not be less than 25cm. Also, don’t use the instrument on
loose or soft surface, or the air inlet of instrument bottom might be
blocked. Excessive temperature will impair performance or result in failure
of instrument. This instrument should not be used in location subjected to
direct sun light. The instrument should be kept away from hot gas, oven
and all other heat sources. If the instrument is to be stored for a long time,
the power plug should be withdrawn and the instrument covered with soft
cloth or plastic film to avoid entrance of dust.
The product is powered by connecting the mains plug to a standard
socket-outlet.Always place the product in such a way that it is easy for the
operator to disconnect the product from the mains supply.
1-2Drybath Incubator
Thermo Scientific
g) Explanation of symbols
Attention, read user manual before use.
There is a sign of “CAUTION: HOT SURFACE!
ATTENTION: SURFACE HOT” on the instrument. The metal part
(module) near the sign should not be touched with any part of the body
when the instrument is operating in a high temperature state or just
finished operation to avoid burns!
Alternating Current
Protective Conductor Terminal
In any of the following cases, immediately turn off the power
supply, withdraw the power plug from the power socket, contact the
supplier for service:
• Liquid drops into the inside of the instrument.
• The instrument is rained on or water is spilled on it.
• The instrument works abnormally, especially if generating an abnormal
sound or odor.
• The instrument is dropped or its casing is damaged.
• The function of instrument obviously changes.
The holes of the blocks should be regularly cleaned with the damp cloth to
ensure the test tube be well contacted with the wall of the holes so as to
have good heat conduction. If the surface of the instrument is polluted, it
can be cleaned with a slightly damp soft cloth.
Warning When cleaning the instrument, the power supply should be shut
off and unplugged. The instrument surface should be cleaned with a noncorrosive cleaning agent.
Thermo Scientific
Drybath Incubator
2-1
Section 3
Introduction
The product is dry bath with advanced microprocessor control, which can
be widely applied to sample reservation, enzyme reservation and reaction,
DNA amplification, electrophoresis degeneration and serum coagulation,
etc. The characteristics of the product are as follows:
• The digital display and control of the temperature.
• Heat blocks help avoid possible contamination while containing the
sample inside a tube
• The heat blocks are easily replaced, clean or disinfect and are suitable for
various tube sizes.
• Built-in over-temperature protection device warrants sample and user
safety
• Temperature deviation adjustment.
Thermo Scientific
Drybath Incubator
3-1
Section 4
Features
This chapter introduces the usage, transportation, storage conditions of the
instrument, as well as its basic parameters, performance and functions.
1. Normal working conditions
Ambient temperature:10°C~30°C
Relative humidity:≤80%
Power supply:100-120V~50/60Hz or 200-240V~ 50/60Hz
Altitude: Up to 2000 m
Pollution degree: 2
Overvoltage category : II
Indoor use
Caution Before using the instrument, make sure the working conditions
meet the above requirements, especially that the power line is reliably
grounded.
2. Transportation and storage conditions
Ambient temperature:-20°C~+55°C
Relative humidity:≤80%
3. Basic parameters
Table 4-1: 100-120V
Parameters / Type
Temperature Range
Digital 1 block
100-120V
Temperature Uniformity
≤±1.0°C
Temperature Accuracy
≤±0.5°C@37°C
Temperature Rise Time
Digital 4 block
100-120V
Ambient Temperature +5°C~130°C(ambient temperature 25°C)
Temperature Fluctuation
≤±0.5°C
≤20 min(rise from 30°C to 130°C)
≤25 min
(rise from 30°C to 130°C)
Size (L×W×H)
288×200×100 mm
11.3×7.87×3.94 in
318×200×100 mm
12.5×7.87×3.94 in
450×200×100 mm
17.7×7.87×3.94 in
Weight
2.9 kg (6.39 lbs.)
3.3 kg (7.28 lbs.)
4.7 kg (10.36 lbs.)
F 250V 2.5A
F 250V 5A
F 250V 8A
Fuse Protector(ø5×20)
Thermo Scientific
Digital 2 block
100-120V
4-1
Section 4
Features
3. Basic Parameters (continued)
Table 4-2: 220V
Parameters / Type
Temperature Range
Digital 1 block
200-240V
Digital 2 block
200-240V
Ambient Temperature +5°C~130°C(ambient temperature 25°C)
Temperature Uniformity
≤±1.0°C
Temperature Accuracy
≤±0.5°C@37°C
Temperature Fluctuation
Temperature Rise Time
Size (L×W×H)
Weight
Fuse Protector(ø5×20)
Digital 4 block
200-240V
≤±0.5°C
≤20 min(rise from 30°C to 130°C)
≤25 min
(rise from 30°C to 130°C)
288×200×100 mm
11.3×7.87×3.94 in
318×200×100 mm
12.5×7.87×3.94 in
450×200×100 mm
17.7×7.87×3.94 in
2.9 kg (6.39 lbs.)
3.3 kg (7.28 lbs.)
4.7 kg (10.36 lbs.)
F 250V 2.5A
F 250V 2.5A
F 250V 3.15A
Caution The instrument shall be used from low to high temperature.
Declaration of Conformity
We hereby declare under our sole responsibility that this product conforms
with the technical requirements of the following standards:
CE EMC:
EN 61326-1
CE Safety:
EN 61010-1
CE Safety:
EN61010-2-010
UL:
61010-1/CSA C22.2 NO. 61010-1
ROHS2.0: 2011/65/EU
4-2
Thermo Scientific
Section 5
Preparation Work
This chapter introduces the structure of the instrument, user interface and
functions of all buttons and preparation before startup. Read the content
in the section carefully before startup when using the instrument for the
first time.
1. Structure Diagram
Housing
Front Cover
Display Window
Figure 5-1. Unit Front
Product Label
Power Socket, Fuse Housing,
Power Switch
Handle
Figure 5-2. Unit Back
Thermo Scientific
Drybath Incubator
5-1
Section 5
Preparation Work
2. Display Panel Diagram
Heating Indicator Light
Warning Indicator Light
Digital Display
3. Instructions for Buttons
SET
CAL.
Setting or adjusting button: Press the button to display present
setting temperature, and press the button again to display present
time. After the unit has reached set point and temperature is stable,
calibration can be set by pressing the button.
Under the status of setting, press “▲” or “▼” to modify the
flashing figure. The instrument will enter temperature calibration
mode if press the two buttons simultaneously under the status of
stopping.
5-2
Drybath Incubator
SHIFT
When setting or adjusting, pressing the button can move the
flashing figure. During the operation, the display can be switched
between the temperature and the time.
START
STOP
For starting up or stopping program
Thermo Scientific
Section 6
Operation Guidance
The chapter introduces the display window and the operation of buttons
of the dry bath with constant temperature.
Examination Before
Start-Up
Confirm the following before inserting the plug into the power socket.
1. Ensure the power source is in accordance with the voltage requirement
of the instrument (refer to Features section for voltage requirements).
2. Make sure the plug has been fully plugged into the power socket.
3. Ensure the power line has been reliably grounded.
Caution If the display of the instrument is abnormal after startup, turn off
the power source immediately and contact the supplier. ▲
Start-Up
Press the power switch and the instrument will power on. All indicator
lights and display serial ports will be turned on. About 3~5 seconds later,
temperature display window will show the real-time temperature. All
indicator lights will be turned off.
Set the Temperature
and Time Values
When the instrument is not running, press “SET/CAL.”, the instrument
will enter setting status. At that time, temperature display window shows
the previous temperature value with the first figure on the left flashing.
Press “SHIFT”, the flashing place can be moved, press “▲”or “▼”to
increase or decrease the flashing figure.
When the temperature is set, press “SET/CAL.” to enter into the time
setting mode and the time display window shows the previous time value
with the first figure on the left flashing. Press “SHIFT”, the flashing place
can be moved, press “▲”or “▼”to increase or decrease the flashing figure.
Wait for 5 seconds after setting, and do not operate the instrument. After
5 seconds, the instrument will automatically exit, setting the status. The
temperature window will show real-time temperature.
Instruction: There is limitation for temperature and time setting. The
temperature range is: 0~135°C;the time range is: 0~9h99min and
continuous mode “---”.
Thermo Scientific
Drybath Incubator
6-1
Section 6
Operation Guidance
Start and Stop
Instrument
Press “START/STOP” to start operation. At this time, the indicator light
“HEAT” will be flashing. When the instrument achieves the setting
temperature, the “HEAT” light will stop flashing. This indicates that the
unit will enter Hold Temperature status. The digital display window will
display the real-time temperature, and the timing function by pressing
“SHIFT” button.
When the holding time equals the setting time, the instrument will alarm
5 times. Under the working status, press “START/STOP” to stop working.
At that time, corresponding working indicator light “HEAT” will be
turned off. The digital display window displays the real-time temperature.
Temperature
Adjustment
During operation, when the instrument temperature isstabilized, the
“HEAT” light will stop flashing. Press “SET/CAL.” to enter into
Temperature Adjusting status. At that time, the digital display window
shows the temperature value that needs to be adjusted with the first figure
on the left flashing. Press “SHIFT” to move the flashing place and press
“▲”or “▼”to increase or decrease the flashing figure. Adjust the display
temperature to the actually verified temperature and then press
“SET/CAL.”. The instrument will drop out of Adjusting status and
continue to work.
Caution
1. To ensure the accuracy of temperature, the instrument shall be
calibrated after temperature stabilizes for 30 minutes.
2. Calibrate the instrument with qualified Grade II standard filled
thermometer
3. Calibration point: The middle hole of the heat block. Fill with
paraffin oil and soak the thermometer bulb.
6-2
Drybath Incubator
Thermo Scientific
Failure Analysis and
Troubleshooting
Section 7
This chapter details possible failures of this instrument, an explanation and
troubleshooting.
Failure Analysis and Troubleshooting
No.
1
Error
Display window is not turned on after
switching on power supply
Cause
Solution
Power supply fails to be connected
Check power supply and connect it
Fuse burned out
Replace fuse
Damage of the switch
Replace the switch
Others
Contact Thermo Fisher Scientific
2
Temperature display window shows “001”
and the buzzer alarms in a di…di…sound
Short circuit of sensor
Check whether the connecting wire of
sensor is damaged, and replace it
3
Temperature display window shows “002”
and the buzzer alarms in a di…di…sound
Open circuit of sensor
Check whether the connecting wire of
sensor is damaged, and replace it
5
Temperature display does not conform to
actual temperature
Sensor is damaged or in poor
contact
Contact Thermo Fisher Scientific
Caution The user is not allowed to open the housing of the instrument for
inspection during the warranty period. If any failures result from opening
the housing for inspection, contact Thermo Fisher Scientific. ▲
Thermo Scientific
Drybath Incubator
7-1
Section 7
Failure Analysis and Troubleshooting
Modular Block Accessories:
7-2
Drybath Incubator
HEATING BLOCKS
NO.OF HOLES
CAT NO
For 6mm test tubes
46
88870101
For 10mm test tubes
28
88870102
For 1.5ml test tubes
28
88870103
For 2.0ml test tubes
28
88870104
For 12mm & 13mm test tubes
24
88870105
For 15mm & 16mm test tubes
15
88870106
For 17mm & 18mm test tubes
12
88870107
For 20mm test tubes
8
88870108
For 25mm test tubes
6
88870109
For 0.5ml test tubes
40
88870110
For 96 well Elisa plate
1
88870111
For mixed size test tubes;
32 holes for 6mm test tubes
21 holes for 10mm test tubes
32 + 21
88870112
For mixed size test tubes;
18 holes for 1.5ml test tubes
10 holes for 2.0ml test tubes
18 + 10
88870113
For mixed size test tubes
3 holes for 25mm test tubes
12 holes for 13mm test tubes
6 holes for 6mm test tubes
3 +12 + 6
88870114
For mixed size test tubes;
30 holes for 0.5ml test tubes
20 holes for 0.2ml test tubes
30 + 20
88870115
For 15 ml flat bottom test tubes
15
88870116
For 50 ml flat bottom test tubes
4
88870117
For 15ml conical bottom test tubes
15
88870118
For 50ml conical bottom test tubes
4
88870119
For 96 well none skirted PCR plate
1
88870120
For 96 well half / full skirted PCR plate
1
88870121
Thermo Scientific
Appendix 1: Wiring Diagram
(The page is just for reference and is subject to change without prior notice)
Thermo Scientific
Drybath Incubator
8-1
Thermo Scientific
Rev. 0 9/13
If equipment service is required, please call your Technical Services Department at 1-800-438-4851 (USA and Canada) or 1-740-373-4763. We're ready
to answer your questions on equipment warranty, operation, maintenance, service and special application. Outside the USA, contact your local distributor for warranty information.
Your local Thermo Sales Office is ready to help with comprehensive site preparation information before your equipment arrives. Printed instruction manuals carefully detail equipment installation, operation and preventive maintenance.
THIS WARRANTY IS EXCLUSIVE AND IN LIEU OF ALL OTHER WARRANTIES, WHETHER WRITTEN, ORAL OR IMPLIED. NO WARRANTIES
OF MERCHANTABILITY OR FITNESS FOR A PARTICULAR PURPOSE SHALL APPLY. Thermo shall not be liable for any indirect or consequential
damages including, without limitation, damages relating to lost profits or loss of products.
Replacement or repair of components parts or equipment under this warranty shall not extend the warranty to either the equipment or to the component part beyond the original warranty period. The Technical Services Department must give prior approval for return of any components or equipment.
At Thermo's option, all non-conforming parts must be returned to Thermo Fisher Scientific postage paid and replacement parts are shipped FOB destination.
During the first two (2) years, component parts proven to be non-conforming in materials or workmanship will be repaired or replaced at Thermo's
expense, labor included. Installation and calibration are not covered by this warranty agreement. The Technical Services Department must be contacted for warranty determination and direction prior to performance of any repairs. Expendable items, glass, filters and gaskets are excluded from this
warranty.
The Warranty Period starts two weeks from the date your equipment is shipped from our facility. This allows for shipping time so the warranty will go
into effect at approximately the same time your equipment is delivered. The warranty protection extends to any subsequent owner during the first year
warranty period.
THERMO FISHER SCIENTIFIC STANDARD PRODUCT WARRANTY
Section 8
Warranty Information
Drybath Incubator
9-1
thermoscientific.com
© 2014 Thermo Fisher Scientific Inc. All rights reserved. All trademarks are the property of Thermo Fisher Scientific and its
subsidiaries. Specifications, terms and pricing are subject to change. Not all products are available in all countries. Please consult your
local sales representative for details.
For the name of the authorized Thermo Scientific product dealer nearest you or any additional information, contact us:
North America: USA / Canada +1-866-984-3766 (866-9-Thermo), www.thermo.com
Europe: Austria +43 1 801 40 0, Belgium +32 2 482 30 30, France +33 2 2803 2180, Germany national toll free 08001-536 376,
Germany international +49 6184 90 6940, Italy +39 02 02 95059, 434-254-375, Netherlands +31 76 571 4440,
Nordic/Baltic countries +358 9 329 100, Russia / CIS +7 (812) 703 42 15, Spain / Portugal +34 93 223 09 18,
Switzerland +41 44 454 12 12 , UK/Ireland +44 870 609 9203.
Asia: China +86 21 6865 4588 or +86 10 8419 3588, India toll free 1 800 22 8374, India +91 22 6716 2200,
Japan +81 45 453 9220, Other Asian countries +852 2885 4613.
Countries Not Listed: +49 6184 90 6940 or +33 2 2803 2180
A Thermo Fisher Scientific Brand


![TSD Series -40C ULT User Manual [EN]](http://vs1.manualzilla.com/store/data/005634658_1-66c9db561a67486106446026c707a26c-150x150.png)


![Cryogenic Freezer - User Manual [EN]](http://vs1.manualzilla.com/store/data/005841262_1-77d7cc3403393239d9b8135bfb24ee2c-150x150.png)