1
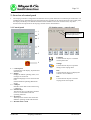
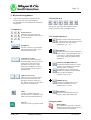
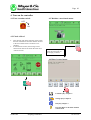
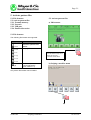
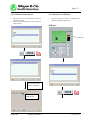
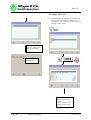
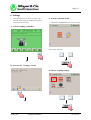
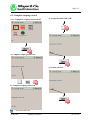
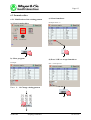
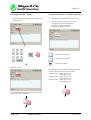
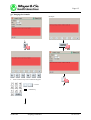
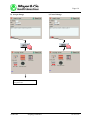
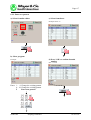
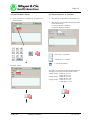
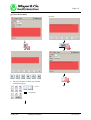
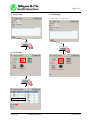
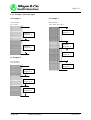
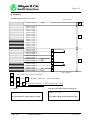
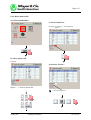
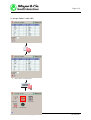
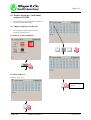
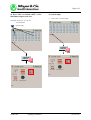
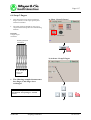
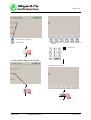
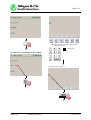
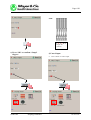
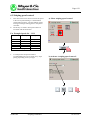
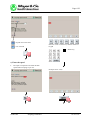
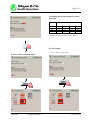
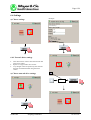
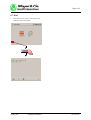
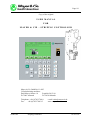
Page 0/1 Copy of the original USER MANUAL FOR M AY E R & C I E – S T R I P I N G C O N T R O L L E R Mayer & Cie GmbH & Co. KG Circular knitting machines Emil-Mayer-Strasse 10 Postfach 20 15 80 D-72461 Albstadt D-72438 Albstadt Telephone: +49 (0)7432 700-0 Fax: +49 (0)7432 700315 02/09 GB Striping Controller e-mail: [email protected] www.mayercie.com 01 99 33.0 Page 0/2 Information concerning the Manual: This Manual is intended to explain setup, function and operation of the striping controller. While the attached pictures and drawings show the essential features of the controller and the program, they are not binding with regard to the accuracy of any dimensions or details. This document shall be subject to deviations and modifications. This Manual shall be made available to any person requiring it and shall be read before any intervention in the machine is carried out. The information presented in this Manual is subject to modification and amendment without any further notification. Mayer & Cie. GmbH & Co. does not bind itself in any way in this context. No part of this Manual may be reproduced in any way (e.g. by photocopy, microfilm or any other process) or processed, duplicated or publicized by electronic means without the prior written consent of Mayer & Cie. GmbH & Co.. The present Manual describes all options and features of a striping controller without taking into account any specific machine type or machine version. Any components or facilities not forming part of the standard version of a machine will only be supplied against a specific customer order and payment of any additional costs incurred. No rights can be derived from this Manual for equipping the machine with such facilities or components. The spare parts catalogue shall be decisive for the ordering of spare parts. Only original Mayer parts may be used. Specific attention is drawn to the safety regulations and the measures to be taken in hazardous areas. Protective and safety facilities shall not be rendered inoperative. Any intervention or work shall be performed by experts only, taking into account the general safety and accident prevention rules. Machine operators shall be appropriately instructed and trained. 02/09 GB Striping Controller This Manual forms a constituent part of the machine. In the case of a machine resale, this Manual shall be supplied to the buyer together with the machine. Mayer & Cie. GmbH & Co. reserves all rights in and to this Manual, in particular the right of duplication, publication and translation. © 2008 Mayer & Cie. GmbH & Co., Albstadt, Germany 01 99 33.0 Page 0/2 Information concerning the Manual: This Manual is intended to explain setup, function and operation of the striping controller. While the attached pictures and drawings show the essential features of the controller and the program, they are not binding with regard to the accuracy of any dimensions or details. This document shall be subject to deviations and modifications. This Manual shall be made available to any person requiring it and shall be read before any intervention in the machine is carried out. The information presented in this Manual is subject to modification and amendment without any further notification. Mayer & Cie. GmbH & Co. does not bind itself in any way in this context. No part of this Manual may be reproduced in any way (e.g. by photocopy, microfilm or any other process) or processed, duplicated or publicized by electronic means without the prior written consent of Mayer & Cie. GmbH & Co.. The present Manual describes all options and features of a striping controller without taking into account any specific machine type or machine version. Any components or facilities not forming part of the standard version of a machine will only be supplied against a specific customer order and payment of any additional costs incurred. No rights can be derived from this Manual for equipping the machine with such facilities or components. The spare parts catalogue shall be decisive for the ordering of spare parts. Only original Mayer parts may be used. Specific attention is drawn to the safety regulations and the measures to be taken in hazardous areas. Protective and safety facilities shall not be rendered inoperative. Any intervention or work shall be performed by experts only, taking into account the general safety and accident prevention rules. Machine operators shall be appropriately instructed and trained. 02/09 GB Striping Controller This Manual forms a constituent part of the machine. In the case of a machine resale, this Manual shall be supplied to the buyer together with the machine. Mayer & Cie. GmbH & Co. reserves all rights in and to this Manual, in particular the right of duplication, publication and translation. © 2008 Mayer & Cie. GmbH & Co., Albstadt, Germany 01 99 33.0 Page 1/1 1. Table of Contents: 0. Cover sheet .............................................................................................................. 0/1 ... 0/2 1. Table of contents ..................................................................................................... 1/1 2. Overview of control panel ....................................................................................... 2/1 3. Keyboard layout ...................................................................................................... 3/1 4. Turn on controller.................................................................................................... 4/1 5. Activate pattern files................................................................................................ 5/1 ... 5/4 5.1 File formats........................................................................................................ 5/1 5.2 Activate pattern files.......................................................................................... 5/1 ... 5/4 6. Settings .................................................................................................................... 6/1 ... 6/26 6.1 Complete striping control .................................................................................. 6/1 ... 6/2 6.2 Formula editor (with example) .......................................................................... 6/3 ... 6/14 6.3 Feeder shutdown................................................................................................ 6/15 ... 6/16 6.4 Swap 2-finger ................................................................................................... 6/17 ... 6/20 6.5 Striping speed control........................................................................................ 6/21 ... 6/23 6.6 Settings (view)................................................................................................... 6/24 ... 6/25 6.7 End..................................................................................................................... 6/26 7. Info........................................................................................................................... 7/1 Update record........................................................................................................... Ä/1 Ensure observation of and compliance with the generally safety regulations of the knitting machines! Subject to modifications and amendments! © 2008 Mayer & Cie. GmbH & Co., Albstadt, Germany 02/09 GB Striping Controller 01 99 33.0 Page 2/1 2. Overview of control panel • The striping controller is integrated in the machine control system and forms a constituent part of the latter. It is intended for use in mechanical stripers and comprises the programs for the striping functions. The control panel, the display and the keys are identical with those of the machine control unit. For this reason, only those functions that are important for the striping controller will be described here. 2.1 Control panel 2.2 Striping menu – control panel 1 2 Status of knitting machine Activated pattern file 3 4 5 Load files Use the function key F1 to load the current pattern file. 6 1 = Control panel Complete unit with display, keyboard and function keys 2 = Display Display to indicate operating states, error messages or menu texts. Different languages can be chosen for the texts. See the Machine Operating Manual for details. 3 = USB port Interface where data can be read in using a USB stick. 4 = Function keys The function keys provide direct and fast access to certain menu items and operating functions. 5 = Keyboard The keyboard is used to enter and select different operating modes and functions. 6 = Machine mains switch 02/09 GB Striping Controller Settings Use the function key F2 to perform settings in the striping menu. Info Use the function key F3 to display the software version installed. Exit Use the function key F6 to exit the striping menu control panel. 01 99 33.0 Page 3/1 3. Keyboard assignment • Only the key assignments important for the striping controller will be described here. See the Machine Control Manual for further key assignments. The function keys offer direct and fast access to certain menu items and operating functions. 3.1 Input keys Numerical keys: These keys are used to select or pre-select indivudual menu items or numerical values. ENTER key: This key is used to accept and start a pre-selected menu item or a preselected numerical value. Left/right arrow keys: In the case of a YES/NO prompt (ON/FF prompt), these keys can be used to move from YES to NO (ON/OFF) or from NO to YES (OFF/ON). In addition, the cursor position within a line is selected with these keys. Up/down arrow keys: These two keys are used to switch from one menu item to the next during pre-selection. These keys may also be used to move the cursor to a position in another line. M key: This key is used activate or deactivate functions. In addition, input fields can be selected with this key. ESC key This key is used to go back in menu 02/09 GB 3.2 Function keys Striping Controller 3.3 Formula input keys P key: Is entered with the function key F1. This function can be used to combine several pattern files into one file. Example P5 = P1 + P3 FINGER key: The function key F2 is used to select the finger (colour). After pressing this key, it is necessary to enter the finger number of the striper using the numerical keys. Example C4 OPEN/CLOSE BRACKET key: Is entered with the function keys F3/F4. Is used to create brackets for formulas. When a bracket is formed, a multiplication sign is automatically generated in connection with a number before or after the bracket. Example: 12*(C1+C2) ADDITION key: Is entered with the function key F5. Is used for the addition of rows. Example: 20 C1 + 30 C2 DELETE key: Is entered with the function key F6. Is used to delete individual inputs. 3.4 Input symbol Hand symbol: In this Manual, this is used as selection symbol to show that the appropriate keys or functions have to be pressed. 01 99 33.0 Page 4/1 4. Turn on the controller 4.1 Turn on mains switch 4.3 Machine control main menu OFF ON 4.2 Check oil level • • This message will appear after the power supply has been switched on. It means that the oil level in the oiler and the waste oil tank has to be checked. In the machine control, this message can be selected with YES or NO under the menu item “Check oil level“. Use the function key F6 to select the main menu of the striping controller. 4.4 Ringel control menu Load files [F1]: Chapter 5 Settings [F2]: Chapter 6 Info [F3]: Chapter 7 Exit [F4]: Back to the main machine control menu 02/09 GB Striping Controller 01 99 33.0 Page 5/1 5. Activate pattern files 5.1 File formates 5.2 Activate pattern files 5.2.1 Formula memory 5.2.2 Network 5.2.3 USB port 5.2.4 Further directories 5.2 Activate pattern files a) Main menue 5.1 File formates The following file formats are supported: File type .m c t Content - Pattern files - Software Updates EMS - MADA - Striping data .r n m .r n f Use the function key F6 to select the striping controller main menu. .r n g .r n 2 .r n 6 .gz - Software Update Control panel eCP (from version 1.4) b) Striping controller menu Only known file formats can be loaded. 02/09 GB Striping Controller 01 99 33.0 Page 5/2 c) Directory selection 5.2.1 Selection from formula memory Pattern files can be chosen from the following directories. • Formula (formula memory) • Network (network) • Usbstick (USB port) • Here a pattern file generated with the formula editor (Chapter 6) can be activated. Selection key Use the selection key F6 or the Enter key to select a directory or a file. Cancel key Press the cancel key F1 to cancel your selection. Delete Key Press the delete key F3 to delete a directory or a sample file. Insert Key Press the insert key F4 to insert a directory or a sample file. Copy Key Press the copy key F5 to copy a directory or a sample file. Up/down arrows Use the UP arrow and DOWN arrow keys to select the directory or the file. 02/09 GB Striping Controller Activated sample file 01 99 33.0 Page 5/3 5.2.2 Selection from network 5.2.3 Selection via USB port • • • Pattern files can be activated from internal or external networks. Network activation depends on the respective plant operator. The pattern file is activated via a USB stick or another compatible application. USB port: USB port Select pattern file from directory and activate with F6 or ENTER. Activated sample file 02/09 GB Striping Controller 01 99 33.0 Page 5/4 5.2.4 Other directories • Further and general data relating to the knitting section can be viewed and stored here, e.g. configuration data. These are not relevant for the loading of pattern files. Example: Select pattern file from directory and activate with F6 or ENTER. Activated sample file Select file from directory and activate with F6 or ENTER. Press F1 to return to the striping or main menu. 02/09 GB Striping Controller 01 99 33.0 Page 6/1 6. Settings • This menu item can be used to activate or deactivate certain functions. Furthermore, pattern files may be entered here. c) Activate selection menu • Menu items highlighted in red can be activated. a) Activate striping controller: Select menu item with b) Activate the “Settings“ menu d) Choose striping settings 02/09 GB Striping Controller 01 99 33.0 Page 6/2 6.1 Complete striping control 6.1.1 Copmplete striping control on/off c) Accept selection with “OK“ a) Complete striping control on d) Cancel selection b) Complete striping control off = Activation indicator 02/09 GB Striping Controller 01 99 33.0 Page 6/3 6.2 Formula editor 6.2.1 Modification of the existing pattern c) Select formula no. a) Select formula editor Example: Enter “1“ b) Select program d) Press “OK“ to accept formula no. Example: Exit = cancel process Enter: 1 – 14 Change existing pattern 02/09 GB Striping Controller 01 99 33.0 Page 6/4 e) Change formula “Name“ f) Choose between 1 or 2 feeders (systems) • • This funktion is depending from machine typ • This function can be used to choose if the striping pattern will be knitted with 1 striper per feeder (1 feeder) or 2 stripers per feeder (2 feeders). Enter the name as a combination of numbers via the keyboard. = Selection 1 or 2 feeders = Selection 1 or 2 feeders = Activation indicator Example “12345“ If 2-feeders are selected, the following designations apply for the finger selection of the stripers: 4-finger striper: Feeder A C1 to C3 Feeder B C4 to C6 5-finger striper: Feeder A C1 to C5 Feeder B C6 to C10 6-finger striper: Feeder A C1 to C6 Feeder B C7 to C12 If no further modifications are required, confirm the input with “OK“ or “ENTER“. 02/09 GB Striping Controller 01 99 33.0 Page 6/5 g) Changing the formula Example: 5 • Enter via the F keys or the numerical keypad. = Cursor = Delete key 02/09 GB Striping Controller 01 99 33.0 Page 6/6 h) Accept change i) Cancel change See Chapter 5 for activation of the pattern file 02/09 GB Striping Controller 01 99 33.0 Page 6/7 6.2.2 Enter new pattern a) Select formular editor c) Select formula no. Example: Enter “5“ b) Select program d) Press “OK“ to confirm formula number Example: Exit = Cancel Enter: 1 – 4 Change the existing pattern 6 – 14 Change the existing pattern 5 Enter new pattern 02/09 GB Striping Controller 01 99 33.0 Page 6/8 e) Enter formula “Name“ f) Choose between 1 or 2 feeders • • This funktion is depending from machine typ • This function can be used if the striping pattern will be knitted with 1 striper per feeder (1 feeder) or 2 striper per feeder (2 feeders). Enter the name as a combination of numbers via the keyboard. = Selection 1 or 2 feeders = Selection 1 or 2 feeders = Activation indicator Example “54321“ If 2 feeders are selected, the following designations will apply to the finger selection of the stripers: 4-finger striper: Feeder A C1 to C3 Feeder B C4 to C6 5-finger striper: Feeder A C1 to C5 Feeder B C6 to C10 6-finger striper: Feeder A C1 to C6 Feeder B C7 to C12 02/09 GB Striping Controller 01 99 33.0 Page 6/9 g) Enter the formula Example: • Enter the formula via the F keys and the numerical keypad. = Cursor = Delete key 02/09 GB Striping Controller 01 99 33.0 Page 6/10 h) Accept input k) Cancel input • Press “Exit“ to cancel input i) Check input 02/09 GB Striping Controller 01 99 33.0 Page 6/11 6.2.3 Example of formula input a) Example 1 c) Example 3 Enter formula: 12C1+12C2 Enter formula: 10C1+14C2+8C3+16C4 12 Rows Finger No. 2 12 Rows Finger No. 1 16 Rows Finger No. 1 8 Rows Finger No. 2 14 Rows Finger No. 3 b) Example 2 Enter formula: 8C1+8C2+9C3 10 Rows Finger No. 4 9 Rows Finger No. 3 8 Rows Finger No. 2 8 Rows Finger No. 1 02/09 GB Striping Controller 01 99 33.0 Page 6/12 d) Example 4 The following pattern is to be created: 52 Rows Finger 6 26 Rows Finger 4 26 Rows Finger 3 26 Rows Finger 4 26 Rows Finger 3 26 Rows Finger 4 26 Rows Finger 3 26 Rows Finger 4 26 Rows Finger 3 20 Rows Finger 2 20 Rows Finger 1 20 Rows Finger 2 20 Rows Finger 1 20 Rows Finger 2 20 Rows Finger 1 26 Rows Finger 4 26 Rows Finger 3 26 Rows Finger 4 26 Rows Finger 3 26 Rows Finger 4 26 Rows Finger 3 26 Rows Finger 4 26 Rows Finger 3 20 Rows Finger 2 20 Rows Finger 1 20 Rows Finger 2 20 Rows Finger 1 20 Rows Finger 2 20 Rows Finger 1 A End of pattern 52C6 B B A 4x (26C3+26C4) *4 3x 2x 26C3 + 26C4 26C3 1x A 3x (20C1+20C2)*3 2x 20 C1 + 20 C2 1x 20 C1 Start of pattern = (20C1+20C2)*3 + (26C3+26C4)*4 A + A = 2* A = 2*((20C1+20C2)*3 + (26C3+26C4)*4) A + A + B = 2*((20C1+20C2)*3 + (26C3+26C4)*4) + 52C6 2nd option through formula rearrangement 1st option Formula P12 : XYZ Formula P12 : XYZ 2*((20c1+20c2)*3+(26c3+26c4)*4)+52c6 2*(3*(20c1+20c2)+4*(26c3+26c4))+52c6 02/09 GB Striping Controller 01 99 33.0 Page 6/13 6.2.4 Delete pattern file a) Select formula editor c) Select formula no. Example: Formula no. 1 will be deleted. Input “1“ b) Select pattern file Example: d) Activate “Delete“ Input: 1 – 14 select pattern file = Activation indicator 02/09 GB Striping Controller 01 99 33.0 Page 6/14 e) Accept “Delete“ with “OK“ • Press “Exit“ to cancel input 02/09 GB Striping Controller 01 99 33.0 Page 6/15 6.3 Feeder shutdown – individual stripers ON/OFF • This menu item can be used to select and turn on or shut down individual stripers. a) Complete striping controller ON • The complete striping controller must be activated. (see chapter 6.1) b) Activate “feeder shutdown” b) Select striper no. Example: striper no. 2 Repeat process as required 02/09 GB Striping Controller 01 99 33.0 Page 6/16 d) Press “OK“ to confirm “OFF“ of the individual stripers and save. d) Cancel input • Press “Exit“ to cancel input. Example: stripers no. 2, 8, 20, 26 are turned off. = Stripers OFF 02/09 GB Striping Controller 01 99 33.0 Page 6/17 6.4 Swap 2 fingers • This menu item can be used to exchange 2 fingers (colours) on the striper quickly and without much effort. • The input of fingers depends on the type of striper and the running direction of the knitting machine. a) Select “Swap 2 fingers“ Example: 6-finger striper clockwise Running direction of machine b) Activate “Swap 2 fingers 1 2 3 4 5 6 Finger No. (colour) • The following example demonstrates how finger 2 and finger 4 are exchanged When another pattern file is activated, the function “Swap 2 fingers” remains active! 02/09 GB Striping Controller 01 99 33.0 Page 6/18 = Swap 2 fingers activated • = not activated Enter the values via the F keys and the numerical keypad = Delete key c) Enter the first finger to be swaped Example: Enter “Finger 2“ 02/09 GB Striping Controller 01 99 33.0 Page 6/19 Î Enter the values via the F keys and the numerical keypad. = Delete key d) Enter the second finger to be swaped Example: Enter “Finger 4“ 02/09 GB Striping Controller 01 99 33.0 Page 6/20 NEW: 1 4 3 2 5 6 Finger No. (colour) e) Press “OK“ to confirm “Swap 2 fingers“ f) Cancel input • 02/09 GB Striping Controller Press “EXIT“ to cancel input 01 99 33.0 Page 6/21 6.5 Striping speed control • • This menu item can be used to increase the speed in the case of plain knitting to “rated machine speed without striping“. The precondition is that no finger exchange is taking place in the pattern controller. The factory-set rated or limit speed cannot be increased with this menu item. a) Select striping speed control For Example Speeds S4 – 3.2 R Diameter Inches 26 30 34 Rated speed Limit speed rpm *25/37 *22/35 *20/31 rpm *30/40 *26/39 *23/34 *with/without striping • A rated speed of 20 rpm maximum is recommended in the case of single jersey stripe plating, depending on the yarn type. 02/09 GB Striping Controller b) Activate “striping speed control“ 01 99 33.0 Page 6/22 = Speed control activated Enter the values via the F keys and the numerical keypad = not activated = Delete key c) Enter the speed • The input corresponds to the rated machine speed without stripingl in per cent. Example: Enter “42%“ 02/09 GB Striping Controller 01 99 33.0 Page 6/23 e) Striping speed with the speed control activated Diameter Zoll 26 30 34 Speed* rpm 30% 11 10 9 40% 15 14 12 S4-3.2R 50% 19 18 16 60% 22 21 19 *Slight deviations in the values are possible f) Cancel input • Press “Exit“ to cancel input d) Press “OK“ to confirm input 02/09 GB Striping Controller 01 99 33.0 Page 6/24 6.6 Settings Example: a) Choose settings //mctee02//ecp ecp **** mct 6.6.1 Network drive settings • • • This menu item is used to select the network and grant access rights. Inputs are only possible via a browser. Any changes will be accepted only after the unit has been switched ON/OFF using the mains switch. a) Choose network drive settings Back 02/09 GB Striping Controller 01 99 33.0 Page 6/25 6.6.2 Machine data MADA • With this menu item you can see the actual machine data and machine settings. b) Back into selection menu a) Choose machine data Back ─ + = look into different pages with ENTER 02/09 GB Striping Controller 01 99 33.0 Page 6/26 6.7 End • This menu item is used to switch back to the machine control main menu. 02/09 GB Striping Controller 01 99 33.0 Page 7/1 7. Information • Press Function key F3 to display the installed version of the software. a) Striping menu control panel b) Information display Back to striping menu control panel 02/09 GB Striping Controller 01 99 33.0 Page Ä/1 Update record: Update index OLD NEW --07/08 07/08 02/09 02/09 GB Chapter no. 01 99 33.0 01 99 33.0 Striping Controller Chapter 0-7 0-7 Pages all all Release date 26.08.2008 16.02.2009 01 99 33.0