1
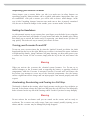
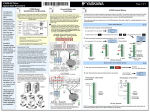
Table of Contents
All Weather Scooter
User Manual
Scooter Part Diagrams ..................................................................................................................................1
Riding Instructions .........................................................................................................................................2-5
Operating Instructions ...............................................................................................................................6-7
The Battery .....................................................................................................................................................8-12
Technical Data ...............................................................................................................................................13-14
Maintenance and Troubleshooting .......................................................................................................15-16
Scooter Part Diagrams
Diagram 1: The All Weather Electric Scooter
.
10
1
11
2
9
7
12
8
3
4
5
6
1.
2.
3.
4.
5.
6.
7.
8.
9.
10.
11.
12.
Seat
Rear Lights / Indicators
Anti-tip wheels
Rear Wheel(s)
Foot Rest
Front Wheel(s)
Headlights
Turn Signals
Windshield Wiper
Control Panel
Mirrors
Door handle
Diagram 2: The Handlebars and Controls
This diagram illustrates the various parts of your scooter. Please note that many of these parts are not user-serviceable and should be repaired only by trained professionals. This is especially true of the electrical
4 8 9
systems and the mechanical components.
ts.
5
3
1. Accelarator
2. Reverse
3. Steering wheel
4.
5.
6.
2
6
7
Speed control
Turn signals
Headlight switch
1
7. Horn
8. Battery indicator
9. FreeWheel switch
1
Riding Instructions
This guide assumes that you already know how to ride a standard scooter. Before you try
to ride an electric scooter, you should be very familiar with controlling and balancing a
normal scooter.
Caution
If you do not have cycling experience, an e-scooter is too dangerous to ride. Do not begin
learning to ride a scooter using an e-scooter.
Important Notes
• Escooters are Fast! E-scooters are capable of traveling at higher speeds than
many scooter riders are accustomed to. Use caution at all times, especially when
travelling in mixed terrain. Always take into account driving and traveling
conditions.
• Obey the Law. Be sure to follow all traffic laws. This includes obeying stop
signs, checking carefully when turning, and riding defensively. An e-scooter is a
motorized vehicle, even though it is classed as a scooter. You must follow the
law.
• Stay Sober. Never ride your scooter while intoxicated. An e-scooter is capable of
traveling faster than a normal scooter, and you should always be in control of it.
• Share the Road. Be careful in mixed traffic. When on scooter paths, traveling near
pedestrians, or on recreational trails, try to be polite and courteous to those using
the paths with you. E-scooters are new in most cities, so other users of the roads
and recreational paths may not know how to deal with e-scooter riders. Bear in
mind that, in a sense, e-scooter riders are “ambassadors” for this new method of
transportation.
2
Inspecting your Electric Scooter
Always inspect your e-scooter before you ride it, to make sure its safety features are
operating properly. Many accidents can be avoided with routine inspections. Once you
are comfortable with your e-scooter, you will be able to detect small changes in the
way it feels. If anything changes between uses, make sure to have it properly examined.
Also, be sure to listen for changes in the sounds your e-scooter makes over time.
Holding the Handlebars
As with a normal scooter or gas scooter, place your fingers over the brake levers, using the
palms of your hand and your thumbs to wrap around and under the handle grips. Doing
this allows you to activate the brakes easily, by squeezing your hand, in case you have to
stop quickly. This is the safe way to control your electric scooter.
Turning your E-scooter On and Off
To turn on your e-scooter, insert the key into the “ignition”, located just below the dash
board, and turn the key to the right. When your e-scooter is activated, the power indicator
will light and the battery charge indicator will jump, showing you how much power your
e-scooter has. To turn off the e-scooter, simply turn the key to the left, and remove the
key.
Warning
When you activate the e-scooter, the electrical system becomes live. Do not try to
affect changes to the E-scooter (such as removing the battery or repairing electrical
components) while the E-scooter is activated. Turn the E-scooter off and remove the
key before you attempt to access any of the electrical components. Also, the battery
carries a significant electric charge and can injure people if not treated properly and with
respect.
Accelerating, Decelerating, and Coming to a Full Stop.
The throttle is found on the steering wheel. Apply pressure on the green lever (right) to go
forward. To decelerate, release the right lever and press the red (left) lever. The emergency
brake is located on the top left of the steering wheel. Use this if you need to stop abruptly.
Warning
Do not activate the accelerator until you are seated on the scooter and are ready to
accelerate. The e-scooter can easily escape from your control, possibly injuring you or
others, and the e-scooter may be damaged by being dropped.
3
Safety Tips
Please keep the following in mind to prevent any unwanted injury or damage.
- DO NOT carry passengers
- DO NOT drives across a slope
- DO NOT drink and drive
- DO NOT tow a trailer
- DO NOT use a distracting device such as a cell phone while driving
- DO NOT exceed inclines over 8 degrees
- DO NOT turn on steep inclines
- DO NOT turn suddenly at high speeds
- DO NOT get on or o the scooter unless the brakes are on and the scooter is o
- DO NOT switch the scooter o while in motion
- DO NOT drive the scooter where you cannot safely walk (roads, streets, etc.)
- DO NOT attempt to drive over curbs greater than 2” in height
- DO NOT exceed the suggested user weight limit
- DO NOT use an escalator; please opt for the elevator
- DO NOT drive on an incline with oil, water, or ice on it
- DO NOT use parts or accessories that are not authorized
- DO NOT connect any medical devices to the scooter battery
On the Road
Please adhere to the following recommendations to ensure your safety.
- DO NOT drive in the rain
- DO NOT drive in or on snow
- DO NOT drive o -road or on any uneven surfaces
- DO NOT drive in tra c
- DO NOT reverse unless you are certain there are no obstacles behind you
- DO NOT make sudden stops, weave erratically, or make sharp turns
- DO NOT extend your arms or legs outside of the scooter while in operation
- DO NOT attempt to climb curbs greater than 2”
- DO NOT attempt to cross a gap greater than 3”
- DO NOT attempt to climb a hill greater than 10”
- DO NOT attempt to drive across a sloping surface greater than 8”
- DO NOT drive at full speed on a decline
- DO NOT get on or o the scooter when on a hill
4
Turning Signal Lights
Your e-scooter has turn signal lights. The turn signal activator is on the left handlebar. Push
it left or right to activate it to indicate that you are turning in the appropriate direction,
and press the middle of the button to turn it off. The turn signals also emit a noise, to
ensure that everyone knows you are turning. This turn signal cannot be disabled without
also disabling the visual signal.
Lights
The headlight and taillight are useful features when you are riding at night or in dark areas.
They radically improve your safety in mixed traffic. The switch is located on the left handlebar. The lights on your e-scooter consume some electricity. Keeping them on may reduce
the maximum distance you can travel on one charge by about 5 %.
Riding in Wet Weather
Your e-scooter is designed to function in wet conditions, such as when it is raining.
However, because the motor is on the rear wheel, it is easy to slip when moving at high
speeds. If it is very wet, be sure to avoid high speeds.
When you are traveling in wet weather, water may cause your brakes to function less
efficiently because it reduces friction between the brake pads and the wheels. Take care
to slow down and give yourself more room to stop or slow if necessary.
Riding in Cold Weather
Your e-scooter is designed to operate year-round. However, in very cold conditions or
when there is a lot of snow or slush on the ground, it is possible for the motor in the
e-scooter to get wet or for the brakes to function less efficiently, just as can happen in wet
weather. Below 10 degrees Celsius, the battery will not work as well as it would in
warmer temperatures.
While Lithium-Ion batteries perform better than Lead-Acid batteries in temperature
extremes, both will experience reduced performance in cold temperatures.
Also, riding the e-scooter in cold temperatures may require you to replace the battery
sooner rather than later.
5
Operating Instructions
Getting Started
Before the first use, you must charge your scooter completely. This should take
approximately 8 to 12 hours.
Getting On/Off
Before getting on or off your scooter, always make sure that the keys are not in the ignition
and that the scooter is off. This is a safety measure to prevent any unwanted injury due to
accidental engaging of levers. Make sure the door is completely closed before moving.
Parking and Locking your E-scooter
When you want to park your e-scooter for a short time, either when you have reached your
destination or are at home, follow these steps:
1. Stop the e-scooter and position it as you want it.
2. Get off the e-scooter, making sure to keep it balanced.
3. Close the door, and use the key to lock it.
Forward and Reverse
First, make sure you are seated comfortably. Put the key into the ignition and turn the
scooter on. You will know that the scooter is active when the LEDs light up on the control
panel. Set your scooter to the lowest speed possible. You may adjust the speed once you
are comfortable with operating the scooter.
Start by gently squeezing the right lever. Gradually apply more pressure to the lever and
the scooter will begin to pick up speed. If you have set your speed to the lowest, your top
speed will be restricted.
Once you are in motion, gently release the lever and the scooter will smoothly come to a
stop. Repeat moving forward and braking a few times to get used to the motion.
Next is to practice reversing. To reverse, gradually squeeze the left lever. Same as before,
the more pressure applied to the lever, the faster the scooter will move. Practice reversing
and stopping a few times to used to the motion.
6
Steering
Steering the scooter is effortless and simple. Before you begin your practice, ensure that
there are no obstacles in the way.
To steer, simply rotate the tiller (handlebars) to the desired direction; the more you rotate,
the more sharp the turn. Begin by slowly moving forward and steering the tiller at small
angles; gradually increase the angle for your turn to familiarize yourself with the maximum turning radius.
Practice by making gentle “S” patterns in both forward and reverse as much as necessary.
When steering through limited spaces (such as a doorway or hallway), make sure to mind
the width of your scooter. When approaching doorways, take your time and proceed slowly to prevent injury to yourself or others or damage to the scooter.
When turning around corners, always keep a safe distance from the wall you are turning
towards. Most importantly, you want to ensure that your rear tires will clear the corner
without getting caught.
Never turn sharply while the scooter is at top speed! Always exercise caution when taking
corners. Failure to do so can cause injury and damage.
Turning off FreeWheel mode
When you first turn on your e-scooter, you may notice the battery indicator flash. This
means the scooter is on FreeWheel mode and it will not allow for drive functions. FreeWheel mode puts the scooter in a neutral mode so it can be pushed while parked.
To turn o f f FreeWheel mode, locate the lever located in the rear, next to the rear
shocks. Place it in the down position. Doing so will lock the wheels when parked, and this
will allow the scooter to accelerate normally.
Long-Term Storage of your E-scooter
If you are storing your scooter for a long period, disconnect the circuit breaker. This is a
safer way to store the electric scooter, as it prevents accidental activation of the e-scooter
and makes it impossible to activate it even with the key.
Please see the section titled “Your Battery” for instructions on battery maintenance while
your e-scooter is being stored.
7
The Battery
The All Weather Scooter utilizes two maintenance free, sealed lead acid batteries. Battery
performance is affected by various factors including: temperature, terrain, the weight of
the user, and overall usage for the batteries. The battery level indicator is only a guide for
judging the amount of charge in the batteries. The true charge of the batteries will display
once the scooter is in drive.
To optimize the battery life, only charge the scooter once the batteries are at
approximately 20%
When storing your unit, be sure to charge the scooter at least once every two weeks to
optimize the battery’s life. Leaving the batteries completely discharged can cause irreversible
damage to the batteries and may need to be replaced.
Charger and Charging
To charge your scooter, first make sure that its off. Plug the charger into the charging port and
then plug the charger into the outlet. Once connected, a red light should appear on the
charger; this indicates the scooter is being charged. When the scooter is completely
charged, the charger will automatically terminate the charge and the light will turn green.
The charger requires a minimum feedback voltage signal from the batteries in order to
begin the charging cycle. If your batteries are severely discharged for a long period of time,
the charge may not receive the necessary feedback and therefore the batteries will not
charge. If this occurs, contact your nearest dealer for assistance.
Always insert the charger into your scooter before the outlet. Failure to do so has a
possibility of short- circuiting the scooter.
Never let your batteries completely discharge. Doing so can result in irreversible damage
to the batteries.
8
Charging your E-scooter
Charging your e-scooter is a simple process. You require the following:
• The charger that came with your e-scooter.
• A 115V household electrical outlet.
Charger Warning
Only use the chargers that were supplied with your e-scooter. Using chargers that do not
have specificcations identical to those which came with the e-scooter could
irreparably damage your e-scooter’s battery and electrical systems, and may cause injury.
To charge your e-scooter, follow these steps:
1. Turn o the e-scooter and remove the key from the “ignition.”
2. Plug the female end of the charger cable into the charging slot on the e-scooter.
This is found on the side of the steering wheel on the left side.
3. Plug the male end of the charger power cable into your wall socket. This should
be a115v household electricity supply. You can also use a portable generator, if
necessary, but make sure it provides 115V current.
4. Allow the e-scooter’s battery to charge for the appropriate amount of time (6-12
hours).
5. Disconnect the charger when the LED light on the charger is green. The batteries
have been fully charged.
If your charger’s LED status light does not change from red to green over an extended
period of time, for perhaps more than 14 hours, and the battery is very hot, the battery or
charger may need replacing. Stop charging and bring both to your dealer immediately.
Do not charge the battery.
9
Battery Care
Follow these suggestions to maintain your battery’s optimal performance. If you do not
follow these suggestions, your battery may lose its ability to maintain a charge and might
have to be replaced sooner than would otherwise be necessary.
• Charge it: Charge your battery immediately after riding it.
• Full Charge: Do not allow the battery to run down completely and lie in storage
without a charge. This significantly reduces the battery’s lifespan and may cause
damage.
• Keep it Charged: When being stored, charge the battery occasionally to make sure
its power supply does not run down. Charging it once every 21 days should be sufficient.
• Storage Conditions: Store the battery on a flat, cool, dry surface. Do not allow the
battery temperature to drop below 10 degrees Celsius for extended periods of
time.
Warning
DO NOT place your Lead-Acid battery on concrete. Concrete drains the battery’s power
and will neutralize the lead-acid. Placing the battery on concrete for any length of time will
likely result in the battery being drained of power and possibly losing its ability to store
electricity.
10
Cold Weather and your Battery
Below 10 degrees Celsius, the battery will not work as well as it would in warmer temperatures. While Lithium-Ion batteries perform better than Lead-Acid batteries in temperature
extremes, both will experience reduced performance in cold temperatures.
Also, repeatedly riding the e-scooter in cold temperatures may cause your battery to have
to be replaced sooner.
Handling the Battery
The battery contains large amounts of electrical power. You must use caution and respect
when handling it. Not following these instructions can result in serious injury.
Warning
Follow these instructions closely. Use care when handling your battery.
• Always lift the battery with both hands, and carry it with care. Never drop the
battery. If the case is damaged, the contents may leak out.
• Never puncture or open the battery case. The contents are dangerous and may
cause injury. Do not touch the contents of a leaking battery. Seek help immediately.
• Do not touch the two metal poles on the battery box at the same time. This can
cause a short-circuit. It could injure you or others and cause serious damage to
the electrical systems in the e-scooter. Your battery contains signi cant amounts
of electrical power.
• Do not handle your battery if either you or the battery are wet. Water is an excellent conductor of electricity. You may experience an electrical shock, and you
may be injured.
11
Replacement and Disposal
After approximately 300 charges, a lead-acid battery will need to be replaced. A lithium-ion
battery will last approximately 1500 charges. When the battery has to be replaced, you will
notice that your battery cannot carry as much of a charge as it could initially.
Contact your local dealer to purchase a new battery.
When replacing your battery, dispose of it at a proper municipal battery recycling facility.
If none is available, please contact your local dealer.
Warning
Be absolutely sure that you replace the battery with an identical or
very similar battery. While it is possible to change the battery format or power levels, this
requires advanced knowledge of electrical systems. If improperly done, this can result in
immediate and irreparable damage to the electronic controller and electrical systems. Be
absolutely certain of what you are doing before you replace the
battery with a di erent type of battery.
Using the wrong type of battery will also void your warranty.
12
Technical Data
This section provides you with the technical specifications for your escooter.
The Motor and Wheel Assembly
The Smart Scooter has a 1200 Watt magnetic motor on the rear wheel hub. This type of motor has excellent
low-end torque and high efficiency when working within its range. Note that while the motor is very quiet, it
does produce some noise. Also attached to the rear hub are speed reduction gear and the speed free clutch.
The Freewheel
The wheels have freewheels, so the e-scooter’s drive train is not fixedly geared. This means that when
coasting or traveling downhill, you can turn o the engine and your e-scooter will continue to move
without slowing. This feature will allow you to achieve faster speeds when coasting, moving downhill or
moving with the wind. It will also allow you to conserve electrical power, because you will be able to let to
the motor rest
while moving.
The Controller
The “D- Drive” technology is the brain of your e-scooter. It allows your e-scooter to achieve faster
acceleration, to climb steeper hills, and to save energy. In future, it will allow for other ways of recharging
your
e-scooter’s batteries, such as by using solar or wind power.
The electronic controller is located under the seat assembly. This controller regulates the speed and
electronic functions of the scooter. It allows for stepless speed adjustment, shuts the motor when the
brakes are activated, has low voltage protection and has fuses to prevent excess current from damaging
the e-scooter’s systems.
The Governor
A key component of the controller is the Governor. The Governor regulates the speed of the e-scooter. It
prevents the motor from assisting riders when the e-scooter’s speed surpasses
32 km per hour.
The governor’s primary function is to make sure that the motor functions efficiently. If the
governor is not functioning, the mileage of the e-scooter will be dramatically reduced, and its performance
will suffer.
Disabling the governor voids the warranty, and may damage your controller.
13
Basic Statistics
Dimensions
Weight
Loading Capacity
Speed and Mileage
Wheel Size: 4.0”x13.5”
Body Size: 171x82x170cm
Seat Height 75cm (29”)
210 kg without battery
222 kg with battery
Standard: 150 kg
Maximum: 205 kg
Max. Speed: 15 km/h
Max. Mileage: 40 km
Electrical System Statistics
Motor Statistics
Charger Statistics
Battery Statistics
Rated Power: 1200W
Max. Climbing Angle: 12 degrees
Charger type: 24V-5AH
Charger Input: AC 100 – 240V
Standard Input voltage: 110V
+/- 10%
Type: Sealed Lead Acid
Voltage: 24V110AH
Battery Life: 300 charges
Power Rated: 80W
Voltage Charge: 43.2 – 44.2V
Charge Current: 2.5A +/- 0.02A
Charge Time: 4-5 hours
Wiring Diagram
14
Maintenance and Troubleshooting
This section outlines problems you may have and solutions you may be able to use.
Many of the parts in this product are not user-serviceable and should be repaired by
trained professionals. This is especially true of the electrical systems and the mechanical
components. Alteration of these components voids the warranty.
Lubrication
In six-month intervals, you should lubricate the following parts with multipurpose grease
or similar lubricant: seat pivot post and seat release lever.
Do not lubricate the transaxle gears.
Wheels and Tires
The wheels have split rims, which allows easy puncture repair. To change the wheel, remove the center 13mm bolt and slide the wheel o its axle. When re tting the wheel, be
sure to use a locking washer and use locktite or a similar adhesive. When changing a tire,
the inner tube must be deflated. Remove the four bolts from the wheel and split the rim.
General Maintenance
Every six months, you may need to tighten certain nuts and bolts. The reason for this is
due to the fact that operating the scooter will cause a lot of vibrations, which can gradually
loosen the nuts and bolts on the scooter. The following are some areas that require
attention: tiller base bolts, wheel axle bolts, wheel-to-axle bolts, etc.
Troubleshooting Checklist
If you are having trouble operating your scooter, please check the following:
- The unit is switched on
- All plugs and connectors are firmly fixed
- Battery is fully charged
- Free wheel lever is engaged
- Fuses are not blown
- Check Fault Codes
15
20