1
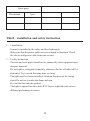
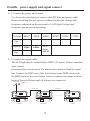
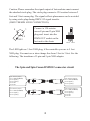
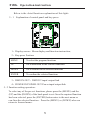
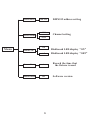
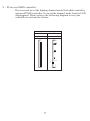
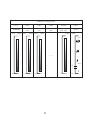
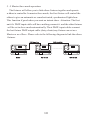
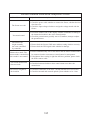
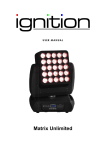
Please read over this manual before operating the light
USER MANUAL
Professional Stage LED show Lighting
TABLE OF CONTENT
Brief ..........................................................................................................1
Packing list .............................................................................................1
Opening the package....................................................................................1
Spare parts...................................................................................................1
Installation and safety instruction...................................................................2
Installation...................................................................................................2
Installation situs..........................................................................................2
safety instruction...................................................................................................2
Use attention...............................................................................................2
Power supply and signal connect......................................................................3
Connect the power and control .............................................................................3
Connect the signal cable........................................................................................3
Operation instruction ......................................................................5
Explanation of control panel and key-press..................................................5
Function setting............................................................................................5
Main Function..............................................................................................6
DMX Control Function....................................................................................7-10
Slave Mode................................................................................................10
Safety warning and maintain ..........................................................11
Safety warning..........................................................................................11
Maintain....................................................................................................11
Specification .......................................................................................11
Common breakdown solution ........................................................12
The manual of LED show system
First、Brief
Thank you for purchasing of our professional LED show system. We
always try to develop our product with high-tech and high performance
to meet your requirement and expectation.
The unit is designed strictly according to the international standard. The
control way is single or master/slave in option.
The manual is included the skill parameter and detail instructions etc.
Please read the manual carefully before using the product.
SECURITY WARNINGS
DANGER
AVOID DIRECT
EXPOSURE TOBEAM
Avoid electric
Green package
Second、Packing list
2 - 1 We use the carton to pack normally. You may choose the fly case.
2 - 2 Opening the package
Open the case and take out the enclosed spare parts, remove the drier,
take the unit and put it in a flat place to operate.
2 - 3 Spare parts
With of exception of this equipment, the pacing enclosed as following
1
Spare parts
The manual
1pcs
Third、installation and safety instruction
3 - 1 installation:
It must be installed in the safety and best light angle.
Make sure that the power cable is never crimped or damaged. Check
the device and power cable from time to time.
3 - 2 safety instruction
The fans and vent-pipes should not be jammed by other equipment and
decorate material.
Do not light or extinguish frequently, otherwise the life of bulbs will be
shortened. Try to avoid the using time too long.
The light must be fixture installed. Attention that prevent the strong
shock.Do not use it under the damp and rain.
Prevent the dust into the product.
The light is applied for disco hall, KTV house, nightclub and various
different performing occasions.
2
Fourth、power supply and signal connect
4 - 1 Connect the power and control
Use the professional plug to connect the LED light and power cable.
Before installing the unit, please confirm whether the voltage and
frequency indicated on the real panel of LED light.Voltage and
frequency parameters(is matching)
Voltage
240V
230V
220V
Frequency 50Hz
60Hz
LED
light
model
208V
120V
110V
Opt
Opt
4 - 2 Connect the signal cable
The LED light may be controlled the DMX 512 signal. Under sound and
Atuo control.
the master/slave can be used. The master/slave mode is lined by signal
line.Connect the DMX-out of the first fixture in the DMX-chain with
the DMX-input of the next fixture. Always connect one output with the
input of the next fixture until all fixtures are connected.
Controller
DMX512
OUT
Control line
IN
IN
OUT
OUT
First unit
Control line
IN
---------------
Second unit
3
OUT
Nth unit
Caution: Please remember the signal output of last machine must connect
the attached circle plug .The circle plug connect a 120 resistor between 2
feet and 3 feet canon plug. The signal reflects phenomena can be avoided
by using circle plug during DMX 512 signal transfer.
(DMX TERMIN ATOR CONNECTION):
Connect a 120 resistor
2
1
3
120Ω
across2-pin and 3-pin XLR
plug and insert into the
DMX OUT socket on the
last unit in the chain.
PIN 2
PIN 3
The LED light use 3 feet XLR plug, if the controller you use is 5 feet
XLR plug. You must use a inter change line from 5 feet to 3 feet. See the
following. The transform of 3-pin and 5-pin XLR adaptor.
The 3pin and 5pin Canon DMX512 connector circuit
5 pin cannon (input)
Pin 1: GND (SCREEN)
Pin 2: Signal(-)
Pin 3: signal(+)
Pin 4: N/C
Pin 5: N/C
3 pin cannon (output)
Pin 1: GND (SCREEN)
Pin 2: Signal(-)
Pin 3: signal(+)
3 pin cannon (input)
Pin 1: GND (SCREEN)
Pin 2: Signal(-)
Pin 3: signal(+)
5 pin cannon (output )
Pin 1: GND (SCREEN)
Pin 2: Signal(-)
Pin 3: signal(+)
Pin 4: N/C
Pin 5: N/C
4
Fifth、Operation instruction
Below is the detail function explanation of this light:
5-1
Explanation of control panel and key-press.
Disconnect from power
before.servicing.
caution
Lamp and fixture may be
extrmely hot,
!WARNING!
MODE/ESC UP
let cool before handling
DOW N
ENTE R
ON
OFF
DMX IN
DMX OUT
POWER
POWER IN
POWER OUT
FUSE
1、Display screen:Menu display and function instruction。
2、Key-press Fuction:
MENU
To select the program functions
UP
Go to backward in the selected functions
DOWN
Go to forward in the selected functions
ENTER
To confirm the selected functions
3、DMX IN/OUT:DMX512 input/ output link
4、POWER IN/POWER OUT:Power input/output link
5 - 2 Function setting operation:
To select any of the pre-set functions, please press the (MENU) and the
(UP) and the (DOWN) of the back panel to set.Once the required function
has been selected, press the (ENTER) button enter to the next menu or
con-firm the selected function . Press the (MENU) or (DOWN) also can
return to forward menu .
5
DMX Address
001~512
DMX512 address setting
2CH
Channel setting
Channel Mode
27CH
Menu
On
Black LCD
Off
Fixture Time
0
Firmware Version
1.01
6
Blakboard LED display“ON”
Blakboard LED display“OFF”
Record the time that
the fixture is used
Software version
5 - 3 Universal DMX controller:
The user need to set the lighting channel mode first while control by
universal DMX controller. It can set the channel mode from its LED
displaypanel. Please refer to the following diagram to use your
controller to activate the fixture:
DMX512 Configuration
Ch1
Ch2
Dimming
Strobe
255 100%
255
fast
Slow
Off
8
7
0
0
0
7
DMX512 Configuration
Ch1
Ch2
Dimming
255
Ch3
The first LED
light
100% 255
100%
Ch4
The Secoud LED The third LED
light
light
255
Ch26
Ch27
The twenty-fifth
LED light
Strobe
100%
100%
255
Fast
……
Slow
Off
8
7
0
0
0
0
0
0
0
8
0
0
5 - 5 Master/slave mode operation:
The fixtures will allow you to link others fixtures together and operate
without a controller. In master/slave mode, the first fixture will control the
others to give an automatic or sound activated, synchronized light show.
This function if good when you want an instant show. Attention: The first
unit it's DMX input cable will have nothing connect it. and the other fixtures
will be set in slave mode automatically. Their DMX input cables connect
the last fixture DMX output cable (daisy chain).any fixture can act as a
Master or as a Slave .Please refer to the following diagram to link the others
fixtures.
DMX signal line
DMX signal line
IN
IN
OUT
OUT
Master
IN
---------------
The 1th unit
9
OUT
The Nth unit
5 - 5 Master/slave mode operation:
The fixtures will allow you to link others fixtures together and operate
without a controller. In master/slave mode, the first fixture will control the
others to give an automatic or sound activated, synchronized light show.
This function if good when you want an instant show. Attention: The first
unit it's DMX input cable will have nothing connect it. and the other fixtures
will be set in slave mode automatically. Their DMX input cables connect
the last fixture DMX output cable (daisy chain).any fixture can act as a
Master or as a Slave .Please refer to the following diagram to link the others
fixtures.
DMX signal line
DMX signal line
IN
IN
OUT
OUT
Master
IN
---------------
The 1th unit
10
OUT
The Nth unit
Sixth、Safety warning and maintain
6 - 1 Safety warning:
1、The product must be installed by a qualified professional. Please do
not open the equipment.
2、The fans and air-vents should not be jammed by other equipment or
decorate materials.
3、Avoid looking directly in the light source.
6 - 2 Maintain:
1、Please read the user manual in detail before operating the equipment
.Please call the technician in case the machine broken down.
2、Keep the equipment away from water or moisture.
3、Make sure the power is off and the equipment is not connected to
the mains power supply before opening the unit or carrying and any
maintenance.
4、If there has been any damaged caused to the LED bulbs by the user
Seventh、Specification
1、Voltage:AC90~260V 50~60Hz
2、Rated Power:300W
3、LED Color: 25PCS10W
4、DMX Channels: 2/27CH
5、Version:1.01
6、Size:750(L)X250(W)X720 ( H ) mm
7、N.W/G.W: 16.6Kg/18.1Kg
8
Product common breakdown comparative chart
Breakdown cause
Major breakdown analysis and solution
The fixture no work
1. Check the power cable whether to connect the fixture, whether the fuse
does burn out.
2. Check the input voltage whether to assign the voltage match with the
fixture.
No sound control
1. Check the address code or the display whether establishes according to
the instruction booklet is the voice control pattern.
2. Check the potentiometer possibly moves is smallest, attempt to adjust
the potentiometer.
The fixture can
bright normally,
but it not controlled
by controller
1. Please check the fixtures' DIP outset address setting whether correctly.
2. Please check the XLR signal cable whether be damage.
1. Please conformed only one for the master and the master without DMX
Master-slave mode, The
be connected, and to set master as sound control or auto pattern.
master mode is normal,but
slave mode is not normal 2. If the Master-slave setting is right but still have problem, please check
the XLR connect cable.
The button malfunction,
does not work.
The fixtures' brightness
obvious dim
1. Check the buttons whether to have some button not to have the
normal reset.
1. Check the LED tubes or the laser already whether to be service life.
2. Check the internal and external optical system whether to be clean.
12