1
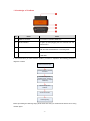
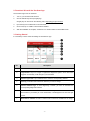
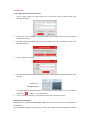
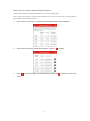
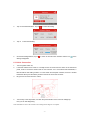
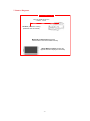
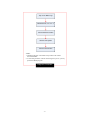
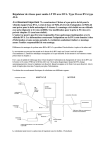
CarScan User Manual Quick Start Guide (V1.00) Note: This Quick Start Guide applies to the iCarScan VCI (Vehicle Communication Interface) connector and is subject to change without prior written notice. -1- Precautions on operation Before using this product, please read the following information carefully. The illustrations herein are for reference only and are subject to change based on the smart mobile terminal you are using and / or software updates. Always perform automotive testing in a safe environment. The instrument is a precision electronic instrument. Pay more attention when in use, NEVER have it dashed. Do not connect or disconnect the VCI connector while the ignition is on or the engine is running. Do not keep the VCI connector plugged into your vehicle overnight, be sure to always remove connector once testing and/or diagnosis is complete. Failure to do so may result in drained or weakened battery. Do not drive the vehicle and operate the VCI connector at the same time. Any distraction may cause an accident. To avoid damaging the VCI connector or generating false data, please make sure the vehicle battery is fully charged and the connection to the vehicle DLC (Data Link Connector) is clear and secure. Keep the VCI connector dry, clean, free from oil, water or grease. Use a mild detergent on a clean cloth to clear the outside of the connector as necessary. Attention: The purchasing agreement for the software is for ONE year subscription. -1- 1. Knowledge of iCarScan No. Name Notes 1 OBD-16 connector To connect to vehicle’s OBDII DLC. 2 Power indicator It lights up while plugging the VCI connector into the vehicle’s DLC. 3 Communication indicator It will flash once the VCI connector is communicating with the smart Android device or it is being reset. 4 Micro USB port To connect to PC for data transmission or upgrade via USB cable. If it is the first time you have used the product, you have to experience the following procedure to diagnose a vehicle. Download iCarScan App User Registration & Activate Connector Purchase Diagnostic Software (Note: This step does not apply to the prepaid 5 software) Download Diagnostic Software Vehicle Connection Start Diagnosing Before proceeding the following steps, please make sure that your Android smart device has a strong network signal. -2- 2. Download & Install the iCarScan App The iCarScan app is free to download. 1. Turn on your Android smart terminal. 2. Go into Android Play Store (Google play). Google play can be found in the following URL: https://play.google.com/store. 3. Input the keyword "ICARSCAN" in the search bar. 4. Once found, tap on "FREE" to download and install it. 5. After the installation is complete, a iCarScan icon will be created on the HOME screen. 3. Getting Started It is necessary to have a basic knowledge of the iCarScan App. No. Description 1 Function menu button: Tap on it to unfold function menu. 2 Login button: Tap on it to login or register the diagnostic system. Once users have logged in successfully, it will change to your username. 3 Vehicle region tab: Tap on different tabs to switch to corresponding vehicles. 4 Free tag: It indicates this software is offered to you free of charge. 5 Vehicle software logo: To start diagnosing a vehicle, you have to download the corresponding diagnostic software. 6 Downloadable icon: It indicates that the current diagnostic software has not been downloaded or purchased yet. Once downloaded, it will disappear from the lower right corner. 7 Reset Series software: A total of 3 reset function software is available free of charge. -3- 4. Initial Use A. User Registration & Activate Connector 1. Tap on "Login" located on the upper right corner of main menu screen, a screen similar to the following will appear: 2. For new users, tap on "Register" to proceed to next step. For existing users, input your Username and Password directly. 3. Input the required information, and then tap on "Register and Login", a dialog box similar to the following will pop up. 4. Tap on "Register Connector". 5. Fill in the Serial Number and Verification Code, which can be found in the password envelope in the package: To register the connector later and exit, tap on "No Connector". In this case, you can also activate it by tapping on 6. -- > "Mine" -- > "Activate Device". Tap on "Confirm" to activate your connector and return to the main menu screen. B. Download Free Software By default max. 5 software (excluding DEMO, EOBD and 3 Reset series software) can be selected for free download. To purchase other software, you need to pay extra fees. For details on purchasing diagnostic software, -4- please refer to "5. Purchase & Download Diagnostic Software". Attention: The purchasing agreement for the software is for ONE year subscription. Once it expires, only the older version becomes available and in this case you may renew your subscription to enjoy the latest version and more functions. 1. Tap on certain car model logo, a window listing all available vehicle software will appear. 2. Check the box to select the desired vehicle software, and tap on 3. Tap on to start downloading. Once downloading is complete, tap screen. -5- to confirm. to return to the main menu 5. Purchase & Download Diagnostic Software A. Purchase Diagnostic Software The icon located on the lower right corner of the diagnostic software logo means that the diagnostic software has not been purchased and downloaded. 1. Tap on the desired vehicle make logo to enter software information interface. Here we take GM as an example. 2. Tap on "Purchase Now" to go into order confirmation page. 3. Double check if your order information is correct and then tap on to enter the payment method page. 4. Select one of payment types, then follow the on-screen instructions to complete the transaction. B. Download Diagnostic Software Only after payment has been made successful for diagnostic software or software package can the software or software package be downloaded. 1. Tap on GM logo, a screen similar to the following appears: -6- 2. Tap on "Download Software". Tap on 3. Tap on 4. Once downloading finishes, tap on to start downloading. to start downloading. to return to the main menu interface and the icon of the GM logo disappears. 6. Vehicle Connection 1. Turn the ignition switch off; 2. Locate the vehicle’s DLC socket: It is usually located 12 inches from the center of the instrument panel, under or around the driver’s side for most vehicles. If it is not located under dashboard, a label should be there telling location. For some Asian and European vehicles, the DLC is located behind the ashtray and the ashtray must be removed to access the connector. 3. Plug the VCI connector into DLC socket; 4. Turn the key to the ON position, and then the power indicator of the connector will light up. Now you can start diagnosing. Note: Remember to remove the connector once testing and/or diagnosis is complete. -7- 7. Start to Diagnose Working Theory Plug the iCarScan into the vehicle’s DLC iCarScan (Collect the running parameter from the vehicle) Bluetooth Communication (Send the collected data to the smart mobile terminal) Smart Mobile Terminal (Analyze the dignostic data and display the test result) -8- Tap on Car Make Logo Bluetooth Pair (*See Note 1) Choose Software Version Choose Test System Choose Test Function *Notes: 1. The Bluetooth name is identified as the product serial number 96579XXXXXXX. 2. To learn and get familiar with the whole diagnostic process, you may operate the DEMO program. Diagnosis Flowchart -9-