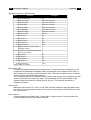
1
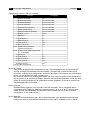
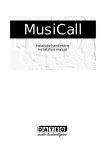
SPL5
Handleiding
User manual
NL
DATEQ SPL5 Handleiding
Veiligheidsinstructies
3
Veiligheidsinstructies
1. Alle veiligheidsinstructies, waarschuwingen en gebruiksaanwijzingen moeten als eerste gelezen
worden.
2. Alle op het apparaat aanwezige waarschuwingen dienen opgevolgd te worden.
3. De gebruiksaanwijzing dient opgevolgd te worden.
4. Bewaar de gebruiksaanwijzing voor toekomstig gebruik.
5. Het apparaat mag nooit in de onmiddellijke nabijheid van water worden gebruikt; voorkom de
mogelijkheid van binnentreden van water en vocht.
6. Het apparaat mag alleen geplaatst of gemonteerd worden op de door de fabrikant aanbevolen
wijze.
7. Het apparaat moet zo geplaatst of gemonteerd worden, dat niets een goede ventilatie in de
weg staat.
8. Het apparaat mag nooit in de onmiddellijke nabijheid van warmtebronnen zoals
verwarmingsinstallatie delen, kachels, en andere warmte producerende apparatuur (onder
andere versterkers) worden geplaatst.
9. Sluit het apparaat alleen aan op de juiste netspanning door middel van de door de fabrikant
aanbevolen kabels, zoals beschreven in de gebruiksaanwijzing en/of vermeld op de
aansluitzijde van het apparaat.
10.Het apparaat mag alleen worden aangesloten op een wettelijk goedgekeurde (rand)geaarde
netspanningsaansluiting.
11.De netspanningskabel of het netspanningssnoer dient zo gelegd, dat er redelijkerwijs niet
overheen gelopen kan worden of geen voorwerpen op of tegenaan geplaatst kunnen worden
welke de kabel kunnen beschadigen. Speciaal moet rekening gehouden worden met het punt
waar de kabel vast zit aan het apparaat en waar de kabel vastzit aan de
netspanningsaansluiting.
12.Voorkom dat vreemde voorwerpen en vloeistoffen in het apparaat kunnen binnendringen.
13.Het apparaat dient op de door de fabrikant aanbevolen wijze gereinigd te worden.
14.De netspanningskabel of het netspanningssnoer dient, indien voor langere tijd het apparaat
niet gebruikt wordt, uit de netspanningsaansluiting gehaald te worden.
15.In alle gevallen, wanneer er na een gebeurtenis gevaar ontstaat voor onveilige werking van het
apparaat, zoals:
Ɣ na het beschadigd raken van de netspanningskabel of het netspanningssnoer
Ɣ na het binnendringen in het apparaat van vreemde voorwerpen of vloeistoffen (onder andere
water)
Ɣ na een val van het apparaat of een beschadiging van de behuizing
Ɣ na het opmerken van een verandering in de werking van het apparaat moet het
gecontroleerd worden door daarvoor bevoegd technisch personeel.
16.De gebruiker moet geen werkzaamheden aan het apparaat uitvoeren anders dan die in de
gebruiksaanwijzing staan omschreven.
NL
DATEQ SPL5 Handleiding
Inleiding
5
Inleiding
SPL 5
Power
LIMITER
µP Controlled Audio Level Guard
TimeSlot
1
2
3
Audio present
Audio reduction
Overload
RS232
Reduction
SPL5
Sanction
De SPL5 is een geluidsdrukbegrenzer die de geluidsdrukgegevens voor een periode van twee
maanden bewaart. Deze gegevens kunnen met behulp van de bijgeleverde PC-software grafisch
worden weergegeven. Ook andere gegevens, zoals het inschakelen, overschrijdingen van het
maximale niveau en eventuele (pogingen tot) sabotage worden geregistreerd.
Met behulp van de bijgeleverde PC-software kan de begrenzer worden uitgelezen en worden
ingeregeld. Voor het inregelen is een wachtwoord nodig, zodat het voor de overige gebruikers
onmogelijk wordt om aanpassingen in het systeem te maken.
De software werkt onder alle huidige versies van Microsoft Windows. De computer moet voorzien
zijn van een RS232 poort, of een USB naar RS232 adapter. Als de computer is aangesloten op
een lokaal netwerk, of het internet, dan is het mogelijk om de limiter op afstand uit te lezen.
Dit houdt het beheren en controleren van de apparatuur snel en overzichtelijk!
De begrenzer maakt gebruik van een meetmicrofoon om de huidige geluidsdruk in de zaal te
bepalen. Wanneer dit niveau te hard dreigt te worden zal de limiter het niveau iets terugdraaien.
Op deze manier blijft het niveau altijd binnen de toelaatbare grenzen.
Door middel van de ingebouwde klok is het mogelijk om iedere dag van de week op te delen in
drie delen. Voor elk dagdeel kan het maximale niveau afzonderlijk worden ingesteld.
Productondersteuning
Voor vragen over de SPL limiter serie, accessoires en andere producten kunt u contact opnemen
met:
DATEQ Audio Technologies
De Paal 37
1351 JG Almere
Nederland
Telefoon:
Fax:
E-mail:
Internet:
036 – 5472222
036 – 5317776
[email protected]
www.dateq.nl
6
Installatie
DATEQ SPL5 Handleiding
NL
Installatie
De begrenzer wordt geïnstalleerd tussen de geluidsbron (bijvoorbeeld de mengtafel, de
voorversterker etc.) en de versterker. Zie figuur 1.
Figuur 1: Aansluiten van de SPL5
Voor het afregelen worden de eindversterkers op maximaal vermogen ingesteld. De begrenzer zal
het signaal zoveel verzwakken als nodig blijkt. Zodra de begrenzer is ingeregeld kan de vooraf
ingestelde grens dus in principe niet meer worden overschreden. Mocht dit toch gebeuren dan zal
het signaal automatisch iets worden verzwakt, zodat de totale geluidsdruk toch binnen de vooraf
ingestelde norm blijft.
Aansluitingen
De SPL5 is uitgevoerd met gebalanceerde in,- en uitgangen. Dit type aansluiting garandeert een
goede geluidskwaliteit, ook over langere afstanden. Als het apparaat is ingeregeld wordt over de
aansluitingen een kap geplaatst, waardoor het maken van aanpassingen achteraf niet meer
mogelijk is. Wanneer de kap wordt verwijderd zal de SPL5 dit registreren. De begrenzer kan dan
alleen met behulp van de sleutel weer worden geactiveerd.
Microfooningang; XLR 3-pens vrouwelijk
Pen
Functie
Omschrijving
1 Massa
Audio aarde
2 Audio +
Voeding en audio
3 Audio Voeding en audio
Tabel 1: microfooningang aansluitingen
Audio ingangen links en rechts; XLR 3-pens vrouwelijk
Pen
Functie
Omschrijving
1 Massa
Audio aarde
2 Audio +
Audio in fase
3 Audio Audio uit fase
Tabel 2: Audio-ingang aansluitingen
Audio uitgangen links en rechts; XLR 3-pens mannelijk
Pen
Functie
Omschrijving
1 Massa
Audio aarde
2 Audio +
Audio in fase
3 Audio Audio uit fase
Tabel 3: audiouitgang aansluitingen
NL
DATEQ SPL5 Handleiding
Installatie
7
Signaleringsconnector; DB-25 vrouwelijk
Pen
Functie
In/ uitgang
1 Externe verzwakker
In
2 Reductie signalering
Uit; 15V/ 5mA max.
3 Overload signalering
Uit; 15V/ 5mA max.
4 Live OK signalering
Uit; 15V/ 5mA max.
5 Waarschuwing signalering
Uit; 15V/ 5mA max.
6 Niveau OK signalering
Uit; 15V/ 5mA max.
7 Veilige geluidsdruk signalering
Uit; 15V/ 5mA max.
8 Externe VU unit
In/ uit
9 Microfoon +
In
10 Links audio in +
In
11 Rechts audio in +
In
12 Links audio uit +
Uit
13 Rechts audio uit +
Uit
14...17 Digitale aarde (gebruik bij
signaleringsuitgangen)
18...20 Analoge aarde (gebruik bij de audio
in,- en uitgangen)
21 Microfoon -
In
22 Links audio in -
In
23 Rechts audio in -
In
24 Links audio uit -
Uit
25 Recht audio uit Tabel 4: DB25 aansluitingen
Uit
Microfoon ingang
Sluit hierop de bijgeleverde meetmicrofoon aan. De aansluitkabel van de microfoon kan
worden verlengd met standaard microfoonkabel. Let hierbij wel op de polariteit! Als de
microfoon verkeerd wordt aangesloten zal deze niet werken. De limiter zal een foutmelding
geven, en het geluid komt sterk verzwakt door.
De microfoon dient zo te worden gemonteerd dat deze zowel het geluid uit de luidsprekers,
als het geluid uit de zaal kan opvangen. Wanneer het maximale toegelaten niveau erg laag
is kan de microfoon dichter bij de luidsprekers worden geplaatst. Zo wordt de invloed van
omgevingsgeluiden verminderd.
Audio ingangen
Gebalanceerde ingangen voor de audio vanaf de mengtafel. Als de mengtafel alleen
ongebalanceerde uitgangen heeft dan moeten pennen 1 en 3 in de XLR connector aan
elkaar worden doorverbonden. Het signaal uit de mengtafel kan nu op pen 2 worden
aangesloten, en de aarde op pen 1.
Audio uitgangen
Sluit hier de eindversterkers aan. Als de eindversterkers geen gebalanceerde ingangen
hebben dan kunnen deze worden aangesloten tussen pen 2 (signaal) en pen 1 (aarde).
8
Installatie
DATEQ SPL5 Handleiding
NL
Externe verzwakker
Deze ingang kan worden gebruikt om de maximale geluidsdruk met behulp van een
externe potmeter te verlagen. Door een lineaire 10kOhm potmeter aan te sluiten tussen
pen 1 (loper) en pen 14 kan de maximale geluidsdruk tijdelijk worden verlaagd.
Dit kan handig zijn om bijvoorbeeld achter de bar de geluidsdruk iets terug te draaien. Het
is ook mogelijk om de geluidsdruk automatisch af te laten nemen wanneer in de zomer de
terras deuren worden geopend.
Reductie signalering
Op deze uitgang kan een indicatie worden aangesloten die aangeeft dat de limiter de
geluidsdruk heeft verzwakt. Deze uitgang heeft dezelfde functie als de reductie LED aan
de voorzijde van het apparaat (Audio reduction).
Overload signalering
Deze uitgang geeft aan dat het signaal ergens in de limiter overstuurd wordt. Dit kan de
audio ingang of de meetmicrofoon zijn. Deze uitgang heeft dezelfde functie als de overload
LED aan de voorzijde van het apparaat (Overload).
Live OK signalering
Deze uitgang is actief zolang het apparaat niet sanctioneert. Op deze uitgang kan een
solid-state relais worden aangesloten, dat de stroomvoorziening van het (live) podium
uitschakelt. Wanneer een live-band de maximale ingestelde geluidsdruk overschrijdt zal de
limiter in sanctie-mode gaan, en de stroomvoorziening automatisch afschakelen. Na een
vooraf ingestelde tijd zal de sanctie-mode vanzelf beëindigd worden.
Waarschuwing signalering
Niveau OK
Veilige geluidsdruk
Deze uitgangen geven een indruk van de actuele geluidsdruk ten opzichte van het vooraf
ingestelde maximum:
C De waarschuwingsuitgang wordt actief zodra de huidige geluidsdruk hoger is dan het
vooraf ingestelde maximum.
C Niveau OK geeft aan dat de geluidsdruk lager is dan het maximum, maar wel het
maximaal toelaatbare niveau nadert (0...12dB ruimte).
C Veilig geeft aan dat de geluidsdruk ruim onder de maximaal toelaatbare grens ligt (12dB
of meer).
Deze indicatoren kunnen bij de disc-jockey of de live band worden geplaatst zodat zij een
indruk van het geluidsniveau hebben.
Externe VU unit
Dit is de data verbinding met de optionele VU-display.
NL
DATEQ SPL5 Handleiding
Bediening
9
Bediening
1. Aan/ uit schakelaar.
2. Display: Hierop zijn alle belangrijke gegevens zichtbaar, zoals de huidige tijd, en de actuele
geluidsdruk (dBA waarde en piek waarde). Verder komen in het scherm de volgende meldingen
voor:
• Waarsch: De limiter heeft een fout ontdekt. Dit kan variëren van een hardwarematig
probleem tot het geopend (geweest) zijn van het deksel. Het geluid zal sterk worden
verzwakt totdat het probleem is opgelost. Maak verbinding met de computer om te zien wat
er exact mis is.
De LED van het actieve TimeSlot zal knipperen om aan te geven dat de geluidsdruk sterk
verzwakt wordt.
De sanctie LED zal knipperen of het type foutmelding aan te geven:
í 80% aan/ 20% uit: Probleem met voeding
í 20% aan/ 80% uit: Microfoon fout
í 50% aan/ 50% uit 1x per sec.: Ongeldige configuratie of deksel geopend
í 50% aan/ 50% uit 2x per sec: Geheugen vol
• Niveau: De huidige geluidsdruk is hoger dan de maximale toegelaten geluidsdruk
• Stil: De uitgangen van de limiter zijn uitgeschakeld. Dit gebeurt als de limiter opstart.
• Calibr.: De limiter moet opnieuw gekalibreerd worden.
• Live: De limiter werkt in live-mode. Dit betekend dat de muziek niet door de limiter en de
eindversterkers wordt gemaakt, maar bijvoorbeeld door een live-band. De limiter zal nu niet
proberen om het geluidsniveau te corrigeren. Bij een overschrijding van de maximale
geluidsdruk zal de limiter wel in sanctie-mode gaan. De podium-apparatuur kan zo dus wel
worden afgeschakeld.
3. Timeslot LEDs: Deze LEDs geven het actieve tijdslot aan. Ieder tijdslot kan een eigen maximale
geluidsdruk toegekend krijgen. Als de LED knippert wil dat zeggen dat de ingestelde maximale
geluidsdruk om wat voor reden dan ook is verzwakt. Mogelijke redenen zijn:
• Tijdens een overgang van twee tijdsloten,
• Tijdens een foutstatus van de limiter,
• Als de externe verzwakker actief is.
4. Status LEDs:
• Audio-present LED geeft aan dat de limiter geluid op de audio ingang heeft gedetecteerd
(schakelt bij -24dB),
• Audio-reduction LED geeft aan dat het geluidsniveau wordt gereduceerd, en de limiter op dit
moment dus ingrijpt,
• Overload geeft aan dat een ingang (line ingang, of de microfoon ingang) wordt overstuurd,
• Sanction LED geeft aan dat de limiter in de sanctie toestand verkeerd (de LED is continu
aan), of dat de limiter in een fout toestand zit (zie hierboven).
10
Bediening
DATEQ SPL5 Handleiding
NL
5. Reductie balk: Als de limiter in muziek-mode werkt is hier de reductie af te lezen (de balk
brandt dan continu):
• Alles uit:
0...3dB reductie
• 1 LED aan:
3...6dB reductie
• 2 LEDs aan: 6...12dB reductie
• 3 LEDs aan: 12...18dB reductie
• 4 LEDs aan: 18...24dB reductie
• 5 LEDs aan: meer dan 24dB reductie
Als de limiter in live-mode werkt zal de reductie balk de actuele geluidsdruk aangeven in relatie
tot de vooraf ingestelde geluidsdruk. De LED-balk zal knipperen.
• Alles uit:
Geluidsdruk is meer dan 24dB onder maximum,
• 1 LED aan:
Geluidsdruk is 18...24dB onder het maximum,
• 2 LEDs aan: Geluidsdruk is 12...18dB onder het maximum,
• 3 LEDs aan: Geluidsdruk is 6...12dB onder het maximum,
• 4 LEDs aan: Geluidsdruk is 0...6dB onder het maximum,
• 5 LEDs aan: Geluidsdruk is harder dan het maximaal toelaatbare.
6. RS232 aansluiting voor de computer. Gebruik de bijgeleverde aansluitkabel om verbinding te
maken.
7. Sleutelschakelaar. Als het deksel van de limiter is verwijderd zal deze sleutel nodig zijn om het
apparaat weer actief te maken.
NL
DATEQ SPL5 Handleiding
Technische specificaties
11
Technische specificaties
Ingangen
Mic (meetmicrofoon).........................................XLR-3 vrouwelijk. Alleen te gebruiken met de
bijgeleverde meetmicrofoon.
Line (links en rechts)........................................XLR-3 vrouwelijk. Electronisch gebalanceerd.
Ingangsgevoeligheid...............................0dBu
Ingangsimpedantie..................................50kOhm
Commom-mode onderdrukking...............>86dB
Uitgangen
Line (links en rechts)........................................XLR-3 mannelijk. Elektronisch gebalanceerd.
Uitgangsimpedantie.................................50Ohm
Algemeen
Audio
Frequentiebereik.....................................5Hz...35kHz @ -1dB
Signaal/ ruis verhouding..........................>80dB
THD+N (IEC-A).......................................<0.06%
Begrenzer
Geluidsdrempel.......................................70...120dBA (resolutie 1dB)
Uitgangscorrectie....................................-50...+18dB (resolutie 0,5dB)
Microfoon correctie..................................-40...+18dB (resolutie 0,5dB)
Maximaal regelbereik instelling...............-6...-50dB (resolutie 0,5dB)
Geheugen
2Mbit E2PROM
64 dagen geluidsdrukinformatie (resolutie 1 minuut)
64 dagen gebeurtenissen (maximaal 96 per dag)
Externe signalering
Externe verzwakker.................................0...-20dB (mbv. 10kOhm lin. potmeter)
Signalering en schakeluitgangen............15V/ 5mA max.
Voeding
Spanningsbereik......................................220...240VAC/ 50Hz
Opgenomen vermogen...........................15W
Afmetingen en gewicht
Front........................................................483mm x 45mm (B x H) = 19inch/ 1HE
Kastdiepte...............................................175mm
Gewicht....................................................2.7kg
SPL5_040825_V1.0
EN
DATEQ SPL5 Manual
Safety instructions
3
Safety instructions
1.
2.
3.
4.
5.
All safety instructions, warnings and operating instructions must be read first.
All warnings on the equipment must be heeded.
The operating instructions must be followed.
Keep the operating instructions for future reference.
The equipment may never be used in the immediate vicinity of water; make sure that water and
damp cannot get into the equipment.
6. The equipment may only be installed or fitted in accordance with the manufacturers
recommendations.
7. The equipment must be installed or fitted such that good ventilation is not obstructed in any way.
8. The equipment may never be installed in the immediate vicinity of sources of heat, such as parts
of heating units, boilers, and other equipment that generates heat (including amplifiers).
9. Connect the equipment to a power supply of the correct voltage, using only the cables
recommended by the manufacturer, as specified in the operating instructions and/or shown on
the connection side of the equipment.
10.The equipment may only be connected to a legally approved earthed mains power supply.
11.The power cable or power cord must be positioned such that it cannot be walked on in normal
use, and objects that might damage the cable or cord cannot be placed on it or against it. Special
attention must be paid to the point at which the cable is attached to the equipment and where the
cable is connected to the power supply.
12.Ensure that foreign objects and liquids cannot get into the equipment.
13.The equipment must be cleaned using the method recommended by the manufacturer.
14.If the equipment is not being used for a prolonged period, the power cable or power cord should
be disconnected from the power supply.
15.In all cases where there is a risk, following an incident, that the equipment could be unsafe, such
as:
Ɣ if the power cable or power cord has been damaged
Ɣ if foreign objects or liquids (including water) have entered the equipment
Ɣ if the equipment has suffered a fall or the casing has been damaged
if a change in the performance of the equipment is noticed
Appropriately qualified technical staff must check it.
16.The user may not carry out any work on the equipment other than that specified in the operating
instructions.
EN
DATEQ SPL5 Manual
Introduction
5
Introduction
SPL 5
Power
LIMITER
µP Controlled Audio Level Guard
TimeSlot
1
2
3
Audio present
Audio reduction
Overload
RS232
Reduction
SPL5
Sanction
The SPL5 is a sound limiter that stores the sound pressure information for a period of two months.
This information can be shown in a clear-to-read graph with the PC-software that is supplied with
the limiter.
Other information, like active time, exertion of the maximum sound pressure level and possible
sabotage (attempts), will be logged also.
The PC software makes it possible to read or adjust all the system settings. To adjust settings a
password is required. This is done to prevent other users of making any alterations in the system.
The software operates with all current versions of Microsoft Windows. The computer requires a
RS232 port, or a USB to RS232 adapter. It is possible to remotely read out the limiter, if the
computer is connected to a local network or the internet. This allows quick administration and
controlling of the system.
The limiter uses a measure microphone to determine the current sound pressure level in the room.
It will adjust the sound pressure level slightly as soon as it threatens to exceed the allowed
maximum.
This ensures the level remains within the maximum limits.
The built-in clock allows each day of the week to be divided into three parts (TimeSlots). Each
TimeSlot can have its own maximum sound pressure level.
Product support
For questions about the SPL limiter series, accessories and other products please contact:
DATEQ Audio Technologies
De Paal 37
1351 JG Almere
The Netherlands
Telephone:
Fax:
E-mail:
Internet:
+31 36 - 5472222
+31 36 - 5317776
[email protected]
www.dateq.nl
6
Installation
DATEQ SPL5 Manual
EN
Installation
The limiter has to be installed between the sound source (for instance the mixer, the pre-amplifier
etc.) and the amplifier. See figure 1.
Figure 1: Installing the SPL5
When calibrating the system, the power amplifier has to be set to maximum output level. The
limiter will reduce the signal as much as needed. When used at nominal level the established
sound pressure limit will not be exceeded after configuring the limiter. However if in any case this
should happen, e.g. When the mixer is used above the nominal level, the limiter will automatically
adjust the signal to ensure the sound pressure level remains below the maximum allowed level.
Connections
The SPL5 is equipped with balanced audio in,- and outputs. This type of connection guarantees a
solid sound quality, even when long audio cables are used. After the limiter is installed the audio
connectors are covered to prevent later adjustments. Removal of this cover will be registered by
the SPL5. To re-activate the limiter the key on the front is needed.
Microphone input; XLR 3-pin female
Pin
Function
Description
1 Ground
Audio ground
2 Audio +
Supply and audio
3 Audio Supply and audio
Table 1: Microphone input
Audio inputs left and right; XLR 3-pin female
Pin
Function
Description
1 Ground
Audio ground
2 Audio +
Audio in phase
3 Audio Audio out of phase
Table 2: Audio-inputs
Audio outputs left and right; XLR 3-pin male
Pin
Function
Description
1 Ground
Audio ground
2 Audio +
Audio in phase
3 Audio Audio out of phase
Table 3: Audio output
EN
DATEQ SPL5 Manual
Installation
7
Signalling connector; DB-25 female
Pin
Function
In/ output
1 External attenuator
In
2 Reduction signal
Out; 15V/ 5mA max.
3 Overload signal
Out; 15V/ 5mA max.
4 Live OK signal
Out; 15V/ 5mA max.
5 Warning signal
Out; 15V/ 5mA max.
6 Level OK signal
Out; 15V/ 5mA max.
7 Safe level signal
Out; 15V/ 5mA max.
8 External VU unit
In/ Out
9 Microphone +
In
10 Left audio in +
In
11 Right audio in +
In
12 Left audio out +
Out
13 Right audio out +
Out
14...17 Digital ground (to be used with the
signalling outputs)
18...20 Analogue ground (to be used with the
audio in and outputs)
21 Microphone -
In
22 Left audio in -
In
23 Right audio in -
In
24 Left audio out -
Out
25 Right audio out Table 4: DB25 connections
Out
Microphone input
Connect the supplied measuring microphone here. The wiring of the microphone can be
lengthened with standard microphone cable. Pay attention to the polarity of the wiring. If
the microphone is wrongly connected it won't work. The limiter will give an error message,
and the volume will be extremely reduced.
The microphone should be installed so that it 'hears' both sound from the speakers as well
as the sound from the crowd in the room. The microphone can be placed closer to the
speakers when the maximum allowed level is very low. This reduces the effects of
background noises.
Audio inputs
Balanced audio inputs. Pin 1 and 3 of the XLR connector should be linked together when
the mixer only has unbalanced outputs. The mixers' signal can be connected to pin 2, and
the ground to pin 1.
Audio outputs
Connect the power amplifiers here. Connect pin 2 (signal) and pin 1 (ground) when the
power amplifier does not have balanced inputs.
8
Installation
DATEQ SPL5 Manual
EN
External attenuator
This input can be used to reduce the maximum sound pressure level with an external
potentiometer. The maximum sound pressure level can be reduced by connecting a linear
10kOhm potentiometer between pin1 and pin 14.
This can be useful to reduce the sound pressure level from behind the bar. It is also
possible to automatically reduce the sound pressure level, for instance when in the summer
some doors are opened.
Reduction signalling
An indicator to show that the limiter has reduced the sound pressure level can be
connected to this output. This output has the same function as the reduction LED on the
front of the limiter (Audio reduction).
Overload signalling
This output indicates an overload somewhere in the limiter. This can be the measuring
microphone or the audio input. This output has the same function as the overload LED on
the front.
Live OK signalling
This output is active as long as the limiter is not in sanction mode. A solid-state relay, to
turn off the power supply of the live band, can be connected to this output. If the maximum
sound pressure level is exceeded by a band, the limiter will go into sanction mode and cut
off the power supply automatically. After a pre-set duration the sanction will be dissolved.
Warning signalling
Level OK
Safe sound pressure
These outputs give an impression of the actual sound pressure level with respect to the
maximum allowed level:
C The warning signalling output becomes active, as soon as the maximum sound pressure
level is exceeded.
C Level OK indicates that the sound pressure level is below the maximum allowed level,
but is getting close (0...12dB span).
C Safe sound pressure indicates that the sound pressure level is well below the maximum
allowed limit (12dB or more).
These indicators can be placed near the disc-jockey, or the live band, to give them an
impression of the sound pressure level.
External VU unit
This is the data connection with the optional VU-display.
EN
DATEQ SPL5 Manual
Operation
9
Operation
1. Power on/ off switch
2. Display: This contains all important data, like the time, actual sound pressure level (dBA value
and peak value). Furthermore it contains the following notifications:
• Warning: The limiter has encountered an error. This can vary from a hardware failure to a
possible sabotage attempt. The volume will be reduced drastically until the problem is
solved. Establish a connection with the computer get a more detailed problem description.
The active TimeSlot LED will start blinking, indicating a reduced output level. The sanction
LED will blink to indicate the type of error message:
í 80% on/ 20% off: A problem with the power supply
í 20% on/ 80% off: Measuring microphone disconnected of defective
í 50% on/ 50% off 1x per sec.: Illegal configuration or cover removed
í 50% on/ 50% off 2x per sec: Memory full
• Level: The current sound pressure is exceeding the maximum allowed sound pressure.
• Muted: The outputs of the limiter are disabled, this occurs when booting the limiter.
• Calibr.: The limiter needs calibration.
• Live: The limiter is functioning in live-mode. This means that the measured audio is not
produced by the limiter and the power amplifiers, but by a live-band. The limiter will not
correct the sound pressure level. When the maximum sound level is exceeded a sanction
will follow. The stage equipment can be switched off if desired.
3. Timeslot LEDs: These LEDs indicate the active time-slots. Each time-slot has it's own
maximum sound pressure level. When the LED is blinking the maximum audio level is reduced.
Possible reasons are:
• When switching between TimeSlots,
• During an error status of the limiter,
• When the external attenuator is active.
4. Status LEDs:
• Audio-present LED indicates the detection of audio signal on the line-in input (activated at
-24dB),
• Audio-reduction LED indicates the attenuation of the sound pressure level,
• Overload indicates that one of the inputs (line or microphone) is overloaded,
• Sanction LED indicates a sanction status of the limiter (LED lights up without blinking) or the
limiter is in error mode (LED is blinking; see above).
10
Operation
DATEQ SPL5 Manual EN
5. Reduction bar: When operating in music-mode the audio reduction can be read out here (the
bar lights up continuously):
• All LEDs off: 0...3dB reduction
• 1 LED on:
3...6dB reduction
• 2 LEDs on:
6...12dB reduction
• 3 LEDs on:
12...18dB reduction
• 4 LEDs on:
18...24dB reduction
• 5 LEDs on:
more than 24dB reduction
When operating in live mode, the current sound pressure level will be indicated with respect to
the maximum sound pressure level. The LED-bar will blink.
• All LEDs off: Sound pressure more than 24dB below maximum,
• 1 LED on:
Sound pressure 18...24dB below maximum,
• 2 LEDs on:
Sound pressure 12...18dB below maximum,
• 3 LEDs on:
Sound pressure 6...12dB below maximum,
• 4 LEDs on:
Sound pressure 0...6dB below maximum,
• 5 LEDs on:
Sound pressure above allowed maximum.
6. RS232 connection for the computer. Please use the supplied cable to connect the limiter to the
computer.
7. Key switch. After removing the cover, the key will be needed to reactivate the limiter.
EN
DATEQ SPL5 Manual
Technical specifications
11
Technical specifications
Inputs
Mic (measuring microphone)............................XLR-3 female. To be used with the supplied
microphone only!
Line (left and right)............................................XLR-3 female. Electronically balanced.
Nominal input level..................................0dBu
Input impedance......................................50kOhm
Common-mode rejection.........................>86dB
Outputs
Line (left and right)............................................XLR-3 male. Electronically balanced.
Output impedance...................................50Ohm
Common
Audio
Frequency response................................5Hz...35kHz @ -1dB
Signal/ noise ratio....................................>80dB
THD+N (IEC-A).......................................<0.06%
Limiter
Threshold................................................70...120dBA (resolution 1dB)
Output correction.....................................-50...+18dB (resolution 0,5dB)
Microphone correction.............................-40...+18dB (resolution 0,5dB)
Maximum attenuation adjustment...........-6...-50dB (resolution 0,5dB)
Memory
2Mbit E2PROM
64 days sound sample memory (resolution 1 minute)
64 days event memory (maximum 96 per day)
External signalling
External attenuator..................................0...-20dB (with 10kOhm lin. potmeter)
Signalling outputs....................................15V/ 5mA max.
Supply
Voltage range..........................................220...240VAC/ 50Hz
Power......................................................15W
Dimensions and weight
Front........................................................483mm x 45mm (B x H) = 19inch/ 1HE
Depth.......................................................175mm
Weight.....................................................2.7kg
SPL5_040825_V1.0
DECLARATION OF CONFORMITY
acc.to art.10.1 EMC directive 89/336/EEC
We,
DATEQ Audio Technologies B.V.
de Paal 37
1351 JG ALMERE
THE NETHERLANDS
hereby declare, exclusively to our responsibility, that this product
Type: SPL 5
Serialnrs.: 49-XXXX
to which this declaration applies, is in accordance with the following
harmonized European norms
EN 50081-1 and EN 50082-1
According to the regulations of the EMC-directive 89/336/EEG, amended by
directive 91/263/EEG, 92/31/EEG and 93/68/EEG.
EN 60065
According to the regulations of IEC 65: 1985 + A1: 1987 + A2: 1989 + A3:
1992, mod. Ratification: 1993-07-06
Almere, August 25th 2004
Managing director
stamp:
signature:
woonplaats / city / Wohnort / place:
d
-
m
-
serienr / serial # / Seriennr. / no. de série:
model / Geräte Typ / produit:
handtekening / signature / Unterschrift
woonplaats / city / Wohnort / place:
aankoopdatum / purchase date / Kaufdatum / date d'achat:
land / country / Land / pays:
postcode / zip code / PLZ:
adres / adress / Adresse / adresse:
koper / buyer / Käufer / acheteur:
postcode / zip code / PLZ:
adres / adress / Adresse / adresse:
dealer / dealer / Vertragshändler / concessionnaire:
inzenden naar DATEQ
mail this to DATEQ
einschicken nach DATEQ
envoyer à DATEQ
GARANTIE / GUARANTEE
d
m
-
aankoopdatum / purchase date / Kaufdatum / date d'achat:
serienummer / serial # / Seriennummer / no. de série:
model / Geräte Typ / produit:
GARANTIE / GUARANTEE
bewaren met de aankoop-/kassa-bon
keep this with original invoice/cash
behalten mit der Originalrechnung
conserver avec la facture originale
GARANTEE CONDITIONS: DATEQ guarantees this product to be free of defects
in materials and workmanship at the time of its original purchase for the period of 12
months. If during this period of guarantee the product proves defective due to
improper materials or workmanship, DATEQ will repair or this product or its
defective parts on the condetions explained hereafter. 1. The guarantee will be
granted only if the correctly filled out guarantee card is presented together with the
original invoice/cash ticket issued to the consumer by the retailer. DATEQ reserves
the right to refuse guarantee service if this information or the products serial
number has been removed or changed after the original purchase of the product. 2.
This guarantee covers none of the following: (a) periodic check-ups, maintenance,
repair or replacements of parts due to normal wear and tear, (b) home service
transport costs and other costs and risks of transport relating directly or indirectly to
theguarantee of this product, (c) damage to this product resulting from abuse and
misuse, including but not limited to the failure to use this product for its normal
purposes or in accordance with DATEQ's instructions on the proper use and
maintenance of this product and the installation or the use of this product in a
manner inconsistent with the technical or safety standards in force in the country
where the product is used, repairs done by non-authorised service stations,
accidents, acts of God, or any cause beyond thecontrol of DATEQ, including but not
limited to lightning, water, fire, public disturbances and improper ventilation.
GARANTIE BEPALINGEN: DATEQ garandeert dat dit produkt vrij is van defecten
in materialen en/of contructie gedurende 12 maanden na aankoop. Indien
gedurende deze periode het produkt defecten vertoont tengevolge van
ondeugdelijke materialen en/of constructie zal DATEQ zonder berekening van
kosten voor arbeidsloon of onderdelen het produkt repareren volgens de
voorwaarden zoals hierna uiteen zijn gezet. 1. Garantie wordt verleend uitsluitend
op vertoon van de garantiekaart tezamen met de originele, door de dealer
afgegeven factuur/kassabon. DATEQ behoudt zich het recht voor garantie af te
wijzen indien de hierboven genoemde gegevens of het serienummer van het
produkt zijn verwijderd of veranderd na de oorspronkelijke aankoop. 2. Deze
garantie dekt niet: (a) periodieke controles, onderhoud en reparatie of vervanging
van onderdelen door normale slijtage, (b) kosten en risico van transport alsmede
voorrijkosten, direct of indirect verband houdende met de garantie van dit produkt,
(c) schade aan dit product ten gevolge van mistbruik of verkeerd gebruik met
inbegrip van maar niet beperkt tot abnormaal gebruik niet in overeenstemming met
de DATEQ instructies over juist gebruik en onderhoud van het produkt en het
installeren of gebruiken van dit produkt in tegenstrijd met de technische of
veiligheidsnormen zoals die van kricht zijn in het land waar het produkt wordt
gebruikt, reparaties uitgevoerd door niet erkende service stations, ongevallen
force majeur, of welke oorzaak dan ook buiten de macht van DATEQ, met inbegrip
van maar niet beperkt tot bliksem, water, vuur, publieke oproer en ondeugdelijke
ventilatie.
CONDITIONS DE GARANTIE:DATEQ garantit que ce produit est exempt de
défaut de matière et de fabrication existant lors de l'acquisition originale par le client
pour un délai d'un an. Si ce produit s'avère défectueux pendant la période de
garantie en raison de matière ou de fabrication incorrecte, DATEQ prendra en
charge le produit ou à défaut DATEQ sous les conditions exposées ci-après. 1. La
garantie sera seulement assurée si la facture origiale et la carte de garantie
remises au consommateur par le distributeur sont présentées. DATEQ se réserve
le droit de refuser sa garantie si tout ou partie de ces mentions ou le numero de
série de l'appareil a été ou modifié après l'acquisition originale du produit par le
client chez le distribiteur. 2. Cette garantie ne couvre aucun des points suivants: (a)
les contrôles périodiquies, l'entretien, la réparation et le remplacement de pièces
par suite d'usure normale; (b) les frais et les risques de transport directs ou indirects
à la mise en oeuvre de la garantie de ce produit; (c) l'endommagement dui produit
résultant d'abus et de mauvais usage, en particulier mais non de façon exclusieve à
la négligence ou faute l'utilisateur, et l'installation ou l'utilisation de ce produit en
contradiction avec les standards techniques ou de sécurité en vigueur dans le pays
où le produit est utilisé, reparations faites par les réparateurs non agréés;
d'accidents de cas de force majeure ou de toute autre cause hors du contrôle de
DATEQ, en particulier mas non de façon exclusieve à la foudre, l'inondation,
l'incendie, les troubles publics, des piles qui ont coulé, une mauvaise ventilation.
GARANTIE BEDINGUNGEN: DATEQ gewährleistet für die Garantiezeit daß dieses
Gerät ab dem Zeitpunkt des Ersterwerbs keine Material und Verarbeitungsfehler
aufweist. Die Garantiezeit beträgt 12 Monate. Sollten sich während der Garantiezeit
Mängel des Gerätes herausstellen, die auf Material- oder Verarbeitungsfehlern
beruhen, wird gemäß den nachstehenden Bedingungen DATEQ ohne Berechnung der
Arbeits- und Materialkosten das Gerät oder seine schadhaften Teile reparieren. 1.
Garantieleistungen werden nur erbracht, wenn die Garantiekarte zusammen mit der
Originalrechnung bzw. dem Kassenbeleg, die der Händler dem Verbraucher ausgestellt
hat, vorgelegt wird. DATEQ behält sich das Recht vor, Garantieleistungen abzulehnen,
wenn nach dem Ersterwerb des Gerätes durch den Verbraucher oder den Händler diese
Angaben oder das Seriennummer entfernt oder geändert worden sind. 2. Diese
Garantie deckt keinen der folgenden Punkte: (a) regelmäßige Inspektionen, Wartung
bzw. Reparatur oder Austausch von Teilen bedingt duch normalen Verschleiß; (b)
Transport-, Fahrtkosten und -risiken, die unmittelbar oder mittelbar mit dieser
Gerätegarantie zusammenhängen; (c) Schäden an diesem Gerät, die verursacht
worden sind durch: Mißbrach und Fehlgebrauch, insbesondere Gebrauch dieses
Gerätes für andere als seinen normalen Zweck bzw. unter Nichtbeachtung der DATEQ
Bedienungs- und Wartungsanleitungen, und den Anschluß oder Gebrauch dieses
Gerätes in einer den in dem Land, in dem das Gerät bebraucht wird, geltenden
technischen oder sicherheitstechnischen Anforderungen nicht entsprechenden Weise;
Reparaturen duch nicht autorisierte Werkstätten; Unfälle, höhere Gewalt oder andere
von DATEQ nicht zu verantwordende Ursachen, insbesondere Blitzschlag, Wasser,
Feuer, Störungen der öffentlichen Ordnung und unzureichende Belüftung.
DATEQ B.V.
De paal 37
1351 JG ALMERE
The Netherlands / Niederlande / Pays Bas
postzegel
stamp
timbre
briefmarke