1
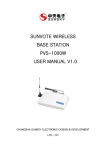
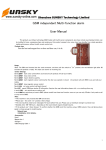
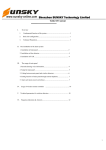
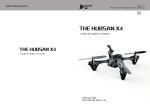
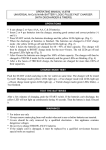
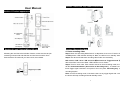
User Manual
Section 3 Load into clip / Stand instructions
Section 1 Product appearance
Section 2 Load / Unload Micro SD card
Section 4 Recording Mode
4.1 Auto recording video
Allocating the card slot at the left side of device, make sure the card pin
Step1: Move the “Recording Mode Switch” on A position, then move “Function Switch”
contacting on down side and slide the card into the slot until it clicks.
on REC position. LED indicator will keep in “Blue”; the device is on “standby” status.
Push the Micro SD card until you hear a click, then release.
Step2: The device will start auto recording video mode once actived by
PIR or Voice \ PIR \ Voice \ PIR and voice(See section 9 “Triggered mode”). The
device has “Bee” sound and “Blue” LED indicator turn to “Green”.
Step3: Time for each video. Each section actived on Auto recording mode, the video
will last 10min\20min\30min ( See section 9 “Recording time” ), no matter how many
times trigger signal received in this period. User can press “Recording key” to stop
recording anytime.
Note: On Auto recording mode, if the device has not any trigger signal with 2 minutes,
the device will stop recording and enter standby mode.
1
2
4.2 Manual recording video
Section 6 Buzzer indication
Step1: Move the “Recording Mode Switch” on M position, then move “Function Switch”
on REC position.
Step2: Press Shooting Key to enter standby mode. LED indicator has on “Blue”.
Step3: Press “Recording Key” to start recording video.
The device has “Bee” sound, and LED indicator change from “Blue” to “Green”.
Step4: Press “Recording Key” again to stop recording video.
4.3 Snapshot image
Step1: Move “Recording Mode Switch” on M position, then moves “Function Switch” on
REC position.
Step2: Press “Shooting Key” to enter standby status, LED indicator on “Blue”. Press
“Shooting Key” once to take one image.
Operation keys instruction
Device Function
“Function
switch”
position
“Recording Mode switch”
position
A/M
Power off
OFF
Recording Automatically
REC
A
Recording Manually
REC
M
Removable disk
USB
A
PC Camera
USB
M
Note: “Function Switch” should be OFF position before adjusting “Recording Mode Switch”.
Action
Status
One short beep
Start recording / capturing picture
Two short beeps
Stop recording
( Device on standby mode for 60 seconds then enter)
Energy saving mode
Three short beeps
Four short beeps
Low battery
Constant beep
Device works abnormally
Section 7 Removable disk Mode
Method 1:
Step1: Move” Function Switch” on OFF position, then move “Recording Mode Switch”
on A position;
Step2: Connecting the device with computer via USB cable; Move “Function Switch” to
USB position;
Then the device will be found as a “Removable disk” and can operate the video file in
Micro SD card.
Method 2: Move “Function switch” on OFF position, takes out the Micro SD card and
install in the card reader. Plug the card reader into computer to check the file.
Section 5 Operational indication
LED
Indicator
Action
Status
On
Charging by power adapter
Off
Charging completes or no external power
Constant Light
Standby mode
Flash quickly
Removable disk / PC Camera
Off
Energy saving
Constant Light
Memory is full
Flash slowly
Recording video
Flash quickly
Do not recognize the memory card
Constant Light
USB mode
Red
Blue
Green
Purple
Tip: Slow flash 1 time per second, quick flash 2 times per second.
3
A: Auto video recording mode
M: Manual recording mode
P: Photograph mode
Recommend to copy the video files to computer before play.
Note: If the power is cut off and battery is taken out, the device’s system time will lose,
in this case, the parameters setting file needs to be re-operated for correcting
parameters and time (see section 9 “Device time”).
4
Select the parameters, click OK, the software will exit automatically, meanwhile, a
Section 8 PC Camera
Step1:Setup
Driver _ Instant USB Device software
Step2:Restart the computer.
Step3:Move “Function Switch” on OFF position, “recording Mode switch” on M position,
then connect the device to computer via USB Cable. Move “Function Switch” on USB
position.
Step4:Run PCCam software.
parameters setting file
will create and store in the Micro SD card.
Disconnect the device and computer; turn off the device for 20 seconds.
and
After the device restarts, device will auto read the configure file
delete this file automatically. If this file still exists, it means the parameters setting is not
successful, repeated above operation.
Recycling record:
Select whether to delete the oldest video file when Micro SD card is full.
Audio Recording:
Select whether to record both video & audio or only record video.
Energy saving:
If this item is selected, when the device is supplied by battery, the device will enter
energy saving mode when it is not videoing or shooting more than one minute under
normal working circumstances. The default mode is not energy saving mode.
Buzzer:
Select whether beep ring of device operation.
Triggered mode:
There are four different video triggered conditions
Section 9 Parameter setting
User can connect the device to computer and run the setting software to change the
device setting.
to the device’s root directory Micro SD Card to run this
Copy this software
software, double-click to enter setting interface, as shown below:
A: PIR or Voice
(Default setting)
B: PIR
C: Voice
D: PIR and voice
Recording time:
Set max one video file time: 10 min / 20 min (Default setting) / 30 min.
Device Time:
The device will synchronize the date and time with computer automatically when the
setting software is running.
Device version:
Show the device software version.
5
6
Shenzhen SUNSKY Technology Limited
Section 10 General Troubleshooting
No
General
Trouble
Possible Reason
Solution
Indicator flash quickly
1
No Micro SD card or card
Load Micro SD card or load SD card properly
in green color, can’t
didn’t install properly
enter video status
Indicator flash
There is not enough
constantly in green
space of Micro SD card,
color, can’t enter
and recycled video
video status
function is not set.
Delete some old files of Micro SD card, or set
2
recycled video function by parameters setting
tool.
The device is not clear
3
Images blur
Clear the device
The protective film on the
Peel off protective film on the device.
device is not peeled off.
The indicator can’t
4
become blue after the
device is turned on
Battery supply for a long
Connect external power for more than 10
time, low voltage
minutes, and then restart the device.
Battery supply voltage,
manual video mode,
Press Shooting key once
didn’t press Shooting key
External power
disconnects, and battery
was taken out before.
Use parameters setting tool, reset the device
External power cut off or
system time.
no electricity, battery
5
The recording file
time is incorrect
supply for a long time, low
voltage
External power cut off,
battery not working, and
Change the battery, use parameters setting tool,
then resumes external
reset the device system time.
power.
5
Use parameters setting
tool to set parameters, the
Regulate the computer time, use parameters
computer time which
setting tool to reset parameters, restart the
The recording file
connected with the device
device within 20 seconds
time is incorrect
is incorrect.
4
Shenzhen SUNSKY Technology Limited
No
General
Trouble
Possible Reason
Solution
Use parameters setting
tool to set parameters,
use parameters setting tool to reset parameters,
restart the device after a
restart the device within 20 seconds
long time(more than 20
seconds)
6
Video file play
Computer recognize USB
Copy the video file to computer, and then play
abnormally
disk slowly
the video with software in the computer.
Section 11 Main technical specifications
No.
Item
Index
1
Camera angle
68 degrees
2
Video format
AVI
3
Video resolution
VGA 640 X 480
4
Image format
JPG
5
Image size
1600 X 1200
6
Micro SD Card
1G~32G
7
Battery capacity
240mAh
8
Charging time
2 hours
9
Infrared detection range
4 meters
10
Infrared detection angle
70 degrees
11
Voice sensor triggered condition
Start videoing when it is above 65dB
12
Battery videoing time
Up to 120 minutes
5