1
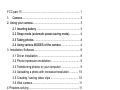
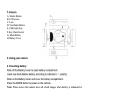
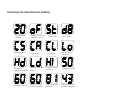
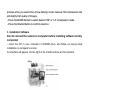
JDC5 User ’s Manual 100K pixels Dual Mode Digital Camera FCC part 15.21 Warning: Changes or modifications to this unit not expressly approved by the party responsible for compliance could void the user’s authority to operate the equipment. FCC part 15.105 NOTE: This equipment has been tested and found to comply with the limits for a Class B digital device, pursuant to Part 15 of the FCC Rules. These limits are designed to provide reasonable protection against harmful interference in a residential installation. This equipment generates, uses, and can radiate radio frequency energy and, if not installed and used in accordance with the instructions, may cause harmful interference to radio communications. However, there is no guarantee that interference will not occur in a particular installation. If this equipment does cause harmful interference to radio or television reception, which can be determined by turning the equipment off and on, the user is encouraged to try to correct the interference by one or more of the following measures: - Reorient or relocate the receiving antenna. - Increase the separation between the equipment and receiver. - Connect the equipment into an outlet on a circuit different from that to which the receiver is connected. - Consult the dealer or an experienced radio TV technician for help. Pertinent testing documentation is available for verification. 1 FCC part 15 ............................................................................. 1 1. Camera ............................................................................. 3 2. Using your camera ............................................................... 3 2.1 Inserting battery .......................................................... 3 2.2 Sleep mode (automatic power-saving mode) .............. 4 2.3 Taking photos .............................................................. 4 2.4 Using various MODES of the camera ......................... 4 3. Installation Software............................................................. 8 3.1 Driver Installation ........................................................ 8 3.2 Photo impression installation ...................................... 9 3.3 Transferring photos to your computer ......................... 9 3.4 Uploading a photo with increased resolution ............ 10 3.5 Creating / saving video clips ..................................... 10 3.6 Web camera...............................................................11 4 Problem-solving ...................................................................11 5 Technical Specifications ...................................................... 12 Important NOTES ............................................................... 13 2 1.Camera A. Shutter Button B. LCD screen C. Lens D. Viewfinder Button E. USB Cable Port F. Key Chain Socket G.. Mode Button H. Battery Cover 2. Using your camera 2.1 Inserting battery Slide off the Battery Cover to open battery compartment. Insert new AAA alkaline battery according to indicated + / - polarity. Slide on the Battery Cover and cover the battery compartment. Press the MODE button to power on the camera. Note: Please notice that camera loses all stored images when battery is exhausted or removed. Transfer all images from camera to the computer before removing or replacing the battery to save store images! 3 2.2 Sleep mode (automatic power-saving mode) If your camera is not connected with the computer and you are not using the camera longer that 30 sec, camera will automatically turn the power off to extend battery life. Blank LCD screen indicates the sleep mode. You can turn camera to the sleep mode (manually) by pressing the MODE button, then LCD screen shows “of.” Press the Shutter Button; you will hear the beep as camera will go to the sleep mode. Press the MODE button to activate the camera, digits on the LCD screen and the beep sound will confirm that camera has been activated. 2.3 Taking photos - Press the MODE button to power up the camera. - Slide the Viewfinder Button up to extend the Viewfinder. Look through its lens and aim at the photographer scene. - Press the Shutter Button to take a picture. Decreased number appears on LCD screen, beep will confirm taken picture. - The camera is ready to take photo, just press the Shutter button, a distinct, single beep sounds and a photo is taken. If you hear two beeps, then picture cannot be taken because it is too dark, or the camera’s memory is full. 2.4 Using various MODES of the camera The LCD screen displays following symbols when the MODE button is pressed 4 consecutively; the interpretations are as follows: H i- r e s o lu tio n p ic tu r e s C o n ti n u o u s m o d e C h a n g e to c o m p re sse d m o d e C h a n g e to 6 0 H z R e a d y to c lo s e o r s h u td o w n m o d e T im e r m o d e D e l e t e la s t D e l e t e a ll C h a n g e to h ig h r e s o lu t io n C h a n g e to n o r m a l m ode L o w r e s o lu tio n p ic tu r e s C o m p r e s s i o n h ig h r e s o lu t io n p ic tu r e s A V I m ode C h a n g e to l o w r e s o lu t io n C h a n g e to 5 0 H z C o m p r e s s io n lo w r e s o lu t io n p i c tu r e s PS: Display is only 2 digits, so for 3 digit numbers e.g. the compression low resolution mode will display two times, 2 & 43 represents 243,1&10 represents 110. 5 2.4.1 “St” Self-timer mode Press the MODE button until the LCD screen displays “St”, then press the Shutter B u tto n . Camera will “beep” ten times and automatically take a picture after ten seconds. 2.4.2 “d8” AVI mode - Press the MODE button and select “dB,” then press the Shutter Button. - Camera will continuously capture scene, as long as you keep the Shutter Button depressed, or until camera’s memory becomes full (approx 6 sec). 2.4.3 “CS” continuous mode - Press the MODE button and select “CS,” then press the Shutter Button. - Camera will continuously capture 3 photos. 2.4.4 “CA” Clear all / Delete all taken pictures - Press the MODE button to select "CA". - Press the Shutter Button to confirm your selection, digits on the LCD screen start to b l i n k . - Press the Shutter Button again to delete all images from the camera. 2.4.5 “CL” Clear last / Delete last taken picture - Press the MODE button to select "CL". - Press the Shutter Button, camera will beep and delete last taken picture and LCD screen will show higher number. 6 If the last photo taken was taken in Continuous mode, then the complete recorded clip will be deleted. 2.4.6 “LO” / “HI” resolution - Press the MODE button to select desired resolution mode; LO low resolution - you can save more pictures, or HI high resolution - better quality, but you can store less pictures in your camera. - When the LCD screen displays desired mode, press the Shutter Button to confirm s e l e c ti o n . The LCD screen will show number of available pictures which can be taken at the selected resolution mode. You can change resolution at any time, as needed. 2.4.7 “50 / 60” frequency Various countries use different frequencies of the electrical power; 50Hz or 60Hz. Select “50 / 60” mode (to avoid flickering images) depends on your current location. - Press the MODE to select “50/60" mode, then press the Shutter Button to confirm s e l e c ti o n . 2.4.8 “Hd / Ld” Compression rate You can select Hd high density, or Ld low density compression rate modes. Note that at the Hd (high density) you can compress / store more pictures, and less 7 pictures when you select the Ld (low density) mode, however Hd compression rate will slightly limit quality of images. - Press the MODE Button to select desired “Hd” or “Ld” compression mode. - Press the Shutter Button to confirm selection. 3. Installation Software Do not connect the camera to computer before installing software is fully completed - Insert the CD in your computer’s CD-ROM drive, and follow up step-by-step installation on computer’s screen. An interface will appear. On the right of the interface there are four buttons. 3.1 Driver Installation - Insert CD in your CD-ROM drive, Click on <Install Camera Driver>, follow up its step-by-step instructions and finish installation. 8 - Restart the computer, <Dual Mode Camera> will appear on the desktop of your computer. 3.2 Photo impression installation - Insert CD into the CD-ROM drive and select <Install Arcsoft Photoimpression 4.0> - Follow instruction and complete installation. - Restart computer. 3.3 Transferring photos to your computer Ä Connect your camera to the computer with the USB cable. Ä Double-click the Photo impression icon and start the program Ä Click on "Get photo" and select the Digital Camera Ä Select "data source": Dual Mode Camera Ä Click on "Acquire" in the bottom left corner. The photo transfer window appears on the screen. Click the "download" button. All taken photos will appear inside the interface window. Using the mouse, select any picture; right click if you like to zoom a picture. You may left click and "select all photos" of the interface then click on the button "Transfer photos." All images will be transferred into the Arcsoft Photo impression application software. You can select / save pictures, or assign titles to your pictures and select the place where you are storing images, like My Documents, Desktop, My pictures folder, etc. When you have pictures transferred / downloaded into the computer, then you can delete images from camera and take another picture. 9 Photo management: with the new Photoimpression interface it is very easy to process your photos. Editing: Photoimpression has a wide range of editing options such as correcting brightness and contrast that are all easily accessible, go to www.adobe.com if you need more information regarding Photo Express application software. Help. To access the ArcSoft Photoimpression 4 Manual on the CD-ROM, you will need Adobe PDF Reader software. This is available as a free download from http://www.adobe.com 3.4 Uploading a photo with increased resolution After downloading photos, click on the button "edit image" in the upload window and select "Increase resolution", then click on the "OK" button to confirm. Select “transfer” button to transfer those photos to Arcsoft photo impression 4.0 Software, then photos will be uploaded with 400K pixels resolution. 3.5 Creating / saving video clips Video clips are saved at with the "AVI capture" mode, - Connect your camera to your computer and select “MyDSC.exe” located in the folder ‘Dual Mode Camera’ on your desktop. - Click on the "Download,” then select "Save photos" on the interface window. A window will open, you can choose the folder where you like to save the video and save as [.avi] file. 10 3.6 Web camera - Connect your camera to a computer and run PCCam program located in the folder <Dual mode camera> on your desktop. - Select <PCCam> in the 'Devices' menu, then select <Preview> in <Options> mode. - Computer will display stream video from the camera. You can select ‘Video Capture Pin’ in the ‘Options’ menu, to change the size of the screen / image. 4 Problem-solving Here are the most common problems: When press the mode button the camera does not turn on: --Battery level is low. You should replace new battery. The camera cannot download photo or display “no photos”: -- Restart the computer and reconnect the camera. Check that the folder Dual Mode Camera is in the Control Panel / System settings. If device is not present then disconnect camera and reinstall Driver again. -- If the camera driver was successfully installed, but still you can’t see images, then disconnect camera, UNINSTALL the software and restart your computer. -- At last, re-install the Driver and application software from CD again. Connect the camera. 11 5 Technical Specifications Resolution: 100K Pixels ((352X288) CIF Colors: 24 bits Lens: Non-spherical Lens f=5.4mm Aperture: 1: 2.6 Focusing range: 0.5m –infinity Storage Capacity: 2MB P h o to s : High-resolution (352X288 pixels), 20 pictures Compression, high-resolution pictures, 60 pictures Low-resolution (176X144 pixels), 81 pictures Compression, low-resolution, 243 pictures Power supply: 1 AAA alkaline battery required Interface:USB port System compatibility: Pentium II and above Personal Computers Windows 98SE/2000/ME/XP Operating System 32 MB or above Memory (64 MB or above Recommended) 60 MB Hard Disk Capacity CD-ROM Drive Color Monitor (Not Lower than 800*600, 24 Bit) USB interface 12 Important NOTES 1.Before using your camera to take many photos, please sample some photos to verify the camera works well and pictures can be downloaded OK. This will avoid any consequential problem with lost images. 2.Please transfer all captured photos to your computer before replacing the batteries 3.Using your camera when there is body static-electricity may power off your camera or stop PC-CAM, simply restart it and the camera will work again. 13


![[VC120-2] [MENARDS] User Guide [FINAL] 20100618](http://vs1.manualzilla.com/store/data/005701495_1-e41e7e0d778d2f045f29de9890ac0ae7-150x150.png)