1
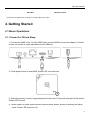
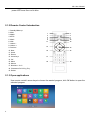
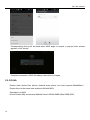
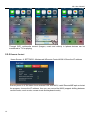
Shenzhen SUNSKY Technology Limited MXQ User Manual M8 User Manual Sorry to the changes of our products parameters but without notice. 1. About MXQ 1.1 Overview (Top View) Power Button Power LED (Front View) 1 M8 User Manual (Back View) Power Headphone RJ45 Port & Port Upgrade Button HDMI Port SPDIF Port (Right View) TF Card OTG Port USB Port USB Port 1.2 Accessories MXQ includes the following accessories Power Adapter 2 HDMI Cable USB Cable M8 User Manual AV Cable Remote Control * Accessories and appearance are subject to change without prior notice 2. Getting Started 2.1 Basic Operations 2.1.1 Power On/ Off and Sleep 1. Connect the MXQ to the TV with HDMI cable, connect MXQ to the power adaptor, Connect mouse, air mouse or other input devices with USB port 2. Press power button to start MXQ, power LED turns into blue 3. Under the power on mode, long press power button over 10 seconds to power off the device, Power LED turns off 4. Under power on mode, press remote control’s power button, device is entering into sleep mode. Power LED turns into red 3 M8 User Manual 5. Under sleep mode, device will be wake when you press remote control’s power button, power LED turns from red to blue 2.1.2 Remote Control Introduction 1. Standby/Wake up 2. Mute 3. Media 4. APPS 5. Music 6. Web 7. Volume 8. Volume + 9. Previous 10. Next 11. Home 12. Return 13. Arrow keys 14. OK 15. Menu 16. Mouse 17. Numbers(0~9) 1 2 3 5 7 9 11 4 6 8 10 12 13 15 14 16 17 18 19 18. Characters Switching Key 19. Delete 2.1.3 Open applications Use remote control’s arrow keys to choose the wanted program, click OK button to open the selected program 4 M8 User Manual 2.1.4 Switch in the applications Click icon arbitrarily to view recently used programs, click program icon to switch application 2.1.5 Close Applications Click icon * to view recently used programs, choose one of them by click and hold, drag it to blank area to close the application * This function only operated in the condition of Mouse mode 2.1.6 Back To Home Screen Click icon Click icon to return to home screen on remote control to return to home screen 2.1.7 Read External Storage Data Read U Disk Insert U flash disk or removable hard disk into USB port in the status of power on, icon appears in top left corner of the desktop, open “FileBrowser”, the identified USB(A:) will 5 M8 User Manual appear under “Local Disk”, U disk’s operation is available now Read TF card Insert TF card into the device in the status of power on, when icon appears in top left corner of the desktop, open “FileBrowser”, the identified External Storage Card will appear under “Local Disk”, TF card’s operation is available now 2.1.8 WIFI Function Home Screen SETTINGSNetwork Select“Wi-Fi”to open WIFI function Choose hotspot Input Password Connect to the network 6 M8 User Manual 2.1.9 Ethernet Function Home Screen SETTINGSNetwork Select “Ethernet” to open Ethernet function Insert network cable, network will be connected automatically 2.1.10 Bluetooth Function Home Screen SETTINGS OtherMore SettingBluetoothON 7 M8 User Manual Click “Not visible to other Bluetooth devices”, the menu turns to “Visible to all nearby Bluetooth devices”, 2 minutes countdown begin Select the target device within 2 minutes, connection will be done automatically, some devices need to enter pairing code, usually is 0000 or 1234 2.2 Advanced Operations 2.2.1 WLAN Hotspot Operations on MXQ: Home Screen SETTINGS Other More Setting More… Portable hotspot Select 8 M8 User Manual “Portable Wi-Fi hotspot” Select “Set up Wi-Fi hotspot” to set up “Network SSID”、“Security”、“Password”parameters * Ensure connected to the wired network, MXQ can be used as wireless AP to support more wireless devices access in the family 2.2.2 Miracast Operations on MXQ Home Screen My recommendMiracast Open Miracast service Operations on other devices (for example MIUI 2) Home Screen Settings WLAN Press menu WLAN Display Find the devices searched (MXQ), click invite 9 M8 User Manual Corresponding device will be listed when MXQ begin to search, a pop-up invite window appears, click “accept” Complete connection, MXQ will display other device’s images 2.2.3 DLNA Ensure other devices like Iphone, Android smart phone, etc have opened iMediaShare *, Ensure them in the same local wireless LAN with MXQ Operations on MXQ Home ScreenMy recommendMedia CenterDLNA DMRStart DMRON 10 M8 User Manual Select DLNA DMP to search device Complete connection, MXQ will display other device’s images * DLNA software including but not limited to iMediaShare 2.2.4 AirPlayer Ensure Iphone devices (iPhone, iPad etc) in the same local wireless LAN with MXQ Operations on MXQ: Home Screen My recommendMedia CenterAirPlayerStart AirPlayerON Operations on Iphone devices 11 M8 User Manual Through WIFI, multimedia content (Images, music and videos) in Iphone devices can be transferred to TV for playing 2.2.5 Remote Control Home Screen SETTINGS AdvancedRemote ControlON Show the IP address Ensure phone is in the same local wireless LAN with MXQ, install RemoteIME.apk and start the program, choose the IP address, then you can control the MXQ (support shifting between remote mode, movie mode, mouse mode and keyboard mode) 12 M8 User Manual * RemoteIME.apk only can run well on android platform 13