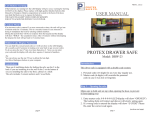
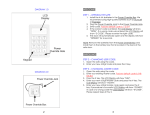
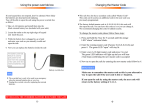
1
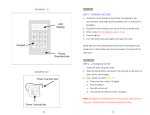
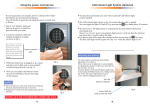
Low Battery warning:
If the batteries are running low the LED display will give you a warning by showing
LO-BAT on the display. Please replace with high quality Alkaline batteries like
Duracell or Energizer. Battery compartment is located in the back of the door,
just slide the black cover to expose the batteries.
THE SAFE WILL KEEP YOUR CODES IN MEMORY
FOR UP TO 6 MONTHS WITHOUT ANY POWER.
P
REV.8.28.12
PROTEX
SAFE CO.
USER MANUAL
Lockout Mode:
If an incorrect code is entered 3 or more consecutive times, the safe will go into
a lockout mode for 15 minutes. This is a security feature in case someone is
trying to manipulate the lock by entering random numbers.
During this period there will be no response from the keypad and the display
will show “HOLD + the countdown timer. After 15 minutes without interrupting
the keypad, the lock will go back to it's normal state.
Hidden Code Display Function:
You can hide the your personal code so it will not show on the LED display.
(It is usually used if someone is looking over your back to spy on your code).
To do so; press the star (*) key two times then press #. Now you can enter
your code and the display will only show squares instead of numbers.
PROTEX HOTEL/PERSONAL SAFE
Model: SHE-1108
Tip:
You can always use the star (*) key to delete the last digit.
Just like a Backspace button on your computer.
Installation:
Introduction:
We recommend hiring a contractor or a handyman to install
the safe in your home or office.
This safe is equipped with a double code system:
Installation Steps:
1. Locate an interior wall that you would know for sure that there are no pipes
running inside. Make sure there is no bathroom or a shower on the other
side of that wall.
2. Using a Stud Finder, locate a good location between two wall studs at approx.
the height of your eyes.
3. Using a level and a measuring tape, draw a rectangular of 18” high x 14” wide.
(to make sure, measure the size of the back of the safe and make the rectangular
about a ¼” larger to have some play).
4. Using a hand held drywall saw, cut the dry wall according to the marking.
DO NOT USE AN ELECTRIC SAW.
5. Remove the drywall cutout and make sure there are no interference
inside the wall to install the safe
6. Insert the safe into the wall and install to the wall studs from the inside
of the safe using the lag bolts provided. It is recommended to drill pilot holes
for bolts.
page 4
1. Personal code (4-6 digit) for an every day regular use.
2. Master code (6-digits) will override the personal
code in case it was lost or forgotten.
Step 1. – Opening the safe.
1. Enter master code: 8-8-8-8-8-8 (LED display will show “OPENED”)
The locking bolts will retract and door will slowly spring-open.
2. If a wrong code is entered the display will show “E-CODE” Please
Re-enter the correct code again.
page 1
(continue next page)
Keypad
Step 2. – Closing the safe.
1. Shut the door and hold it closed all the way with one hand.
2. While holding the door shut, press # and the door will
automatically lock, the display will show “CLOSED”
then your personal code.
Note: You have 10 minutes to press # and close the safe from
the time it was opened.
If you press # and the display shows “E-CODE”, it means
that the 10 minute period have passed. To close the safe
now, you must enter your personal code and press # (e.g. 1-2-3-4-#).
The door will lock; the display will show “CLOSED” then
your personal code.
Step 3. – Changing your personal code.
1. Open the safe with your personal code or factory code 1-2-3-4
(if it was never changed before).
2. Write your new 4 digit code on a piece of paper or memorize
it in your head
3. Shut the door, hold it closed, then enter that new 4 digit personal code.
4. The safe will automatically lock and retain your new code you
just entered. The display will show “CLOSE” “CLOSED”
and your new personal code.
5. Now you can test it by entering your new code. Just key-in
the new 4 digit code and safe will open.
Step 4. Changing the master code (Optional)
1. Open the safe using your personal code and leave it in
the open position.
2. Enter the existing 6 digit master code (Factory code is: 8-8-8-8-8-8)
and press #. The LED display will show “NEU”.
3. Now enter a new 6 digit master code and press #
(LED display will show “AGAIN”)
Enter that 6 digit master code again for the second time and press #.
LED Display
Power Override
Hole
If the procedure was successful the display will show “DONED”.
This indicates that the new master code has been accepted.
If the display shows “E-CODE” please repeat all the steps in Step 4.
THE MASTER CODE OVERRIDES THE PERSONAL CODE
IN CASE IT WAS LOST OR FORGOTTEN.
Using the Emergency override key:
Please use this key only if both codes (user and master) are not
available or if the keypad is malfunctioning.
DO NOT use this key to open the safe on a regular bases.
To use the key, gently unscrew the chrome keyhole cap located
to the left of the keypad. Insert the key with the notch
pointing upwards and turn counter-clockwise to open the safe.
NEVER LOCK THE KEYS INSIDE THE SAFE. ALWAYS KEEP
THE KEYS OUTSIDE OF THE SAFE IN A HIDDEN PLACE.
Using the Power override battery box:
If the internal batteries of the safe die, you can always give power to
the lock from the outside by using the included battery override box.
1. Slide the battery box cover and install 4 AA batteries
2. Plug in the jack in the power override hole in the keypad
3. Now open the safe as you would by using your personal or master code
NEVER LOCK THE POWER OVERRIDE BOX INSIDE THE SAFE.
(continue next page)
page 2
page 3