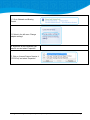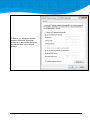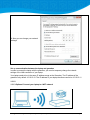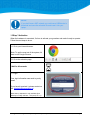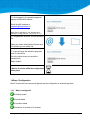
1
Getting started with your iSii aqua compact iSii aqua compact Quick start Version date: November 11, 2013 Release version: 1646 This document has been created with utmost care. Given the scope of its content and the complexity of the matter Hoogendoorn Growth Management is not responsible for the correctness of this document. Terms of delivery Mailing Address: Visiting Address: PO Box 108 Westlandseweg 190 NL - 3130 AC Vlaardingen The Netherlands Telephone: +31 10 4608080 E-mail: [email protected] RIGHTS. Copyright © Hoogendoorn Growth Management, Vlaardingen, The Netherlands 2011. All rights reserved. Names with ® are registered trademarks of Hoogendoorn Growth Management. TERMS OF DELIVERY The General Terms of Delivery of Installation Companies of 2007 (ALIB 2007) as laid down by Uneto-VNI, apply to all our contractual relationships. On your request, these terms will be sent to you immediately and free of charge. They can also be read in the Help function of your Hoogendoorn computer and on the Internet: www.hoogendoorn.nl In addition, the contractual or general terms of your Hoogendoorn dealer or installer may also apply. In the event of any conflict between terms, the terms of the dealer/installer will prevail. UNDISTURBED FUNCTION In addition to the ALIB 2007 General Terms of Delivery, there are two extra provisions concerning the iSii Aqua Compact process computer: 1. Do not run or install any other software on the iSii Aqua Compact than provided by Hoogendoorn, unless Hoogendoorn has specifically declared this third party software “appropriate for Hoogendoorn”. 2. The iSii Aqua Compact should only be connected to a computer network (LAN, WAN, Internet etc.) by a skilled and professional IT supplier who strictly follows the Hoogendoorn guidelines on this matter. These guidelines can be obtained free of charge at the Hoogendoorn helpdesk. Unless both of these items are observed properly, Hoogendoorn will not be responsible for any possible consequences. PUBLICATIONS Every effort has been made to ensure the accuracy of the contents of this publication and the computer program described. Should any errors be detected, Hoogendoorn would greatly appreciate notification. Notwithstanding the above, Hoogendoorn can only accept liability for any damage or for the consequences thereof, as described in the above-mentioned General Terms. The contents of this document are subject to change without notice. EXTRA PROTECTION You should not rely on critical processes to be guarded and protected by means of your computer alone. There are many critical processes in a greenhouse - like watering, levelling of peaks in 2 gas and electricity consumption, CO supply, lighting, etc. – which need to be safeguarded. We strongly advise you to provide for back-up protection by means other than a computer through equipment unconnected to or independent of the process computer. Above that, personal (visual) checks of vital processes should be performed regularly. Furthermore, precautions outside the computer must be implemented to prevent from damage to installations due to erroneous or unexpected computer actions. Getting started with your iSii aqua compact iSii aqua compact Quick start Terms of delivery 3 Contents 1 QUICK START.....................................................................................................................................5 1.1 STEP 1 REQUIREMENTS ...............................................................................................................................5 1.2 STEP 2 PREPARATION .................................................................................................................................6 1.2.1 Connect the hardware ....................................................................................................................6 1.3 STEP 3 ACTIVATION ................................................................................................................................. 11 1.4 STEP 4 CONFIGURATION........................................................................................................................... 12 1.4.1 What is configured? .................................................................................................................... 12 1.5 QUICK START CONCLUSION....................................................................................................................... 13 1.5.1 Note when operating .................................................................................................................. 13 Getting started with your iSii aqua compact iSii aqua compact Quick start Contents 4 1 Quick Start The iSii aqua compact is a plug & play system. This means that a great part of the installation, the software part, of the system is done automatically. Get started and follow the next 4 steps! 1.1 Step 1 Requirements Before you start, check if all items in the list below is present. Some items (*) you need to purchase yourself. iSii aqua compact Greenbox The actual computer inside the iSii aqua compact. Power outlet Switch * Getting started with your iSii aqua compact iSii aqua compact Quick start Quick Start 5 Laptop * WiFi * Network cables * Login information (send by mail) MAC address (will appear once you've logged in) Activation File (send by mail) 1.2 Step 2 Preparation 1.2.1 Connect the hardware It's now time to connect the hardware to each other. Getting started with your iSii aqua compact iSii aqua compact Quick start Quick Start 6 A. Insert the plug into the outlet B. Connect the greenbox to the switch with a network cable Use LAN1 of the greenbox C. Connect your laptop to the same switch with a network cable D. Switch the power of the greenbox on by switching the 'Main' and 'IO' module upwards on the poweroutlet. 1.2.1.1 How to change network settings step by step A.Go to your Control Panel via the 'windows' button B. Go to 'Network and Internet' Getting started with your iSii aqua compact iSii aqua compact Quick start Quick Start 7 C. Go to 'Network and Sharing Center' D. Select in the left menu 'Change adapter settings' E. Right-click on the connection you want to use and select 'Properties' F. Click on 'Internet Protocol Version 4 (TCP/IPv4)' and select 'Properties' Getting started with your iSii aqua compact iSii aqua compact Quick start Quick Start 8 G. Before you change the network settings, write down the original settings so in the end the laptop can be changed back into its original settings. Getting started with your iSii aqua compact iSii aqua compact Quick start Quick Start 9 H. Now you can change your network settings! Set up communication between the laptop and greenbox In order to connect the laptop with the greenbox, you need to temporary change the network settings of the LAN connection of your laptop. Your laptop needs to be in the same IP address range as the Greenbox. The IP address of the greenbox is by default 10.10.10.10. The IP address of your laptop therefore need to be 10.10.10.11. 1.2.1.2 1.2.1.3 Optional: Connect your laptop to a WiFi network Getting started with your iSii aqua compact iSii aqua compact Quick start Quick Start 10 NOTE! If you don't have a WiFi network you could use a USB device to download and save the activation file and insert it into your laptop. 1.3 Step 3 Activation When the hardware is connected, it's time to activate your greenbox and make it ready to operate. Follow the next steps to do so. A. Go to your internet browser. Note: To get the most out of the system, it's best to use Google Chrome. B. Go to the activation page Wait for 60 seconds C. Login Your login information was send to you by email. If you haven't received it, please contact us via [email protected]. Note that our helpdesk is only available from Monday to Friday 8:00 am - 5:00 pm (UTC +1) Getting started with your iSii aqua compact iSii aqua compact Quick start Quick Start 11 D. Once logged in, the activation page will appear with the MAC address. Email the MAC address to [email protected] Note that our helpdesk is only available from Monday to Friday 8:00 am - 5:00 pm (UTC +1) E. Hoogendoorn will email you the activation file. Open your email, download the file and save it to a folder you can easily find. F. Login and open the activation page and click on 'choose file'. Go to the folder where you saved the activation file. Select 'submit'. Wait for 5 minutes while the configuration takes place. 1.4 Step 4 Configuration After 5 minutes the home screen will appear and the configuration is automatically done! 1.4.1 What is configured? Activating system Controls added IO modules added Connection of controls to IO modules Getting started with your iSii aqua compact iSii aqua compact Quick start Quick Start 12 Connection between controls 1.5 Quick Start Conclusion When the automatic configuration is done, you can take the followings steps: 1.5.1 [recommended] Check the configuration > Installation Manual, chapter "After activation check" . Connect the hardware > Installation manual, chapter "Connect hardware". Backup your system > Installation manual, chapter "Backup and restore". When you want to operate your system, go to the User manual. Note when operating Note that when setting parameter values, the correct separation characters are used. For example Use the ":" when you need to insert time as "h:m:s". 1.5.1.1 Editing values Values with a “pencil” button are editable by users. When the “pencil” button is pressed a user is able to change the setting value. After clicking the green button the edited value is saved. The content of the page is refreshed every second. Setting values that are in edit mode are not refreshed. Getting started with your iSii aqua compact iSii aqua compact Quick start Quick Start 13 The parameters of all control pages are sorted in alphabetical order. All actions described in this document can only be done when you are logged in as "AquaService". Getting started with your iSii aqua compact iSii aqua compact Quick start Quick Start 14