1
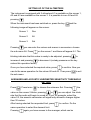
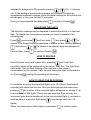
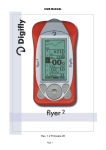
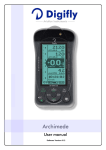
USER MANUAL
DISPLAY
A: Analogue variometer
B: Screen 1
Altimeter A1
C: Screen 2
Digital variometer / Anemometer
D: Screen 3
Altimeter A2 - Altimeter A3 - Flight timer
KEYBOARD SYMBOLS
Switching on - Switching off
Menu
Variometer / anemometer variator
Volume of the acoustic variometer
Altimeters A2, A3 and flight timer
Zero-setter A2, A3 and timer
USE OF THE KEYS DURING THE FLIGHT
The keys to be used during the flight are 4.
Pressing it you can regulate the volume of the acoustic variometer:
silent, medium, loud.
Pressing it you select A2, A3 and flight timer on the screen 3.
Pressing it you select the digital variometer or the instant speed
(when the instrument is supplied with the speed probe) on the
screen 2.
Pressing it you zero the value now appearing on the screen 3
(A2, A3 or flight timer).
SETTING UP OF THE ALTIMETERS
The instrument is equipped with 3 altimeters:A1 is readable on the screen 1,
A2 and A3 are readable on the screen 3. It is possible to zero A2 and A3
pressing
.
When the instrument has been switched on, press the key
and the
following image will appear on the screen:
Pressing
Screen 1
Rec
Screen 2
Alt
Screen 3
Set
you can enter the various sub-menus in succession: choose
the sub-menu Alt. Press
on the screen 1 and there will appear A1. The
blinking indicates that this value is ready to be adjusted, pressing
increase it and pressing
to
to decrease it (a stedy pressure on the key
makes this operation faster).
Once you have selected the required value, press
to confirm. Now you
can do the same operation for the values A2 and A3. Then press
to exit
the sub-menu.
AVERAGER AND ACOUSTIC VARIOMETER SENSITIVITY THRESHOLD
SETTING
Press
. Press twice
to choose the submenu Set. Pressing
value on the screen 2 blinks: pressing
or
the
you can adjust the climb
rate that the audio will begin to sound at. If you, for example, select the
value 0.3, the acoustic variometer will signal only altimetric changes higher
than 30 cm/sec.
After having selected the requested limit, press
to confirm. Do the
same operation to select the descent limit.
Pressing
again you have access to the averager, which can be
selected for delays up to 30 seconds, pressing
or
(Ex.: if I choose
sec 15 the analogue and sound-variometer will continue to signal the
instantaneous altimetric change, while the digital variometer will indicate the
altitude gain or loss over the last 15 seconds).
Once you have selected the delay press
to confirm. Escape
.
ADJUSTING THE UNITS
The altimetric readings can be displayed in metres and Km/h or in feet and
Mph. To change the measurement system you have to operate in the
following way.
Press
, press twice
and four times
then press
or
to
choose if the height has to be expressed in metres or feet. Confirm pressing
. Now press
or
Km/h or Mph. Press
to choose if the speed has to be expressed in
to confirm. Escape
.
HOW TO RECORD
Enter the main menu and choose Rec: pressing
you’ll start the
recording, which will be confirmed by the notice: Start Rec. The flight timer
self-zeroes. The constant flashing of the indicator of the chosen
measurement unit on screen 1 tells the pilot during the flight the recorder is
on. Pressing
during the recording will interrupt it.
HOW TO READ THE RECORDING
It is possible to re-play the recorded flights up to 10 of them, the eleventh
recording will cancel the first one. After you have entered the main menu,
pressing
the number of the recorded flights will appear on screen 2, up
to a maximum of 999 flights. Every time you enter the flight memory the
instrument goes back automatically to the last recorded flight: if you want to
read the data of a previous flight press
(you can go back up to 10
flights).
When you have chosen which flight to read press
to confirm and to
enter the reading of the highest values. If you press
lowest recorded values. Pressing
again you enter the
you can read the highest speed of
the flight on the screen 2, instead of the alti averager. On the screen 3 you
can see the lenght of the flight in hours and minutes (up to 99 h and 59
min.).
HOW TO ACTIVATE THE ANEMOMETER
The instrument is calibrated to read speed during the flight. On the right side
of the VL100 there is the jack, in which you can insert the special probe
(optional). After its insertion you have only to press the key
to turn the
variometric value into the anemometric one and vice versa on the screen 2.
POWER
The instrument is powered by two 1,5 volt pen light batteries. The working
life is of about 200 hours, using alkaline batteries.
Be careful to insert the batteries with the correct polarity. When there are
about 40 hours of power left, the flashing notice Batt on the display tells you
that the batteries are nearly exhausted.
TECHNICAL DATA
3 altimeters readable up to 6096 mt
Analogue variometer with a scala up to +/- 10 mt/sec
Digital variometer with a scala up to +/- 25 mt/sec
Audio variometer with different tones for ascent and descent
Average variometer with a delay which can be set from 1 to 30 sec
Anemometer
Flight timer
Units, which can be set as metric decimal or imperial ft/mph
Data bank of the last 10 flights
Working life of about 200 h
Measures: 1355x72x37 mm
Weight: about 200 g with the batteries
The technical data is liable to be changed without previous notice.