1
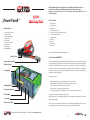
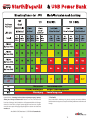
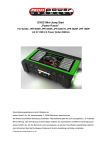
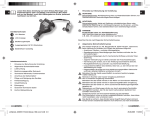
„Power Punch“
12VDC
Mini Jump Start
„Power Punch“
12VDC
Mini Jump Start
USER MANUAL
JPR 1800 P
JPR 4500 P
for device variations
JPR 2600 P
JPR 9000 P, JPR 4500 P, JPR 4500 6V, JPR 2600 P, JPR 1800 P
mit 5V USB 2.0 Power Outlet 2000mA
This manual is a publication of axhess, industry 11, 56589 Rheinbrohl. www.axhess.de
All rights including translation. Reproductions of any kind, even in part, such as photoco-
JPR 9000 P
pying, microfilming or storage in electronic data processing equipment, without the express written consent of axhess. Reproduction, even partial, is prohibited. This manual corresponds to the technical status at printing. Changes in technology, features and design.
© Copyright 2013 axhess GmbH & Co. KG
12VDC
Mini Jump Start
„Power Punch“
Handling the Unit
1
2
3
4
5
6
7
8
9
jumper cable connector
Function Control
battery charged green
battery - Pliers
USB output
Power on / off switch
start switch
side lighting
Warning Blinker
Read this manual before using the device, very carefully and keep it in order once
needed even for disclosure to third parties, at any time for future reference.
Charge 12 hours before first use. For 12V systems only, except JPR 4500 6V for
6V-board systems.
Table of Contents
1
2
3
4
5
6
7
8
9
10
11
General Safety
Scope of delivery
Intended use
Features, Functionality
Connection / Operation of the jumper device
Care and cleaning of the unit
Troubleshooting
Warranty
Disposal
Specifications
Conformity
Please observe the following safety instructions.
4 battery - Pliers
1 General Safety - IMPORTANT -
1 jumper cable connector
The axhess GmbH & Co.KG, Industriestrasse 11, D-56598 Rheinbrohl, Germany, is not liable for damage or
consequential damage caused due to non-observance of this manual. To property or personal injury and
caused by not following the instructions or improper use of the device, we assume no liability. In such
cases, the warranty becomes void. Particularly the unauthorized intervention, alteration or modification
of the device or its accessories, is expressly not permitted. The device must only be charged with the supplied charger or 12V charging cable.
2 Function Control
8 side lighting
The warranty is void if:
-
9 Warning Blinker
3 battery charged green
5 USB output
Equipment damage due to mechanical influences and / or overvoltage.
Any change to the connecting cables, output cables and other accessories.
Use for others, as described in the instructions purposes.
Fluid action and / or appropriate storage instructions.
Consequential damages due to the improper use and / or defective Batteries may arise.
Operate the device only as intended according to its use.
Make sure that when you are dealing with the product is not crushed the charging and booster cables or
damaged by sharp edges.
7 start switch
6 Power on / off switch
Always place and use the jump start unit in the vicinity of combustible or flammable materials, or hazardous environments, such as Gasoline, thinner, oil, gas or other solid, flammable materials.
axhess GmbH & Co. KG, Industriestrasse 11, 56598 Rheinbrohl, www.axhess.de
1
2
Do not expose the start device is not high or very low temperatures, strong vibrations or humidity.
Always look for a safe placement of the device! The start device must be securely installed / placed so that
it does not fall down or fall over.
The device is not a toy. It does not belong in the hands of children.
In industrial facilities, the safety regulations of any relevant professional association are observed.
Caution! Working in the vicinity of lead-acid batteries is dangerous! Batteries emit explosive gases during
operation and loading at startup help! Always suitable clothing, gloves and safety goggles when working
on a battery!
Battery acid is corrosive! Possibly. Thoroughly acid splashes immediately with plenty of water and seek
medical advice. If battery acid gets in the eyes, immediately wash out at least 10 minutes under running
water, seek medical attention.
Never smoke near the battery, or use open flames, sparks and avoid sparks!
With the included charger only this start device must be loaded. Do not use another charger to charge
the booster unit. The use of accessories or attachments, that are not recommended by the
manufacturer may cause damage to the unit or injury to personnel, and! In addition,
the warranty expires!
To avoid damage to the terminals and the instrument, never pull on the cable,
always using connector / terminal disconnect the jumper connection.
The charging and jump start cables must be in good condition. Lines are damaged,
do not use start device. First device repaired by an authorized technician.
Any flammable objects such as Leave candles on the apparatus. No objects filled
with liquids, such as Water containers, beverage containers on the device or turn
around. Only undamaged batteries support. Ensure a sufficient level of liquid in the battery (open leadacid batteries). Note the Hinwiese the battery / vehicle manufacturer. These can be found in the accompanying document, the log of your vehicle. Or, contact the battery manufacturer. Never remove the battery
clamps while jump starting! Not short circuit terminal clamps! First connect to the battery terminal clamps
in the correct polarity, then hitting jump start switch. Clean the battery terminals and connectors on the
vehicle only.
Work. For your protection and security are not alone or at least so that another person is always within
calling distance Personal metallic objects (such as rings, cuffs and necklaces, watches) before working on
the starter Remove the battery to prevent accidental short-circuit Short-circuit voltages as Melt rings and
so cause severe burns.
2 Scope of delivery
1
1
1
1
1
1
1
1
start device
Charger 230V / 12V
Car Charger 12V (not included with JPR1800)
set of jumper cables with connectors
storage bag
12V connection cable (only device JPR9000)
User manual
Fully recyclable retail packaging.
3 Intended use
This jump starter provides additional support for the 12V vehicle battery startup problems in vehicle engines. As far as this by a weak or defective
Vehicle battery caused. The start device can not replace the vehicle battery.
Use the start device not as a starter battery replacement, EXPLOSION!
Connect the start device exclusively with the battery. No contact with the
Making body! The vehicle electrical system could be damaged.
Do not let the booster unit and do not burden the body with additional devices
Weight, you put the device to shock or severe vibration, protect the unit from heating up, put the device
or check the device in flames, keep it always dry, submerge it in liquids one, pour never spill liquids on the
start device. LIONS EXPO DANGER!
Use of the booster unit is permitted only in dry areas or dry conditions. Contact with moisture, such as fog,
rain, snow, Kondensnässe etc. must be avoided. Any use other than that described above will damage the
product and is also associated with dangers like short-circuit, burns, electric shock, etc.. The entire product
and its accessories may not be changed or modified, the device housing not be opened! Observe these
safety instructions!
4 Technical Features / Amenities
This start device is equipped with a high quality lithium battery. The device can be as light and compact,
use anywhere to help launch or as a power charger for USB devices. Avoid high ambient temperatures.
Lithium batteries should be kept cool. Overheated up vehicle interiors and high ambient temperatures
should be avoided. Store the device therefore not in the vehicle. Minus ambient temperatures have a significant influence on the battery capacity. This is greatly reduced in cold weather. Therefore, do not store
or winter, the start device in the vehicle.
The input voltage of the supplied charger voltage corresponds to the household. (230V AC 50Hz) Output
power is 1A.
Finally, always use the power values __of the jumper and the connected device to support battery.
(See table in the appendix to use this manual) Only rechargeable 12V lead-acid batteries are supported! The jump starter is suitable for all lead-acid for GEL, AGM and - batteries. Depending on the device
version for 6V or 12V batteries. Other types of batteries and battery voltages must not be connected to
the emergency starter.
axhess GmbH & Co. KG, Industriestrasse 11, 56598 Rheinbrohl, www.axhess.de
3
4
Lithium batteries are subject to minimal self-discharge. Every 6 months later than the start device is to
be loaded in order to avoid a full discharge of the battery device. Possible damage to the start device
which arise due to full discharge or overheating is not in the warranty. Store the start device always
in a cool environment at about 15 ° C to 20 ° C Vehicles often feature electronic electrical facilities.
These can be damaged by high rise surges and spikes. Please read carefully before you connect the
device to a vehicle, the manual of the vehicle, whether a jump-start aid is permitted. Note before
connecting the safety warnings in this manual and your vehicle and battery manufacturer this unit to a
12V car battery. Note the warning symbols on start device!
4.3 LED Funktionskontrolle und Ladestatus
Rot bis Grün an
After pressing the ON OFF button lights up the spectrum. It
disappears after about 3 seconds.
By pressing the SOS button is lit again, and the spectrum shows
the current charge level of the jumper device. Green 81-100%
jumpstart function OK.
Yellow LED lights 61 - 80% charged.
jumpstart function OK.
4.1 This jump starter is fully automatic. There is only from jumpstart power when the power switch
first and then Jump Start switch was activated and recognizes a corresponding resistance (car battery).
The jumper cables remain without power supply while the device is not connected to a 12V vehicle
battery and the switch is not pressed. Connect the device only to jump start the battery terminals.
The start device never connected to the vehicle body! Exclusively connect to the battery in the correct
polarity!
Orange LED lights, 41 - 60% charged. Every 6 months, the unit
should be charged and to prevent a discharge damage to the
device battery. Jumpstart function OK but limited power.
Red LED lights 21 - 40% charged. Red LED flashes on the
instrument housing laterally loaded below 20%. If the red box
is on, the start device must be charged! ORANGE or RED lights
illuminated, the device can not be used to jump-start! Device
deactivated. Recharge soonest.
The start device has several protection mechanisms:
Overcharge protection / under voltage protection Overload the lithium battery is prevented by the
charger. At too low a charge of the battery, the device switches off automatically.
5 Connection / Operation in single steps:
Spark protection.
In mutual contact and terminal clips no sparks are generated.
Reverse polarity protection Connecting them incorrectly, confusing the polarity, the device switches off
immediately. The battery and the start device will be protected.
Overheating protection
The device switches off automatically when the max. Operating temperature is exceeded the device
housing. It automatically turns on again when it has cooled down accordingly.
4.2 Features
1.
2
3
4
6
7
8
9
10th
11th
12th
13th
14th
15th
16th
Fire retardant plastic housing
Automatic shut off to save energy. Approx. 5 seconds after starting a car engine.
High-start performance, high power reserve for USB devices
Integrated emergency work light side of the housing
Spark protection
Reverse polarity, short circuit protection.
Automatic undervoltage lockout integrated devices battery
Overheat protection, automatic shutdown in case of overheating of the device
Convenient connectors for jumper cables
Depending on the ambient temperature, up to 10 start-up aid in succession with a
batterycharge possible.
5V 2000mA USB 2.0 output, for operating or charging USB device.
Lithium battery with high life expectancy by following the instructions.
LED Warning light , LED side light (worklight)
Cable with OBDII connector (only with JPR9000)
By removable caps from dust and moisture-proof equipment outputs
5.1 Before starting aid
-
-
Make sure the log book of the vehicle manufacturer if a jump start is permitted.
Wear suitable protective clothing.
Clean the terminals (battery terminals and cable connections) before the start.
In open batteries: Fill in distilled water until the level specified by battery manufacturer is reached.
For maintenance-free batteries, please follow exactly the instructions of the battery manufacturer.
Make sure that the start device is fully charged. (Power LED Green)
Connect to the battery - first the red terminal clamp to the positive terminal (+), then the black
binding post (). The correct sequence!
Make sure that the battery terminals are securely connected to the battery terminals before
Press the start help function!
Make sure that all electrical consumers of the vehicle are turned off or disconnected from the electrical
system! Also include the interior, Motorrau or trunk lights, radio, navigation, driving and parking
lights, hazard lights, ventilation, heated seats, etc.
Make sure that the vehicle circuit is idle, no gear is engaged.
The hand brake is on! The vehicle is secured against rolling.
Take care that no clothing jewelry, body parts, charging cable caught in the vicinity of rotating
engine parts.
Upon completion of the jumpstart process, first disconnect the black jumper cable from the battery
first and then disconnect the red cable from the battery. Observe the sequence!
axhess GmbH & Co. KG, Industriestrasse 11, 56598 Rheinbrohl, www.axhess.de
5
6
5.2 Position of the jumper device
The start device, as far as the cable length allows, connect the battery removed. The jumpstart Never
place directly over or under the vehicle battery. From the battery leaking gas or fluids could damage the
start device. Start device should not be placed on the engine block. Place the unit so that it can not fall
or overturn.
5.3 jumpstart
Make sure before you use the-start device on the charging stand. The start device should be fully charged
for the booster to achieve best possible results.
Check the charging stand at the start device: Press the switch. After the rainbow spectrum is gone, only
the green LED is lit, press the SOS Switch for about 3 seconds. The illumination of the control function
displays the charge level of the battery. (See above 4.3.) Turn off the power to the switch again.
The jumpstart success depends inter alia from the fact that the start device is loaded when used.
In extreme cold thicken engine and transmission oil. This may mean that you need multiple attempts for
a successful start. Even a healthy car battery is suffering from extreme cold. The vehicle battery can freeze
at approximately -25 °. Never attempt to support a frozen starter battery via jumper, EXPLOSION! Similarly,
the condition of the vehicle battery to be supported, as well as their current performance plays a major
role. Dead or defective vehicle batteries can not replace the start device, but may still be successfully
start. It can deliver despite its small size, considerable current strengths that allow a rule to start a car.
(See the appendix to this manual see the overview, which start device for which vehicle)
In extremely cold outdoor temperatures (from -10 ° C), it is advisable to store the start device in a
heated room and charge about 30 minutes before use. It is possible then that the vehicle can be started at
low temperatures immediately. Close the start device as above described to the battery, turn on,
as described above, the mode, wait about 3 minutes. Then try to start the first aid procedure. You will
possibly need several attempts. Take no more than a maximum of 10 tests with a load! After the jump start
charging device.
5.4 Connecting the jumper cables: Connect the plug with the jumper cables to the start device.
Press the power (ON OFF) switch. The function key lights. After about 3 seconds the green LED is on (on
a fully charged start device).
Connect the jumper cables to the unit with the supporting battery.
1 The red terminal of the booster unit to the PLUS - (+) pole of the battery.
2 The black clamp to the NEGATIVE - terminal (-) of the battery.
3 Make absolutely sure that the clamps of the jumper device as described previously, are connected to
the battery. Never confuse the connections. This may result in damage to the unit and or jump-start the
vehicle battery or the vehicle electrical system.
4 Press the power switch to the start device ON.
5 To activate the help function, press the Jump Start switch. The booster function is now enabled.
Here, the short-circuit protection of the jumper device is disabled. Incorrect wiring (polarity reversal), the
red LED lights up. In such case first of all correct the connection! Otherwise, in case of wrong connection,
it will damage the booster unit. This is not covered in the warranty. Make sure before you activate the
jump start function to the correct terminal of the booster unit.
6 Starting the vehicle If all connections are correct, the booster function is enabled, start the vehicle.
Generally, the engine will start immediately. At very low temperatures (p.5.3), several tests may be
necessary. Is the jump start procedure was unsuccessful, turn off the start device OFF. First, check the
connections. Turn the power back ON.
For example defective, dead battery, hold the JumpStart switch for 5 seconds. Thus, the jump start feature
is turned on permanently, the short-circuit protection is deactivated. Therefore, you pay attention to the
correct polarity! Repeat the jump start procedure. If the engine does not start, turn off the start device.
Wait about 30 seconds until the next jump start attempt. This pause is necessary to regenerate the lithium
battery jump start unit. Take then a restart operation of the vehicle. Once the vehicle engine is running
under its own power, the engine running.
7 Remove the battery, the black jump lead from the first MINUS - Pol (-).
8 Then remove the red wire from the battery. Note sequence. Turn off the start device by pressing
the switch OFF.
5.5 Changing the battery on the vehicle. For model JPR 9000, use of the cable:
This cable is used for preservation of data stored in the vehicle (navigation, on-board computer, etc.)
for example Battery change. Or for other reasons, the power supply of the vehicle is interrupted.
Connect the cable to the 12V Car Memory output of the booster unit. This is the side of the start device.
Remove the protective cap on the device, insert the Memory Kable 12V plug in the 12V output.
Now open the OBDII Coverage
If the vehicle to which the power supply is to be interrupted. Plug the OBDII Plug the cable fits into
the memory OBDII port. Press the POWER switch of the jumper device. Now the car is using the booster unit with max. 8A / 12V supplies. The vehicle battery without loss of wiring data to be changed.
The loaded-start device, the vehicle for about 3.5 hours (JPR9000) with energy.
Smaller Devices about 1, 5 hours (JPR 4500), about 1 hour (JPR 2600), 40 min (JPR 1800).
When using a jumpstart our devices, JPR, we recommend to maintain the vehicle electrical system when
battery replacement, use a suitable 12V power source such as a power station with at least 8A output
power on the 12V output (if available). Please to see our disclaimer at the end of this manual.
5.6 Use of LED lighting
5.6.1 LED Emergency Working Light
On the lateral sides of the jumper device are light leaks, equipped with 2 white LED mounted. To activate
the emergency work light, press the power (ON OFF) switch and then the switch with the lettering SIDELIGHT. Output light intensity per light output approximately 1,000 lux both outlets are switched simultaneously.
5.6.2 LED warning light
Under the functional control on the front of the jumper device is the LED warning light. The warning
light illuminates when polarity, Falschanschuss automatically as a reference.
It is named after the POWER switch is pressed, the switch means SOS LIGHT on.
The red LED is turned off by 1x in constant light. The white LED will cycle through 2x activated as a constant light. With 3x press the switch, the red and white alternating flashing LED. Repeated actuation of
the switch disables this feature. Despite the small size of the warning light, this is due to the high power
LED, visible from afar in the dark. This switch also charging the status of the jumper device can be read.
Turn on the unit with the POWER switch again.
5.7 load the booster unit
Upon delivery, the start device is partially loaded. Download it before the first use.
The start device must only be charged with the supplied charger.
The charger: power consumption in charge of the booster unit is initially approximately 20W, is reduced
in the course of charging up to 7.5 W. Plug the charger into a 230V electrical outlet. Insert the charger
plug into the side of the unit mounted charging jack labeled DC. The charging status is displayed in the
function control.
axhess GmbH & Co. KG, Industriestrasse 11, 56598 Rheinbrohl, www.axhess.de
7
8
The LED charge status display signals the respective charge state by a flashing LED. When charging
is complete, the green LED in the function control. With green LED light-up the start device is ready to
start. The start device after each jump-start operation at least until the yellow mark upload it to always
be kept ready. Latest when the side of the unit mounted red LED labeled Low, the start device must
be charged urgently to avoid damage to the battery. The booster function and the USB port are not
available at this stage. Have you missed the charge of the star using the device and the low light is off,
the lithium battery penetrate to load. Turn off the start device is NOT on, turn the LED lighting
on NOT to avoid damage to the internal battery. The start device should be regularly charged at
least every six months at least until the yellow mark. For longer periods of time connected
to the charger is not recommended by the aging of the battery is not to speed. (S. Lagerung) to avoid.
5.10 Ttransportation inside a vehicle
If the device is transported in a vehicle, place it in a suitable location so that it can not begin to move with
sudden speed and or direction changes. Keep or store the start device but not in the vehicle permanently.
(See above storage)
6 Care and Cleaning
Check the technical safety of the jumper device, eg Damage the jumper cable or the housing. Wipe the
device only with a dry cloth. Do not use liquid or chemical cleaners. Do not immerse the appliance in
liquids. Never spill liquids on the unit.
5.8 Storage of the jumper device
7 Troubleshooting
Note that lithium batteries react sensitive to high temperatures. Store in a cool-start the device. Keep
the unit away from heat sources or additional sunlight. The battery will age faster the higher their cell
voltage, so it should be avoided to keep continually charged 100 percent of a Li battery. Cold storage
is advantageous. The self-discharge of the lithium battery is only about 3% per month. We recommend
storage at 15 ° C - 20 ° C at a load level of about 60% = YELLOW LED display. Lithium batteries should not
be discharged below 2.5V per cell, even when stored. The electrolytes in the cell must not freeze, which
occurs at a temperature around -25 ° C. Store or store because of the temperature sensitivity of the lithium
batteries therefore not permanent in the emergency starter vehicle. Every 6 months to start using the
device at least up to the mark YELLOW be loaded.
5.9 The USB output
The start device has a USB 2.0 output, 5V 2000mA max., The operation of loading or capable of many 5V
USB products, with max. Power consumption of max. 2.0 A, is determined. The USB output is activated
by pressing the POWER switch. He can power USB devices for many hours. The supply duration varies
depending on the charge level of the booster unit, power and intensity of the connecting device. During a
starting operation means, the supply of a USB device connected previously to be interrupted. Do not use
the USB output at start. During charging, connect the jump start device to the charger, the USB output
can be used. Use the USB output, even if you are not sure if the remaining battery jump start device is not
in use for a longer appears too high. Charge your mobile phone, tablet PC or other USB devices to the
battery level indicator shows the yellow range. (S.Lagerung) The start device with its high capacity battery
can recharge devices, you also make it operational during the (holiday) drive USB compatible devices such
as mobile phone, tablet PC, Kewego, or other USB. It can also be used as power source for use if your USB
device on strike unexpectedly due to power shortage. It can be due to its compact dimensions and low
weight, be a easily transportable, additional energy source.
With this start device you have purchased a product which has been designed according to state of the art
and is reliable. However, there may be problems or disorders.
Therefore, we would like to describe here how to fix any problems: Troubleshooting
No function - If the red LED on the charger, the start device has been loaded?
- If the device is fully charged?
- Is it damaged?
- Check the mains socket of the charger, mains power is there?
- Is the jump start connector with the jumper cables correctly with the emergency starter connected?
Device has function solution
Jumpstart without success
- Is the start device is sufficiently charged?
- The vehicle ignition is on, this has been pressed?
- All electricity consumers in the vehicle?
- The connections to the vehicle properly with correct polarity? Check and correct if necessary
- Has the black terminal (black clip) contact, check correct if necessary
- Have the red terminal contact, check correct if necessary
- The ambient temperature outside the device limits (See technical data)
Other measures as described above are carried out exclusively by qualified personnel authorized by
the manufacturer.
Caution! The start device may not replace a starter battery! It should not be a substitute for a starter
battery used explosion! It may not be used in frozen battery (from about -25 ° C) explosion! Never connect
to the vehicle body! Fire hazard for the vehicle electrical system!
axhess GmbH & Co. KG, Industriestrasse 11, 56598 Rheinbrohl, www.axhess.de
9
10
8 Warranty:
10 Technical Data / Model
Apply axhess general warranty conditions without Your legal rights are affected. The warranty applies
only to manufacturing or material defects. The warranty period is 24 months from date of purchase.
For the built in lithium battery jump starter, the warranty is limited to 24 months from date of delivery.
The required, battery maintenance as described here advancing, is required. Damaged batteries due to
maintenance errors, are not included in the warranty.
JPR
9000
Integrated, high-quality lithium battery
JPR
4500
JPR
2600
JPR
1800
JPR
4500 6V
√
√
√
√
√
Nominal battery capacity in mA
9000
4500
2600
1800
4500
Battery CCA
486
243
184
97
234
Continuous power
810
405
234
162
405
Jumpstart peak power max. A
1000
600
400
162
600
9 Disposal:
Charging time max. (Depending on battery status
also shorter) hrs
12
8
8
8
8
Packing:
The packaging is reprocessed. Place the packaging material only in the corresponding Recycle - garbage.
Automatic shutdown after last Action min.
1
1
1
1
1
Automatic shutdown after jumpstart sec
5
5
5
5
5
Waiting time to attempt to jumpstart sequence sec
30
30
30
30
30
Number Jumpstart a fully charged battery up to
10
10
10
10
10
a temperature in ° C +
10
10
10
10
10
at up - 12 ° C Temperature
5
5
5
5
5
1600
800
350
250
800
Battery performance / life cycle to start aids *
√
√
√
√
√
Protective device PCM (Protektive Circuit Modul)
√
√
√
√
√
Overheating protection
√
√
√
√
√
Reverse polarity protection
√
√
√
√
√
Overcharge protection Battery back current
√
√
√
√
√
Battery back current protection
√
√
√
√
√
Ambient temperature jump start
- short-term max. to ° C
-20
-20
-20
-20
-20
-15 bis 45
-15 bis 45
-15 bis 45
-15 bis 45
-15 bis 45
50
50
50
50
50
Old appliance:
If the device one day is taken out of service permanently, run it according to the applicable laws / regulations, the designated collection points to. If in doubt, contact your local waste disposal or the appropriate
municipal office.
Battery performance
Ambient temperature jump start - Normal ° C
Automatic shutdown at approx ° C
Ambient temperature, storage approx ° C
Jumper cable set Length mm / mm cable diameter
-10 bis 20°C -10 bis 20°C -10 bis 20°C -10 bis 20°C -10 bis 20°C
570 / 10
570 / 10
570 / 10
570 / 10
570 / 10
IP Class
20
20
20
20
20
Charger Input 100-204VAC 50/60Hz
√
√
√
√
√
Output 12VDC 1A Charger
√
√
√
√
√
Travel Charger Length approx 150 cm
√
√
√
√
√
√
√
√
√
√
USB Outlet 5V 2000mA
Unit dimensions (LxWxH) mm
Unit weight without cable kg
190x160x45 192x135x45 192x135x45 192x135x45 192x135x45
1,200
0,835
0,720
0,675
0,690
optional
Accessories
12V charging cable
√
√
√
optional
Storage Bag
√
√
√
√
√
OBDII cable for power conservation when
changing batteries
√
no
no
no
no
AC charger
√
√
√
√
√
* optimal battery maintenance and storage
axhess GmbH & Co. KG, Industriestrasse 11, 56598 Rheinbrohl, www.axhess.de
11
12
Ergänzender Hinweis: Verwendung einer Power Station zur Spannungsversorgung / Spannungserhaltung eines Fahrzeuges bei Batteriewechsel. Verbinden Sie ein 12V auf 12V Kabel mit der
Power Station (12V Ausgang ) und der Bordsteckdose oder Zigarettenanzünder-Buchse des Fahrzeuges.
Schalten Sie die Power Station ein, Freigabe Stromversorgung. Die Power Station muss voll geladen
sein und über einen separaten 12V Ausgang verfügen. Geeignete Power Stationen sehen Sie bitte unter
www.axhess.de
11 Konformität
Dieses Produkt erfüllt die Anforderungen der geltenden europäischen und nationalen Richtlinien.
Die Konformität wurde nachgewiesen, die entsprechende Erklärung und Dokumente sind beim Hersteller
hinterlegt.
axhess GmbH & Co. KG, Industriestrasse 11, 56598 Rheinbrohl, www.axhess.de
13
14