1
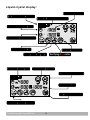
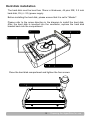
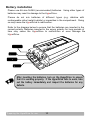
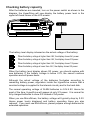
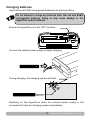
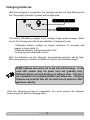
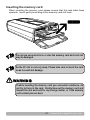
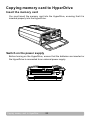
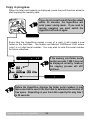
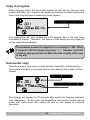
Getting Started
Thank you for purchasing the HyperDrive Portable Storage Device HD80.In
your hand is one of the most advanced portable storage device, with currently
the fastest transfer speed in the world, ultra efficient battery management
system giving you the longest battery performance not seen in any similar
device and a reliable operating system that ensures that all our precious
photos and data are safely stored in the HyperDrive HD80. All these excellent
features are all packed in a sturdy and lightweight aluminum casing that can
withstand some of the hardest knocks.
Please read this manual carefully to ensure proper operation.
Kindly inspect the contents of the package and contact your dealer if there are
any defects. Included in the packaging are the following items:
HD80 Portable Storage Device
USB cable
AC adapter
Screwdriver
Instruction manual
Carrying case
Please ensure that the hard disk and batteries purchased are of appropriate
capacities to suit your needs. Your dealer will be able to provide you with the
correct hard disk and batteries or you may wish to purchase these items
yourself.
Due to differences in retailer bundles, the HD80 you bought may
already include a hard disk or batteries.
The information contained in this handbook is correct at the time of printing.
Due to continued improvements to our product, please refer to our website for
the most recent information or check with your dealer.
1
Getting Started
Safety Information
WARNING
Using inappropriate batteries in the HyperDrive may prevent it from
functioning normally or even result in damage. Please refer to the instructions
within to determine the correct type of batteries for use.
Please observe the correct polarity when installing the batteries. Wrongly
inserted batteries may prevent the HyperDrive from functioning normally.
Serious damage may occur if the batteries are short-circuited and may even
result in fire.
Use only the provided AC adaptor or car adaptor (optional). Use of other
adaptors or chargers with electrical ratings outside of the HyperDrive
operating current and voltage requirements runs the risk of electric shock,
property damage or personal injury.
Do not disassemble the HyperDrive other than for the purpose of installing the
hard disk. Contact with high voltage circuits may result in electric shock. If
the battery compartment exterior is damaged, please shut off the input power
source and cease using the HyperDrive immediately.
Avoid leaving the batteries charging in the HyperDrive for more than 24 hours.
If the HyperDrive emits any strange sounds or smell, abnormally high heat or
smoke, immediately cut off the power and remove the batteries. Take care
while removing the batteries so as not to get burnt.
Do not use the HyperDrive in moist environments. Also please do not handle
the HyperDrive with wet hands. If water enters the HyperDrive, immediately
take out the batteries and return the HyperDrive to your dealer for inspection.
If the HyperDrive is corroded by liquid there is a danger of short-circuit
resulting in a fire.
Safety Information
2
Table Of Contents
Introducing the HyperDrive
Battery compartment
Hard disk compartment
Liquid crystal display
Operation panel
Preparing the HyperDrive for use
Hard disk installation
Battery installation
Checking battery capacity
Using external power supply
Charging batteries
Formatting the hard disk
Checking hard disk capacity
Inserting the memory card
Copying memory card contents to HyperDrive hard disk
Inserting the memory card
Switch on the power source
Copy in progress
Successful copy
Copying another memory card, File verification during copying
Checking the backup folder file quantity and capacity
Common error messages and solutions
Viewing files through a computer
System requirements
Connecting to a computer via USB cable
Using the HyperDrive as a card reader
Windows operation
Mac OS operation
Folder structure of HyperDrive
Safely disconnecting the HyperDrive from the computer
Advanced operation
One-handed operation
Increasing memory card copy speeds
Copying cards with complex folder structures
Improving hard disk performance
HyperDrive auto folder numbering system
Upgrading HyperDrive firmware
Choosing appropriate batteries
Re-formating hard disk
Specifications
Operating environment
Technical specifications
3
4
5
6
7
8
10
11
12
13
16
19
20
22
22
23
25
26
27
29
31
32
33
33
34
35
36
37
38
39
40
41
42
44
45
47
47
Table Of Contents
Introducing the HyperDrive
Front View:
Battery compartment:
Please refer to the arrow directions in the diagram to open/close the battery compartment.
Introducing the HyperDrive
4
Hard disk compartment:
The hard disk compartment is located on the back of HyperDrive. The
compartment door can be opened by removing the screws.
5
Introducing the HyperDrive
Liquid crystal display:
:
:
GB
USB
Verifying Indicator
USB
Introducing the HyperDrive
6
Operation panel:
Direction of operation
xD/MS/MSPRO/MMC/ SD
OK
CompactFlash/MicroDrive
7
OFF ON
STA USB
Introducing the HyperDrive
Preparing the HyperDrive for use
Hard disk installation
Remove the four screws from the hard disk compartment according to
the diagram. Pay attention not to lose them.
Remove the hard disk bracket according to the diagram.
Preparing the HyperDrive for use
8
Hard disk installation
The hard disk must be less than 10mm in thickness, 44 pins IDE, 2.5 inch
hard disk, 5V (+/- 5%) power supply
Before installing the hard disk, please ensure that it is set to "Master".
Please refer to the arrow direction in the diagram to install the hard disk.
After the hard disk is inserted into the connector, replace the hard disk
bracket back into the compartment.
Close the hard disk compartment and tighten the four screws.
9
Preparing the HyperDrive for use
Battery installation
Please use AA size Ni-MH (recommended) batteries. Using other types of
batteries may result in damage to the HyperDrive.
Please do not mix batteries of different types (e.g. alkaline with
rechargeable nickel metal-hydride) or capacities in the compartment. Doing
so may cause the HyperDrive to malfunction.
Refer to the diagram below to ensure that the batteries are inserted in the
correct polarity. Batteries inserted in the wrong polarity for long periods of
time may cause the HyperDrive to malfunction or even damage the
HyperDrive.
After inserting the batteries, turn on the HyperDrive to ensure
that it is working properly. If the HyperDrive fails to work, take
out the battery immediately and inspect the batteries for any
defects.
Preparing the HyperDrive for use
10
Checking battery capacity
After the batteries are inserted, turn on the power switch as shown in the
diagram, the HyperDrive will now display the battery power level in the
upper left-hand corner of the LCD screen.
xD/ MS/MSPRO/MMC/ SD
OK
CompactFlash/MicroDrive
OFF ON
STA USB
The battery level display is based on the actual voltage of the battery:
When the battery voltage is higher than 4.8V, the display shows full power
When the battery voltage is higher than 4.6V, the display shows 2/3 power
When the battery voltage is higher than 4.4V, the display shows 1/3 power
When the battery voltage is lower than 4.4V, the display shows 0/3 power
When the battery level display shows 0/3 power, you should replace with
new batteries. If the battery voltage is below 4.2V, the cannot continue
operation and will power down.
Although the actual voltage of the batteries fluctuates according to
remaining battery power, regulators inside the HyperDrive ensure that a
constant voltage is supplied to the internal circuitry and to the hard disk.
The normal operating voltage of Ni-MH batteries is 4.6V-4.8V. Hence for
most of the time, HyperDrive will appear at only 2/3 power. It is normal for
fully charged batteries to show 2/3 instead of full power.
When you use MicroDrives, the battery voltage will typically drop by 0.2V.
Hence power levels displayed and battery operating times are also
reduced. If you must use MicroDrives, please prepare enough batteries for
extended operation.
11
Preparing the HyperDrive for use
Using external power supply
Ensure that the power switch is in the “OFF” position before connecting to
the AC adapter or car charger.
When on external power, if batteries are inserted in the HyperDrive at the
same time, it will draw power from both external power and batteries. If you
do not want to drain the batteries, please remove them before connecting the
external power supply.
As the USB cable is not able to supply enough power by itself to power the
HyperDrive, please use either the external power supply or batteries for
operation.
When on external power, if no batteries are inserted in the HyperDrive, it will
not display the battery power symbol.
Use only the provided AC adapter or car adapter (optional). The
adapter used must be within the prescribed input voltage. Use of
other adapters or chargers with voltage exceeding the allowable
limit runs the risk of electric shock, property damage or personal
injury.
Preparing the HyperDrive for use
12
Charging batteries
Insert AA sized Ni-MH rechargeable batteries into the HyperDrive.
Do not attempt to charge any batteries other than AA size Ni-MH
rechargeable batteries. Doing so may cause damage to the
HyperDrive and the batteries
Ensure the HyperDrive is in the “OFF” position.
xD/ MS/MSPRO/ MMC/ SD
OK
CompactFlash/MicroDrive
OFF ON
STA USB
Connect the external power supply to begin charging.
During charging, the charging symbol will flash.
(Minute)
Switching on the HyperDrive while the external power supply is still
connected will stop the charging process immediately.
13
Preparing the HyperDrive for use
Charging batteries
After the charging is completed, the charging symbol will stop flashing and
the “Successful indicator” symbol will be displayed.
(Minute)
The built-in AA battery charger is an intelligent high-speed charger. When
one of the following conditions are satisfied, charging will end:
1,Detected battery voltage no longer continues to increase and
begins to drop (delta-V).
2,Detected battery voltage exceeds 6.29V.
3,Charging has exceeded 4 hours.
After the batteries are fully charged, temperatures naturally will be high.
We recommend you set the unit aside for a short while before using it.
Ni-MH batteries even when not in use will self-discharge. If not
used after several days the power level will gradually drop.
Different batteries will self-discharge at different rates. Therefore
we recommend only charging batteries just before use. Charging
batteries way ahead of time will not allow them to perform to their
maximum capacity.
After the charging process is completed, you must remove the external
power supply to exit the charging state.
Preparing the HyperDrive for use
14
Charging batteries
WARNING
When charging conditions are not met, the HyperDrive will stop
charging and display an error message. You should shut down
the external power supply immediately and remove the batteries.
The batteries may be very hot. Please take care when removing
the batteries to avoid burning yourself.
The HyperDrive may display the following error messages while charging:
No.-21: External power supply
output voltage is wrong. Please shut
down external power supply
immediately and replace with an
appropriate external power supply
adapter.
No.-22:The battery detected cannot
be charged or cannot be used.
Kindly remove and replace with
appropriate batteries.
Some batteries should only be recharged with their own
specialized charger. Kindly check your battery usage instructions.
15
Preparing the HyperDrive for use
Formatting the hard disk
The HyperDrive utilizes the FAT32 file system for the hard disk. Before
copying your memory card ensure that the hard disk is formatted to the
correct file system.
If your hard disk has not been formatted or is not in FAT32 format, the
screen will display error No.-18 when the HyperDrive is turned on.
At this time you may choose to turn off the unit or format the hard disk.
Error No.-18 only indicates that the hard disk format is not
compatible with the HyperDrive. It does not necessarily mean that
the hard disk is not formatted. Therefore before carrying out the
formatting operation, please ensure that you do not have any
important data on the hard disk.
WARNING
The hard disk formatting operation will delete all data on the hard
disk. If the hard disk contains multiple partitions, all partitions
will be deleted.
WARNING
If error No.-18 is displayed and the hard disk contains important
data, turn off the power immediately and remove the hard disk.
Put the hard disk into a computer and backup the data before
proceeding further. Then re-install the hard disk into the
HyperDrive to complete the formatting operation.
Preparing the HyperDrive for use
16
Formatting the hard disk
When Error No.-18 is displayed, scroll the multi-function wheel downwards
once to display the hard disk maximum capacity.
GB
When the maximum capacity is displayed scroll the multi-function wheel
upwards once, the screen will display the 'Formatting indicator' icon.
GB
When the 'Formatting indicator' icon is displayed, press down the multifunction wheel to start the formatting operation. While the hard disk is
formatting, the "Hard disk state indicator' icon will flash.
GB
17
Preparing the HyperDrive for use
Formatting the hard disk
After the hard disk successfully formatted, the 'Successful indicator' icon
will be displayed. At this point in time, we may switch off the unit.
GB
The displayed hard disk capacity may not tally with the
manufacturer’s stated capacity. This is because the HyperDrive
capacity is based on 1GB=1024MB and 1MB=1024KB whereas
manufacturers go by 1GB=1000MB and 1MB=1000KB. Therefore a
40GB hard disk would actually have 37.2GB available space.
The above three operations must be performed in the correct
sequence to start the hard disk formatting. Otherwise the hard
disk formatting will not be able to proceed.
Preparing the HyperDrive for use
18
Checking hard disk capacity
Ensure that the memory card is not in the memory card slot.
Load the batteries or connect the external power supply.
Turn on the HyperDrive.
The HyperDrive will start to calculate the available hard disk space. At this
time the hard disk space on the LCD screen will continue to increase.
:
GB
When the hard disk space stops increasing, the displayed capacity is the
available hard disk space. You may switch off the power at this time.
The HyperDrive only uses the contiguous hard disk space to store
data from the memory card. Even if there is a lot of available
space, sometimes you may be unable to copy the memory card.
This is because the available space is too fragmented. In this
situation you may use the Defragment software provided with the
Windows operating system or similar Mac software or you may reformat hard disk. We recommend that you format or defragment
the hard disk before any important trips or activities to ensure
maximum available hard disk space.
19
Preparing the HyperDrive for use
Inserting the memory card
The HyperDrive has two memory card slots located on the operation panel.
Card slot for xD, MS, MSPro, SD, MMC
Use the appropriate slot depending on the memory card to be copied. The
upper slot is compatible with SD, MMC, MS, MS Pro and xD cards. The
lower slot is for CF Type I/II cards as well as MicroDrives.
Preparing the HyperDrive for use
20
Inserting the memory card
When inserting the memory card please ensure that the card label faces
upwards. Insert gently according to the memory card slot track.
Do not use excessive force or else the memory card and card slot
may be damaged.
As the CF slot is not very deep. Please take care to insert the card
so as to avoid slot damage.
WARNING
If while inserting the memory card you encounter resistance, do
not try to force in the card. Kindly take out the memory card and
inspect the slot and card for any foreign matter, or if the memory
card contact pins are bent.
21
Preparing the HyperDrive for use
Copying memory card to HyperDrive
Insert the memory card
You must insert the memory card into the HyperDrive, ensuring that it is
inserted properly into the HyperDrive.
Switch on the power supply
Before turning on the HyperDrive, ensure that the batteries are inserted or
the HyperDrive is connected to an external power supply.
xD/MS/MSPRO/ MMC/SD
OK
CompactFlash/MicroDrive
Copying memory card to HyperDrive
22
OFF ON
STA USB
Copy in progress
The HyperDrive will first display the 'Copying indicator' icon as well as
examining the memory card capacity and hard disk total capacity:
:
:
GB
MB
The memory card and hard disk capacity displayed is the total
capacity, not the amount of capacity in use.
The displayed memory card capacity may not tally with the
manufacturers stated capacity. The HyperDrive display is based
on 1GB=1024MB, 1MB=1024KB. Therefore a memory card with
128MB capacity will actually display as 122MB.
23 Copying memory card to HyperDrive
Copy in progress
When the total card capacity is displayed, press the multi-function wheel to
start copying the memory card.
If you do not press the multi-function wheel
within 30 seconds, the HyperDrive will
enter power saving mode. If you need to
resume operation you must switch the
HyperDrive off and on again.
Every time the HyperDrive makes a copy of a card, it will create a new
folder on the hard disk. The folders are labeled 'CARDnnnn.UHS' where
'nnnn' is a 4 digit serial number. You may wish to note this serial number
for future reference.
If the memory card folder serial
number exceeds 1,999 it may not
be displayed correctly, however
the copying process will still
continue.
No.
COPY:
MB
Files
Before the HyperDrive displays the folder serial numbers it may
take some time to search the hard disk to determine the location of
free space. Depending on your hard disk capacity this may take 1
to 30 seconds.
Copying memory card to HyperDrive
24
Copy in progress
When copying starts, the hard disk symbol as well as the memory card
symbol will flash. As it copies it will display in realtime the total number and
size of the files that have successfully been copied.
No.
COPY:
MB
Files
The HyperDrive will only update the LCD display after a file has been
successfully copied. Therefore, the status of files which are very large will
not be updated immediately.
The maximum number the HyperDrive can display is 1,999. When
it exceeds 1,999 the display may show "----". However it will still
continue copying and does not affect the data integrity of the copy
in any way.
Successful copy
After the memory card copy is completed the HyperDrive will display the
'Successful indicator' icon as well as the total capacity and number of files
copied.
No.
COPY:
MB
Files
This display will appear for 30 seconds after which the 'Copying indicator'
icon disappears. At this time the HyperDrive has entered power saving
mode and users must first switch off and on the power to continue
operation.
25 Copying memory card to HyperDrive
Copying another memory card
If you need to immediately copy in another memory card, take out the
current memory card and insert another memory card. Press the multifunction wheel within 30 seconds after the copy completion of the previous
memory card. The HyperDrive will re-examine the card and display the new
card capacity. Press the multi-function wheel once more to start the copy
process of the new memory card.
If the current card copy completes and the multi-function wheel is
not pressed within 30 seconds, the HyperDrive will enter into
power saving mode and will not copy the new memory card. (The
'copying indicator' icon will disappear from the LCD screen).
File verification during copying
HyperDrive possess a hardware based file verifier and encoder, which
automatically calculates memory card data checksum when ever data from
the memory card is being read.
If the file verification feature is activated, every time after a file is copied
onto the HyperDrive, the device will read the copied file stored on the hard
disk and calculate the data checksum. HyperDrive compares this hard disk
data checksum with the memory card data checksum to determine if the file
is identical and hence successfully copied.
You can activate the file verification feature before the memory card copy
process begins.When the total card capacity is displayed, scroll down the
multi-function wheel to start copying the memory card with verification.
:
:
GB
MB
A successful copy is deemed to take place when the file verifier determines
that the copied file on the hard disk is identical to the file on the memory
card. During which, the HyperDrive will proceed in copying the next file.
Otherwise, the HyperDrive will display error 30 and stop the copy
immediately.
Copying memory card to HyperDrive
26
Checking the backup folder file quantity and capacity
The HyperDrive has a simple built-in browser to check the copied files and
folders without the need to connect to a computer.
Before carrying out this operation please ensure that there are no memory
cards inserted in the card slot. Turn on the HyperDrive.
The HyperDrive will first check the available space on the hard disk.
:
GB
Press the multi-function wheel and the HyperDrive will display the first
memory card folder serial number, number of files and total capacity.
No.
COPY:
27
MB
Files
Check the contents
Checking the backup folder file quantity and capacity
Move the multi-function wheel upwards or downwards to navigate between
folders.
No.
COPY:
MB
Files
MB
Files
No.
COPY:
No.
COPY:
MB
Files
If you are presently in the last memory card folder, moving the
multi function-wheel downwards will exit browsing mode. If you
are in the first folder, moving the multi-function wheel upwards
will also similarly exit browsing mode.
When browsing the memory card folders, pressing the multifunction wheel will exit browsing mode. If 30 seconds pass
without any user input, the HyperDrive will automatically enter
into power saving mode. You will need to turn off and on the
HyperDrive to continue operation.
Check the contents
28
Common error messages and solutions
On the rare occasion, users may encounter errors and an error number will
appear on the LCD screen. Please refer to the following table for
explanations on these errors and how to resolve them.
When any error occurs, the red indicator lamp on the operation panel will
turn on. The HyperDrive will not enter power saving mode until you turn the
unit off.
No.-20 Insufficient battery power
Solution: The battery power has been exhausted. Please replace
the batteries or use the external power supply.
No.-13 Insufficient contiguous space on the hard disk available to copy data.
Solution: The HyperDrive uses contiguous hard disk space to store
data from the memory card. If the hard disk space is exhausted or
is very fragmented, it may cause the memory card backup to fail.
Format the hard disk or delete some files to free up space. If the
hard disk has adequate free space but is too fragmented, please
use the Defragment tool under the Windows operating system or
similar software to clean up the fragmentation.
No.-18 Incorrect hard disk format.
Solution: The HyperDrive uses the FAT32 file system for the hard
disk. Please refer to the section on hard disk formatting.
No.-09 The memory card folder structure nesting is too complex.
No. -15 Solution: The HyperDrive is mainly for storing data from digital
camera memory cards. If you need to copy memory cards used in
other devices, please check that the folders do not contain more
than 250 sub-folders. If it exceeds this limit, the HyperDrive will not
be able to copy. Windows OS on PC has a similar limit of 256 subfolders
29
Common error messages and solutions
Common error messages and solutions
N o .- 1 0 Appears when the HyperDrive encounters an I/O error, some files
N o .- 11 may not have been transferred to the hard disk correctly.
N o .- 1 2 Solution: Switch off the power and re-insert the memory card again.
If this does not resolve the problem, test the HyperDrive using
another memory card. The HyperDrive may not be compatible with
your memory card.
N o .-1 6 The memory card format is unrecognizable.
Solution: The HyperDrive can only read FAT12/16/32 file systems.
Please ensure that the memory card has been formatted in the
digital camera.
N o .- 1 4 Too many files or folders in the memory card.
Solution: When the number of files per folder in the memory card
exceeds 2,000, memory card backup may fail. Please reduce the
number of documents in a folder.
N o .-1 9 Cannot detect hard disk.
Solution: The HyperDrive requires a hard disk to operate. If a hard
disk has already been installed, please inspect the hard disk to see
whether it is installed correctly and whether the batteries have
sufficient power.
N o .-3 0 Verification failure.
Solution: Turn off HyperDrive and retry.
Common error messages and solutions
30
Viewing files through a computer
System requirements
The HyperDrive is compatible with the majority of personal computer
systems.
Windows based computers:
Computers with USB ports running WindowsME, 2000 and XP do not
require any additional drivers. Windows98 Second Edition users may need
to install additional drivers.
Mac OS based computers:
Computers with USB ports and Mac OS 9.X, 10.X operating systems.
31
Viewing files through a computer
Connecting to a computer via USB cable
Ensure that the HyperDrive is turned off.
Insert the USB cable into the appropriate ports on the HyperDrive and
computer.
Please use only the USB ports located at the back of the computer.
Do not use USB extension cables or USB hubs, otherwise the
computer may not be able to detect the HyperDrive properly.
Turn on the HyperDrive and after a few seconds the LCD display on the
HyperDrive will display the total hard disk capacity. If a card is also
inserted into the HyperDrive, it will display the capacity of the memory card.
When the computer connects to the HyperDrive, the LCD display on the
HyperDrive will show the USB connection symbol.
:
:
USB
Viewing files through a computer
32
GB
MB
Using the HyperDrive as a card reader
The HyperDrive can also be used as a card reader. If you need to use this
function, you will need to insert the card into the slot before you turn on the
HyperDrive. Only one slot can be used at a time. If two cards are inserted
at the same time, only the CF slot will be recognized.
This function is only for copying data from the memory card to the
computer and vice versa. Some memory cards cannot be
formatted in the card reader. To ensure maximum card
compatibility, please format the memory card in your camera.
Windows operation
When Windows detects the HyperDrive it will appear as a new removable
disk in 'My Computer'. You may then access the HyperDrive like an
ordinary removable disk.
33
Viewing files through a computer
Mac OS operation
On Mac OS computers, a new drive icon will appear on the desktop
Hyper Drive
Hyper Drive
Viewing files through a computer
34
Folder structure of HyperDrive
When you open the HyperDrive from the computer your previously copied
data will be stored in folders CARDnnnn.UHS. (Where 'nnnn' is the
memory card serial number).
On Windows:
On Mac OS:
Hyper Drive
Hyper Dr
The memory card serial number is automatically assigned when
the card is copied. Every generated number is unique but if you
have previously deleted folders from the HyperDrive the new serial
number may not follow the previous sequence.
35
Viewing files through a computer
Safely disconnecting the HyperDrive from the computer
If you do not wish to continue using the HyperDrive, you must safely
disconnect the HyperDrive from the computer.
On Windows:
Right click on 'Removable Disk' in 'My Computer' and choose “Eject...'
Click 'Safely remove hardware' icon and select 'USB Mass Storage Device'.
When Windows confirms that the drive has been removed, turn off the
device and disconnect the USB cable.
On Mac OS:
Drag the “Removable Drive” symbol to the “Trash Can” to eject it.
Turn off the HyperDrive and disconnect the USB cable.
Viewing files through a computer
36
Advanced Operation
One-handed operation
The HyperDrive can be operated single handedly.
Please ensure that you have enough batteries before traveling.
We recommend keeping the HyperDrive in the carrying case provided
which can be attached to your belt. Please insert the HyperDrive with the
operation panel facing upwards.
When you wish to use the HyperDrive:
Open the carrying case and open the dustproof cover.
Insert the memory card the correct way.
Turn on the HyperDrive, after 2 seconds the indicator light will turn
red.
When the HyperDrive has detected the memory card, the indicator
light will turn green.
Press down the multi-function wheel, and the indicator lamp will turn
off. The HyperDrive will search the hard disk for available space.
This may take 1 to 30 seconds depending on available space and
hard disk formatting method.
When the indicator lamp turns green, the HyperDrive will start to copy
the memory card. While copying data, the indicator light will flash
continuously.
After the copy has completed successfully, the indicator lamp will turn
green and disappear after 3 seconds.
When the copying is completed, you may remove the memory card. If
you do not wish to copy another memory card you may turn off the
unit.
If while copying the indicator lamp turns red, you must remove the
HyperDrive from the carrying case and check the error message on
the LCD screen.
37
Advanced Operation
Increasing memory card copy speeds
The HD80 Ultra High Speed HyperDrive has an extremely high data
transfer rate. However there are many factors which may affect actual
copy performance. You may wish to check the following points to improve
performance:
Choose high speed memory cards designed for the professional
photographers. Normal speed memory cards cannot achieve high
copy speed performance.
Use Compact Flash memory cards as far as possible. The Compact
Flash memory card slot has a 16-bit data path to the HyperDrive
which allows it to copy faster than the other types of memory cards.
Using a hard disk with a 8MB cache or more may achieve faster copy
speeds. The cache size has a large effect on copy speed, but hard
disk rotational speed is not an essential factor. Therefore a 4200rpm
8MB cache hard disk will perform better than a 5400rpm hard disk
with 2MB cache.
Format the hard disk with the built-in formatter or CDFormatter
software. This can improve copy performance especially for hard
disks with smaller cache.
As far as possible store only pictures from the camera on the memory
card and delete non-essential files. If there are many small files on
the card, it will lower the copy speed of the HyperDrive. Some
cameras when writing RAW files also create small thumbnails. This
will affect copy speed.
Where possible the memory card should be formatted in FAT16
format. The copy speed with FAT16 is faster than that of FAT12 or
FAT32.
Advanced Operation
38
Copying cards with complex folder structures
The HyperDrive can process folder structures produced by digital cameras
as well as digital camcorders.
Occasionally your memory card may have data copied from the personal
computer. This data may have been organized in complex folder structures.
The HyperDrive can process up to 250 folders. In other words the memory
card cannot have more than 250 folders (including sub-sub-folders).
Generally speaking, computer data is not stored in such complex
structures. However if such situations arise we recommend copying
directly from the computer through the USB connection and not through the
memory card.
The memory card backup is limited to 2,000 files in any folder. Too many
files in a folder also does not facilitate easy retrieval. The HyperDrive is
unable to copy from memory cards with more than 2,000 files in a folder.
If you need to transfer complex folder structures into the HyperDrive, do so
through the USB connection.
39
Advanced Operation
Improving hard disk performance
The HyperDrive uses the FAT file system to store data. However with
continuous copying and deletion the hard disk will become highly
fragmented. The HD80 cannot use this fragmented space to store data. In
order to maximize your hard disk space, we recommend regular formatting
of the hard disk or running the Defragment tool provided with Windows. If
the hard disk is excessively fragmented the HyperDrive will run out of
space prematurely.
To ensure that you will always be able to back up to the HyperDrive, you
should defragment or format the hard disk before any major outing.
Formatting or the defragmenting will not reduce the hard disk lifespan. In
fact, it extends the hard disk lifespan as a lesser fragmented hard disk
requires lesser access time to read/write data every time and places less
stress on the hard disk motor.
Advanced Operation
40
HyperDrive auto folder numbering system
Every time a memory card is copied the HyperDrive will create a folder in
the hard disk root directory labelled CARDnnnn.UHS. where 'nnnn' is the
card folder serial number.The HyperDrive ensures that each memory card
folder serial number is not redundant. However this serial number will not
always be in sequence.
The HyperDrive numbers the folders according to their relative position in
the root directory. The first position is 0, second position is 1, third position
is 2, and so on. The following is an explanation with examples of the folder
numbering system:
1) Three memory cards are copied to a newly formatted hard disk. These three
memory card folders are named in turn:
CARD0000.UHS, CARD0001.UHS, CARD0002.UHS.
2) The HyperDrive is connected to a computer and a new folder named
'MYFOLDER' is created in the HyperDrive. At this point the HyperDrive root
directory has four folders:
CARD0000.UHS, CARD0001.UHS, CARD0002.UHS , MYFOLDER.
3) The HyperDrive is disconnected from the computer and another memory card
is copied to the HyperDrive. The folder created this time is CARD0004.UHS. Note
that the HyperDrive has not produced CARD0003.UHS. This is because the root
directory 4th position has been occupied by 'MYFOLDER'.
4) Now the HyperDrive is connected to the computer and folder CARD0001.UHS
is deleted. Four folders are left in the HyperDrive:
CARD0000.UHS,CARD0002.UHS, MYFOLDER, CARD0004.UHS.
5) The HyperDrive is again disconnected from the computer and another card is
copied to the HyperDrive. The newly created folder is CARD0001.UHS. Note that
the HyperDrive has not created CARD0005.UHS. This is because the 2nd
position in the HyperDrive root directory is empty, therefore the last copy created
folder serial number 0001.
From the example above you should have a better idea how the HyperDrive
allocates folder serial numbers. To ensure that the serial number increases
every time to avoid confusion, do not delete the folders after you have
copied or deleted the files. This will ensure that folder numbers will
increase each time you do a copy.
41
Advanced Operation
Upgrading HyperDrive firmware
With firmware updates, the memory card copy functions or performance
may be improved. The HyperDrive has the ability to self-update its
firmware. In order to upgrade the firmware, you must follow the step-bystep instructions carefully.
WARNING
If it is not necessary, we do not recommend you perform the
firmware upgrade. The firmware upgrade operation will attempt
to rewrite the data in the chip. If this operation is unsuccessful, it
may cause the HyperDrive to cease functioning and you may be
required to return the unit to your dealer for servicing.
1) Download the firmware upgrade files which you require from our website
(Only FIRMPD70.BSC and FIRMPD70.UMS are appropriate files.)
2) Prepare a memory card of between 256MB and 2GB. The memory card
must be formatted to FAT16 (FAT12 or FAT32 file systems will not work in
this case of firmware upgrading).
3) Copy the firmware upgrade file to the memory card. (Note that only one
firmware upgrade file should be copied onto the memory card at any time.)
4) Ensure that there is sufficient power to run the HyperDrive and connect
the HyperDrive to the external power supply.
5) Insert card with the firmware upgrade file into the memory card slot.
6) Hold down the multi-function wheel while turning on the HyperDrive.
Advanced Operation
42
Upgrading HyperDrive firmware
7) Continue holding down the multi-function wheel until the HyperDrive LCD
screen displays “Upc” or “Upu”, then release.
8) The HyperDrive will automatically read the firmware file and upgrade the
firmware. While upgrading the LCD display number will continue to
increase until the “Successful indicator” icon appears.
While the LCD numbers are running do not switch off the power,
otherwise it will damage the device. If the numbers have stopped
moving for 10 seconds but no 'Successful indicator' icon
appears, it might mean that upgrading was unsuccessful.
9 )Remove the memory card and delete the firmware files from the card.
10) Turn off the HyperDrive and restart it to check that it is operating
correctly.
43
Advanced Operation
Choosing appropriate batteries
The HyperDrive can use AA size rechargeable nickel metal-hydride (Ni-MH)
batteries. Many of such batteries are available on the market, when
choosing batteries, please note the following points:
1) As far as possible choose branded batteries as they guarantee
quality and safety. Do not use nickel cadmium (Ni-Cd) batteries.
2) Higher capacity batteries are not necessarily better. If the battery
has a high internal resistance it will not be able to last very long as the
energy is lost to resistance.
3) Nickel metal-hydride batteries have a high self-discharge rate. In
other words, even if you do not use them, they will gradually lose their
charge over time. Choose a battery with as low self-discharge rate as
possible.
4) The built-in battery charger has a peak charging current of 1000mA.
When choosing batteries please ensure that they can handle this level
of current.
Advanced Operation
44
Re-formatting hard disk
The HyperDrive has the ability to re-format hard disk by itself. In order to
clear the fragment on the hard disk, you need to re-format the hard disk
periodically.
WARNING
The hard disk formatting operation will delete all data on the hard disk.
If the hard disk contains many partitions all partitions will be deleted.
In order to re-format the hard disk, you must follow the step-by-step
instructions carefully.
1) Prepare a memory card of between 256MB and 2GB. The memory card
must be formatted to FAT16 (FAT12 or FAT32 file systems will not work).
2) Create a file named 'FORMAT70.CMD' in the root directory of the
memory card. The file name must be in all caps.
3) Ensure that there is sufficient power to run the HyperDrive or connect the
HyperDrive to the external power supply.
4) Insert card with the 'FORMAT70.CMD' file into the memory card slot.
5) Hold down the multi-function wheel while turning on the HyperDrive.
6) Continue holding down the multi-function wheel until the HyperDrive LCD
screen displays 'Formatting indicator' icon, then release.
MB
45
Advanced Operation
Re-formatting hard disk
7) The HyperDrive will display error No.-18 . Please refer to page 16 on this
manual to start formatting the hard disk.
Advanced Operation
46
Specifications
Operating environment:
Temperature:
5 degree Celsius ~ 40 degree Celsius
Relative humidity:
8% ~ 90% non condensing
Temperature rate of change:<20 degree Celsius/Hour
Technical specifications:
Memory card interface:
3.3V (+/-1%) power supply
First slot: CF Type I & II, MD
Second slot: SD, MMC, xD, MS, MS Pro
Hard disk interface:
5.0V (+/-5%) 1A power supply
44Pin 2.5" IDE hard disk
Computer interface:
USB2.0 High Speed/Full Speed,
USB1.0 Compatible
Data transfer modes:
Transfer from memory card to hard disk (stand-alone)
From hard disk to computer (via USB)
From memory card to computer (via USB)
Data transfer performance:Stand alone mode burst rate: 16000KBytes/S
USB 2.0 sustained transfer rate: 8190Kbytes/S
Display monitor:
Monochromatic liquid crystal display monitor,
Displays battery capacity, Hard disk capacity,
Memory card capacity, Copy number,
Copied files quantity and capacity.
Operation controls:
Multi-function wheel, 3 positions
Battery specifications:
Uses 4 x AA size batteries (NiMH recommended)
Battery autonomy:
Up to approximately 80GB of data transfer
(based on 2500mAH Ni-MH batteries)
Built-In battery charger:
Intelligent quick charger,
Charging current 500mA ~ 1000mA (+/- 10%)
Size:
132mm/5.31"(W) x 83mm/3.27"(H) x 33mm/1.30"(D)
47
Specifications