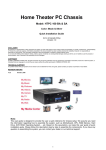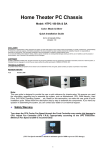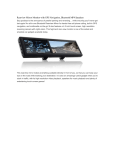
1
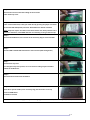
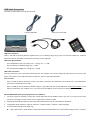
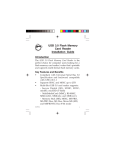
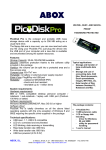
2.5” HDD Enclosure & Card Reader Combo Models: nDRIVE-B nDRIVE-S Quick Installation Guide Introduction 1-1. HDD Enclosure Key Features - Application: 2.5" notebook / laptop hard drives (SATA Interface) - Support 2.5” HDD up to 500GB - Transfer Rates Up To 480MBPS w/ USB2.0 (12MBPS w/USB1.1) - Easily Add Storage To Any System With USB - Supports Hot-Swapping and Plug and Play function. - USB Bus powered; no external power required. - Support Win ME/2000/XP/Vista, Mac OS X/ V9.2 or higher - Driverless 1-2. Card Reader Key Features - Support the latest High Speed / High Capacity Flash Memory Card Up to 32GB (SDHC 2.0 Compliance) - Support the latest flash card specification: CF 4.0 (DMA mode), SD1.1/2.0 (SDHC), MMC4.1/4.2, MSPro parallel mode (4-bit), xD 1.2 - Supports Hot-Swapping and Plug and Play function. - Support slot-to-slot read/write operation - USB Bus powered; no external power required. - Support USB V2.0 specification and USB Device Class Definition for Mass Storage, Bulk-Transport - Support Win ME/2000/XP/Vista, Mac OS X/ V9.2 or higher - Driverless Hardware Installation Guide Required tool: - Cross Screw Driver - Static Protection Kit if possible Step 1 Reader the user manual Step 2 Take off the 4 screws from the bottom Step 3 Reverse the enclosure box after taking off the 4 screws Take off the top cover Step 4 Take out the PCB board; install your hard drive by pushing the jumper connector toward the PCB HDD (black) connector. Read HDD user manual if needed. Note: Steps 3-6 require non-static environment. Please use static protection kit if possible. Otherwise, install HDD with bear foot standing on the ground will help. Step 5 Reverse the PCB board, use 4 screws in the accessory bag to secure the HDD Step 6 Put the HDD installed PCB board back to the enclosure (HDD facing down) Step 7 Put back the top cover To change the top cover picture, do it now. Picture cutting may be needed to match the window size. Step 8 Re-install the 4 screws from the bottom Step 9 Push the 4 special stands (in the accessory bag) into the hole to cover up. Connect USB cables Installation finished Note: For future hard drive upgrade or picture changing, take off the stands, and re-do steps 2, 3, 6, 7, 8, 9. 2/4 USB Cable Connection There are two USB cables come with the enclosure. Y-Shape USB Cable USB to 5V Power Cable USB Power Limitation USB 1.1 and USB 2.0 protocols limit bus supplied power up to 2.5 Watts (0.5A @ +5V) per port. As more high capacity 2.5” notebook hard drive comes to the market, it consumes more powers from the USB port. USB Power Requirements: - Use Card Reader to read your memory card (0.5A @ +5V)= 1 USB - Use your HDD up to 200GB (0.5A @ +5V) = 1 USB - Use your HDD 250-500GB ( 2 X 0.5A @ +5V) = 2 USB USB Cable Connection: Read your hard drive power consumption requirement first. The USB bus can provide a supply with rated power of 5V/0.5A for USB device. If the current of your hard drive doesn’t exceed 0.5A, use the Y type USB cable ONLY. User scenarios: - Using a 160 GB (or below) Hard Drive, use the Y type cable, 2 USB ports are needed from your notebook or PC. This cable should power up the card reader and 2.5” HDD. - Using a 160GB (or above) Hard Drive, besides using the Y type USB cable, the second USB power cable may be needed. 3 USB ports are needed from your notebook or PC. If you only have two available, use one end of the Y-shape and the USB-5V cable. Window ME/2000/XP/Vista Operating System Driver Installation: 1. No driver program is necessary. Connect the Y-shape USB cable and the USB-5V cable to your PC. If you only have two USB ports from your laptop, connect one end of the Y-shape and the USB to 5V cable. 2. Window will automatically detect the device and start installs the drivers for the card reader and hard drive. 3. Verify/Update driver and device, Open My Computer – System Property - Hardware – Device Manager 4. Format the hard drive (first time install only) Open Control Panel – Administration Tools (Under Performance & Management in Control Panel Category View) – Computer 3/4 Management – Storage – Disk Management Format and name the hard drive MAC Operating System Driver Installation For MAC OS 9.0 or higher, No driver program is necessary. The driver software for Mac OS 8.6 or older is ‘Gene USB CF.SIT’ under the directory of MAC. 1. Copy the file to the desktop and double click and it will produce the driver file automatically 2. Copy the driver file produced under the extension directory [System Folder] -> [extension] 3. Connect the USB Y type cable and USB-5V cable, restart computer. 4. Format the hard drive for first time installation If you have any questions, feel free to contact us. 1. nMedia Technical support [email protected] Thank for using the nDRIVE Copyright© nMedia System. All reserved. 4/4