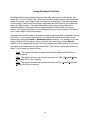
1
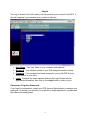
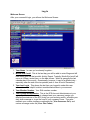
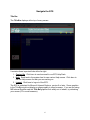
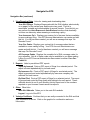
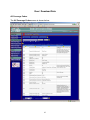
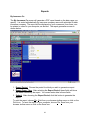
EFS User Manual
Table of Contents
Click any line in the Table of Contents
to jump to that page
Screen Overview .......................................................................................1
Log In ............................................................................................................3
Passwords / Forgotten Passwords .............................................................3
Welcome Screen ........................................................................................4
Navigate the EFS .......................................................................................6
Title Bar ......................................................................................................6
Navigation Bar ............................................................................................7
Submit Data ................................................................................................9
Enter a Filing...........................................................................................10
Policy No .............................................................................................11
Filing Type...........................................................................................11
Insurance Company ............................................................................11
Can’t Find Your Insurance Company? ................................................13
Percents Don’t Add Up to 100%?........................................................13
Insured Name......................................................................................13
Address 1 ............................................................................................13
Address 2 ............................................................................................13
City ......................................................................................................14
State....................................................................................................14
Zip .......................................................................................................14
Effective Date......................................................................................14
Term....................................................................................................14
Amount of Coverage ...........................................................................14
Coverage Code, Premium & Fire Marshal Tax....................................15
Surplus Line Tax .................................................................................16
Stamping Fee......................................................................................16
User Fields 1 – 4 .................................................................................16
Submit .................................................................................................16
Upload Batch ..........................................................................................17
Table of Contents (continued)
Click any line in the Table of Contents
to jump to that page
View / Download Data............................................................................19
Your SLA Filings.....................................................................................19
Policy Id...............................................................................................21
Batch / Item .........................................................................................21
Filing Type...........................................................................................21
Policy Number.....................................................................................21
Insured ................................................................................................21
Effective Date......................................................................................21
Premium..............................................................................................21
View/Print ............................................................................................21
Renew (“Auto-Renew”) .......................................................................21
Endorse (“Auto-Endorse”) ...................................................................22
Export..................................................................................................22
Search.................................................................................................22
Add New Filing ....................................................................................22
Sorting.................................................................................................22
Pages of Records / Records Per Page ...............................................22
Your Insurance Companies ...................................................................23
Insurance Companies .........................................................................24
Last Update.........................................................................................24
Last Update By....................................................................................24
Export..................................................................................................24
Sorting.................................................................................................24
Pages of Records / Records Per Page ...............................................24
Your Coverage Codes ............................................................................25
Coverage Codes .................................................................................26
Last Update.........................................................................................26
Last Update By....................................................................................26
Export..................................................................................................26
Sorting.................................................................................................26
Pages of Records / Records Per Page ...............................................26
Table of Contents (continued)
Click any line in the Table of Contents
to jump to that page
All Coverage Codes................................................................................27
Coverage Code ...................................................................................28
Category..............................................................................................28
Description ..........................................................................................28
Notes...................................................................................................28
Export..................................................................................................28
Search.................................................................................................28
Sorting.................................................................................................28
Pages of Records / Records Per Page ...............................................28
Reports
Alpha By Insured ......................................................................................29
By Insurance Company ............................................................................30
By Date Filed ............................................................................................31
Sorting Displayed Records .................................................................32
Using the Search Controls ..................................................................33
Simple Search ..........................................................................................33
Simple Search Options.............................................................................33
Show All Button ........................................................................................33
Advanced Search .....................................................................................34
General ...............................................................................................36
Entering Search Criteria ......................................................................36
Using Comparison Operators..............................................................36
“Like” Searches ...................................................................................37
Filing Type Search ..............................................................................37
Insurance Co Search ..........................................................................37
Coverage Code Search.......................................................................38
Search Button .....................................................................................38
Using the Export Controls ...................................................................39
Pages of Records ........................................................................................... 40
Screen Overview
The Electronic Filing System screen is divided into three basic sections:
1. Title Bar. Contains three important links at the far right:
Contact Us. Click here to send an email to our EFS Help Desk.
Help. Each task in the system has its own custom Help screen. Click here to
see the Help screen for task you are working on.
Logout. Click here to log out of the EFS.
The EFS is optimized for Microsoft Internet Explorer, version 6 or later. Some
graphics in the Title Bar might not display or align properly in other browsers. If
you are not using MS Internet Explorer and the Title Bar graphics look wildly out
of whack, try refreshing your screen (F5 in most browsers).
1
Screen Overview (continued)
2. Navigation Bar. Use this section to navigate the site and choose the task you
want to perform. The Navigation Bar is divided into five sections (not all of the
sections/buttons may display for you depending on the permissions your EFS
Account Administrator assigned to you):
Submit Data. Links for submitting data.
View/Download Data. Links for viewing and downloading data.
Administrators can also edit some data on these screens.
Reports. Links to pre-defined PDF reports
Other. Other links.
Verisign Certificate. Confirms that you are really connected to the SLA and
that your connection is secure. Click on the graphic for confirmation and
more information.
3. Work Area. This is the area where you will view and enter data.
2
Log In
The Log In Screen is the first screen you'll see each time you connect to the EFS. It
also will reappear if your session times out due to inactivity.
1. User Name. Your User Name is your company email address.
2. Member #. Your member number is your SLA-assigned member number.
3. Password. Your password has been assigned to you by the EFS Account
Administrator in your office.
4. Login. Complete the three required fields on the Login Screen with the
appropriate information, then click on the Login button in order to log in.
Passwords / Forgotten Passwords
If you forget your password, contact your EFS Account Administrator to reassign your
password. In general, you should try to avoid short, simple passwords, or passwords
that others can readily guess.
3
Log In
Welcome Screen
After your successful login, you will see the Welcome Screen:
1. Your Name. In case you’ve already forgotten…
2. Month-End Cutoff. This is the last day you will be able to enter filings and still
have them show on that month’s Activity Report. Typically, Month-End cutoff will
occur at 4:30pm, central time, on the date shown – which is generally the last
calendar day of the month. Occasionally, however, it may be a different day –
especially near the end of the tax periods (end of June & end of December).
3. Your Last Login. This shows the last time you logged in under this user
information. It is helpful to detect unauthorized access to your account.
4. Your Member Number. Your SLA member number.
5. Your System Administrator. This is the EFS Account Administrator at your
company. Contact this person to change/reset your password, assign you
different permissions on the EFS, bring you your morning muffin, schedule your
daily chair massage or to get the keys to your company Lexus. They also
maintain your custom insurance companies list (Your Insurance Co’s) and
custom coverage codes list (Your Cov Codes).
4
Log In
Welcome Screen (continued)
6. System Message. If the SLA wants to communicate system information to you
and other users, it will show here (for example, “The system will be down for scheduled
maintenance from 3/15/07 09:00:00 PM until 3/16/07 02:30:00 AM” or “Help…we’ve run out of
coffee”).
5
Navigate the EFS
Title Bar
The Title Bar displays at the top of every screen.
It contains three important links at the far right:
1. Contact Us. Click here to send an email to our EFS Help Desk.
2. Help. Each task in the system has its own custom Help screen. Click here to
see the Help screen for task you are working on.
3. Logout. Click here to log out of the EFS.
The EFS is optimized for Microsoft Internet Explorer, version 6 or later. Some graphics
in the Title Bar might not display or align properly in other browsers. If you are not using
MS Internet Explorer and the Title Bar graphics look wildly out of whack, try refreshing
your screen (F5 in most browsers).
6
Navigate the EFS
Navigation Bar
The Navigation Bar displays at the left side of every screen. Use it to navigate the site
and choose the task you want to perform. The Navigation Bar is divided into five
sections (not all of the sections/buttons may display for you depending on the
permissions your EFS Account Administrator assigned to you):
1. Submit Data. Links for submitting data.
Enter a Filing. Click here to navigate to the screen that lets you input a new
filing into the EFS.
Upload Batch. Click here to navigate to the screen that lets you make filings
by uploading a batch of data that has been extracted from your computer
system.
The Bulk Entry section of the system will allow users who can extract data from their system
and format it according to an SLA specification, to upload that data on a bulk basis to the SLA
system. The Bulk Entry section will be available to users Q3 or Q4 of 2007.
7
Navigate the EFS
Navigation Bar (continued)
2. View/Download Data. Links for viewing and downloading data.
Your SLA Filings. Displays filings made with the SLA (whether electronically
or on paper) for the current year and the prior two years. The list is
searchable, sortable and downloadable in several formats. From this list you
can perform the Auto-Renew and Auto-Endorse functions that drastically
cut down on data entry when renewing or endorsing a policy.
Your Insurance Co’s. Displays your custom list of insurers that are available
to users making a filing. Your EFS Account Administrator can create and edit
this list. If no list has been created, you will see a message that says “No
Records Found.”
Your Cov Codes. Displays your custom list of coverage codes that are
available to users making a filing. Your EFS Account Administrator can
create and edit this list. If no list has been created, you will see a message
that says “No Records Found.”
All Coverage Codes. Displays the complete list of SLA coverage codes for
your reference. Not all of these codes may be available to you when making
a filing if your EFS Account Administrator has created a custom Your Cov
Codes list.
3. Reports. Links to pre-defined PDF reports
Alpha by Insured. Prints a PDF report of filings for a selected period. The
report is sorted alphabetically by insured name.
By Insurance Co. Prints a PDF report of filings for a selected period. The
report is grouped and sorted alphabetically by insurance company with
subtotals for each insurer.
By Date Filed. Prints a PDF report of filings for a selected period. The report
is grouped and sorted by filing month with subtotals for each period. These
subtotals should tie out to your Monthly Activity Report and to the numbers
reported on your licensee’s semi-annual tax reports.
4. Other. Other links.
Main SLA Website. Takes you to the main SLA website.
Logout. Log out of the EFS.
5. Verisign Certificate. Confirms that you are really connected to the SLA and that
your connection is secure. Click on the graphic for confirmation and more
information.
8
Submit Data
If you are entering a completely new policy, you should start directly with the Enter a
Filing screen. This screen allows you to input all of the data necessary to make an
electronic filing with the Association. If you are renewing or endorsing an existing
policy, be sure to check out the time saving Auto-Renew and Auto-Endorse features
which are available from the Your SLA Filings screen. These functions will populate
the Enter a Filing screen with most of the data you need, based on previous filings for
the selected policy, requiring you to fill in just a few fields.
9
Submit Data
Enter a Filing
The Enter a Filing screen is shown below:
10
Submit Data
Enter a Filing (continued)
Use the [TAB] key to navigate between fields on the Enter a Filing screen. If you hit
the [ENTER] key, it is the same as clicking on the SUBMIT button! You can click on
any field name to get Help information for that field. If you want to clear the screen and
start over, just click on the Enter a Filing button on the Navigation Bar and the screen
will be reloaded with all of the fields blank. The various fields on the screen are
described below:
1. Policy No. Enter the complete policy number as it appears on the declarations
page. You can leave out any space, punctuation and/or symbols. The system will
automatically remove any spaces, punctuation and/or symbols you enter and
convert all characters to upper case. Be sure to include any prefixes or policy
codes. It is important to enter the policy number correctly and consistently!
When you try to enter a return premium endorsement for a policy, the system
searches for previous filings under that policy number to ensure that you are not
returning more premium than you've filed.
2. Filing Type. Check the button as appropriate. You can only select one. You
must make a separate filing for each endorsement not included as part of the
policy when issued. For endorsements extending the policy period and renewal
certificates, check the “Policy” button and treat it as a new policy.
3. Insurance Company.
General Info
It is important that you enter the proper insurance company. Since many
names can be similar, be certain the name you pick matches the policy
exactly (ABC Insurance, Inc. can be a different company than ABC
Insurance, Ltd.).
Your system administrator may have limited the list of available insurance
companies to only those that your firm uses. This should make your searches
much easier.
If you are unable to find your insurance company using one of the methods
below, click on the Can’t find your insurance company? Click Here button.
Each time you enter an insurance company, the screen adds a new blank
insurance company line, in case you have more than one insurer participating
on the risk.
11
Submit Data
Enter a Filing (continued)
3. Insurance Company (continued).
Name
Start typing the name in the first box and the system will try to “guess” the
company you are entering (The SLA EFS is optimized for Microsoft Internet Explorer
version 6 or later. If you are using an alternate browser, this "guessing" feature may not
work). If it is a match, just hit [TAB] or click into the next desired field. The
system will fill in the NAIC and AM Best numbers for you. Alternatively, you
can select the company from the drop down box (just below the type-in field).
To open the drop-down box, click on the gray box that has the black,
downward-pointing triangle. Companies are listed alphabetically.
NAIC#
If you know the NAIC# of the insurance company listed in the policy, you can
enter it here, rather than looking it up alphabetically.
AM Best#
If you know the AM Best# of the insurance company listed in the policy, you
can enter it here, rather than looking it up alphabetically.
Percent
Enter the percentage of the risk covered by the insurance company you have
selected. If there is only one insurance company on the policy, enter “100”. If
the risk is insured by more than one insurance company you must list all
insurance companies participating in the policy and the percentage of risk
they insure. The total percentage must add up to 100%.
If the percentages in the policy do not add up to 100% (perhaps the risk is not
100% subscribed or an admitted insurance company participated) then click
on the Percents don’t add up? Click Here button. The EFS requires that
you provide the percentage of participation as it relates to the document you
are filing (not as it relates to the entire risk). This button opens a screen that
will automatically recalculate your percentages (based on what you've
entered) so they show the insurer's percentage of risk for this filing. When you
click the UPDATE button on this screen, the recalculated percentages will be
dropped into the Enter a Filing screen.
12
Submit Data
Enter a Filing (continued)
4. Can’t Find Your Insurance Company? Click Here. This window lists all
insurance companies alphabetically, their NAIC and AM Best numbers and their
“status” in our system. From this window you can select the insurance company
by clicking Select in the column on the right side.
If the company is an active Illinois surplus line company it will be added to the
data entry screen. Remember, however, that if your EFS Account Administrator
has created a custom Your Insurance Companies list, only the insurance
companies on that list can be selected for data entry. If there is a company that
needs to be added to your custom list, contact the EFS Account Administrator at
your company.
If the insurance company's status does not allow activity, a message will pop up
informing you of the status of the company and why you cannot use it at this
time. In some cases, it may be that the insurer has simply never been used in
Illinois before. If you believe this to be the case, contact the Help Desk for
assistance.
5. Percents Don’t Add Up? Click Here. The efile system requires that the
insurance company percentages add up to 100%. However, in some cases, the
percentages in the policy do not add up to 100% (perhaps the risk is not 100%
subscribed or an admitted insurance company participated). The EFS requires
that you provide the percentage of participation as it relates to the document you
are filing (not as it relates to the entire risk). This button opens a screen that will
automatically recalculate your percentages (based on what you've entered) so
they show the insurer's percentage of risk for this filing. When you click the
UPDATE button on this screen, the recalculated percentages will be dropped into
the Enter a Filing screen.
6. Insured. Enter the full insured name as listed on declarations page. Include the
“Doing Business As” (d/b/a) information, if applicable. Maximum length of this
field is 50 characters including spaces.
7. Address 1. Insured’s address as listed on declarations page including any suite
numbers or post office box numbers. Maximum length of this field is 50
characters including spaces. If address does not fit entirely in this field, you can
use Address 2 field for any overflow. Report only the address that is listed on the
declarations page. It is not necessary to enter the property locations as reported
in the schedule of locations, if any.
8. Address 2. Field to include any insured’s address information contained on the
declarations page that does not fit into the Address1 field. Maximum length of
this field is 50 characters including spaces.
13
Submit Data
Enter a Filing (continued)
9. City. Insured’s city as listed on the declarations page. Maximum length of this
field is 50 characters including spaces. As you begin typing, the system will try to
“guess” the city name you are entering (The SLA EFS is optimized for Microsoft Internet
Explorer version 6 or later. If you are using an alternate browser, this "guessing" feature may not
work). If the proper name comes up, you can stop typing and hit the [TAB] key or
click into the next field.
10. State. Enter state as listed on the declarations page. The system defaults to
Illinois but any state can be selected from the drop down box.
11. Zip. Insured’s zip code as listed on the declarations page. Zip code can be
reported as standard 5 digit or expanded 9 digit code. The system will accept
both formats.
12. Effective Date. Inception or start date of the policy. You may enter the date in
mmddyyyy format (without typing slashes or dashes), or you can use the m/d/yy
or the m-d-yy format (typing the slashes or dashes). Alternatively, you can
select the date by clicking on the calendar icon to the right of the field.
13. Term (months) – or – Expiration Date. Length of the policy period in months.
Enter only a one-digit or two-digit number in this field. For example, if the
effective date of a policy is 03/01/07 and the term is one year, then enter 12 in
this field. If the term of the policy is less than one month, then enter 1 in this
field.
Alternatively, you can enter the Expiration Date of the policy in the Expiration
Date field to the right or select the date by clicking on the calendar icon. The
system will then calculate the term and place the calculated value in the Term
(months) Box (The SLA EFS is optimized for Microsoft Internet Explorer version 6 or later. If
you are using an alternate browser, this calculation feature may not work).
14. Amount of Coverage. Enter the total, aggregate coverage limits of the policy.
The coverage limits should be added up for all lines of business that the policy
covers and reported as one number in this field (not to exceed the policy
aggregate limit). When completing this field, do not enter a dollar sign, use only
numbers and commas, if preferred. For example, if a policy has coverage limits
for property and liability, then both these limits should be added together and the
total reported in this field (not to exceed the policy aggregate limit). The
maximum acceptable value for this field is $2,147,483,647.
14
Submit Data
Enter a Filing (continued)
15. Coverage Code, Premium / Fire Marshal Tax.
Coverage Code. The coverage code is a unique four digit number that identifies
the type of policy coverage. Reporting the correct coverage code for the policy is
critical, as it determines the correct amount of fire marshal tax.
There are two different ways to enter the coverage code:
a. Enter the four digit coverage code in the CC # field, if known.
b. If the code is not known then, from the Select Coverage Category
here drop down box, select a coverage category. Once the category
has been selected, choose a specific coverage from the then Select
Coverage here drop down box. At this point, the four digit coverage
code will appear in the CC # field. For example, if you select “Liability
General” in the first box, and “Excess” in the second, 5003 will appear
in the CC # field.
Your system administrator may have limited the list of available coverage codes
to only those that your firm uses. This should make your searches much easier.
If the list has been limited by your system administrator, you can still review all
available coverage codes by clicking on the All Coverage Codes button located
on the left-hand side of the screen.
Premium. Enter the gross premium in this field, rounded to the nearest whole
dollar. Do not include in the premium the surplus line tax, stamping fee, fire
marshal tax or any other fees such as filing fee, policy fee, broker fee or
inspection fee.
Fire Marshal Tax. The efile system automatically calculates the fire marshal tax
based on coverage code selected and the premium entered. In most
circumstances, the system will not permit the fire marshal tax to be overwritten.
For mutli-peril policies, you can enter the information in one of two ways:
a. You can select a mutli-peril coverage code which will calculate the 1%
fire marshal tax on 40% of the premium entered on that line.
b. You can enter the coverage code and premium for each line of
coverage on the policy. For example, when a policy has both inland
marine coverage and general liability coverage, you would enter
coverage code 3001 for the inland marine coverage along with the
related premium, and then on the next line you would enter coverage
code 5001 for the general liability and its related premium. The fire
marshal tax would only be calculated on the inland marine premium.
For more information on this topic, see the Fire Marshal Tax Section in the SLA
Procedures Manual.
15
Submit Data
Enter a Filing (continued)
16. Surplus Line Tax. The efile system automatically calculates the surplus line tax
(the current rate is 3.5% of total gross premium) based on the total premium
entered into the system. In most circumstances, the system will not permit the
surplus line tax to be overwritten.
17. Stamping Fee. The efile system automatically calculates the stamping fee
based on the effective date of the policy. The rate is currently 0.1% (one-tenth of
one percent) for policies with an effective date of 07/01/06 or later. Other rates
apply for policies effective prior to 07/01/06 (and endorsements to these policies).
See the Stamping Fee Schedule in the SLA Procedures Manual. In most
circumstances, the system will not permit the stamping fee to be overwritten.
18. User Fields 1 - 4. These fields are for member's use. The member making the
filing can use these fields for any internal information that they want the efile
system to capture. The efile system will store this data along with the filing
information. When accessing your filing data, these User Fields can be
searched, sorted, exported and printed out as needed.
19. SUBMIT. Click on this button when you are done entering the required
information. If any of the required information is missing or invalid, the system
will let you know immediately. Pressing the [ENTER] key on the keyboard is the
same as clicking on this button.
16
Upload Batch
The Bulk Entry section of the system will allow users who can extract data from their
system and format it according to an SLA specification, to upload that data on a bulk
basis to the SLA system. The Bulk Entry section will be available to users Q3 or Q4 of
2007.
17
View / Download Data
This section of the EFS contains screens that allow you to allow you to view and
download data. There are powerful search capabilities and helpful Auto-Renew and
Auto-Endorse functions.
18
View / Download Data
Your SLA Filings
The Your SLA Filings screen lists all filings made with the Association (whether by
paper or electronically) from the current year and the prior two years. It is a powerful
search and retrieval tool that not only lets you view and download data but also gives
you access to the handy Auto-Renew and Auto-Endorse features which save time and
improve accuracy by automatically filling in most of the Enter a Filing screen when you
are renewing or endorsing a policy. The Search Box, which searches all fields whose
column headings have an asterisk (*) as well as some others you can't even see, lets
you quickly search for insured names, policy numbers or SLA batch numbers. Once the
desired record is located, you can view the detailed record, reprint the stamping
confirmation page or use the Renew or Endorse links to easily make renewal or
endorsement filings with minimal data entry required. The Advanced Search button
gives you access to more complex searches.
19
View / Download Data
Your SLA Filings (continued)
The Your SLA Filings screen is shown below:
20
View / Download Data
Your SLA Filings (continued)
The various fields on the Your SLA Filings screen are described below:
1. Policy Id. This is the unique number that identifies each filing. It is also the
“SLA Countersignature #.” A document submitted through the EFS is considered
“stamped” once this number is affixed to the declarations page and labeled as
the “SLA Countersignature #” (or when the countersignature confirmation page is
printed and attached to the policy).
2. Batch / Item. These are the SLA-assigned batch numbers and item numbers for
filings that have been made on paper.
3. Filing Type. Shows whether the filing was a Policy or an Endorsement.
4. Policy Number. Shows the policy number for this filing.
5. Insured. Shows the insured’s name for this filing.
6. Effective Date. Shows the effective date of the policy or endorsement.
7. Premium. Shows the premium for this filing.
8. View/Print. You'll notice, as you move your mouse over the list of filings, the line
over which your mouse is hovering turns a stunning shade of orange (or is that
peach?). In technical parlance, this is called "unnecessary (but pretty cool) stuff
that web pages can do." If you click on the View/Print link near the right end of
the record – or anywhere on the highlighted record (except the Renew or
Endorse links), you will be able to view all the detail for that record. The detail is
shown in the same format as the confirmation page you saw when you first
entered the filing, so if you've lost your confirmation page, you can then reprint it.
9. Renew (“Auto-Renew” Function). Click on the Endorse link for the highlighted
record to enter an endorsement filing for that policy. The Enter a Filing screen
will come up, pre-loaded with all of the information you need except the Effective
Date and Premium. If any of the pre-loaded data is incorrect or has changed,
you can over-type the pre-loaded data.
If the insurance company or coverage code records do not automatically load into the
Enter a Filing screen after clicking this link, it is likely because your EFS Account
Administrator has limited the insurance companies or coverage codes available to you
by creating a custom list. Click on the Your Insurance Co’s or Your Coverage Codes
button on the Navigation Bar to check the list and contact your EFS Account
Administrator with questions.
21
View / Download Data
Your SLA Filings (continued)
10. Endorse (“Auto-Endorse” Function). Click on the Renew link for the
highlighted record to enter a renewal filing for that policy. The Enter a Filing
screen will come up, pre-loaded with all of the information you need except the
Policy Number, Effective Date and Premium. If any of the pre-loaded data is
incorrect or has changed, you can over-type the pre-loaded data.
If the insurance company or coverage code records do not automatically load into the
Enter a Filing screen after clicking this link, it is likely because your EFS Account
Administrator has limited the insurance companies or coverage codes available to you
by creating a custom list. Click on the Your Insurance Co’s or Your Coverage Codes
button on the Navigation Bar to check the list and contact your EFS Account
Administrator with questions.
11. Export. See the Using the Export Controls section of this manual on page 39.
12. Search. See the Using the Search Controls section of this manual on page 33.
12. Add New Filing. This button gives you a quick link back to the Enter a Filing
screen.
13. Sorting. See the Sorting Displayed Records section of this manual on page
32.
14. Pages of Records / Records Per Page. See the Pages of Records section of
this manual on page 40.
22
View / Download Data
Your Insurance Companies
The Your Insurance Co's screen displays the custom list of insurers that was created
by your EFS Account Administrator. If no list has been created, the screen says "No
records found." This custom list is used by the Enter a Filing screen so that a person
entering a filing can only choose an insurer from this list. If the custom list does not
exist, the Enter a Filing screen displays a large, and somewhat unwieldy, list of
insurers that is more difficult for users to scroll through.
If you have tried to make a filing and the Enter a Filing screen will not display or accept the
insurer you tried to enter, chances are it is because the insurer is not on the custom Your
Insurance Co's list. Contact your EFS Account Administrator for assistance in adding the
insurer, if appropriate, to your list.
If there is no custom list, the screen will look like this:
23
View / Download Data
Your Insurance Companies (continued)
If your efile System Administrator has created a list, it will look like this:
1. Insurance Companies. These are the insurance companies that your EFS
Account Administrator has selected to be available to you when using the Enter
a Filing screen.
2. Last Update. Date and time this record was added to your custom insurance
companies list.
3. Last Update By. Person who added this record to your custom insurance
companies list. This should be your EFS Account Administrator.
4. Export. See the Using the Export Controls section of this manual on page 39.
5. Sorting. See the Sorting Displayed Records section of this manual on page
32.
6. Pages of Records / Records Per Page. See the Pages of Records section of
this manual on page 40.
24
View / Download Data
Your Coverage Codes
The Your Coverage Codes screen displays the custom list of coverage codes that was
created by your EFS Account Administrator. If no list has been created, the screen
says "No records found." This custom list is used by the Enter a Filing screen so that a
person entering a filing can only choose a coverage code from this list. If the custom list
does not exist, the Enter a Filing screen displays a large, and somewhat unwieldy, list
of coverages that is more difficult for users to scroll through.
If you have tried to make a filing and the Enter a Filing screen will not display or accept the
coverage you tried to enter, chances are it is because the insurer is not on the custom Your
Insurance Co's list. Contact your EFS Account Administrator for assistance in adding the
insurer, if appropriate, to your list.
If there is no custom list, the screen will look like this:
25
View / Download Data
Your Coverage Codes (continued)
If your efile System Administrator has created a list, it will look like this:
1. Coverage Codes. These are the coverages that your EFS Account
Administrator has selected to be available to you when using the Enter a Filing
screen.
2. Last Update. Date and time this record was added to your custom coverage
code list.
3. Last Update By. Person who added this record to your custom coverage code
list. This should be your EFS Account Administrator.
4. Export. See the Using the Export Controls section of this manual on page 39.
5. Sorting. See the Sorting Displayed Records section of this manual on page
32.
6. Pages of Records / Records Per Page. See the Pages of Records section of
this manual on page 40.
26
View / Download Data
All Coverage Codes
The All Coverage Codes screen is shown below:
27
View / Download Data
All Coverage Codes (continued)
The various fields on the All Coverage Codes screen are described below:
1. Coverage Code. This is the internal SLA numeric code for the coverage. You
don’t have to know this code since the Enter a Filing screen lets you find the
coverage by using “drop-down” boxes. But if you pay attention to the codes,
especially for your most common coverages, you will be able to speed up your
data entry by just entering the code number.
2. Category. Coverage codes in the efile system are broken up into broad
categories to help you search for them more quickly. This is the category for the
coverage shown on this record.
3. Description. This is the description of the coverage.
4. Notes. These are some additional notes regarding this coverage that may help
you in deciding which SLA coverage code to use.
5. Export. See the Using the Export Controls section of this manual on page 39.
6. Search. See the Using the Search Controls section of this manual on page 33.
7. Sorting. See the Sorting Displayed Records section of this manual on page
32.
8. Pages of Records / Records Per Page. See the Pages of Records section of
this manual on page 40.
28
Reports
Alpha By Insured
The Alpha By Insured screen will generate a PDF report based on the data range you
specify. It is sorted alphabetically by insured name. The report will be displayed on
your screen and, from there, can be printed or saved to your computer, as desired. The
report generation screen is shown below:
1. Report Period. Choose the period for which you wish to generate a report.
2. Report From / Thru. After selecting the Report Period, these fields will show
the dates covered by the report. You cannot enter data in these fields.
3. Submit. After choosing the Report Period, click this button to generate the
report.
To print the report, choose File, Print from your browser toolbar menu or click on the
Print icon. To save the report to your computer, choose File, Save from your
browser toolbar menu or click on the Save icon.
29
Reports
By Insurance Co
The By Insurance Co screen will generate a PDF report based on the data range you
specify. It is sorted alphabetically by insurance company name with subtotals for each
insurance company. The report will be displayed on your screen and, from there, can
be printed or saved to your computer, as desired. The report generation screen is
shown below:
1. Report Period. Choose the period for which you wish to generate a report.
2. Report From / Thru. After selecting the Report Period, these fields will show
the dates covered by the report. You cannot enter data in these fields.
3. Submit. After choosing the Report Period, click this button to generate the
report.
To print the report, choose File, Print from your browser toolbar menu or click on the
Print icon. To save the report to your computer, choose File, Save from your
browser toolbar menu or click on the Save icon.
30
Reports
By Date Filed
The By Date Filed screen will generate a PDF report based on the data range you
specify. It is sorted by month filed with subtotals for each month. The report will be
displayed on your screen and, from there, can be printed or saved to your computer, as
desired. The report generation screen is shown below:
4. Report Period. Choose the period for which you wish to generate a report.
5. Report From / Thru. After selecting the Report Period, these fields will show
the dates covered by the report. You cannot enter data in these fields.
6. Submit. After choosing the Report Period, click this button to generate the
report.
To print the report, choose File, Print from your browser toolbar menu or click on the
Print icon. To save the report to your computer, choose File, Save from your
browser toolbar menu or click on the Save icon.
31
Sorting Displayed Records
Any table of displayed records (in a column/row format) can be sorted by clicking on the
column title. You can sort by a single column or by multiple columns. You can also sort
in ascending or descending order.
Single-Column Sort (Asc or Desc)
Initially clicking on the column title will sort the records in ascending order by the
values in that column. The column title will show an Ascending Sort icon (see
below) next to the title text. A second click on the column title will change the sort
to descending order and a Descending Sort icon (see below) will display next to
the title text.
Ascending Sort icon
Descending Sort icon
Multiple-Column Sort (Asc or Desc)
You can sort by more than one column by clicking on the title of the first column
you want to sort by (click it twice if you want it in descending order), then holding
down the CTRL key on your keyboard and clicking on additional column titles
(CTRL-click them twice for descending order). The screen may go completely
blank for a moment while the system re-sorts the records. This is completely
normal (it's not a bug – it's a feature!!).
32
Using the Search Controls
Simple Search
To do a Simple Search, use the Search Box near the top of the screen. The Search
Button is labeled with the word “Search”, plus an asterisk (*). This is to remind you
that a simple search will search the columns in the table where the column title text
is also followed by an asterisk (it also searches the Address, City, State and Zip
fields – even though you don't see them on this screen). Multiple words typed into
the Search Box should be separated by spaces (do not use commas, quotations or
any other punctuation). You cannot use the greater-than (>), less-than (<) or equalto (=) operators.
All simple searches are LIKE-type searches. In other words, if you are searching for
a Policy Number, you do not need to type in the ENTIRE Policy Number. If you
enter GL123, the system will return records where the Policy Number is GL123456,
CGL123XYZ11, ABC444GL123, etc.
Simple Search Options
Just below the Search Box are the three Simple Search Options.
Exact Phrase. This is the default search type. The system will return records where
the characters you typed in the Search Box are found, in the exact order you typed
them, ANYWHERE within the searchable fields.
All Words. This is an AND-type search. Use this option when there is more than
one word that you are searching for within the records. Multiple words typed into the
Search Box should only be separated by spaces (do not use commas or other
punctuation). For example, if you want to see records where the Policy Number
begins with "GL" AND the insured is located in "Chicago", type GL Chicago in the
Search Box (do not type quotation marks!).
Any Words. This is an OR-type search. Use this option when you want to search
for records that contain one set of characters OR another set of characters. For
example, if you want to see records where the insured name has "Smith" within it,
OR the Policy Number has the characters "CMP" in it, OR the insured's address is
on "Clybourne" street, you would select this option and type Smith CMP Clybourne
in the Search Box (do not type quotation marks!).
Show All Button
If you have previously limited the number of records displayed by using the Search
function and now want to see all of your filings again, click on the Show All button.
33
Using the Search Controls
Advanced Search
The Advanced Search button will bring up a new screen that allows you to do
complex searches. The Advanced Search screen is shown on the next page:
34
35
Using the Search Controls
Advanced Search (continued)
General
The Advanced Search screen lets you perform complex searches across multiple
fields. For most fields, it allows you to choose the type of search using
comparison operators (< = >) so you can choose whether you are looking for
records whose field values are less than, equal to, more than or not equal to the
values you specify.
Entering Search Criteria
There is a label and search criteria box for each field in the record. Enter criteria
is as many, or as few, boxes as you wish. In general, numeric searches allow
you to choose a comparison operator. Text fields are automatically "like"
searches. Enter criteria and choose comparison operators in any order you
want. The search is not performed until you click on the Search Button. All of
the criteria and comparisons must be true for a given record in order for the
system to return that record when it performs the search.
Using Comparison Operators
There are six different comparison operators.
Equal to =
Records will only be returned if the field in the record matches exactly the
criteria you have entered in the search criteria box for that field.
Not equal to <>
Records wil only be returned if the field in the record does not exactly match
the criteria you have entered in the search criteria box for that field.
Less than <
Records will be returned if the record's field is less than the amount typed in
the search criteria box.
Less than or equal to <=
Records will be returned if the record's field is less than, or equal to, the
amount typed in the search criteria box.
Greater than >
Records will be returned if the record's field is greater than the amount typed
in the search criteria box.
36
Using the Search Controls
Advanced Search (continued)
Greater than or equal to >=
Records will be returned if the record's field is greater than, or equal to, the
amount typed in the search criteria box.
"Like" Searches
Alphanumeric or text fields are automatically searched using the "LIKE"
comparison operator. This means that the system will return records when it
finds the characters you typed in any part (beginning, middle, end) of
corresponding field in the record. For example, if you enter GL123 in the Policy
Number search field, the system will return records where the Policy Number is
GL123456, CGL123XYZ11, ABC444GL123, etc.
Filing Type Search
The Filing Type field does not have a search criteria box, but rather, two buttons
you can choose. If you only want policies in the returned recordset, click the
Policy button. If you only want endorsements, click the Endorsemt button. If you
want the system to return policy and endorsement records, do not click on either
button.
Insurance Co Search
The Insurance Company field is not a regular search criteria box, but rather a
"drop-down" box. There are a couple of ways to make choices in this box.
When the screen's focus is in the Insurance Company drop-down box, quickly
type the first few letters of the insurer's name. The box will scroll to the record (if
any) that matches the characters you are typing. If you pause too long between
typing the characters, the system will think you are starting over and begin a new
search for the characters you are typing.
You can also click on the light blue box with the downward-pointing arrow at the
right side of the drop-down box. This will "open" the box and show you part of
the list of insurance companies. There is a vertical scroll bar at the right side of
the list. Navigate through the list using the up and down arrows on your
keyboard, the PageUp and PageDn keys on your keyboard, or the vertical scroll
bar. When you find the insurer you want to choose, click on it.
37
Using the Search Controls
Advanced Search (continued)
Coverage Code Search
The Coverage Code field is not a regular search criteria box, but rather a "dropdown" box. There are a couple of ways to make choices in this box.
When the screen's focus is in the Coverage Code drop-down box, quickly type
the first few letters of the coverage code name. The box will scroll to the record
(if any) that matches the characters you are typing. If you pause too long
between typing the characters, the system will think you are starting over and
begin a new search for the characters you are typing.
You can also click on the light blue box with the downward-pointing arrow at the
right side of the drop-down box. This will "open" the box and show you part of
the list of coverage codes. There is a vertical scroll bar at the right side of the
list. Navigate through the list using the up and down arrows on your keyboard,
the PageUp and PageDn keys on your keyboard, or the vertical scroll bar. When
you find the coverage code you want to choose, click on it
.
Search Button
When you have finished entering search criteria, click on the Search Button and
the system will begin the search.
38
Using the Export Controls
The Export Buttons are located at the top of the dark blue section of the screen, just
below the "Your SLA Filings" title. When you choose to export records, the system will
export all records, on all pages in the recordset (i.e. even if only 25 records are shown
on the screen, if the bottom of the screen says there are 2000 records, the system will
export all 2000 records). If you have filtered the record set by doing a Simple or
Advanced Search, the system will only export the records that match your search
criteria. The system will prompt you to save the file on your local computer and allows
you to export data in one of three ways.
There is a limit to the number of records the system will export (this is especially true for
Excel files). If your export does not work, try limiting the number of records you are
exporting by using the Search or Advanced Search functions. For instance, if you are
trying to export to Excel and you have not limited your records by using a Search
function, you are attempting to export all of your current year data, plus all of your prior
year data, plus all data from the year before that! That can be a whole heck of a lot of
data! Try just doing one year at a time.
Excel. The system will save the exported records to a Microsoft Excel file on
your computer.
XML. The system will save the exported records to an XML (eXtended Markup
Language) file on your computer.
CSV. The system will save the exported records to a CSV (Comma Separated
Values) file on your computer.
39
Pages of Records
Pages of Records
For convenience and speed, the system shows you records in pages of 25,
50 or 100 records at a time. At the bottom of the screen there are controls
that let you page through the records and choose how many records will
display on each page. The controls look like this:
Click on the FirstPage icon (see below) to display the first page of records.
Click on the PrevPage icon (see below) to display the previous page of
records. Click on the NextPage icon (see below) to display the next page of
records. Click on the LastPage icon (see below) to display the last page of
records.
FirstPage icon
PrevPage icon
NextPage icon
LastPage icon
Records Per Page
For convenience and speed, the system shows you records in pages of 25,
50 or 100 records at a time. At the bottom of the screen there are controls
that let you page through the records and choose how many records will
display on each page. The controls look like this:
To choose the number of records that will be displayed on each page, click on
the downward-pointing arrow on the right side of the Records Per Page box
and select either 25, 50 or 100. There will normally be a brief pause before
the system refreshes your screen to display the number of desired records.
40