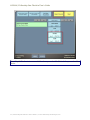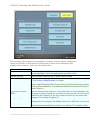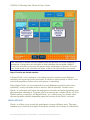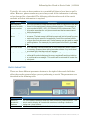
1
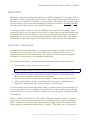
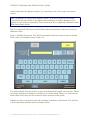
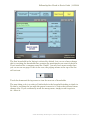
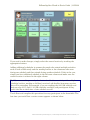
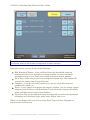
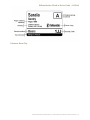
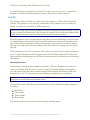
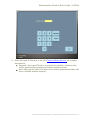
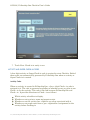
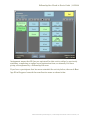
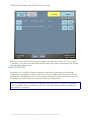
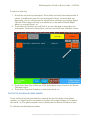
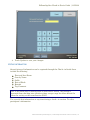
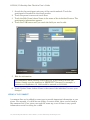
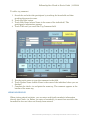
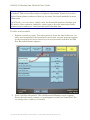
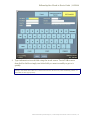
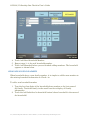
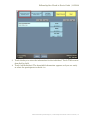
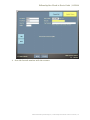
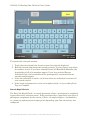
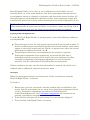
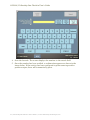
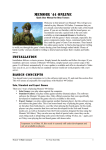
Fellowship One Check-in User's Guide
8/5/2010
Copyright Fellowship Technologies, L.P. 2004-2010. All Rights Reserved. Reproduction without prior written
permission is prohibited, except as allowed under the copyright laws.
Information in this document is subject to change without notice. The software described in this document is
furnished under a license agreement or nondisclosure agreement. The software may be used or copied only in
accordance with the terms of those agreements. No part of this publication may be reproduced, stored in a
retrieval system, or transmitted in any form or any means electronic or mechanical, including photocopying and
recording for any purpose other than the purchaser’s personal use without the written permission of Fellowship
Technologies, L.P.
Trademarks
Fellowship Technologies, Fellowship One, Fellowship One Check-in, Fellowship One Contributions, and
Fellowship One WebLink are registered trademarks of Fellowship Technologies, L.P. in the USA and other
countries.
Fellowship One Check-in User's Guide | 8/5/2010
QUICK START
Before we jump into the detailed explanation of Fellowship One®, let’s take a look at
the steps to check participants into activities. This section of the guide will show you
how easy it is to learn to use Check—in very quickly. First things first though, there
are two modes you can use when checking people into activities—Assisted and Self.
We will explore the steps for each method separately.
It may seem silly to mention, but the following bears repeating: no matter which
mode of Check-in you are using, ensure that you always greet your participants and
make them feel welcome. When you are busy watching the technology, it is easy to
forget that you are one of the first people visitors see when they come to the church.
This makes it especially important to always have a nice word to welcome people.
QUICK START - ASSISTED MODE
Assisted mode means that there is a volunteer operating the kiosk to check the
participants into activities. This is the mode that you will most often use at
registration areas for first time visitors or for special activities that may require
assistance to locate rooms or to complete registration.
The steps you will take to check people into activities using assisted mode are:
1. Greet people as they arrive at your station.
Tip! New visitors should be directed to complete a visitor registration card. You will need to collect dates
of birth for children checking into activities as well as special needs information such as allergies.
2. Ask for the last 4 digits of the phone number (Check—in will look at both
Home and Cell phone numbers when searching).
3. Use the touch screen to enter the last 4 digits of the number. Touch Search.
4. Select individuals to check in and then select the correct rooms/locations.
5. Optionally, print name tags, parent receipts, and item tags.
Ok, let’s break each of these steps down. Step 1 is pretty obvious, but remember it’s
easy to get distracted by technology and forget that one of the main reasons people
come to church is to connect with the community. So smile, greet, and make people
feel welcome.
Step 2—ask for what? Why the last 4 digits? The short answer is that it’s easier to
hear numbers than name pronunciations in crowded hallways. Also, searching by
phone numbers is a focused search guaranteed to bring back fewer search results
than typing in common last names such as “Smith”. That being said, if the person
©2010 Fellowship Technologies | Fellowship One Check-in User's Guide | 3
8/5/2010| Fellowship One Check-in User's Guide
cannot remember his phone number, you can always use a last name, first name
search.
Note: All pictures in this section display Check—in with its default color theme.
Your church has the ability to configure custom themes and these themes can be
applied to each activity separately. Your screen may have completely different colors
than those shown below.
Don’t’ be alarmed! All screens will still have the same buttons, they may just be in
different colors.
Step 3—finding the person. You will be presented with the search screen as shown
below after you complete every check—in.
You will probably have questions as you read through this quick start section. There
are many settings and buttons available to you when using Check—in. Don’t worry
about these now, they will be covered in later sections of this guide.
Simply use the touch pad to enter the numbers and then touch Search. You will see
a list of matching search results as shown below.
4 | Fellowship One Check-in User's Guide | © 2010 Fellowship Technologies, L.P.
Fellowship One Check-in User's Guide | 8/5/2010
The first household in the listing is selected by default, but you can always change
this by touching the household that contains the participants you want to check in.
If you searched for a common name like “Smith”, you may have more results than
you can see on one page. If this is the case, the paging arrows at the top of the list
will activate.
Touch the downward facing arrow to view the next set of households.
The next thing to do is to select all individuals in the household wishing to check in.
Do this by touching the box with the person’s name in it. Notice that selected items
change color. If you accidentally touch the wrong name, simply touch it again to
de—select it.
©2010 Fellowship Technologies | Fellowship One Check-in User's Guide | 5
8/5/2010| Fellowship One Check-in User's Guide
Tip! Repeat the names back to the family while you are touching them to confirm
the individuals checking in. For example, “Are you checking in Christina, Tuck, and
Molly today?”
Step 4—you are now ready to check the selected individuals into the correct
locations. Do this by touching the Next button (upper—right corner of the screen).
The first selected individual appears with the correct assignment/best age fit room
selected by default.
As shown in the image below, Christina will be checked into the 11:00 AM schedule
into the John room. You know this because there is a check mark in the 11:00 AM
schedule box and the buttons to the John room are all selected.
10 | Fellowship One Check-in User's Guide | © 2010 Fellowship Technologies, L.P.
Fellowship One Check-in User's Guide | 8/5/2010
If you need to make changes, simply select the correct location by touching the
appropriate buttons.
Adding additional schedules is common for people who attend multiple activities
such as both a Bible study and the worship service or for volunteers who serve
during one schedule and then attend during another schedule. If this is the case,
simply touch an additional schedule in the left most column and make sure the
correct location is selected in the right column.
Tip! If you are working an early check—in schedule for an activity with multiple
schedules (such as worship or children’s services) ask families how many services
they will be attending. For example, if you are working the 9:00 AM schedule and
there are also 10:15 and 11:30 AM schedules available, ask participants if they
would also like to check into a later schedule as well.
Touch Next and complete this procedure for every participant in the household. The
last time you touch Next a review screen appears as shown below.
©2010 Fellowship Technologies | Fellowship One Check-in User's Guide | 11
8/5/2010| Fellowship One Check-in User's Guide
Note: Double—check your entries on this screen. Touch the Edit button beside any
participant who has an incorrect assignment to make changes.
From this screen, you can do any of the following:
Edit Household Phone—if you could not locate the household using the
number provided, it’s a good idea to change it while you have the family
standing in front of you. Touch this button and enter the new number.
Print Tags—if the activity has been configured to print tags, this button will
activate the printer and all tags will print.
Complete—if you do not want to print tags, you can touch this button to
complete the check—in.
Pager—if your church uses pagers for nursery children, you can assign a pager
number to the children in the household. Touch this button beside each baby’s
name and then touch Assign Pager Number.
Print Item Tag—prints and extra name tag that will be used to mark personal
belongings such as diaper bags, teddy bears, Bibles, and so on.
When you are happy with your choices touch Print Tags and then Complete to
return to the search screen.
12 | Fellowship One Check-in User's Guide | © 2010 Fellowship Technologies, L.P.
Fellowship One Check-in User's Guide | 8/5/2010
UNDER THE HOOD
Now that you have been introduced to the basics of how Check—in works, let’s take
a step back and look under the hood at what Check—in is and what it does. This
section will focus on what exactly is happening when you are checking people in and
how Check—in can act as a security monitor at your church.
WHAT IS FELLOWSHIP ONE CHECK-IN?
The long definition: Fellowship One Check—in allows the church to record real—
time attendance for all attendees while enforcing child security, safety and
registration requirements for any event or activity. In summary, it’s a tool the
church can use to record who is no longer attending an activity and to provide a
secure way for adults to claim children after an activity.
During popular activities there are often many unfamiliar faces in the church and
we want to ensure our children are safe at all times during these busy periods.
Check—in has built in functionality that can help with this.
Check-in and Ministry
Check—in helps your church shepherd by not letting any opportunity to minister
pass by. In the shepherd role, your ministry leaders need to see who isn’t attending
just as importantly as who is. Someone who was once a regular attendee who has
been absent for several weeks may need additional care and it’s critical for your
ministry leadership to know when this is happening.
Real—time attendance means that ministry leadership can run reports to see who
they need to follow—up with. They can even do this while an activity is still in
progress. In essence, real—time attendance means that leadership has immediate
access to the data that is being entered via Check—in.
Check-in and Security
Children’s activities can be configured to print a parent/guardian security receipt.
The receipt prints with the name tags as kids check into an activity. Here’s why
receipts are important:
Receipt codes are randomly generated at the time of Check—in.
Receipts will only ever print one time for a single activity schedule. People
cannot trick the system into printing a second receipt for the same schedule.
Receipts do not list identifying information. If the parent accidentally drops
the receipt and it is picked up by another person, it cannot be used to locate a
child without help from a volunteer.
©2010 Fellowship Technologies | Fellowship One Check-in User's Guide | 13
8/5/2010| Fellowship One Check-in User's Guide
Parents must display a receipt to collect children from activities. This receipt
must match the code printed on the child’s name tag. If they have lost the
receipt, measures should be put in place to check identity. Check with your
Fellowship Technologies implementation manager for ideas on how this can be
accomplished at your church.
HOW DOES CHECK-IN WORK?
Your church’s management system is Fellowship One. Within Fellowship One,
activities are created so that they have the following:
Settings specific to Check—in
Schedules with recurrence patterns
Optionally, breakout groups
Optionally, activity groups
Rooms/locations with settings specific to Check—in
Optionally, a graphical theme to display at the Check—in station
Activities are created to track involvement in church events. One of the ways to
track involvement is to take attendance and this can easily be accomplished using
Check—in.
PUTTING IT ALL TOGETHER
All the options covered in this section work together to create name tags and parent
receipts. As shown in the following image, the name tag includes all details about
the activity. In addition, when a participant checks into an activity, you may add a
tag comment and a pager number if needed. These scenarios will be covered later in
this guide.
Participant Name Tag
14 | Fellowship One Check-in User's Guide | © 2010 Fellowship Technologies, L.P.
Fellowship One Check-in User's Guide | 8/5/2010
Volunteer Name Tag
©2010 Fellowship Technologies | Fellowship One Check-in User's Guide | 15
8/5/2010| Fellowship One Check-in User's Guide
Parent Receipt
16 | Fellowship One Check-in User's Guide | © 2010 Fellowship Technologies, L.P.
Fellowship One Check-in User's Guide | 8/5/2010
TOUCHSCREEN MONITORS, PRINTERS AND BARCODE SCANNERS
In this section, we will discuss the peripheral equipment that can be used with
Check—in. Make sure you consult with your Fellowship Technologies
implementation manager on the right equipment for your church. He or she will
have first—hand knowledge of your project and will be able to make the best
recommendations.
See any of the following:
Touchscreen Monitors
Printers
Barcode Scanners
TOUCHSCREEN MONITORS
The concept of a touch screen is not new in today’s world. Many service industries,
in particular fast food and dine—in restaurants, use touch screens to reduce the
amount of time it takes to perform an action. Check—in is no different. The idea is
to quickly process people so that they do not have to wait long to attend an activity.
Touchscreens are like a keyboard. Any button you touch on the screen causes
Check—in to respond in some fashion. The use of a touchscreen greatly accelerates
the check—in process for an activity. With it, you can quickly find people and assign
them to the correct location, or you can use Check—in in Self mode and allow your
participants to check themselves in!
Note: You do not have to use a touchscreen monitor. Check—in works with keyboard
and mouse just as well as with a touchscreen.
Use the touchscreen monitors recommended by your Fellowship Technologies
implementation manager and follow the directions provided with the monitor when
installing. Most touchscreen monitors have proprietary software drivers that must
©2010 Fellowship Technologies | Fellowship One Check-in User's Guide | 17
8/5/2010| Fellowship One Check-in User's Guide
be installed before the monitor will work. You may also need to run a calibration
program included with the monitor to ensure the monitor works correctly.
PRINTERS
The printer used for Check—in name tags and receipts is a Zebra brand thermal
printer. This printer can be directly connected to the computer you are using for
check—in either by a parallel or USB connection.
WARNING: Only very specific models of the Zebra printer work with Check—in. Be
sure to consult the Hardware Guide located in answer ID 44 (click the Support link
within Fellowship One and then click Find Answers) for exact models.
Thermal printers never require ink because they use heat technology to print words
or simple images onto paper labels. Labels for name tags and parent receipts come
pre—rolled and are designed to fit into the printer. If you run out of labels, simply
lift the cover and replace the roll. Ensure that the labels are coming over the top of
the roll.
If the printing is not clear or seems a little messy, you may need to clean the printer
head. A special marker for this purpose comes with all Zebra printers. Check with
your network administrator or the Zebra documentation for instructions on cleaning
the printer.
Resetting the Printer
Occasionally technology does experience glitches. This can happen for a variety of
reasons including loss of power or a power surge. If something like this happens,
you will notice that the power button on top of the machine will blink or will turn
from green to red. If your printer is not working as expected, try resetting it.
Note: Always check the documentation included with your printer for complete
directions on troubleshooting printer errors.
To reset the printer hold the power button down until it blinks through a sequence
as follows:
One blink
Two blinks
Three blinks
Four blinks
The printer will now be reset and should begin working again.
18 | Fellowship One Check-in User's Guide | © 2010 Fellowship Technologies, L.P.
Fellowship One Check-in User's Guide | 8/5/2010
Printer Troubleshooting
If you are still having trouble with the printer, you should refer to the
documentation that is specific to your printer for all details on fixing problems. You
may also visit www.zebra.com for support information.
BARCODE SCANNERS
Barcode scanners can be used to check people into activities in either Assisted or
Self modes. Operating in Self mode requires a barcode scanner. If touchscreen
check—in is fast, then barcode scanned check—in is super—sonic!
Participants who will check—in must have a barcode associated with their
individual record before they can check—in. Barcodes can be any 5 — 18 digit
number. For example, a driver’s license barcode, a grocery store discount card, or a
barcode especially made for your church. As long as the code has numbers only (5 to
18 digits), it will work with Check—in.
The barcode scanner is typically connected to the computer via a USB connection.
There is typically no software to install, simply plug in the device and wait for
Microsoft Windows to recognize it.
Assisted Mode Barcode Scanning
When using barcode scanning in Assisted check—in mode, ensure you are on the
Search screen and scan the barcode number. The individual or household associated
with the barcode number appears. Simply check the participants into their correct
location as normal.
©2010 Fellowship Technologies | Fellowship One Check-in User's Guide | 19
8/5/2010| Fellowship One Check-in User's Guide
STARTING CHECK-IN
If Check—in is not already started, a shortcut should be available on the desktop of
the computer. It should appear similarly to the one shown below.
The first time you launch Check—in on a computer, you need to authenticate with
Fellowship One. This procedure needs to be performed one time only.
Authentication is the process of ensuring that Check—in can access activities and
people data. Once authenticated, the only time you ever need to authenticate again
will be if you re—install the application.
Authentication requires you to have a Fellowship One user name and password. No
special security rights are required for this account.
Note: Some churches choose to create user accounts specifically for Check—in
stations. The user name can be something generic like “Checkin”. This practice
allows you to have a user account with no security access rights in Fellowship One.
To launch Check—in and authenticate
1. Locate the Check—in shortcut icon on the desktop of your computer. Touch the
shortcut icon quickly two times (or use the mouse to double—click the shortcut
if there is a mouse attached to the computer).
2. Check—in will start and launch the automatic updater. If an update is found,
it is downloaded and installed automatically. The Authenticate Church screen
appears with fields that allow you to enter the proper credentials to access
Check—in.
40 | Fellowship One Check-in User's Guide | © 2010 Fellowship Technologies, L.P.
8/5/2010| Fellowship One Check-in User's Guide
3. Use the touchscreen to enter your User Name, Password and Church Code.
Touch the TAB button to move from field to field.
Note: Passwords require you to touch the SYMBOLS button to access special characters.
4. Touch Authenticate Church. If the information you entered is correct, the
Activity Code screen appears. If any of the information is incorrect Check—in
displays an error message. Correct any errors and try again. See Activity and
Super Check-in Codes for details on locating activity and Super Check-in
codes.
5. Enter the activity or Super Check-in code by touching the number pad. When
the final number is entered, the Check-in type selection screen appears.
42 | Fellowship One Check-in User's Guide | © 2010 Fellowship Technologies, L.P.
Fellowship One Check-in User's Guide | 8/5/2010
6. Select the mode of Check-in to use (see Check-in Mode Selection for complete
descriptions):
Assisted—this type of Check-in is meant to be used by a volunteer who
will be greeting and assisting participants and new visitors.
Self—this type of Check-in is meant to be used by frequent attendees who
have a barcode number assigned.
©2010 Fellowship Technologies | Fellowship One Check-in User's Guide | 43
8/5/2010| Fellowship One Check-in User's Guide
7. Touch Next. Check-in is ready to use.
ACTIVITY AND SUPER CHECK-IN CODES
A four-digit activity or Super Check-in code is required to start Check-in. Both of
these codes are automatically generated by Fellowship One when an activity or
Super Check-in is created.
Activity Codes
When an activity is created in Fellowship One, a four—digit Check—in code is
assigned to it. The code is generated regardless of whether or not you plan to use
Check—in for the activity. This code is the link between Fellowship One and
Check—in. It provides directions to Check—in as follows:
Which activity schedules to display
Whether or not to print a name tag/parent receipt
Whether or not the activity has a specific age range associated with it
Whether or not people must have a pre—registration (assignment) to the
activity before checking in
44 | Fellowship One Check-in User's Guide | © 2010 Fellowship Technologies, L.P.
Fellowship One Check-in User's Guide | 8/5/2010
Whether or not an assignment exists
Whether or not an assignment can override closed room settings
NO ACTIVE CHECKINS
If the activity code does not have a current schedule available, an error message
appears as shown in the image below.
This error means that there are no current schedules for the activity that you
entered. For example, Sunday activities cannot be accessed any day of the week
except for Sunday.
Note: If you want to test an activity prior to the activity’s scheduled date/time, you
can add a recurrence to your activity schedule that ends prior to the activity date.
See How can I Practice? for details.
CHECK-IN MODE SELECTION
After entering the activity or super check—in code you need to choose what mode of
check—in to use. Two modes are available as follows:
Assisted—this type of check—in is meant to be used by a volunteer who will be
greeting and assisting participants and new visitors.
©2010 Fellowship Technologies | Fellowship One Check-in User's Guide | 45
8/5/2010| Fellowship One Check-in User's Guide
Self—this type of check—in is meant to be used by frequent attenders who
have a barcode number assigned. Barcode checkin will be covered in detail in a
later section.
Assisted Check-in Options
As mentioned previously, assisted check—in is meant to be used by volunteers. The
following are two options that are available for your volunteers:
Show Image—this option displays the picture associated with an individual’s
record as shown below. If no image exists, a picture will not display.
46 | Fellowship One Check-in User's Guide | © 2010 Fellowship Technologies, L.P.
Fellowship One Check-in User's Guide | 8/5/2010
Enable Rapid—this option allows volunteers to skip the room/location selection
screens and proceed immediately to the review checkins screen as shown
below.
©2010 Fellowship Technologies | Fellowship One Check-in User's Guide | 51
8/5/2010| Fellowship One Check-in User's Guide
Note: Rapid Check—in is not available when you select No Default for your schedule
choice.
50 | Fellowship One Check-in User's Guide | © 2010 Fellowship Technologies, L.P.
Fellowship One Check-in User's Guide | 8/5/2010
MENU OPTIONS
Check—in has several menu options that help you manage functionality. Once you
have entered an activity code, the Menu button appears at the bottom of the screen.
Note: The Menu button will appear only in Assisted Check—in mode.
The following image shows the available menu options.
©2010 Fellowship Technologies | Fellowship One Check-in User's Guide | 49
8/5/2010| Fellowship One Check-in User's Guide
The available menu options are grouped by category—Activity Setup, Application
Setup and Printer. A description of each option is listed in the following table.
Simply touch a button to activate the functionality.
Button
Set Default Activity
Change Activity
Self or Assisted Check-in
Authenticate Church
Turn Printer Functions
Off/On
Set Default Printer
Print Test Tag
Description
Touch to change the default activity schedule. All activity schedules for the
day are displayed. Touch the appropriate schedule choice.
Touch to enter a new activity or Super Check-in code.
Touch to choose the type of check-in—either volunteer assisted or self Che c
in. See Check-in Mode Selection for details.
Touch to supply a user name, password and church code to authenticate
Check-in with Fellowship One. You need only do this the first time you launc
Check-in after installation. The values are saved and reused each time you
launch Check-in.
Touch to disable printer functions. This is useful when it is not necessary to pri
name tag or security receipt for an activity or when you do not have a print
attached to the computer. If you turn printer functions off, the button title
changes to Turn Printer Functions On.
Touch to choose the default Zebra printer to use during Check-in. All printer
configured for the computer will display allow you to select the correct print
Touch to print a test tag to your default printer. Make a habit of printing a te
tag before participants begin arriving for your activity. This will allow you to
50 | Fellowship One Check-in User's Guide | © 2010 Fellowship Technologies, L.P.
Fellowship One Check-in User's Guide | 8/5/2010
Turn Cutter On
Exit Application
Search
troubleshoot any printer errors prior to your check-in session.
If you purchased a Zebra printer with a cutter option, you can turn the cutt e
on by touching this button. It is turned off by default. If you turn the cutter o n
the setting is saved and the cutter will be turned on every time you launch
Check-in.
Touch to exit Check-in. The program will close and you will see the comput e
desktop.
Touch to exit the menu options and return to Assisted Check-in mode.
TESTING THE PRINTER
Before participants begin to arrive for an activity it’s a good idea to test the
connection to the printer. This is especially important the first time you use a
computer for Check—in purposes.
Ensure that name tags and parent receipts will print by testing the connection.
Before beginning, ensure that the printer is connected to the computer and is turned
on. Also ensure that the labels and in the printer as directed in the printer’s
documentation.
To print a test tag
1. Start Check—in. Authenticate to Fellowship One if necessary. See Starting
Check-in for more information.
2. Enter the activity code by touching the numbers on the touchscreen keypad.
3. Touch the Menu button that appears on the bottom of the screen.
4. Touch the Print Test Tag button in the Printer settings group. A tag should
print on the printer.
If a tag does not print, check the connection of the printer to the computer. The
connector should fit tightly into the back of the computer (or into the USB port).
Following is a list of some other things to check:
Check the power connection to the printer. The function button on the top of
the printer will light up when the printer has power and is turned on.
Ensure the printer is turned on. The power switch is in the back of the printer
beside the power cord. Consult your printer’s documentation for exact location.
Ensure the labels are in the printer correctly. If there are no labels in the
printer or the labels are not feeding correctly, a test tag will not print.
Turn on Printer Functions
Check—in’s menu options allow you to control whether or not the printer functions
will work with Check—in. You can turn printer functions off if you do not have
access to a printer or the activity does not require printing name tags or parent
©2010 Fellowship Technologies | Fellowship One Check-in User's Guide | 51
8/5/2010| Fellowship One Check-in User's Guide
receipts. If you have turned the printer functions off, you must turn them on again
to allow Check—in to print tags.
To turn on (or off) printer functions
1. Start Check—in and enter an activity code.
2. Touch the Menu button at the bottom of the screen.
3. Touch the Turn Printer Functions On button. Note that this button will
display Turn Printer Functions Off if the printer functions are already turned
on.
Turn Cutter On
If you have purchased a Zebra printer with a cutter, you can select to turn the cutter
features on. This option will ensure that the printer cuts when through printing.
Note: Please consult the Hardware Guide prior to purchasing printers with cutters.
Only specific models of the Zebra printer work with Check—in. See answer ID 44 in
Fellowship One by clicking the Support link and then clicking the Find Answers
link.
When you have turned the cutter feature on, the setting is remembered every time
you start Check—in on the computer.
To turn cutter on
1. Start Check—in and enter an activity code.
2. Touch the Menu button at the bottom of the screen.
3. Touch Turn Cutter On. Note that the button will display Turn Cutter Off if the
cutter feature has already been turned on.
52 | Fellowship One Check-in User's Guide | © 2010 Fellowship Technologies, L.P.
Fellowship One Check-in User's Guide | 8/5/2010
ASSISTED MODE CHECK-IN
Check—in in Assisted mode is volunteer driven. This means that a volunteer is
running the checkin station and assisting participants with class location, greeting
visitors, and collecting and entering information.
The volunteer will handle all the details of selecting the correct schedule, group, and
room/location for the participant to check into. The volunteer will also ensure that
anything that prints is given to the participants and provides direction on how to
wear these items.
DEFAULT ACTIVITY SCHEDULES
When using Check—in in Assisted mode for activities with multiple schedules, the
first thing you must do is select the default schedule to check into. Selecting the
correct schedule will speed up the check—in process.
If an activity has more than one available schedule on any particular day, the
schedules appear immediately after you select the Assisted check—in type. As
shown below, this example activity has three available schedules.
©2010 Fellowship Technologies | Fellowship One Check-in User's Guide | 53
8/5/2010| Fellowship One Check-in User's Guide
Note: The activity schedule selection screen appears only when you have entered an
activity code for an activity with multiple schedules.
This screen allows you to choose between the following:
Any available schedule—touch the schedule that corresponds to the current
check—in period.
No Default—this choice may be appropriate in cases where you need to assign
a participant to two or more schedules or when using a Super Check—in with
many available activities and schedules.
Note: No Default is not available if you have selected to Enable Rapid to enable
rapid check—in.
Case study 1: No Default Schedule
If you choose No Default, Check—in displays all available choices for the
participant. The volunteer must determine which schedule the participant should be
checked into.
This option is appropriate for activities where the majority of participants check into
multiple schedules. For example, a children’s service activity where kids stay for
two services while parents attend a Bible study and the worship service.
Remember that the volunteer only needs to press one button—touch the appropriate
schedule choice and the remaining buttons will select automatically based on the
participant’s assignment or best age fit.
54 | Fellowship One Check-in User's Guide | © 2010 Fellowship Technologies, L.P.
Fellowship One Check-in User's Guide | 8/5/2010
Case study 2: Selected activity schedule
When you choose a default schedule, the schedule along with it’s assignment is
selected for you. Simply verify the participant is in the correct room and touch Next
or Quick Print Complete.
©2010 Fellowship Technologies | Fellowship One Check-in User's Guide | 55
8/5/2010| Fellowship One Check-in User's Guide
Note: Selecting a default activity schedule does not prevent you from assigning a
participant to more than one schedule or from changing the assigned schedule.
Touch each schedule and ensure the proper room assignment is selected. You will
see a check mark in the schedule box when a check—in selection has been made.
Super Check-in and default schedules
A Super Check—in is created in cases where several activities across different
ministries are occurring at the same time. It allows an entire family to check—in at
one kiosk regardless of the activity each person is attending.
Since Super Check—ins are composed of several different activities (and activity
schedules), it may not make sense to choose a default schedule. In these cases,
Check—in volunteers will select the appropriate schedule and room depending upon
the participant checking in. Typically, the best selection for a Super Check—in is No
Default unless you want to use Rapid Check—in, in which case, you should select
the most popular schedule depending upon the location of the Check—in kiosk.
SEARCH METHODS
Check—in allows you to search for participants in many different ways. The most
common way is the last four digits of the phone number (can be home or cell/mobile).
60 | Fellowship One Check-in User's Guide | © 2010 Fellowship Technologies, L.P.
Fellowship One Check-in User's Guide | 8/5/2010
Typically, it’s easier to hear numbers in a crowded hall than to hear how to spell a
name. However, phone number may not always work if this information is missing
or has changed for a household. The following table describes each of the search
methods and what information is required.
Method
Last 4 digits of
home or mobile
phone number
Description
Touch the numbers on the touch screen that correspond to the last
4 found in the participant’s home phone number. For example, a
phone number of 469—442—0100 touch 0100 on the screen. This
option also searches for cell phone numbers that are associated
with the household.
Last Name, First
Touch the letters that correspond to the letters in the participant’s
Name
last name. The last name is all that is required, but to speed up your
search and return specific households, touch the comma button
and type the first name as well. Partial names can be used to make
searching faster. For example, for participant John Smith, type smi,
joh.
Bar Code Scan
Use a barcode scanner attached to the computer where Check—
in is running. Scan an item with a barcode number. Any individual
associated with that barcode will appear.
Confirmation Code When using Fellowship One WebLink’s Event Registration tool, a
confirmation code is assigned to every registrant and is printed on
the confirmation message. This code can be entered to locate the
participant.
SEARCH PARAMETERS
There are three different parameter buttons to the right of the search field that
affect the results returned when you are performing a search. The parameters are
described in the following table.
Parameter
Return All
Household
Members
Return
Description
This is the default selection and the most commonly used selection. The
search results display all household members including a button to
display one—time visitors.
Search results display only the individuals that match your search criteria.
©2010 Fellowship Technologies | Fellowship One Check-in User's Guide | 61
8/5/2010| Fellowship One Check-in User's Guide
Parameter
Individual
Only
Description
This selection is more appropriate for activities where you are checking
one individual in to one activity such as students checking into a youth
activity or ladies checking into a women’s Bible study.
Bar Code
Rapid Check- This feature locates the individual associated with the bar code number
scanned and immediately checks them into a room. The volunteer will
in
not be required to select a room/location. This selection is appropriate
for activities where participant’s have been assigned to a room and
have a barcode number associated with their record.
If the room/activity has been configured to print a name tag and/or
receipt, these items will print automatically.*
*Note: Barcode Rapid Check—in requires some setup before it will work
automatically.
SEARCHING FOR PARTICIPANTS
To check a participant into an activity, you must first display the participant’s
information. Use the touchscreen as described below.
To search for a participant
1. If not already started, you will need to start Check—in and enter the correct
activity or Super Check—in code.
2. Select the Assisted option and optionally, choose to Show Images and/or
Enable Rapid.
3. Touch Next.
4. Optionally, select the schedule to check participants into; this screen will
display only when there is more than one available schedule. Once the
schedule has been selected, the Start Check—in button will activate. You may
choose No Default if your participants will be checking into multiple schedules.
5. Touch Start Check—in. The search screen appears.
62 | Fellowship One Check-in User's Guide | © 2010 Fellowship Technologies, L.P.
Fellowship One Check-in User's Guide | 8/5/2010
6. Type the last 4 digits of a participant’s home or mobile phone number into the
search field by touching each number.
7. Touch the Search button. A list of all households with phone numbers that
match your entry appear.
SELECTING A PARTICIPANT
The results of your search display all matching households on the left. If you
searched for a common name, you may return more results than can be displayed on
a single screen. Notice the up and down arrows at the top of the household listing;
these buttons allow you to scroll through all search results. In the image shown
below, touching the downward facing arrow will display the next set of search
results.
©2010 Fellowship Technologies | Fellowship One Check-in User's Guide | 63
8/5/2010| Fellowship One Check-in User's Guide
When you find the household you want to use, touch it to display all household
members. Simply touch each participant in the family that you want to check into
the activity.
If multiple people are checking into the activity, select all participants. As shown
below, Eli and Jenni are checking into the activity.
64 | Fellowship One Check-in User's Guide | © 2010 Fellowship Technologies, L.P.
Fellowship One Check-in User's Guide | 8/5/2010
Let’s address these two options separately. First, let’s touch Rapid Check—in to see
what happens (remember that you must Enable Rapid when starting Check—in to
display this button). The screen displays the review checkins list.
©2010 Fellowship Technologies | Fellowship One Check-in User's Guide | 65
8/5/2010| Fellowship One Check-in User's Guide
You can simply verify the schedules and locations and touch Print Tags and then
Complete. If there is a mistake in the list, you can touch the Edit button beside the
participant to go back and change the room/location or schedule.
The other option is to verify each individual’s assignment as you are checking them
in. When you have selected the individuals to check—in, you will notice a Next
button in the upper right corner of the screen. This button displays the
room/location selection screen for the first participant.
Note: The activity examples shown may look completely different from yours.
Imagine your own activity and room names in place of our examples.
As shown in the image below, Eli has an Assignment to the Llama room. You know
this because the word Assignment is printed beneath the Llama room name in the
far right column.
66 | Fellowship One Check-in User's Guide | © 2010 Fellowship Technologies, L.P.
Fellowship One Check-in User's Guide | 8/5/2010
Assignment means that Eli has pre-registered for this activity either by previously
attending, completing an online event registration form, or manually has been
giving an assignment by a Fellowship One user.
If you have a participant that has never attended the activity before, the words Best
Age Fit will appear beneath the room/location name as shown below.
©2010 Fellowship Technologies | Fellowship One Check-in User's Guide | 67
8/5/2010| Fellowship One Check-in User's Guide
Best age fit is looking at the age of the participant and comparing it to the age range
assigned to the room/location. In this case, Jenni does not have an assignment and
she meets the age requirements for the Goose room.
For the most part, Fellowship One will choose all the information for you, you
simply have to verify what is on the screen. For example, if you notice that the room
that is selected is not correct, or the parent tells you their child is in a different
grade, you can touch the correct room to change the check—in.
Tip! What you want to ensure on the room selection screen is that the red check
mark is displayed in the schedule you want to check the participant into and the
correct room/location has been selected.
When you have finished verifying the information, simply touch the Next button to
move to the next participant or to proceed to the Review Checkins screen.
68 | Fellowship One Check-in User's Guide | © 2010 Fellowship Technologies, L.P.
8/5/2010| Fellowship One Check-in User's Guide
Here you will touch Print Tags and Complete to finish the check—in. If you notice
a mistake, you can touch the Edit button beside any of the participants and change
the selected room/location.
PRINTING ITEM TAGS
Item tags are available to help volunteers keep track of participant belongings.
Diaper bags, backpacks, lunches, and so on can be labeled with an item tag for the
participant. Multiple item tags can be printed from the Review Checkins screen. An
item tag prints each time you touch the Print Item Tag button.
Note: If the printer functions are turned off, the Print Item Tag button is disabled.
Touch the Menu button and then touch Turn Printer Functions On to enable the
Print Item Tag buttons.
72 | Fellowship One Check-in User's Guide | © 2010 Fellowship Technologies, L.P.
Fellowship One Check-in User's Guide | 8/5/2010
To print an item tag
1. Search for and select a participant. Touch Next and verify the room/location is
correct. Complete this step for each participant if there are more than one.
Optionally, you can also bypass the room/location selection by touching Rapid
Checkin. This button will only be available if you decided to Enable Rapid
when you started Check—in.
2. Touch Review Checkins or touch Next if you are checking in more than one
participant. Continue touching Next until you see the Review Checkins screen.
3. Touch Print Item Tag beside any of the participant names listed on the Review
Checkins screen.
4. Touch Print Tags and Complete to finish the check—in.
EDITING THE HOUSEHOLD PHONE NUMBER
If you could not find the household by entering the last four digits of the phone
number, you should ask for an update and correct the number before you complete
the check—in. The phone number can be edited from the Review Checkins screen.
To edit the household phone number
©2010 Fellowship Technologies | Fellowship One Check-in User's Guide | 73
8/5/2010| Fellowship One Check-in User's Guide
1. Search for and select a participant. Touch Next and verify the room/location is
correct. Complete this step for each participant if there are more than one.
Optionally, you can also bypass the room/location selection by touching Rapid
Checkin. This button will only be available if you decided to Enable Rapid
when you started Check—in.
2. Touch Review Checkins or touch Next if you are checking in more than one
participant. Continue touching Next until you see the Review Checkins screen.
Note: For security purposes, the current household phone number displays the last four digits only.
3. Type a new phone number using the touch pad.
74 | Fellowship One Check-in User's Guide | © 2010 Fellowship Technologies, L.P.
Fellowship One Check-in User's Guide | 8/5/2010
4. Touch Update to save your changes.
EDITING INFORMATION
Several pieces of information can be captured through the Check—in kiosk; these
include the following:
First and Last Name
Goes by Name
Suffix
Date of Birth
Barcode
Tag Comment
Note: If the birth date is missing from an individual’s record , the person is
prevented from checking into activities where an age range has been defined for
either the activity or the room/location (RLC).
You can edit this information at any time during a check—in session. To edit a
participant's information
©2010 Fellowship Technologies | Fellowship One Check-in User's Guide | 75
8/5/2010| Fellowship One Check-in User's Guide
1. Search for the participant using any of the search methods. Touch the
participant’s household in the search results.
2. Touch the person’s name and touch Next.
3. Touch the Edit Name (where Name is the name of the individual) button. The
participant's information appears.
4. Touch the TAB button until you reach the field you need to edit.
5. Edit the information.
Tip! Remember when entering a date that you do not need to include the
slashes. Simply type the numbers in MMDDYYYY format. For example, a
birth date on September 12, 1999 would be entered as 09121999.
6. Touch Update Name (where Name is the name of the individual) to save your
changes.
ADDING A TAG COMMENT
A comment line can be added to name tags to provide important information to care
givers. For example, if a child has an allergy to certain foods, these can be listed in
the comment line. Care givers can read the name tag to see if there is any special
information crucial to caring for a child.
76 | Fellowship One Check-in User's Guide | © 2010 Fellowship Technologies, L.P.
Fellowship One Check-in User's Guide | 8/5/2010
To add a tag comment
1. Search for and select the participant by touching the household and then
touching the person’s name.
2. Touch the Next button.
3. Touch Edit Name (where Name is the name of the individual). The
participant's information appears.
4. Touch TAB until you reach the Tag Comment field.
5. Use the touch screen to type the comment in the field.
6. Touch Update Name (where Name is the name of the individual when you are
finished.
7. Complete the check—in and print the name tag. The comment appears at the
bottom of the name tag.
ADDING HOUSEHOLDS
When visitors attend activities, you can enter each family member’s information
directly into Check—in. Before you enter a household, you must first search for the
household to be sure it has not already been entered.
©2010 Fellowship Technologies | Fellowship One Check-in User's Guide | 77
8/5/2010| Fellowship One Check-in User's Guide
Tip! Always try searching at least two different ways before you enter a new
household. This reduces the number of duplicate households. Search by last four
digits of home phone number and then try by name. See search methods for more
information.
Tip! If check—in is very busy, simply enter the household members checking into
the activity. Have someone complete a visitor form so that the remaining family
members can be added at a later time through Fellowship One.
To add a new household
1. Perform a search as usual. You must search at least one time before you can
add a new household. If the household is not found, an error message appears
(or the household will not be listed in your search results) and then the Add
New Household button appears.
2. Touch Add New Household. The Add Household Member screen appears.
Notice that the search criteria you used appears in the Last Name field. You
can change this or add to it if needed.
78 | Fellowship One Check-in User's Guide | © 2010 Fellowship Technologies, L.P.
Fellowship One Check-in User's Guide | 8/5/2010
3. Type information in each field using the touch screen. Touch TAB to move
from field to field or simply touch the field you want to modify to get to it
quickly.
Tip! When entering the date of birth, simply touch each number in the format of MMDDYYYY. For
example, if the birth date is March 17, 1973 touch 03171973. Do not worry about formatting, Check—in
will format the date appropriately.
©2010 Fellowship Technologies | Fellowship One Check-in User's Guide | 79
8/5/2010| Fellowship One Check-in User's Guide
4. Touch Add Next Household Member.
5. Repeat steps 3—4 for each household member.
6. Touch Add Household when you are finished adding members. The household
appears as shown below.
ADDING NEW HOUSEHOLD MEMBERS
When households have a new family member, it is simple to add the new member to
the existing household information in Check—in.
To add a new household member
1. Type the last four digits of the household phone number or the last name of
the family. Touch the family in the search results to display all family
information.
2. Touch the Add Individual to household button (where household is the name of
the household).
80 | Fellowship One Check-in User's Guide | © 2010 Fellowship Technologies, L.P.
Fellowship One Check-in User's Guide | 8/5/2010
3. Touch the keys to enter the information for the individual. Touch TAB to move
from field to field.
4. Touch Add Individual. The household information appears and you are ready
to select the participants to check—in.
©2010 Fellowship Technologies | Fellowship One Check-in User's Guide | 81
8/5/2010| Fellowship One Check-in User's Guide
ADDING VISITORS TO HOUSEHOLDS
When visitors such as friends, neighbors, or relatives attend activities with church
attendees, you can quickly add the person as a one time visitor in the household he
or she is accompanying.
One time visitors remain with the household information but are hidden beneath a
Show One Time Visitors button.
To add a one time visitor
1. Search for the household using one of the usual search methods. Touch the
correct household to select it.
2. Touch the Add Visitor to household (where household is the name of the
household) button. The Add Individual screen appears.
82 | Fellowship One Check-in User's Guide | © 2010 Fellowship Technologies, L.P.
Fellowship One Check-in User's Guide | 8/5/2010
3. Type the individual’s information into the fields as appropriate. Touch the
TAB key to move from field to field.
4. Touch Add Individual to add the individual. The household information
appears with the Show Visitors button selected.
5. Touch each participant checking in and touch Next to continue. Check the
participants in as usual.
RETURNING VISITORS
Remember that you will see a Show Visitors button at the top of the household
members list when visitors have previously been added.
Let’s look at an example of this. Harold and Rebecca Butler are regular attendees of
Dynamic Church. Their granddaughter Brittany comes to stay with them from
time—to—time and will attend church with them on Sundays. When they check in
for the Children’s Service activity, the check—in volunteer must touch the Show
Visitors button to display Brittany’s information.
©2010 Fellowship Technologies | Fellowship One Check-in User's Guide | 83
8/5/2010| Fellowship One Check-in User's Guide
84 | Fellowship One Check-in User's Guide | © 2010 Fellowship Technologies, L.P.
Fellowship One Check-in User's Guide | 8/5/2010
BARCODE ASSISTED CHECK-IN
In Search Methods, we learned that you can actually search for households/
individuals by scanning a barcode number. This section will describe barcodes and
how to use them when working in Assisted mode.
Barcode Numbers
Before we get into the details, it’s important to understand what kinds of barcodes
we can use with Check—in. Generally, any card with a barcode number on it can be
used with Check—in. This could include any of the following (and others):
Church—issued key chain tags or cards
Grocery store discount key chain tags
Library cards
©2010 Fellowship Technologies | Fellowship One Check-in User's Guide | 85
8/5/2010| Fellowship One Check-in User's Guide
Driver's licenses
Discount club cards
Barcode numbers are constrained by the following parameters:
Must be between 5 and 18 numbers
Must be numbers only — characters can be scanned, but Check—in does not
recognize characters.
Associating Barcode Numbers
The first step in using a barcode item to check people in is to associate the numbers
with participants. Once this has been done, the barcode number can be used
anytime the participant or a member of his/her household needs to check into an
activity.
Tip! Send out emails and/or mail notifying parents that barcodes will be issued for
quick, convenient self check-in. Let everyone know that they should plan on arriving
early for services to allow for time to receive their bar code tags.
Typically, barcode numbers are associated with the heads of household. However,
you may want to plan on giving barcodes to students and other adults in the
household as well. See Self Mode Check-in for more information.
To associate a barcode number with an individual
1. Search for and select the individual by touching the household and then the
individual. Touch Next.
2. Touch the Edit Name (where Name is the name of the person) button. The
individual’s information appears.
3. Touch the TAB button until the cursor is in the Barcode field.
86 | Fellowship One Check-in User's Guide | © 2010 Fellowship Technologies, L.P.
Fellowship One Check-in User's Guide | 8/5/2010
4. Scan the barcode number with the scanner.
©2010 Fellowship Technologies | Fellowship One Check-in User's Guide | 91
8/5/2010| Fellowship One Check-in User's Guide
5. Touch Update Name (where Name is the name of the person) to save the
information.
Checking in Using Barcodes
After you have associated barcode numbers with participants, the numbers can be
used to search for participants.
Search parameters are important in barcode scanning situations. If you only
associated a barcode number with one member of the family, you need to select the
Return All Household Members search parameter if you want to see all household
members. If you only want to see the individual’s information touch the Return
Individual Only parameter.
90 | Fellowship One Check-in User's Guide | © 2010 Fellowship Technologies, L.P.
8/5/2010| Fellowship One Check-in User's Guide
To search with a barcode number
1. Touch Search to display the Search screen if not already displayed.
2. Hold the barcode item under the barcode scanner. You may hear a beep when
the number is read. If you have selected Return All Household Members, the
household and all of its members appear. If you have selected Return
Individual Only, the household and the participant(s) associated with the
barcode number appear.
3. Select the individual to check—in (if more than one individual is returned in
your search results).
4. Select room assignments as usual and complete check—in by touching Print
Tags or Complete.
Barcode Rapid Check-in
The Bar Code Rapid Check—in search parameter allows a participant to completely
bypass the activity selection screen. If the participant has a previously been given a
participant assignment for the activity, Check—in simply displays a confirmation,
or a name tag and/or parent receipts prints depending upon how the activity was
configured.
92 | Fellowship One Check-in User's Guide | © 2010 Fellowship Technologies, L.P.
Fellowship One Check-in User's Guide | 8/5/2010
Barcode Rapid Check—in is a way to use a combination of self check—in and
assisted check—in at the same machine. Only those participants that do not have
an assignment require a volunteer to intervene and choose the correct location. All
other participants are immediately checked in (and a name tag/parent receipt will
automatically print if the activity and/or room/location has been configured to do so).
Tip! Bar Code Rapid Check—in is a great feature to use with your middle and high
school students who may not want to check—in and wear a name tag. Being able to
scan a barcode item such as a key chain tag or card may appeal to students.
Preparing for Barcode Rapid Check-in
To make Bar Code Rapid Check—in work properly, ensure the following conditions
are completed: �
The participant can be the only person associated with the barcode number. If
there is another person associated with the same barcode number, both names
appear in the search results and the Check—in greeter must select the correct
participant to complete the check—in. �
The participant must have an assignment for the activity in question.
Participant assignments can automatically be created the first time a
participant attends an activity if the activity has been configured to allow
automatic assignments. Participant assignments can also be entered
manually. See the online help in Fellowship One for instructions.
If these conditions are met, once the barcode number is scanned, the check—in is
complete and no additional selections need to be made.
Checking In
When the participant attends an activity/event, he/she can check in using the
BarCode Rapid Check—in feature.
To check in
1. Ensure that you have associated a barcode number with an individual. Also
ensure that the participant you are using has a participant assignment for the
activity. Participant assignments are entered in Fellowship One
(www.fellowshipone.com). See Participant Assignments for instructions on
creating a participant assignment.
2. Touch Search to display the Search screen if it is not already displayed.
3. Touch the Bar Code Rapid Check—in button.
©2010 Fellowship Technologies | Fellowship One Check-in User's Guide | 93
8/5/2010| Fellowship One Check-in User's Guide
4. Scan the barcode. The screen displays the number in the search field.
5. Once the number has been verified, a confirmation appears as shown in the
image below. If the activity has been configured to print name tags and/or
parent receipts, those will automatically print.
94 | Fellowship One Check-in User's Guide | © 2010 Fellowship Technologies, L.P.
Fellowship One Check-in User's Guide | 8/5/2010
©2010 Fellowship Technologies | Fellowship One Check-in User's Guide | 97