1
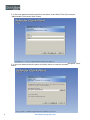
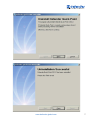
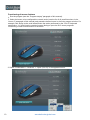
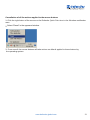
Defender Quick
Quick Point
Defender
Point
Software for
Software
formice
mice
www.defender-global.com
www.defender-global.com
1
Contents
Defender Quick-Point
software for mice
Contents............................................................................................................................................2
Defender Quick Point software user manual for five-button mice..................................................3
System requirements.........................................................................................................................3
Installation..........................................................................................................................................3
Removing..........................................................................................................................................6
Program start-up...............................................................................................................................8
Program automatic start-up together with Windows..........................................................................9
Exit the program................................................................................................................................9
Function of the mouse buttons........................................................................................................10
Cancellation of the actions applied to the mouse buttons.................................................................11
Cancellation of all actions applied to the mouse buttons..................................................................13
Appendix 1. Description of context menu of the program icon in the Windows
notification area................................................................................................................................14
Appendix 2. Description of the drop-down menu by means of which the mouse
buttons are configured diffenrent actions..........................................................................................14
2
www.defender-global.com
Defender Quick Point Software User Manual for Five Button
Mice
Defender Quick Point Software is to function various actions to the mouse buttons (see the list
of possible actions in the paragraph “Annex 2” of this manual).
System requirements
OS: Windows XP, Windows Vista, Windows 7.
1
4
7
100Mb of spare disk space.
Installation
1. Close all active Windows applications.
2. Run “Quick Point.exe” file.
3. If user account control is on, then in Windows Vista the permission request of the installer to
make changes to this computer will appear. Press the “Yes” button.
If user account control is on, then in Windows Vista the permission request of the installer to
make changes to this computer will appear. Press the “Yes” button.
4. Press “Next” button in the appeared program window.
www.defender-global.com
3
5. In the next appeared window enter the user name in the “Name” field (for example,
“Administrator”) and press “Next” button.
6. In the next appeared window select the folder where to install the programand press “Next”
button.
4
www.defender-global.com
7. In the next appeared window select the shortcut folder, then using the option button select
whether to install the shortcuts only for the current user or available for all users in the system and
press “Next” button.
8. Press “Next” button in the next appeared program window. The installer will install Defender
Quick Point software to the operating system.
www.defender-global.com
5
9. When the installation is complete, the Installation successful window will appear.
Press “Finish” button to complete the installation.
Removing
1. Exit Defender Quick Point program (see t he “Exit Application” paragraph of this manual).
2. Open the control panel.
3. Select the Programs and Components icon.
4. Select “Defender Quick Point” in the list of installed programs and press “Remove” button.
5. If Windows user account control is on, then the permission request to remove the
application will appear. Press the “Next” button.
6. Press “Next” button in the next appeared program window. The program uninstallation will
start.
7. When the uninstallation is complete, the uninstallation successful window will appear. Press
“Finish” button to complete uninstallation.
6
www.defender-global.com
www.defender-global.com
7
Program start-up
1. Press “Start” button (located in the bottom-left corner of the screen or on the keyboard). Then select
“All Programs” menu option. Then select the program shortcut folderspecified on the sixth step of
“Installation” paragraph of this manual (“Defender Quick-Point” on default). Then select “Quick Point”
shortcut.
2. Main program window will appear.
8
www.defender-global.com
Program automatic start-up together with Windows
1. Click the right button of the mouse on the Defender Quick Point icon in the Windows notification.
appearedmenu
menuset
setthe
the“Start
“Start With
With Windows”
Windows” flag
flag ifif the
the program
program is
is needed
needed to
2.
2. In
In the
th appeared
to be
be automatically
if the program
not program
needed to be
started
up withstarted
Windows
or reset
the “Start
With the
Windows”
fla g Windows”
automatically
up with
Windows
or reset
“Start With
flag is
if the
is not neededstarted
to be automatically
started up with Windows.
automatically
up with Windows.
Exit the program
1. Click the right button of the mouse on the Defender Quick Point icon in the Windows notification area.
2. Select “Exit Application” in the appeared window.
3. After exiting the actions configured to the mouse buttons will not function.
www.defender-global.com
9
Functioning of mouse buttons
1. Run the program (see the “Program start-up” paragraph of this manual).
2. Select the button to be configured the certain action (see the list of all possible actions in the
“Annex 2” paragraph of this manual) and pressthe relevant button in the main program window. For
example, let's assign to the scroll wheel button the action performed by the “Ctrl+O” keyboard
combination, i.e. launching the standard system dialog to open the file in some programs.
Functioning of other mouse buttons is the same.
3. Select “Combination”-> “Archives” -> “Open (Ctrl+O)” in the appeared menu.
10
www.defender-global.com
4. Now the main window button by means of which the configuration of the action of scrolling the wheel up
shows the action configured to scrolling the wheel up:«Open».
5. From now while scrolling the wheel up in the programs supporting the launch of the standard
system dialog to open the file by the «Ctrl+O» keyboard combination this dialog will be launched.
Cancellation of the actions configured to the mouse buttons
1. Run the program (see the “Program start-up” paragraph of this manual).
2. To cancel the action configured to the button, in the main program window press the button serving
to configure actions to this button (see the second step ofthe “Program start-up” paragraph of this
manual). For example, let's cancel the action configured to scroll the wheel up. The cancellation of the
actions configured to other buttons is the same.
www.defender-global.com
11
3. Select “No Settings” in the appeared window.
4. Now the main window button by means of which the configuring of the action of scrolling the
wheel up shows the action configured to scrolling the wheel up on default: «Wheel Up».
5. From now while scrolling the wheel up the action on default configured by the operating
system, i.e. scrolling up, will be performed.
12
www.defender-global.com
Cancellation of all the actions applied to the mouse buttons
1. Click the right button of the mouse on the Defender Quick Point icon in the Windows notification
area.
2. Select “Reset” in the appeared window.
3. From now all the mouse buttons will take actions on default applied to these buttons by
the operating system.
www.defender-global.com
13
Appendix 1 Description of context menu of the program icon in the Windows
notification area
“Hide Application”
To hide the main program window.
“Show Application”
To show the main program window.
“Reset”
To cancel all the actions configured to the buttons.
“Start With Windows”
To start the program automatically with Windows.
“Exit Application”
To exit the program.
Appendix 2. Description of the drop-down menu by means of which the buttons are
configured by different actions.
“No Settings”
To cancel the action applied to the button.
“Mouse”
To configure the button with the action performed by another button.
“Left Button”
To configure the button with the action performed by the left button.
“Right Button”
To configure the button with the action performed by the right button.
“Middle Button”
To configure the button with the action performed by the middle button.
“X1 Button”
To configure the button with the action performed by the X1 button.
“X2 Button”
To configure the button with the action performed by the X2 button.
“Wheel Up”
To configure the button with the action performed by scrolling the scroll wheel
upward.
“Wheel Down”
To configure the button with the action performed by scrolling the scroll wheel
downward.
“Office Used”
“Zoom In”
To configure the button with the action performed by the “+” keyboard button.
“Zoom Out”
To configure the button with the action performedby the “-” keyboard button.
14
www.defender-global.com
“Past
To con
“Run
To con
“Com
To con
“Wor
“Cut
To co
move
“Cop
To co
copy
“Past
To co
paste
“Dele
To co
“Sear
To co
launc
“Sele
To co
selec
“Red
To co
redo t
“Und
To co
cance
“Arch
“New
To con
launch
“Open
To con
launch
“Save
To con
launch
are
“Paste Text”
To configure the button with the action to paste the text from the clipboard.
“Run Software”
To configure the button with the action to run the file selected by the user.
“Combination”
To configure the button with the action performed by a certain keyboard combination.
“Word”
“Cut (Ctrl+X)”
To configure the button with the action performed by the “Ctrl+X” keyboard combination, i.e. to
move to the clipboard in the programs supporting such action.
“Copy (Ctrl+C)”
To configure the button with the action performed by the “Ctrl+X” keyboard combination,i.e. to
copy to the clipboard in the programs supporting such action.
“Paste (Ctrl+V)”
To configure the button with the action performed by the “Ctrl+V” keyboard combination, i.e. to
paste to the clipboard in the programs supporting such action.
“Delete (Del)”
To configure the button with the action performed by the “Del” button.
“Search (Ctrl+F)”
To configure the button with the action performed by the “Ctrl+F” keyboard combination, i.e. to
launch the search dialog in the file in the programs supporting such action.
“Select All (Ctrl+A)”
To configure the button with the action performed by the “Ctrl+A” keyboard combination, i.e. to
select the whole document in the programs supporting such action.
“Redo (Ctrl+Y)”
To configure the button with the action performed by the “Ctrl+Y” keyboard combination,i.e. to
redo the last cancelled action in the programs supporting such action.
“Undo (Ctrl+Z)”
To configure the button with the action performed by the “Ctrl+Z” keyboard combination,i.e. to
cancel the last change in the programs supportingsuch action.
“Archives”
“New (Ctrl+N)”
To configure the button with the action performed by the “Ctrl+N” keyboard combination,i.e. to
launch the standard system dialog to open the file in the programs supporting such action.
“Open (Ctrl+O)”
To configure the button with the action performed by the “Ctrl+O” keyboard combination,i.e. to
launch the standard system dialog to open the file in the programs supporting such action.
“Save (Ctrl+S”)
To configure the button with the action performed by the “Ctrl+S” keyboard combination,i.e. to
launch the standard system dialog to save the files in the programs supporting such action.
www.defender-global.com
15
“Print (Ctrl+P)”
the action performed by the “Ctrl+P” keyboard
To configure the button with
combination, i.e. to launch the standard system dialog to send the files to print in
the programs supporting such action.
“Multimedia”
To configure the button to launch or control of various functions of Windows
Media Player.
“Media Player”
To launch the Windows Media Player.
“Previous Track”
To go to the previous element of the playlist.
“Next Track”
To go to the next element of the playlist.
“Stop”
To stop playing.
“Play/Pause”
To start playing, to pause playing or to renew playing.
“Mute”
To mute or to unmute the sound.
“Volume Up”
To increase the volume.
“Volume Down”
To decrease the volume.
“Network”
To configure the button with certain actions in the web-browser.
“Back”
To go to the previous page.
“Forward”
To go to the next page.
“Stop”
To stop loading the page.
“Refresh”
To refresh the current page.
“Search”
To go to the search window
in the search systems in the
Mozilla Firefox web-browser.
“Favorites”
To show or to hide the web-browser sidebar.
“Home Page”
To run the web-browser on default or if it already runs go to the web-browser's home page.
“Mail”
To run the mail program on default.
16
www.defender-global.com
“System”
“Calculator”
To configure the button to launch “Calculator” program.
“My computer”
To configure the button to launch “Explorer” program.
“Stand By”
To configure the button to turn the computer to the stand-by mode.
“Sleep”
To configure the button to move the computer to the sleep mode.
“Shutdown”
To configure the button to switch the computer off.
“Run Program”
To configure the button with any macros. The definitions of the macros are
in the ScriptMacros subfolder of the folder where the program is installed.
“TRIPLE SHOT”
To make three shots in Counter Strike game.
“CS_REVERSE”
To reverse to more than 180 degree in Counter Strike game.
“CS_4 SHOT”
To make four shots in Counter Strike game.
“CS_MULTI SHOT (40 ms)”
While using automatic weapon to make multi triple shots in Counter Strike game.
“CS_AUTOMATIC SHOT”
While using automatic weapon to make automatic five shots with kick compensation
in Counter Strike game.
“OFFICE_DOUBLECLICK”
Double left click.
“LEFT-BUTTOM DBLCLICK”
Double left click.
“WC3_SELECT IDLE WORKER”
To select the idle worker in Warcraft 3 game.
e.
www.defender-global.com
17
18
www.defender-global.com