1
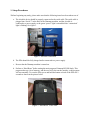
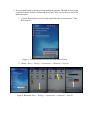
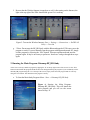
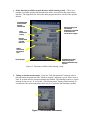
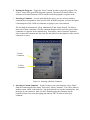
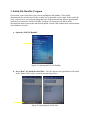
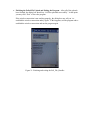
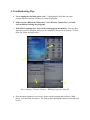
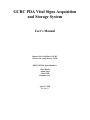
GCRC PDA Vital Signs Acquisition
and Storage System
User’s Manual
Sponsor: Dr. Paul Harris, GCRC
Advisor: Dr. Andy Dozier, VUSE
EECE 295-296 Team Members:
Chris Heath
Adam Nagel
Chris Nash
Brendan Soar
April 17, 2005
Revision 1
1. Setup Procedures
*Before beginning any study, please make sure that the following items have been taken care of.
a. The Aircable device should be properly connected to the serial cable. The serial cable is
plugged into “Serial 2” in the back of the Dinamap machine, and the Aircable is
connected to a power supply so the green “power” light is on and the blue “connection”
light is flashing. See figure 1.
Figure 1. AirCable Connection
b. The PDA should be fully charged and/or connected to a power supply.
c. Be sure that the Dinamap machine is turned on.
d. Perform a “Hard Reset” before stating the main program, Dinamap BP_HR Study. This
program takes up a lot of memory, and the reset will clear out the memory so the program
will run smoothly. To reset the PDA, press and hold the button on back of the PDA for 2
seconds as shown in the picture below.
Figure 2. “Hard Reset” of the PDA
e. Be sure that Bluetooth is turned on before starting the program. The light at the top right
of the PDA should flash blue if Bluetooth is activated. There are two ways to turn on the
Bluetooth option.
i. Click the Bluetooth Icon on the bottom right of the pda screen and select “Turn
Bluetooth On”.
Figure 3: Turning Bluetooth ON/OFF using the Bluetooth Icon
ii. Choose: Start -> Settings -> Connections -> Bluetooth ->Turn On
Figure 4: Bluetooth: Start -> Settings -> Connections -> Bluetooth ->Turn On
f. Be sure that the Wireless Internet is turned on as well. After turning on the Internet, the
light at the top right of the PDA should blink green if it is working.
Figure 5: Turn on the Wireless Internet: Start -> Settings -> Connections -> Dell WLAN
Utility -> Turn On
g. **Note: Do not start the BP_HR Study with the Bluetooth turned off. This may cause the
program to crash. If you accidentally start the program with Bluetooth turned off, simply
exit the program by selecting the “Exit” button. Then turn on Bluetooth and start the
program again. It may be necessary to perform a “hard reset” and go through these steps
again.
2. Running the Main Program: Dinamap BP_HR Study
*Note: Never exit any LABView program by tapping the ‘X” at the top right corner of the screen. Use the “Exit”
buttons located within the program and the menu boxes that appear during the program. If you accidentally exit the
main BP_HR program using the “X” at the top of the screen, simply restart the same program and exit correctly
using the “Exit” button. This should reset the program correctly.
a. To Start the Main Study Program Select : Start -> Dinamap BP_HR Study
Figure 6. Starting the Main Program:
Dinamap BP_HR Study. This will launch the
main program and you will see the screen
shown in step “b”.
b. Next, enter the required Study ID into the text box and press “continue”. Tap the keypad
at the bottom right corner of the screen, and then click one time inside the text box. Then
enter the Study ID one character at a time. Next, click the keypad one more time and press
“Continue” to submit the Study ID.
c. If the wireless is not turned on or the ID was invalid, then you may see the screen below.
Figure 8. In the situation that the wireless is not
activated or the Study ID was not validated, this screen
will be shown. It alright to hit “OK” and continue the
program, but the data will not be uploaded to the
database as the program runs. The data will be stored to
the PDA and can be uploaded at a later time. You may
decide to hit “Cancel” and attempt to enter another
Study ID, or you may want to hit “Cancel” and exit the
program in order to turn on the wireless and start the
program again.
d. The next menu box will appear and ask you if you are ready to take the first
measurement. Hit “OK” if the patient is properly connected and you are ready to take the
first measurement.
Figure 9. Press “ok” to begin the study and take the first measurement.
e. Acquiring a measurement. While acquiring a measurement the screen should look
similar to how it does below. The “Ready to Acquire” indicator should be dark,
indicating that a measurement is currently underway. When the “Ready to Acquire”
indicator is dark, most of the other functions are not available until the current
measurement is over.
It is possible to stop the current measurement by hitting the “Abort Acquisition” button.
Figure 10. PDA screen while acquiring a measurement. You may tap the “Abort
Acquisition” button to stop the current measurement.
f. After acquiring a measurement – After the measurement has been taken, the Dinamap
should display the measurement on its screen and the PDA screen should look just as it
does below.
If the measurement was successful, the screen should say “measurement successful” in its
text box, and the time that the measurement was taken should also be displayed.
The Systolic Pressure, Diastolic Pressure, Heart Rate, and Mean Arterial Pressure should
be displayed on the PDA screen. If the wireless connection is working properly, the
measurement should also be uploaded to the database automatically.
The “Ready to Acquire” indicator should be green as well because a measurement is not
currently underway.
If the measurement success/failure indicator box states that that the measurement failed,
check the machine to make sure it is set up correctly and the BP cuff is properly
connected to the patient. You many continue with the next measurement.
“Ready to Acquire”
Indicator
Time of Last
Measurement
Measurement
Success/Failure Indicator
Measurements
Figure 11. Interface after acquiring a measurement
g. Other functions available on main interface while running a study – There are a
number of possible options and functions that can be accessed from the main control
interface. The diagram below shows the main program interface with all of the options
labeled.
Increase/decrease
the time between
automatic
measurements
Seconds remaining until
next automatic
measurement. It increases
or decreases as the
“minute wait” is changed.
Take a
measurement
instantly
Insert the
comment listed
in the drop
down menu
Select a
comment from
the drop down
menu
Exit the Program
Pause/Resume the Study.
Timer will stop, and all
functions will halt while study
is paused.
Figure 12. Functions available while running a study
h. Taking an instant measurement – Press the “Take Measurement” button in order to
take an instant measurement if the “Ready to Acquire” indicator is green. Please wait at
least 30 seconds after the last measurement has finished. The Dinamap requires a certain
amount of time to reset. If you hit the “Take Measurement” button without waiting 30
seconds since the last measurement, there may be a lag before the Dinamap responds.
Figure 13. Take an Instant Measurement
i. Pausing the Program – Toggle the “Pause” button in order to pause the program. The
“Pause” icon will be green if the program is paused. The timer will remain where it is,
and none of the other functions will be useable while the program is in pause mode.
j. Inserting a Comment – At some point during the study, you may wish to include a
comment that corresponds to some special event. With this program, you have the option
of inserting one of the 2 built-in comments or typing in your own comment.
The two built in comments are “Drug Administered” and “Study Paused”. In order to
insert one of these comments, click the comment drop down box and select one of these
comments so it appears in the comment box. Then tap the “Insert Comment” button in
order to insert the comment into the study file and upload it to the database if the wireless
connection is active.
2. Insert
Comment
1. Select
Comment
Figure 14. Inserting a Built-In Comment
k. Inserting a Custom Comment – In order to insert your own comment, select “Other”
from the comment pull-down menu. Then select “Insert Comment”. You will be taken to
another screen, which is shown below. Tap the keyboard icon, tap the comment box, and
then type in your comment. After you have finished typing the comment, tap the
keyboard icon to clear away the typing pad and tap “OK” in order to insert your
comment.
3. New Screen Appears
2. Insert Comment
4. Tap Keyboard Icon
1. Select “Other”
5. Tap Comment Box
8. “OK” to insert comment
6. Type Comment
7. Tap Keyboard to
clear typing pad
Figure 15. Inserting a Custom Comment
If you decide that you do not want to insert a comment, tap “Cancel” and you will return to
the main program screen.
Tap “Clear” if you would like to clear out the current contents of the Comment Box.
“Clear” to clear the
comment box
“Cancel” to not insert a
comment and return to
previous screen
Figure 16. Other Comment Options
l. Exiting the Main Program – When you are finished with a study, exit the main program
by tapping “Exit” on the main interface screen. Another dialog box will appear and ask if
you are sure that you want to exit. Select “OK” to exit and “Cancel” to return to the main
program.
Figure 17. Exiting the Dinamap BP_HR Study
m. Failed Measurements Message – When you exit the program, you may see a message
that says some of the measurements failed to upload correctly. This may be because the
wireless connection was not working correctly at some point during the study. All of the
measurements are saved to a special file, and should be uploaded by running the “Failed
File Handler” program, which is described in the next section.
Figure 18. Failed Uploading Message – Tap “OK” to continue and exit the program.
3. Failed-File Handler Program
On occasion, some of the data is not correctly uploaded to the database. These failed
measurements are stored in special files so they can be uploaded at a later time. At the end of the
study, you may have seen a screen stating that some of the measurements failed to upload and it
instructed you to run the “Fail-File Handler” program. This program will find all of the
measurements from recent studies that did not upload correctly and resubmit these measurements
to the database correctly.
a. Open the “Fail File Handler”
Figure 19. Opening the Fail File Handler
b. Press “Run” to Upload the failed Files – The files that are being uploaded will be listed
in the “Status” Box, as they are on the second image below.
Figure 20. Uploading the Failed Files
c. Finishing the Failed File Upload and Exiting the Program – After all of the uploads
have finished, the dialog box should say “All files uploaded successfully.” At this point
you may click “Exit” to leave the program.
If the wireless connection is not working properly, the dialog box may tell you “reestablish the wireless connection and try again.” If this happens, exit the program and reestablish the wireless connection and run the program again.
Figure 21. Finishing and exiting the Fail_File_Handler
4. Troubleshooting Tips
a. Never unplug the AirCable power cord. – Unplugging the AirCable can cause
unexpected errors and you will have to restart the program.
b. Make sure the “Bluetooth Connectivity” and “Wireless Connectivity” are both
activated before starting the programs.
c. If the PDA is running slow, clear out the running programs memory. You may have
improperly exited a program, and it was not completely cleared out of memory. To clear
these out, follow the steps below.
Figure 22. Clear running programs:
Start->Settings->System->Memory->Running Programs->Stop All
d. If an unexpected memory error occurs, please exit the program and perform a “Hard
Reset” as is described in section 1. The study will be interrupted but none of the data will
be lost.