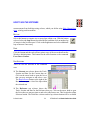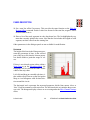
1
HOW TO USE THE MANUAL
HOW TO USE THE MANUAL
This manual describes the Stack Data Analysis software Stack DataPro.
For your convenience there are several ways that you may use to navigate through this
manual:
You may use the Adobe® Acrobat® navigation
buttons to move to the beginning or the end of
the file, or forwards and backwards by a single
page. You may also click the page number field and type the number of the page you
wish to see.
You may use the mouse to click on a topic listed in the BOOKMARKS tab to
the left-hand side of the screen. Alternatively, you may select the PAGES
tab and then click on one of the page thumbnails to take you to that page.
Throughout the manual you will find links that appear in underlined blue text.
If you click anywhere on the link the page changes to show you the referenced
information. Click on the PREVIOUS VIEW or the NEXT VIEW button to go
backwards or forwards through the sequence of pages you have viewed.
Links may also appear as blue boxes on a screen image. Click inside a
blue box to move to the referenced part of the manual.
You may click and drag the button on the vertical slider at the right-hand side of the
display to move forwards and backwards through the pages.
© Stack Limited
2
ST542050-007 draft Stack DataPro User Guide
HOW TO USE THE MANUAL
Adobe® Acrobat® includes a powerful facility to find specific words in the
text. Click the FIND button and then enter the word that you need to find. The
software will then display the first occurrence of that word after the current
location. Hold the [Ctrl] key and press [G] to find the next and subsequent occurrences of the search word.
You may print part or all of the manual if you wish. To do this, choose FILE>PRINT from
the Acrobat® menu bar.
© Stack Limited
3
ST542050-007 draft Stack DataPro User Guide
WHAT IS STACK DATAPRO?
WHAT IS STACK DATAPRO?
Stack DataPro is a software package, created and supplied by Stack Limited, that allows
you to download and then analyse data stored by a Stack data recorder on a vehicle.
To run the software you will require a PC of the following minimum specification:
Microsoft® Windows™ Millennium Edition, Windows™ 2000 Professional, Windows™ XP Home Edition, Windows™ XP Professional.
Pentium III 500MHz processor or equivalent.
128MB RAM.
At least 100MB of available disk space.
SuperVGA graphics.
Mouse or suitable pointing device.
CD-ROM drive for software installation only.
USB port.
Additionally, you will require suitable Stack sensors and data recording equipment installed on the vehicle, and a Stack Network cable to connect the PC to the vehicle.
INSTALL THE SOFTWARE
The default Stack DataPro installation process places some sample data files on your PC.
You may use these files to try out the software and to become familiar with its features.
The following instruction sequence guides you through the software installation procedure and shows you how to begin using Stack DataPro by displaying the sample files.
© Stack Limited
4
ST542050-007 draft Stack DataPro User Guide
WHAT IS STACK DATAPRO?
You should take the earliest opportunity to read through this manual so that you become
fully familiar with Stack DataPro and that you understand how to use all its controls and
features.
1. Before you start to install the software, you
should save any data you are using and then
close all Windows applications on your PC.
If necessary, during the installation process
you can click <BACK to return to the previous installation wizard dialog.
2. Insert the supplied CD in your CD ROM
drive. The Installation Wizard should start
automatically. However, if it does not,
choose START>RUN D:\SETUP.EXE
(where D: is the drive letter of your CD
ROM). Click OK at the splash screen to
start the installation procedure and display
the InstallShield welcome dialog. Click
NEXT> to continue the installation.
3. Read and accept the license agreement and
click NEXT> to continue with the installation.
© Stack Limited
5
ST542050-007 draft Stack DataPro User Guide
WHAT IS STACK DATAPRO?
4. Type your name and, if necessary, the name
of your organization in their corresponding
fields. These will be the details of the person to whom Stack DataPro is registered.
5. Select the appropriate radio button either to
allow use of the software by only you, or by
anyone who uses the computer on which it
is installed. Click NEXT> to continue with
the installation.
6. Select whether to use the default complete
installation, or to use a custom installation
that allows you to select the components
installed. Click NEXT> to continue the
installation process.
7. If you chose a custom installation, the dialog allows you to set the options required.
The options available include:
the software components installed
whether the demonstration data is
installed, and
the drive and directory where the software is installed.
Click the CHANGE button to select a different installation location for the software.
© Stack Limited
6
ST542050-007 draft Stack DataPro User Guide
WHAT IS STACK DATAPRO?
The SPACE button allows you to see how much space there is available for the installation on your PC. If you click on any of the software components listed, text to the
right of the list will show the disk space required for that component.
Click NEXT> when you are ready to continue with the installation process.
8. Select the region where you will be operating the Stack DataPro software.
This selection determines which measurement units the software will use to display information. You can change the display units
within software after installation if necessary.
Click NEXT> to complete the installation
process. to set the units used.
9. On successful installation of Stack DataPro, you will see the new program icon
installed on your desktop. The Start menu also will include a Stack Limited entry
with the software components added by the installation process.
10.Double-click on the program icon to start Stack DataPro and select the default destination directory for data transferred from the vehicle recorder. The illustration on
page 19 shows the features of the Stack DataPro main screen.
11.To use the software, refer to the detailed instructions on How to use the Software,
beginning on page 30.
© Stack Limited
7
ST542050-007 draft Stack DataPro User Guide
WHAT IS STACK DATAPRO?
INSTALL THE HARDWARE
1. Install the DataPro software before you install the hardware. On completion of software installation, remove the CDROM from the PC’s drive. See the detailed instructions beginning on page 4 for a full description of the software installation procedure.
2. Plug the CAN USB network interface into
an available USB port on your PC. The
operating system will detect that a new
device has been plugged in and will display
a message at the system tray to report this.
3. The software displays the New Hardware
wizard. Click NEXT> to continue the hardware installation.
4. Windows creates a new System Restore
point.
© Stack Limited
8
ST542050-007 draft Stack DataPro User Guide
WHAT IS STACK DATAPRO?
5. Wait while the wizard installs the correct
driver for use with the PCAN USB device.
6. Click the FINISH button when the PCAN
USB device has been installed as shown by
the final dialog in the installation wizard.
The system tray shows that the installation
process has been completed successfully and
the new hardware has been installed.
TO UNINSTALL THE SOFTWARE
If you wish to uninstall the software, choose
START>SETTINGS>CONTROL PANEL... and
then double-click on ADD/REMOVE PROGRAMS. From the list of installed programs select Stack DataPro and then click the REMOVE button.
AUTHORISATION
Before you can download or review historic data, you must authorise the program with
the appropriate PIN code for your system’s data logging module.
If you received your software as part of a new vehicle data recording system, you will
find the correct 16-character PIN code attached to the CD case.
If you are upgrading your system to use Stack DataPro software, you must contact
Stack to obtain the correct authorisation PIN code. To do this you must supply the relevant ‘Tag’ number associated with your vehicle recording system. Follow the
instructions below to obtain software authorisation.
Stack DataPro matches the PIN code against a ‘tag’ number encoded within data from
your logging system. If these relate to each other correctly the software releases the
© Stack Limited
9
ST542050-007 draft Stack DataPro User Guide
WHAT IS STACK DATAPRO?
lock and allows you to download information, either directly from the recording system on the vehicle or from a file on the PC hard disk. You may then display and analyse
data from that source indefinitely.
To obtain your PIN code:
1. Connect the PC running Stack DataPro to the vehicle data recording system.
2. Choose FILE>AUTHORISATION... and click the
DOWNLOAD button. Wait while the software interrogates the data recording system for its ‘tag’ number.
3. Note the ‘tag’ number displayed in the dialogue panel
and then contact Stack with these details. Stack will
supply the associated PIN code, which you must then
enter on the Authorisation dialogue box. Keep a
written record of this PIN code — it is important.
4. Click the AUTHORISE button to begin using the software to download, display and
analyse data from your vehicle recording system.
Note the following:
The tag number comes from your vehicle data recording system, NOT from the software. This means that the supplied PIN code will allow permanent access for you to
download, display and analyse data only from your data recording system.
To analyse data from another data recording system, the owner of that recording system must supply the relevant PIN code. Similarly, if you supply data from your
recording system to another Stack DataPro user, you should also supply your PIN
code.
The demonstration files installed with Stack DataPro do not require a PIN code.
© Stack Limited
10
ST542050-007 draft Stack DataPro User Guide
WHAT IS STACK DATAPRO?
VEHICLE SETUP
Stack DataPro cannot download data without the vehicle’s setup information. The setup
information is created automatically when you perform an Upload in DataPro Designer.
This means that you must perform an Upload at least once, whether or not you have a configurable system, before you can Download data.
The vehicle setup information is stored in file form on the PC on which the Upload was
performed. If you need to download data for the vehicle on a different PC, you must first
copy over the appropriate vehicle setup information from the PC on which the system
configuration was uploaded. You can do this relatively easily by using the Run Manager
as explained in the instructions to Backup and Restore a setup beginning on page 87.
DOCKABLE PANES
Stack DataPro uses dockable ‘panes’ to display the controls and the data. Although this
approach may be unfamiliar to you, it has differences and advantages over the alternative
method of displaying information in separate windows:
The layout of panes on the display area is locked
by default when you first start the program. You
must unlock them to make any changes to the
layout. To unlock the panes, click the PANE
LOCK button on the toolbar, The panes will then
show grab handles as double bars along their top
edges or down their left-hand side, and CLOSE
buttons (marked ‘X’) at one of their corners. The
toolbar and the menu bar both have single vertical grab handles at their left-hand edge.
Grab handles
The illustration on page 19 shows the LOCK PANES control button. When
deselected it appears as an open padlock. In this condition the grab handles
also appear on the panes and you may change their arrangement on the screen
freely.
© Stack Limited
11
ST542050-007 draft Stack DataPro User Guide
WHAT IS STACK DATAPRO?
With the LOCK PANES button selected the button appears as a closed padlock.
In this condition the grab handles disappear from the panes so that you cannot
change their arrangement on the screen.
By clicking with the mouse on the grab handle of a docking pane you may drag the
pane to any location on the screen. You may also hover the mouse pointer over one of
the borders of a pane so that it becomes a re-sizing handle. Click and drag the border
to change the size of the pane.
After you move or re-size a pane, Stack DataPro rearranges the screen automatically
to fill the available display area. This is of particular benefit when you use Stack DataPro on a laptop PC, because the display area always remains tidy and makes the most
efficient and effective use of limited screen space.
Because Stack DataPro always tiles and rearranges the screen details efficiently,
important details in one pane are never obscured by another as might otherwise happen if the software presented information in separate overlapping windows.
Once you have arranged the dockable panes on the screen, you may lock them in
place by clicking the PANE LOCK button again. If you then select a new layout from
the Layout selector, the software allows you to save the modified layout first so that
you may restore it at any time.
© Stack Limited
12
ST542050-007 draft Stack DataPro User Guide
SESSION TASKS
SESSION TASKS
This section takes you step by step through the various processes carried out during dayto-day use of Stack DataPro.
CONNECTING TO THE VEHICLE
Before you can transfer data between the vehicle recording system and the PC, you must
use the Stack Network cable to connect the two systems. After you have transferred data
to the PC, you may disconnect from the vehicle and use Stack DataPro by itself to analyse
and manipulate the data.
Connection to the vehicle is through an electrical port installed at a convenient location
on the vehicle. Connection to the PC is through the USB port. Once you have made connections to the vehicle and to the PC, the interface will be automatic whenever you select
a command that communicates with the recording system.
The vehicle ignition must be on to supply power to the recording system (although
the engine need not be running) before the PC can interface with the system.
Special note if you are using a PC running under Windows 2000 Professional or
Windows XP: Once the CANUSB adapter is plugged into the USB port with the PC
switched on, do not remove the adapter from the USB port without first clicking
the icon on the system tray and selecting Safely remove PCAN-USB Device.
© Stack Limited
14
ST542050-007 draft Stack DataPro User Guide
SESSION TASKS
SYSTEM CHECKOUT TASKS
Connect the PC running Stack DataPro to the vehicle through the Stack Network
cable. Choose RECORDER>ERASE MEMORY from the Data Pro menu bar to erase the
vehicle memory to prepare for new data. Start the engine.
Choose RECORDER>START LOGGING to start the recording.
Choose RECORDER>DIAGNOSTICS>REAL TIME DISPLAY and ensure the displayed
readings are correct for this situation.
If possible, spin the wheel that has the wheel speed sensor and check the indicator
LED on the sensor.
Point the laptime beacon at the receiver and power-on the transmitter briefly.
Stop the engine. Download the acquired data and check it. For example, check that a
lap time has been recorded successfully. If all channels show valid data, erase the
vehicle memory and proceed with the Session.
NORMAL DATA GATHERING TASKS
SETTING UP THE LAP BEACON
Place the lap timing beacon on the track before the vehicle goes out. Position the transmitter as advised in the Stack manual supplied with your system and ensure that it has a
fully charged battery.
Once the data recorder begins to gather data, it will continue to collect data until you
switch off the ignition. The system has a memory that will store the data safely even when
the power is off. However, note that the system power must be ON in order to download
data to Stack DataPro, although the engine does not need to be running. You will not erase
the recorder memory by switching off power.
© Stack Limited
15
ST542050-007 draft Stack DataPro User Guide
SESSION TASKS
You must perform the following tasks when you are recording data for each run:
PRE-DOWNLOAD TASKS
1. If this is the first time you have used the recording
system at this track: Select FILE>CREATE NEW
TRACK... and then enter the name of a the track and
click OK. Stack DataPro will then suggest a name
for a new session at the track. The suggested name
is based on the date, although you may change this
if necessary.
2. If you know the track length, setup the track length and tolerance to normalise the
data against the known track distance. Refer to the description of the Navigation Map
feature on page 67.
3. If you have used the recording system at this track before: Choose FILE>CREATE
NEW SESSION... and then select the track from the drop-down list. Accept the suggested name for the session or supply a new one if you prefer. Click OK.
4. Ensure that Auto Calculation has the Standard calculation
file selected to ensure data is normalised. Choose
EDIT>AUTO CALCULATION... to set this feature.
5. Connect the Stack Network cable to the vehicle and to the
PC through the USB port.
DOWNLOAD TASKS
6. Ensure the vehicle recording system is powered-on.
7. When ready, download data from the recorder. If the recorder is still running when
you do this it will stop recording automatically.
8. When the download is complete, disconnect the PC from the vehicle and turn off the
recorder power.
© Stack Limited
16
ST542050-007 draft Stack DataPro User Guide
SESSION TASKS
9. If the track length has not been
set you will see a ‘Lap Not
Normalised’ error message.
Be aware that the recording
system will report extreme
errors (100%) in lap lengths if
it misses a beacon. Refer to
Track Properties on page 68
for further information.
10.Review the downloaded data.
Update the run notes with
information that will help you
to analyse the data in the future.
11.Repeat the above tasks for each run during the Session.
END OF DAY TASKS
Perform the following tasks when you have completed all the runs for the Session and you
have downloaded all data to the PC:
1. Erase the vehicle recorder memory.
2. Do not forget to retrieve the lap timing beacon and recharge its battery.
© Stack Limited
17
ST542050-007 draft Stack DataPro User Guide
SOFTWARE DESCRIPTION
SOFTWARE DESCRIPTION
The Stack Stack DataPro software can download, analyse and compare the performance
parameters logged by one of the Stack range of on-vehicle data recording systems. The
parameters available for recording and analysis depend on the particular Stack recording
system in use and on the sensors fitted to the vehicle. Follow the instructions in the relevant Stack manual to install the data recorder and its sensors on the vehicle.
The software also allows you to monitor the Stack data recorder on the vehicle, calibrate
the vehicle sensors and organise the downloaded data.
DATA ORGANISATION
Stack DataPro analyses data lap by lap and
allows you to compare data from different
runs or sessions on the same or different
tracks.
TRACK A
Data is organised by track, session and
run. Each session is a convenient set of data, usually acquired during a single day.
You may also use Stack DataPro to
record, analyse and compare data from
several vehicles or drivers by creating separate sessions for each.
Session 1
Session 2
Session 3
Session 4
Run 1
Run 1
Run 1
Run 1
Run 2
Run 2
Run 2
Run 2
Run 3
Stack DataPro allows you to select a track
from a list of those available, or to create
a new track if this is the first time you have
recorded data at this location.
Run 3
Run 4
You may then create a new session for the track and record separate runs for the session.
Subsequently you may then retrieve, analyse and compare data for any run and session
© Stack Limited
18
ST542050-007 draft Stack DataPro User Guide
SOFTWARE DESCRIPTION
recorded at that track. You may compare any of the runs for a track with any other runs
for the same or a different track recorded during the current or any other session.
AN INTRODUCTION TO STACK DATAPRO
Opening screen
COMMAND AREA
The Command Area includes the Menu bar commands, Toolbar and the Layout, Run and
Lap Selectors. Use these commands, tools and selectors to control the program and to set
the appearance of the Display Area.
© Stack Limited
19
ST542050-007 draft Stack DataPro User Guide
SOFTWARE DESCRIPTION
The Menu bar commands, Toolbar, Selectors and the chart and data panes are all
dockable: In the unlocked condition, each
has a ‘grab handle’ down the left-hand
side or along the top that you may use to
drag it to another location on the screen.
Stack DataPro automatically re-arranges
the display area to make the most efficient
use of available screen space without obscuring any details.
MENU BAR COMMANDS
Access the menu commands and their submenus by left-clicking on them with the
mouse. The paragraphs below provide a brief
description of the menus. Refer to the Menu
Commands section starting on page 30 of this
manual for a full description of each command and for instructions to use them.
© Stack Limited
20
ST542050-007 draft Stack DataPro User Guide
SOFTWARE DESCRIPTION
FILE
The File menu provides the following facilities. Refer
to page 30 for full instructions to use the File menu.
Define the name for a new track that you wish to
create.
Create a new session for a selected track.
Import data from an EFI Euro–6 or a Euro–12 logger. Note that this will be available only if
installed as the Custom System.
Export data to applications such as Microsoft®
Excel.
Print the screen.
Obtain and apply software authorisation.
Authorise imported data from archive.
Exit the program.
© Stack Limited
21
ST542050-007 draft Stack DataPro User Guide
SOFTWARE DESCRIPTION
EDIT
The Edit menu provides the following facilities. Refer to
page 35 for full instructions to use the Edit menu.
Define the settings used to display the data channels.
Enter and edit text notes specifically for the displayed
run.
Adjust the calibration for existing data.
Calculate a map of the track using information recorded
during a session.
Select the calculations to be reviewed during the download.
Align laps that use a different beacon position.
Permanently re-align laps to a specific beacon position.
© Stack Limited
22
ST542050-007 draft Stack DataPro User Guide
SOFTWARE DESCRIPTION
RECORDER
The Recorder menu provides the following facilities. Refer to page 42 for full instructions
to use the Recorder menu.
Before you use any of the options in this menu for the first time you must connect
the PC to the recording system on the vehicle using the Stack Network cable supplied.
Download and store data from the vehicle recording
system.
Erase the data memory in the vehicle recording system.
Check the status of the recorder.
Start and stop the logging operation.
Perform diagnostics on the recording system.
© Stack Limited
23
ST542050-007 draft Stack DataPro User Guide
SOFTWARE DESCRIPTION
LAYOUT
Layout is the arrangement of Panes on the Display Area. The
Layout menu provides the following facilities. Refer to
page 45 for full instructions to use the Layout menu.
Change the contents of the primary pane on the display.
This pane is not necessarily the largest, and so you should
identify it by the fact that it does NOT have grab handles
when you unlock the panes. The main pane can include either strip charts or a map
chart.
Add panes to the layout.
Organize the available layouts.
Save a layout that you have created.
TOOLS, MULTI-CAR SETUP...
Refer to page 49 for full instructions to use the Tools menu.
Set up Stack DataPro to download data automatically from
more than one vehicle.
Start Stack DataPro Designer for use with a Configurable
Engineering System (ST8900).
Start the Run Manager.
Start the telemetry monitor application for use with configurable data logging systems.
© Stack Limited
24
ST542050-007 draft Stack DataPro User Guide
SOFTWARE DESCRIPTION
HELP
The Help menu allows you to display details about the installed version of Stack DataPro. It also provides on-line access to this user manual. Refer to page 50 for full instructions
to use the Help menu.
TOOLBAR
Toolbar buttons
Panes unlocked
Panes locked
BACK AND FORWARD ONE LAP
These buttons allow you to move the cursor backwards or forwards to
the same location in the previous or next lap. Each click of the button
will repeat the operation until the display reaches the first or the final
lap in the run. Refer to page 51 for a detailed description of these controls.
SINGLE RUN AND COMPARE TWO RUNS
These buttons allow you to show details of a single run or to compare
two runs. You may also use the compare button to show different parts
of the same run.
© Stack Limited
25
ST542050-007 draft Stack DataPro User Guide
SOFTWARE DESCRIPTION
You define the source files and lap numbers by using the ‘Reference’ and the ‘Current’
Run Selectors. The data panes show measurements using a different user-defined colour
to help you identify them. Refer to page 51 for full instructions to use these buttons.
Stack DataPro is not restricted to a lap-based display. It can examine and compare
any section of the same run or of different runs from the same or from different
tracks.
MULTILAP
This button allows you to overlay and compare details from two or more laps
from the same run or from different runs. Use it, together with the Lap Selector, to select the laps of interest.
PRINT
This button allows you to print the screen details to the Windows default printer for your PC. This might be a local or a network printer.
LOCK PANES
The default condition is for the pane layout to be locked when you
start Stack DataPro or when you select a new arrangement of panes
from the layout selector. This button allows you to unlock and lock the
arrangement of dockable panes on the Display Area. With the button
selected the panes lose their grab handles, releasing slightly more of
the screen area for the data display. Refer to page 51 for a detailed description of this function.
© Stack Limited
26
Unlocked
Locked
ST542050-007 draft Stack DataPro User Guide
SOFTWARE DESCRIPTION
SELECTORS
There are three selector types on the screen:
The Layout Selector includes a series of pane arrangements pre-defined by Stack. If
you change the screen layout in any way, Stack DataPro allows you to save the new
arrangement under a new name so that you may restore it again in the future.
The CURRENT and the REFERENCE Run Selectors list the Tracks, Sessions and Runs
available for analysis. Click on the arrow head to open a list so that you may navigate
to and select a run from those available.
The REFERENCE Run Selector will be accessible only if you have set the Compare
Two Runs button on the Toolbar, otherwise it will be greyed out. You may use the
REFERENCE Selector to compare data from different runs, or data from different parts
of the same run.
The Run Selectors immediately to the right of the Run Selectors allow you to select a
lap from among those available in the selected run.
© Stack Limited
27
ST542050-007 draft Stack DataPro User Guide
SOFTWARE DESCRIPTION
DISPLAY AREA
The Display Area includes a layout of one or more dockable panes. You may unlock the
layout and then add panes to the Display Area, delete them or move them around to provide an effective arrangement. The panes will resize automatically to fit the space available with no overlap. You may lock the panes once you are satisfied with their layout.
If you make any changes to a layout, Stack DataPro allows you to save the layout when
you select a new layout or close the program.
© Stack Limited
28
ST542050-007 draft Stack DataPro User Guide
SOFTWARE DESCRIPTION
STATUS BAR
The Status Bar includes the following
information:
Lap identity and total lap time for
the current lap.
Lap identity and total lap time for
the reference lap if you have
selected the Compare feature.
Cursor location (time and distance) in the current lap.
Cursor location (time and distance) in the reference lap if you have selected the Compare feature
If you drag the cursor to highlight a section of the circuit, the status bar shows the start
and end points of that section, and the time and distance between the start and end
points.
At the right-hand end of the status bar there is an indicator that shows the current
zoom mode of the charts. There are three zoom modes: Zoom Run, Zoom Lap and
Zoom Selection. The zoom mode is retained when you change the lap, run or layout.
The zoom indicator on the status bar makes it easy to keep track of how data is being
displayed.
A horizontal progress bar appears briefly at the right-hand end of the status bar to
indicate progress when loading a file.
© Stack Limited
29
ST542050-007 draft Stack DataPro User Guide
HOW TO USE THE SOFTWARE
HOW TO USE THE SOFTWARE
COMMANDS AND CONTROLS
THE MENUS
Select a menu command by clicking with the
mouse. Any menu command followed by an
ellipsis (...) opens a dialogue panel that requests additional information.
FILE
These menu commands allow you to perform operations on sessions and runs.
CREATE NEW TRACK...
Enter a name and details for the new track where
you recorded the session data. Use this command
if you record data at a new location, or if the track
layout has changed significantly since you
recorded data there previously. Refer also to “Predownload tasks” on page 16.
CREATE NEW SESSION...
Enter the name for a new session of recorded data. Select the relevant track name
from a drop-down list or create a new track by using the command described above.
© Stack Limited
30
ST542050-007 draft Stack DataPro User Guide
HOW TO USE THE SOFTWARE
IMPORT EFI
DATA...
This option is available only if you installed EFI from the Custom System selector.
Stack DataPro will import and display data acquired from EFI Euro–6 and Euro–12
ECU Logger systems. However, currently Stack DataPro does not allow you to download data from these loggers directly—you must use the ECU’s communication tool
software to do this.
Because Stack DataPro does not communicate with these loggers, the BEFORE YOU
USE THE RECORDER MENU menu and some other options on the EDIT menu are disabled when the EFI system is selected.
When EFI data is available for import (after the user has downloaded data from the logger with the ECU’s communication tool software), the ‘IMPORT EFI DATA...’ option
on the FILE menu becomes enabled. Select this option to display a dialogue, shown below, that lists the runs available for import. This dialogue also allows the multicar
mode, described on page 49, to be selected.
© Stack Limited
31
ST542050-007 draft Stack DataPro User Guide
HOW TO USE THE SOFTWARE
If you are not using the multicar mode then just click the ‘Import’ button on the dialogue. Stack DataPro will import the EFI data into the tracks and sessions shown. The
import will generate calculated channels such as DISTANCE, COMB_G, RADIUS,
LONG_G and G_RATIO. After the import is complete, the last imported run should
be displayed in the currently selected layout.
If you have set up a multi–car list using the ‘Multi–car setup’ option on the Tools
menu, then you may check the ‘Use Multi–Car Setup’ box on the import dialogue. This
will allow you to select the appropriate multicar setup from the dropdown list. Multicar
mode will use the session names setup in multicar rather than the sessions listed in the
import dialogue.
EXPORT DATA...
Use this command to export data
from Stack DataPro to another application, such as Microsoft® Excel.
Select the checkboxes against the
data channels that you wish to export
in the Data/Channels list. For convenience there are two buttons that
allow you to select all channels or
clear your selection.
Type a name for the exported file in
the Export To/File box. You may
also use the Browse… button to navigate to a directory where you intend
to save the exported file.
Select the appropriate delimiter from the Delimiter drop-down list. You may select
‘Other’ from the list and then type your chosen delimiter in the box to the right.
© Stack Limited
32
ST542050-007 draft Stack DataPro User Guide
HOW TO USE THE SOFTWARE
The Header information shows what will be included with the heading of the exported
file. You may leave this at the suggested entries, or you may edit the header information before export if you prefer. There is a checkbox that will prevent any header information being included with the exported file if selected.
Select an appropriate option under Range to set the range of data included in the exported file. This may be all data in a particular run or lap, data from a selection you
have made on the Stack DataPro screen, or all data in a range of laps that you define in
the From and To drop-down lists.
The Template function allows you to save the choices you make for exporting data under and re-use them again for future exports.
The First Column of data included in the exported file is always a time index. You
may select the Interval between data packets and the time Format from their dropdown lists. The Offset drop-down list allows you to determine where the zero time index occurs.
After you have selected all the necessary options, click Export to export the data to the
file specified.
PRINT SCREEN
Print a copy of the current screen details to the Windows default printer connected to
your PC. The screen will show an error message if there is no printer on-line and connected to the PC. You will be prompted to confirm the print command. Note that if
you select this command while using the Stack Network cable to connect to the vehicle, you might experience software conflicts.
AUTHORISATION...
Use this command to authorise the software as explained on page 8.
© Stack Limited
33
ST542050-007 draft Stack DataPro User Guide
HOW TO USE THE SOFTWARE
IMPORT OLD
DATA
Use this command to authorise data that you have restored from an archive created
using an old version of the Stack software, for example Version 6 or Version 6 Plus. It
will search for and authorise all the source files on your PC hard disk. You should
therefore copy all archived data to your hard disk before you use this command, even
if you do not intend to analyse it immediately. After you use the command and Stack
DataPro authorises your archived data, you may then re-archive it to clear space on
your PC.
Use this command carefully. Stack DataPro allows you to import old data up to ten
times before it locks the command permanently against further use. You should
consider importing large quantities of data during one import session, instead of
using the command during many sessions that will use up all the import opportunities quickly.
EXIT
Close Stack DataPro. If you have made unsaved changes to the Layout of panes you
will be prompted to save these before the program closes.
© Stack Limited
34
ST542050-007 draft Stack DataPro User Guide
HOW TO USE THE SOFTWARE
EDIT
CHANNEL SETTINGS...
This command sets the colours and units used to display
the Strip Chart, Histogram and XY Plot for each of the
data channels. Select appropriate colours for the Current
data set and for the Reference data set so that you may
identify them easily. Choose the channel settings for the
units you want to use for the individual display channels.
Use this command to set the number of decimal places
used to display values. Note that this setting does not affect the precision of recorded data or the accuracy of calculations performed by Stack DataPro.
Note that the channels settings apply globally for all data, histograms and XY Plots.
© Stack Limited
35
ST542050-007 draft Stack DataPro User Guide
HOW TO USE THE SOFTWARE
SHOW RUN NOTES
Use this command to record notes and comments
that relate to this run only.
If you use the software to Compare two runs, this
command will show notes for both runs simultaneously.
The dialogue panel includes a scroll bar for use
when viewing notes and comments that extend beyond the panel boundaries.
RUN RECALIBRATION
Use this command if you wish to change the calibrations for a run.
CALCULATE CHANNELS...
Use this command to calculate
derived channels for a run from data
collected on the vehicle. For example,
you may use it to calculate damper
velocity from the damper displacement channels.
© Stack Limited
36
ST542050-007 draft Stack DataPro User Guide
HOW TO USE THE SOFTWARE
CALCULATE MAPS...
Use this command to calculate a map of
the track based on measurements made
and recorded by the vehicle sensors.
Note that Stack DataPro requires measurements of lateral acceleration, lap times and
wheel speed to generate the map. If the vehicle does not have the correct sensors fitted or if they are calibrated incorrectly, an
accurate map cannot be created.
To draw the track map you must correctly
identify the rotation in which the track is
drawn — clockwise or counter-clockwise. Use the compass orientation N-S-E-W to set
the orientation of the track, with the compass point defining the direction of the starting
line. There is also an option to set a figure-of-eight track arrangement.
To calculate a map:
1. Select the type and orientation of map from those available. Click OK.
2. Select the lap that contains the data that you wish to use to create the track map and
press the Enter key. Select 0 (zero) if you wish to use data from all laps to calculate the map.
AUTO CALCULATION
This command configures Stack DataPro to calculate the specified vehicle parameters
automatically during the transfer of data from the vehicle recording system.
© Stack Limited
37
ST542050-007 draft Stack DataPro User Guide
HOW TO USE THE SOFTWARE
SET RUN OFFSET
This command operates only with the Compare two runs button selected.
Use this command to align data in the current and the reference runs. This might be
necessary, for example, when the beacon position is different.
To set the alignment, click on a part of the reference lap that you want to move and
drag the cursor to the part of the current lap with which it must align. Then select SET
RUN OFFSET to align the data sets. You may establish the point either visually or by
moving the current lap a known offset distance by reading the values on the status bar.
SET BEACON OFFSET
This command allows you to compensate for any offset between the location of the
beacon and of the start/finish line. Stack DataPro saves this offset with the data so that
it will apply automatically when you next load the same run. You may re-enter a new
beacon offset at any time.
In Single Lap Mode:
You may either select an area of the strip chart using the mouse and then select SET
BEACON OFFSET or you may enter a numerical value in the Map Properties dialogue
panel described on page 68.
Enter the beacon offset distance, using positive values if the beacon is before the start/
finish line or negative values if the beacon is after the line. The Navigation Map pane
shows the position of the beacon as a circle, and the start/finish line as line across the
track with a double arrow.
In Compare Laps Mode:
Click and drag the cursor to the appropriate part of a reference lap and then select SET
BEACON OFFSET.
© Stack Limited
38
ST542050-007 draft Stack DataPro User Guide
HOW TO USE THE SOFTWARE
Stack DataPro recalculates the lap times automatically when you set a new beacon offset.
RUN MARKERS
© Stack Limited
39
ST542050-007 draft Stack DataPro User Guide
HOW TO USE THE SOFTWARE
To access the Edit Run Markers function.
Select a run using the RUN SELECTOR on the toolbar.
Choose EDIT>RUN MARKERS….
Some typical tasks performed using the Edit Run Markers feature…
Enter official lap times.
If there are no lap markers:
use the INSERT… button to add a lap, and then
enter the official time.
If lap markers are present:
select any lap that does not match the official time
click the EDIT… button, and then
enter the official time.
Delete a lap marker generated by an extra beacon out on the track or an accidental button–push on the dash.
Select the unwanted lap, and
click the DELETE button.
Insert a lap marker that was missed due to a malfunctioning beacon or another
car blocking the beacon.
Select the lap where the new marker should be inserted to split the lap into two,
and
enter the time for the new lap.
© Stack Limited
40
ST542050-007 draft Stack DataPro User Guide
HOW TO USE THE SOFTWARE
What if I make a mistake?
The RESET button will discard the most recent changes made and restore the lap
markers to their Before Edit state.
The RESTORE ORIGINAL button will discard all changes made since the run was
downloaded and will restore the lap markers to their original downloaded state.
Saving Changes
Once changes are complete, click the OK button to save the changes. This will automatically perform the Calculate Channels function to update the data with the new
marker information.
Features
The Edit Run Markers dialogue can be left open while other functions of Stack DataPro are accessed. For example, while editing markers it might be useful to look at the
chart windows for the run. You may minimise the Edit Run Markers dialogue by
clicking the minimise button on the title bar of the window allowing easier viewing of
the charts.
The Run Selector is disabled while the Edit Run Markers dialogue is open.
© Stack Limited
41
ST542050-007 draft Stack DataPro User Guide
HOW TO USE THE SOFTWARE
BEFORE YOU USE THE RECORDER MENU
Before you use any of the options in the Recorder menu for the first time you must
connect the PCNIU adapter to one of the PC’s USB ports and follow the instructions in the ‘Found New Hardware’ dialog when it detects the PCAN-USB Device
as follows.
Important: Install the Stack DataPro software BEFORE you plug in the CAN USB
network interface.
RECORDER
DOWNLOAD ERASE MEMORY
Use this command to download information stored in
the vehicle data recorder and to erase the data
recorder simultaneously. This dialogue box allows
you to select the track and the session where the PC
will store the data.
Stack DataPro will not erase the recorder memory until it confirms a successful data transfer.
DOWNLOAD SAVE MEMORY
This command downloads data from the vehicle recorder without erasing the recorder
memory. This dialogue box allows you to select the track and the session where the
PC will store the data.
ERASE MEMORY
This command erases the vehicle recorder memory without downloading it first.
Deleted information cannot be retrieved and so you should make certain you download and store the recorded information before you carry out this operation.
© Stack Limited
42
ST542050-007 draft Stack DataPro User Guide
HOW TO USE THE SOFTWARE
RECORDER STATUS...
When recording is in progress this command displays a dialog that shows how much recorder
memory has been used and how much is available
for use. If recording is not in progress, this dialog
also includes a recorded run information as in the
example on the right here.
START LOGGING
Use this command to start logging data on the vehicle recorder.
STOP LOGGING
Use this command to stop logging data on the vehicle recorder.
DIAGNOSTICS
There are three sub-menu items available through this command that require the PC to
be connected to the vehicle through the Stack Network cable:
REAL TIME DISPLAY
This command allows you to view measurements from the vehicle sensors using
the real-world units determined by the calibration details within the setup.
REAL TIME DISPLAY (RAW)
This command allows you to view measurements from the vehicle sensors using
the raw units before conversion.
SYSTEM DIAGNOSTICS
If the system develops a fault, this command allows you to interact directly with
the internal control software, UNDER THE GUIDANCE OF STACK SERVICE PERSONNEL ONLY, to identify the problem.
© Stack Limited
43
ST542050-007 draft Stack DataPro User Guide
HOW TO USE THE SOFTWARE
DO NOT use this command unless you are entirely confident with it — incorrect
use of the SYSTEM DIAGNOSTICS command can cause system corruption and the
loss of valuable recorded data.
NETWORK INFO...
This command displays a list of the modules on the CANBUS network.
© Stack Limited
44
ST542050-007 draft Stack DataPro User Guide
HOW TO USE THE SOFTWARE
LAYOUT
‘Layout’ is the arrangement of Panes on the Display Area.
Stack DataPro allows you to select among a range of standard
and user-defined layouts.
CHANGE MAIN PANE...
Use the CHANGE MAIN PANE command to select, from a
drop-down list of those available, which type of pane To use these opoccupies the Main area on the display.
tions you must first
unlock the pane arrangement.
ADD PANE...
Use this command to add a pane to the Display Area. The
command allows you to select the type of pane and its initial location. You may relocate the new pane manually to a new position after insertion if you wish. Stack DataPro will rearrange the layout to provide the most efficient display.
If you wish to delete a pane from the screen, click on the ‘X’ button that appears next
to its grab handles when the layout is unlocked.
© Stack Limited
45
ST542050-007 draft Stack DataPro User Guide
HOW TO USE THE SOFTWARE
ORGANIZE LAYOUTS...
Hide Layouts in Layout
Selector.
To prevent a layout from being
shown in the Layout Selector,
uncheck the box to the left of
the layout in the organiser’s
tree. You may also right-click
an entry in the tree and select
Hide or Show from the context menu that appears.
If all the layouts under a particular category are unchecked,
then the category will also be
hidden from the Layout Selector.
Delete a Layout or Category
You may delete only the user-defined layouts.
Select the layout that you wish to delete and then press the [Delete] key. You may
also right-click the entry and select Delete from the context menu. Note that the deletion will not occur until you click OK to close the Organize Layouts dialogue.
Categories that contain only user-defined layouts may be deleted in the same manner, by highlighting the category in the tree and then pressing the [Delete] key.
Create a New Category
Right-click on the tree and select New Category from the context menu. Type a
name for the new category.
© Stack Limited
46
ST542050-007 draft Stack DataPro User Guide
HOW TO USE THE SOFTWARE
Rename a Category or Layout
You may rename only the user-defined layouts.
Right-click on the user category or layout and select Rename from the context
menu. Type a new name for the category or layout.
Move a Layout into another category
The layout tree is drag-and-drop enabled.
Click and hold the left mouse button when pointing to the layout that you wish to
move, and drag it to the new location in the tree. Release the left button to complete
the move. You may also right-click the entry and select Cut or Paste from the context menu.
Restore Default Stack Layout
If you have customised a Stack layout by making a change to the layout and then
saving it under the same name, you may restore the original Stack layout by right
clicking the name and selecting Restore Default from the context menu.
Customised layouts are identified by a special icon.
Modifying a Layout Comment
Highlight the layout in the tree and then modify the comment in the text box at the
bottom of the Organise Layouts dialogue. Note that the change will not actually
occur until you click OK to close the Organise Layouts dialogue.
© Stack Limited
47
ST542050-007 draft Stack DataPro User Guide
HOW TO USE THE SOFTWARE
SAVE LAYOUT
You may save the current layout at any time
by clicking the SAVE LAYOUT button next
to the Layout Selector, or by choosing LAYOUT>SAVE LAYOUT.
Customising a Stack Layout.
To customise a Stack layout, make no
changes to the name in the Save Modified Layout dialogue.
You may change the category or the
comment if necessary.
Click OK to close the dialogue.
Creating a User Layout.
To create a user layout simply change the layout name in the Save Modified Layout dialogue to something other than a Stack layout name (use the drop-down list
to see a list of all layout names).
You may change the category or the comment if necessary.
Click OK to close the dialogue.
© Stack Limited
48
ST542050-007 draft Stack DataPro User Guide
HOW TO USE THE SOFTWARE
Advanced Layout Options.
Click the ADVANCED... button on the
Save Modified Layout dialogue to set
the default mode that the layout uses
when it is displayed.
Click OK to save the advanced options.
TOOLS
MULTI-CAR SETUP...
Use this command if you intend to download data from
more than one vehicle.
In the mulitcar mode, Stack DataPro identifies the vehicle by
the tag number encoded in the data from its recorder and selects the appropriate vehicle setup and session from the car set. It is also possible to set
the auto-calculation file for each car.
You may use the multicar mode after importing data from an EFI Euro–6 or Euro–12
ECU Logger system. Refer to page 31 for a description of this feature.
To invoke multicar, open Download Erase Memory or Download Save Memory and
click on the multicar selection box.
© Stack Limited
49
ST542050-007 draft Stack DataPro User Guide
HOW TO USE THE SOFTWARE
DESIGNER
Use this command to start the software package Stack DataPro Designer, which is
available only with Engineering Systems (ST8900). Refer to the separate User Guide
that accompanies Stack DataPro Designer for information about this feature.
RUN MANAGER
Choose this command to use the Run Manager feature described beginning on
page 85.
TELEMONITOR
Choose this command to use the telemetry support if your system includes configurable data logging systems. Refer to the separate User Guide for information about this
feature.
You will need to have the appropriate telemetry hardware before you will be able
to use this feature.
HELP
USER MANUAL
This command launches Adobe Acrobat Reader™
and opens the electronic copy of this user manual
installed with the program. Refer to page 2 of this
manual for instructions to navigate within the electronic document.
ABOUT STACK DATAPRO
Display the version number and other details about the installed version of Stack DataPro.
© Stack Limited
50
ST542050-007 draft Stack DataPro User Guide
HOW TO USE THE SOFTWARE
TOOL BUTTONS
Toolbar buttons
BACK ONE LAP
Select this button to move the cursor to the same location in the previous lap.
If necessary, the strip chart pane will zoom to show a single lap. Each click of
the Back One Lap button will step to the previous lap in the run until it reaches
the Out lap.
FORWARD ONE LAP
Select this button to move the cursor to the same location in the next lap. If
necessary, the strip chart pane will zoom in to show a single lap. Each click of
the Forward One Lap button will step to the next lap in the run until it reaches
the In lap.
SINGLE RUN DISPLAY
Select this button to show data from the current run only.
COMPARE TWO RUNS
Select this button to compare data from the two runs defined in the Reference
and the Current Run Selectors. You may compare any two laps recorded at
the same or different tracks using this facility — they may be two different laps
from the same run, or laps from different runs or sessions. The data panes show
© Stack Limited
51
ST542050-007 draft Stack DataPro User Guide
HOW TO USE THE SOFTWARE
measurements from both laps using colours, which you define using Edit>Channel Settings, to help you discern them.
MULTILAP
Select this button to compare two or more laps within a run. With the button
selected, select the Lap button (described below) and then click on another lap
of interest in the list that opens. Click on the Lap button and select additional
laps of interest if necessary.
PRINT
Click this button and then select Yes to print a copy of the screen details on the
Windows default printer. This button has the same function as the command
FILE>PRINT SCREEN.
RUN SELECTORS
There are two run selectors in the command
area:
The Current run selector shows the Track,
Session and Run for the Current data set.
Click on the arrow head to open the list so
that you may navigate to and select a run.
The Run Selectors button, to the right of the
Run Selector, opens a list of the laps within
the selected run.
The Reference run selector shows the
Track, Session and Run for the Reference data set. Click on the arrow head to open
the list so that you may navigate to and select a Reference run. This list also has a Run
Selectors button. The Reference selector and its lap selector button will be available
© Stack Limited
52
ST542050-007 draft Stack DataPro User Guide
HOW TO USE THE SOFTWARE
only if you have set the Compare two runs option on the Toolbar, otherwise they will
be greyed out.
You may use the Reference selector and its Lap selector to compare segments from
the same or from different runs.
LAP SELECTOR
These buttons, located alongside the Current
and the Reference drop-down lists, open up a
list of the available laps in the selected run.
The list identifies the laps by their lap number,
or by the designation IN or OUT as appropriate.
The list includes lap timing details for each
lap, with the fastest lap identified by a flag
icon.
© Stack Limited
53
ST542050-007 draft Stack DataPro User Guide
HOW TO USE THE SOFTWARE
LAYOUT SELECTOR
Stack
DataPro
includes a series of
screen layouts predefined by Stack.
The drop-down list
of the Layout
Selector displays
the layouts for each
category as a tree.
A preview of the
highlighted layout
appears to the right
of the tree with a
description along
the bottom.
LOCK PANES
Stack DataPro presents information in a layout of one or more
Panes unlocked
panes in the display area. By default, the panes are locked when
you start the program and when you select a new layout. However, you may unlock the layout by clicking the Lock Panes
Panes locked
button, and then add panes to the area, resize or delete them, or
move the panes around by clicking and dragging their grab handles. Stack DataPro will resize the panes automatically to fit the new layout. You may
then lock the panes in their current layout by clicking on the Lock Panes button again.
The grab handles do not appear on locked panes. Stack DataPro allows you to save a pane
layout under a convenient name for future use.
© Stack Limited
54
ST542050-007 draft Stack DataPro User Guide
HOW TO USE THE SOFTWARE
SAVE LAYOUT
Save Layout
User layout
Stack layout
User modified
Stack layout
Layout category folder
There is a layout save button identified by the disk icon,
to the right of the Lock Panes button, that allows you to
save a new layout that you have created. Icons identify
whether the layout is a user layout, a Stack layout or a
user modified Stack layout.
You may access the same facility by choosing
Layout>Save Layout… from the Stack DataPro menu
bar.
Type a name for the layout, or select
an existing name from the Name
drop-down list.
Select a category under which you
wish to store your new layout from
the Category drop-down list.
Type a Comment that will help you
to remember the specific purpose of
the new layout.
© Stack Limited
55
ST542050-007 draft Stack DataPro User Guide
HOW TO USE THE SOFTWARE
Click the Advanced button to set the defaults
for the new layout. These defaults, which include whether the layout uses single run or
compare mode and whether the X-axis represents distance or time, will be restored automatically each time you select the layout.
The Stack-defined pane layouts are optimised
to support specific analysis requirements and,
depending on the sensors fitted to the vehicle,
can include:
1. Corner radius
2. Map
3. Gear ratio
4. G forces
5. Ride height
6. Pressure and temperature histograms
7. Engine temperatures and pressures
8. Driver activity and comparison
9. Dampers (smoothed and unsmoothed) and damper velocity
10.Battery voltage
© Stack Limited
56
ST542050-007 draft Stack DataPro User Guide
HOW TO USE THE SOFTWARE
11.Pitch and roll
12.Rolling laptime
13.Run and segment reports
14.Vehicle and engine speed
15.Speed and time comparisons
16.Steering movements
© Stack Limited
57
ST542050-007 draft Stack DataPro User Guide
PANES DESCRIPTION
PANES DESCRIPTION
STRIP CHART
The Strip Chart pane, shown above, presents data through a series of horizontal strip
charts. The software allows you to control the presentation of data on the strip chart:
Set the vertical axis for each strip chart to include one or more channels. These channels may use different units and ranges.
Set the horizontal axis to include gradations of either time or distance.
© Stack Limited
58
ST542050-007 draft Stack DataPro User Guide
PANES DESCRIPTION
Set the channel ranges, background colours, screen font, title and measurement units
for each strip chart to display the selected parameters optimally.
You may zoom in to expand chart details infinitely by repeatedly dragging a highlight
on the chart and then right-clicking in the highlight.
You may use the keyboard to move around the chart:
Press the [Home] key to move half a screen’s worth of data to the left.
Press the [End] key to move half a screen’s worth of data to the right.
Press the [Ctrl]+[Home] key to move a full screen’s worth of data to the left.
Press the [Ctrl]+[End] key to move a full screen’s worth of data to the right.
CHART TYPES
You may set the chart region to include one or more of the recorded or derived data channels, depending on the sensor types fitted to the vehicle. If there is no information available for a channel, the strip chart will show a fixed reading close to zero. The default units
are decided by the system setup, but you may select other units from a list. Stack DataPro
remembers your preferred units for future use.
Click the radio button next to the channel
name on the chart’s vertical scale to display the information for that channel. The
selected channel name, the cursor value
and the appropriate units all display in
bold type on the screen. The cursor crosshair on the strip chart will follow the selected channel.
The example on the right shows the same
strip chart with the lateral G measurements (top) and with the steering angle
selected (bottom).
© Stack Limited
59
ST542050-007 draft Stack DataPro User Guide
PANES DESCRIPTION
CHART PROPERTIES
To set the parameters for any visible strip chart, use the mouse to right-click on the vertical scale. The context menu that appears allows you to insert a strip at the current location,
append a strip to the bottom of the chart pane, or remove a strip from the chart pane. It
also allows you to set the properties for the selected strip.
Select Properties from the context menu. The dialogue box that appears has four tabs:
Axis settings — Use this tab to define the displayed range and format.
Channel Selection — Use this tab to define one or more types of data that the strip
will include.
© Stack Limited
60
ST542050-007 draft Stack DataPro User Guide
PANES DESCRIPTION
Line Styles—Use this tab to set the line style and width for the channels by the strip
chart.
Font — Use this tab to set the typeface used to display text.
AXIS SETTINGS
Select the radio button
for the channel for
which you require to
change the Y-axis limits. Right-click on the
vertical axis and select
PROPERTIES from the
context menu that
appears to display the
Strip Properties dialog. The Axis Settings tab shows the
Limits section and
indicates the channel
that the Min and Max settings will affect.
If you set inappropriate values the chart might not display data in the way you expect.
If possible, set the minimum and maximum scale limits to include all possible values.
If you do not know the range of measurements recorded on the selected channel, experiment with different settings to achieve the clearest view. Click Apply to view the
changes.
The chart ranges are stored with the track details so that you may establish appropriate
ranges for each track.
© Stack Limited
61
ST542050-007 draft Stack DataPro User Guide
PANES DESCRIPTION
Select the Show title check box to display the title you define for the selected chart in
the Y-axis border.
Select the Show value check box to display the measured value at the cursor position
in the Y-axis border.
If the axis annotation does not fit after you click OK, hover the mouse over the
thick vertical bar in the top border area until it becomes a sizing cursor and then
drag the bar to one side or the other to change the Y-axis width.
Set colours for the chart background and for the grid lines.
Select Edit>Channel Settings if you need to set the colours of
the plotted data lines on the strip chart.
© Stack Limited
62
ST542050-007 draft Stack DataPro User Guide
PANES DESCRIPTION
CHANNEL SELECTION
Use the Channel Selection tab to define the content of the strip chart:
Select a channel that you wish to display from the Available Channels list and click
Add to move it into the Channels On This Strip list. To select multiple channels,
hold the [Ctrl] key as you click on each channel selection and then click Add to move
the multiple selection to the Channels On This Strip list.
To remove a channel from the strip chart, select it in the Channels On This Strip list
and click Remove.
© Stack Limited
63
ST542050-007 draft Stack DataPro User Guide
PANES DESCRIPTION
You may set the display to show differences in a channel: Click on a channel in the
Available Channels list and then select the DIFF selection box. Click Add to set the
appropriate difference channel.
The difference channel should appear identified with the ‘-DIFF’ suffix to confirm that
it shows the difference information.
LINE STYLES
You may set the line width and style for the strip chart. The Line Width setting determines the thickness, in screen pixels, for the current and the reference lines. The Line
Style selection determines whether the line is solid or whether it is broken.
© Stack Limited
64
ST542050-007 draft Stack DataPro User Guide
PANES DESCRIPTION
The Line Styles selection does not allow you to set the colour of the line. To do this,
choose EDIT>CHANNEL SETTINGS….
FONT
Select a suitable font, size and style for the chart text from among those installed on
your PC to display the text clearly without using excessive screen space. Note that
fonts such as Arial, Tahoma or Verdana provide a clear display of text and are usually
available on all PCs.
© Stack Limited
65
ST542050-007 draft Stack DataPro User Guide
PANES DESCRIPTION
TIME OR DISTANCE SCALE
You may set the horizontal axis to display measurements of distance or time
by using the mouse to right-click on
the scale. Select the type of scale from
the pop-up menu.
Right-click
It is more useful to select a distance
with the
scale to compare data from two runs so
mouse
that you may correlate events that appear in the data sets against precise points on the track. If you use the time scale instead,
the data will become increasingly misaligned with increasing distance around the lap.
Distance can be selected only if a distance channel has been calculated.
ZOOM VIEW
Left-click in one of the strip charts to set the cursor position. The cursor is a vertical red
line through all visible strip charts, whose location appears as a time and distance in the
Status Bar. If the display area also includes a Navigation Map pane then a red cross identifies the cursor location on the map.
Right-click again to zoom to the Run.
Left-click and drag in a strip chart to make a selection around the track. The Status Bar
shows the start and end times and distances for the selected segment. Right-click in the
selection to zoom the view so that it expands horizontally to fill the pane. The Status Bar
includes an indicator that shows the current zoom mode of the charts.
Right-click again on a point in the strip chart to zoom out.
You may also use the Up and Down arrow keys to zoom In and Out respectively.
© Stack Limited
66
ST542050-007 draft Stack DataPro User Guide
PANES DESCRIPTION
NAVIGATION MAP
The Navigation Map pane shows a map of the
track. The map includes the following symbols:
The start/finish line appears as a blue double
arrow pointing in the direction of travel
around the track.
The lap marker beacon appears as a blue
circle. Use the Edit>Set Beacon Offset command if you cannot arrange to set the beacon
at the start/finish line. Any beacon offset that
you set will appear on the Navigation Map
as a grey circle.
The current cursor location appears as a red
cross. This point also appears as a vertical red line in the Strip Chart pane. You may
click and drag on the Navigation Map to extend the selection, with the start and end
locations identified on the Status Bar.
Numbered boxes identify segments around the track. Nominally straight segments are
white and corner segments are black. You may click and drag the cursor, and then
right-click on the extended selection to insert a new segment using the context menu
that appears. You may also use the context menu to delete a segment. Stack DataPro
renumbers the segments automatically in sequence. Note that, to make the most efficient use of available screen space, the segment numbers disappear when the map
pane is reduced to a small size.
When data is zoomed, grey circles appear on the map at the start and the end of the
selection.
© Stack Limited
67
ST542050-007 draft Stack DataPro User Guide
PANES DESCRIPTION
TRACK PROPERTIES
Right-click in the Navigation Map and then select ‘Properties’. The dialogue panel allows
you to set the following parameters:
Deselect the check box if you prefer to display the Navigation Map
as a black and white track against
a white background.
Enter a name for the track.
Set the nominal length of the track
(in appropriate units). If the track
length has changed since your last
visit, change the nominal length
defined in this field. Set the nominal length to a value that you calculate during a practise lap that
has provided clean data. In particular you should choose a lap in
which the line taken by the vehicle
is good and that does not contain
excessive wheel lock-up, understeer or oversteer.
Do not use the published track length, but obtain the track distance from the data
download or channel values instead. Some laps will not be normalised if the beacon was missed.
Set the tolerance that the software uses when it normalises the length of each lap when
calculating the distance channel.
© Stack Limited
68
ST542050-007 draft Stack DataPro User Guide
PANES DESCRIPTION
Set a start line offset if necessary. This provides the same function as the Edit>Set
Beacon Offset command. Positive values are forward of the start line, negative values
are backwards from it.
Show a list of the track segments in a the drop-down box. The list highlights the segment that currently includes the cursor. Note that the list includes the lengths of each
segment, not their offset from the starting line.
Other parameters in the dialogue panel are not available for modification.
HISTOGRAM
The height of the bars in the Histogram represents the percentage of time, in the selected
part of the lap or run, that the chosen parameter dwells within a particular range of values.
If there is no selected region (either within a
Strip Chart or on the Navigation Map), the
histograms will be valid for the entire visible
width of the strip chart.
Left-click and drag an extended selection, either within a Strip Chart or on the Navigation
Map, to view histograms valid for that selection around the circuit.
The horizontal scale represents the measured parameter divided into narrow slices or
‘bins’. Each bin contains a solid vertical bar. The left-hand scale axis includes the percentage scale. The histogram display colours are as set using under the Edit>Channel Settings
menu.
© Stack Limited
69
ST542050-007 draft Stack DataPro User Guide
PANES DESCRIPTION
If you set the display to Compare two runs, the reference measurement appears as an unfilled outline superimposed over the data for the current run.
Right click on the histogram to set its properties:
Set the measurement channel from the dropdown list. This can be any of the available channels listed and described in Chart types.
Set the number of bins in the horizontal axis.
Set the range of the vertical scale to an appropriate value. If necessary, use this facility to expand
the chart vertically to provide a clearer view of
low data values.
Set the minimum and maximum values for the
horizontal scale. Measurements that fall outside
the set range limits will appear in the vertical slots reserved for them.
These ranges are stored with the track details so that you may set different ranges for
each track.
Select the check boxes to display actual percentage values above each occupied bin in
the histogram, and to show a background grid pattern on the histogram.
© Stack Limited
70
ST542050-007 draft Stack DataPro User Guide
PANES DESCRIPTION
XY PLOT
The XY Plot shows how values plotted against the horizontal (X) axis relate to values
plotted against the vertical (Y) axis. Although you may select any available channel for
each axis, the value of this type of chart is in its ability to show how two interdependent
values relate to each other. The example above shows how lateral G and longitudinal G
relate in a Traction Circle.
If you have zoomed Stack DataPro to show only a segment of a lap, the XY Plot will show
only those data points that are included in the zoomed selection. Otherwise the XY Plot
will show all available data points.
© Stack Limited
71
ST542050-007 draft Stack DataPro User Guide
PANES DESCRIPTION
You may drag the horizontal and the vertical axes in either direction to show the scales
more clearly.
XY GRAPH PROPERTIES
Right-click on the XY Pane to set its properties. The XY Graph Properties dialogue has
three tabs. The XY Plot can show data from the current run and from the reference run if
you are using Stack DataPro to compare two sets of data.
General—Use this tab to set the origin of the XY Plot and to set options for the grid
lines.
Axes—Use this tab to set the channels displayed by the chart axes.
Line—Use this tab to set line and plot options for data displayed by the chart.
© Stack Limited
72
ST542050-007 draft Stack DataPro User Guide
PANES DESCRIPTION
GENERAL
Select the radio
button that determines where the
origin of the chart
is to be. The
example uses an
origin at the bottom left.
Your choice will
depend on which
values you are
plotting on the
graph and on the
way they change
with respect to
each other.
© Stack Limited
73
ST542050-007 draft Stack DataPro User Guide
PANES DESCRIPTION
Select the appropriate selection box to set a Normal or a Circular grid according to
your needs. You may select both selection boxes if you wish to display normal and
circular grid patterns.
A Normal grid has horizontal and vertical lines that pass through the axis gradations,
similar to conventional graph paper.
A Circular grid has lines that are circular with their centre at the 0, 0 point of the axes.
The drop-down list to the right of the grid selection box allows you to set the colour of
the lines used to display the grid. You may set different colours for the normal and the
circular grids.
Click Font… to select the font that Stack DataPro uses to display the axis information
on the XY graph.
© Stack Limited
74
ST542050-007 draft Stack DataPro User Guide
PANES DESCRIPTION
AXES
Use the dropdown lists to
select the channels
displayed by the
horizontal (X) and
the vertical (Y)
axes of the XY
Plot.
You may select
only one channel
for each axis.
Enter the minimum and the maximum values to be
charted for each of
the plotted channels.
© Stack Limited
75
ST542050-007 draft Stack DataPro User Guide
PANES DESCRIPTION
LINE
Select the radio
button to determine whether data
for the current run
is presented as a
Scatter graph or
as a Line graph.
If you choose to
use a Scatter graph
to display data,
you may select the
size of the data
points
and
whether they are
hollow or solid.
Select the options
used to display
data for the Reference run, if you are using this feature of Stack DataPro.
© Stack Limited
76
ST542050-007 draft Stack DataPro User Guide
PANES DESCRIPTION
CHANNEL VALUES REPORT
A
B
C
D
E
F
G
H
I
The Channel Values Report includes columns of measurements. If you have selected the
Compare two runs option, measurement columns will include the current value and the
reference value. Columns will contain information valid for the selected point or for a selection that you identify around the track.
A) The channel identification.
B) The instantaneous values of each parameter at the cursor location.
C) The minimum values recorded in the selection for each channel.
D) The maximum values recorded in the selection for each channel.
E) The average values recorded in the selection for each channel.
F) The rate of change for each channel between the start and the end of the selection.
G) The difference between the current and reference values or, in a selection, between
the start and the end.
H) The value of the channel at the start of the selection.
I) The value of the channel at the end of the selection.
Hover the mouse over the vertical bars that separate the headers of two columns and then
left-click and drag the resizing cursor to adjust the column width. Double-click with the
resizing cursor to adjust the column width automatically to the correct setting.
© Stack Limited
77
ST542050-007 draft Stack DataPro User Guide
PANES DESCRIPTION
Click in a column heading and drag that column left or right to move it to a new position.
Right-click anywhere in the Report pane to use the context
menu that provides the following features:
Hide the selected column, or Show a column that was hidden previously.
Channel Selection to choose the channels to display on the
report.
Sort Channels on the report in increasing or decreasing order, or choose to have them
unsorted.
Show Units on the displayed data.
Copy to Clipboard the data displayed in the report. You may then paste the information into another application.
SEGMENT COMPARE REPORT
This report includes details for each segment of the lap
number defined in the Selectors. If necessary, scroll the
list vertically and horizontally to see all details of the lap.
With the software set to a Single run display, the pane
will include the maximum speed on a straight or minimum speed in a corner segment, and the time taken to
complete each segment in the lap.
With the software set to Compare two runs, the line for
each lap segment will include the maximum speed on a
straight or minimum speed in a corner segment, current
© Stack Limited
78
ST542050-007 draft Stack DataPro User Guide
PANES DESCRIPTION
and reference speeds, and the time taken to complete the segment in the current and the
reference laps. It will also include the differences between these measurements. White
rows represent nominally straight segments while black rows represent corner segments.
You may resize and move the columns as for a Channel Values report.
Right-click anywhere in the Segment Compare Report and select the option displayed to
copy the displayed information to the clipboard.
RUN REPORT
This report shows the total lap time and the times recorded for each segment of the entire
run. The report shows the fastest segments in the run, highlighted in red fields, with the
values repeated in the Theoretical row at the bottom of the report.
The report highlights the fastest rolling lap in light blue fields with the values repeated in
the Rolling Lap row. White columns represent nominally straight segments while black
columns represent corner segments.
You may resize and move columns as for a Channel Values report.
Right-click anywhere in the Run Report and select the option displayed to copy the displayed information to the clipboard.
© Stack Limited
79
ST542050-007 draft Stack DataPro User Guide
SENSOR CALIBRATION
SENSOR CALIBRATION
If fitted to the vehicle, certain types of sensor must be calibrated before you can rely on
the accuracy of their measurements. For example:
Wheel circumference so that the wheel speed sensor will allow the recorder to measure distance and speed. Up to five wheel sensors can be calibrated if fitted.
Throttle and brake pedal sensors connected mechanically to the pedal linkage. You
must calibrate these for their fully open and fully closed positions.
Steering sensor connected mechanically to the steering shaft. You must calibrate this
for its centre and left/right positions.
LatG sensors calibrated on a level surface in race trim to set the zero position.
Damper sensors calibrated in the same way as for LatG sensors to set the zero position (neither up nor down). Up to four sensors can be calibrated if fitted.
© Stack Limited
80
ST542050-007 draft Stack DataPro User Guide
SENSOR CALIBRATION
To calibrate the sensors on your vehicle, connect to the vehicle and then select
TOOLS>DESIGNER. The DataPro Designer opens, as shown below.
Select the system and the display types you are using from their drop-down lists, and
choose an appropriate gateway type if you are using one. Click CONTINUE when ready.
© Stack Limited
81
ST542050-007 draft Stack DataPro User Guide
SENSOR CALIBRATION
To calibrate the sensors in use, select ACTIONS>CALIBRATE… from the menu bar.
The Calibrator dialog then allows you to
select the appropriate sensor to calibrate.
It should be necessary to calibrate the sensors only under the following conditions:
If you have installed part or all of the
recording system on the vehicle and
have not yet performed a sensor calibration.
If you have made any physical changes to sensors since you performed a calibration
previously.
If the vehicle setup has changed since you performed a calibration previously. For
example, you might have to re-calibrate the suspension sensors (if fitted) after you
have changed the loading significantly to meet a class weight penalty, or if you have
changed the springs.
If you have conducted a major overhaul of the vehicle.
To calibrate a sensor, select the relevant sensor parameter and click the Set Value… button. Click OK when you have completed all the calibrations to close the dialog.
© Stack Limited
82
ST542050-007 draft Stack DataPro User Guide
SENSOR CALIBRATION
THROTTLE AND BRAKE PEDAL CALIBRATION
The ‘Current Value’ listed in
the dialogue box is the value
being transmitted from the
sensor.
1. With the pedal released,
click the Set Zero button.
2. Fully depress the pedal and
click the Set Full button.
3. Click OK to return to the
Calibrator dialog. This action saves the new calibration setting. You may click Cancel instead to return to the Calibrator dialog without saving the new setting.
You can use the same procedure to calibrate the throttle and the brake pedal.
STEERING CALIBRATION
1. Turn the steering wheel
fully to the left and click
the Set Left button.
2. Turn the steering wheel
fully to the right and click
the Set Right button.
© Stack Limited
83
ST542050-007 draft Stack DataPro User Guide
SENSOR CALIBRATION
3. Click OK to return to the Calibrator dialog. This action saves the new calibration
setting. You may click Cancel instead to return to the Calibrator dialog without saving the new setting.
LATERAL G FORCE CALIBRATION
The lateral G force sensor should return a value of zero (0 G) when the vehicle is stationary on a level surface. If it does not, you should compensate for this and obtain a true reading by calibrating the value, using the current incorrect value as an offset:
1. With the vehicle stationary
and on a level surface, note
the reading given by the
lateral G force sensor.
2. If this is different from the
Lateral G Offset value,
click the Set button to use
the current value as the offset.
3. Click OK to return to the
Calibrator dialog. This action saves the new calibration setting. You may click Cancel instead to return to the Calibrator dialog without saving the new setting.
© Stack Limited
84
ST542050-007 draft Stack DataPro User Guide
SENSOR CALIBRATION
WHEEL CIRCUMFERENCE
The Wheel Circumference calibration dialog allows you to
supply the wheel circumference measurement for use in
DataPro’s calculations.
1. Type the value for wheel
circumference in the Current value field.
2. Click OK to return to the
Calibrator dialog. This
action saves the new calibration setting. You may click Cancel instead to return to the
Calibrator dialog without saving the new setting.
SUSPENSION POSITION SENSOR CALIBRATION
The suspension sensors will appear in the calibrator dialog only if they are present on the
vehicle and are connected to the system.
This calibration is to determine which suspension position will be assigned the zero value.
This could be with the suspension at full droop or, more typically, it could be with the vehicle stationary on a level surface with the driver and fuel on board.
The Current Value indicates the sensor travel, with the lowest position of the sensor represented by –50% and the highest position by +50%.
1. The current values are the values being transmitted from each of the suspension
movement sensors. With the vehicle stationary and level, to assign the current suspension positions a zero value click Set Zero.
© Stack Limited
85
ST542050-007 draft Stack DataPro User Guide
SENSOR CALIBRATION
2. In manual mode you may adjust the individual values to compensate for individual
differences between the sensors.
3. Click OK to return to the Calibrator dialog. This action saves the new calibration
setting. You may click Cancel instead to return to the Calibrator dialog without saving the new setting.
© Stack Limited
86
ST542050-007 draft Stack DataPro User Guide
RUN MANAGER – DATA MANAGEMENT TOOL
RUN MANAGER – DATA MANAGEMENT TOOL
Choose TOOLS>RUN MANAGER to access the Run Manager application.
Stack DataPro must be shut down before you can use Run Manager. Click Yes to
close Stack DataPro and start Run Manager, or click No to return to Stack DataPro
without starting Run Manager.
If the required data directory is not already open in the Run Manager, select FILE>OPEN
on the menu or click the Folder icon on the toolbar, then select the appropriate data directory.
© Stack Limited
85
ST542050-007 draft Stack DataPro User Guide
RUN MANAGER – DATA MANAGEMENT TOOL
Some typical tasks performed using the Run Manager application…
Run data has been downloaded into the wrong track.
To move a complete session from one track to another, use the left–hand pane (Track
and Session Tree): Drag the session and drop it onto the correct track.
Run data has been downloaded into the wrong session.
To move a single run or multiple runs from one session to another, use the right–hand
pane (Run List): Select the run with the mouse (hold the [Ctrl] or [Shift] key down to
select a number of runs) and drag the runs to the correct session in the left–hand pane
(Track and Session Tree).
Delete unwanted runs.
Select the run or runs in the right–hand pane and press the [Del] key.
Delete an unwanted session.
Select the required session in the left–hand pane and press the [Del] key.
Delete an unwanted track.
Select the required track in the left–hand pane and press the [Del] key.
Reorder runs after a move or delete.
To place runs in chronological order after a move or delete: Right-click the right–hand
pane and select REORDER RUNS from the context menu. Note—you may like to arrange for the reorder to be done automatically after a move or delete by checking the
appropriate boxes in the TOOLS>OPTIONS window. Reordering renumbers the runs
according to their download date and time, with Run 001 being the oldest.
© Stack Limited
86
ST542050-007 draft Stack DataPro User Guide
RUN MANAGER – DATA MANAGEMENT TOOL
Backup a session.
Keep data safe by backing it up to removable media or a network drive: Use the lefthand pane and right–click the required session. Select BACKUP from the context menu.
This feature uses PKWARE®’s compression utility (PKZIP®) to copy the data to the
selected media.
Run Manager provides a means of backing up the data directory’s setup files to a compressed file (dpsetup.zip). This feature complements the Backup Session feature described above so that, used together, it is possible to backup a complete data directory and
restore it to another location. The files that may be backed up include upload files (*.def),
setup files (*.vue), calculator files (*.cal) and the system file (st800.ini). It is also possible
to backup DataPro specific files including PIN code information and user-defined layouts.
Backing up a setup
Choose FILE>BACKUP>SETUP to display
the Backup Setup dialogue shown on the
right.
Select the option check boxes that you wish
to use during the backup operation.
Click on OK. to select a location for the
backup file (dpnsetup.zip). Once you have
set the receiving data directory, the backup
is created using PKWARE®’s compression
utility (PKZIP®).
© Stack Limited
87
ST542050-007 draft Stack DataPro User Guide
RUN MANAGER – DATA MANAGEMENT TOOL
Restoring a setup
Choose FILE>RESTORE>SETUP. Locate the
backup file (dpsetup.zip), following which
the dialogue shown on the right will be displayed.
Select the option check boxes that you wish
to use during the restore operation. Click
OK to restore the selected files.
Archive a session.
Keep data safe and free-up valuable disk
space: using the left-hand pane, right-click
the required session and select ARCHIVE
from the context menu. This feature will
compress and copy the data to the selected
location, then delete the original channel data. Once archived, the runs appear in red in
the right-hand pane; the session icon changes in the left-hand pane and no more move,
copy and delete operations may be carried out on this archived session.
Restore an archived session.
To restore a previously archived session: Use the left–hand pane and right–click the
archived session. Select RESTORE from the context menu. This feature will prompt
you for the archived media location, then unzip the archive, restoring the original channel data. Choosing FILE>RESTORE allows the archived session to be restored to a different data directory.
© Stack Limited
88
ST542050-007 draft Stack DataPro User Guide
RUN MANAGER – DATA MANAGEMENT TOOL
Edit Track or Run Notes.
Make sure editing is enabled: Choose TOOLS>OPTIONS… and then select the General
tab. Check the Enable notes editor box.
To edit track notes: Select the appropriate track in the left–hand pane and then use
the Editor window to change the track notes.
To edit run notes: Select the appropriate run in the right–hand pane and then use
the Editor window to change the run notes.
Create a Track.
Right–click the left–hand pane and select NEW TRACK from the context menu, then
enter the track name.
Create a Session.
Right–click a track in left–hand pane and select NEW SESSION from the context menu,
then either accept the default name or enter a new session name.
Copy Run(s) or Session
Use the same process as move, except you should hold the [Ctr]l key down while dragging.
Features
Run Manager cannot be run while the Data Pro application is running.
Run Manager starts up with the data directory last used by Data Pro.
Multiple data directory windows may be opened in Run Manager for copying data.
Most operations may be performed by using any of the following methods: the main
menu, toolbar icons, right-click context menus, keyboard shortcuts or drag and drop.
© Stack Limited
89
ST542050-007 draft Stack DataPro User Guide
RUN MANAGER – DATA MANAGEMENT TOOL
The delete operation always places the deleted item in the Recycle Bin.
Operations may be customised by setting options under the TOOLS menu.
Double-click on the run in the right-hand pane to display the header information of
the run (this will display the original location of the downloaded run).
© Stack Limited
90
ST542050-007 draft Stack DataPro User Guide
WHO TO CONTACT FOR HELP
WHO TO CONTACT FOR HELP
The contact details for Stack are:
UK and International
USA and North America
Stack Limited
Wedgwood Road
Bicester
Oxfordshire OX26 4UL
UK
Stack Inc
3545A Cove Creek Court
Cumming
Atlanta
Georgia GA 30040
USA
Tel: +44 (0)1869 240404
Fax: +44 (0)1869 245500
e-mail: [email protected]
e-mail: [email protected]
www.stackltd.com
Tel: (888) 867 5183
Fax: (888) 364 2609
e-mail: [email protected]
e-mail: [email protected]
www.stackinc.com
© Stack Limited
91
ST542050-007 draft Stack DataPro User Guide