1
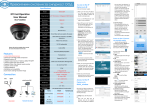
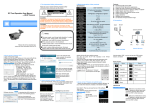
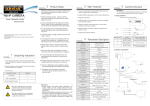
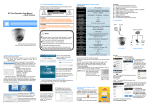
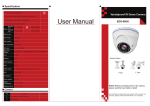
Specifications
IPC Fast Operation
User Manual
HD-IP CAMERA
Please refer to the complete User manual
for more information from the CD.
Model
IPC-DFW3100S
Image Sensor
1/4" Omnivision 1 Megapixel CMOS Sensor
Resolution
1280×720
Minimum Illumination
>1Lux
S/N Ratio
>50db
Focus Mode
Manual Focus
Day/Night
IR cut filter with auto switch, IR sensor.
Network
1 RJ45 Ethernet interface, 10/100M adaptation
Delay
Within The LAN 0.3S
Connection
RJ45
DC12V
switch/router/FOT
IPC
IPC-DFW3100S
PC
NVR
Network Structure
1. Use correct power supply.
2. Make sure the device IP address
is in the same LAN with the
router, the default IP address of
the IPC is 192.168.1.168.
3. Go to CD->IPCSearch.exe and
copy it to your computer.
4. Open IPC Search, click “Search”,
you will find the device IP, and
you also can modify the IP information, see the picture (1)
Frame Rate
25/30 FPS (adjustable)
Video Compression
H.264 /JPEG
Protocol
RTSP/FTP/DDNS/NTP/SMTP
POE
Yes(optional)
Onvif
Support Onvif 2.0(port:8999)
User Permission
Multi-user Classification Management
Power/Current
DC 12V/1A or POE
Consumption
3.0W
Lens
2 Megapixel HD
Board Lens 3.6mm/F2.0
IR Status
IR LED: ¢5X24PCS IR range: 20M
Dimension (mm)
¢94 x 69(H) mm
Weight (g)
450
Temperature
-20~55℃
Humidity
0%-90%RH,Without Condensation
Features
Δ Vandalproof IR Dome Camera
Δ Advanced H.264 High profile compression
Δ Support browsers: IE
Δ Support several servers, IP address, DDNS, FTP,SMTP
Δ Support single, dual, three streams
Δ Support iPhone, iPad, Android remote monitor
Δ Support connect to NVR
Δ Support ONVIF2.0
Δ Reliability and compatibility
Δ Low streams and high resolution image
Access to the IP Camera via IE
Name
Model
Number (pcs)
1.
HD-IP Camera
IPC-DFW3100S
1
2.
CD
IPC-DFW3100S
1
3.
IPC Fast Operation User
Manual
IPC-DFW3100S
1
2. View the images
After adding the devices, you
can see the devices in “Device
List” of the main interface, you
can double _click the device to
control it to play or stop.
5. Factory default IP setting:
IP Address : 192.168.1.168
Subnet Mask: 255.255.255.0
Gateway: 192.168.1.1
User name: admin
Password: admin
6. After modifying IP, click “Search”
again, you will find the new IP of
the your device. Double-click the
new IP, you can access to the IPC
via IE, or enter the IP Address in
the address bar of IE, then click
“Enter”, the download_OCX
controls interface please see the
picture (2), Please click here
(2)
(3)
to download the OCX
7. as is shown in picture (3), Click
run, the system will automatically
download the OCX.
(4)
8. Click “yes” as the picture (4),Then
it will install the OCX,when
complete ,Click ”OK” and refresh
the page. You will enter the login
interface, as is shown in picture
(5)
(5)
Access to the IP Camera via HSCMS
Go to CD, find “HerospeedCMS.exe.
“ Copy “HerospeedCMS.exe “ to
your computer and install it, then
run it. See the picture (6):
list:
See the picture (7):
Here you can manually add your
IP Cameras. Also can click
“Search device” to search your IP
Cameras in local area network.
(6)
1. Device
(7)
(8)
(9)
Access to the IP Camera
via Android mobile
Search and download the
surveillance software “Danale” to
your mobile from electronic markets or the Mobile Assistant, then
install it. Then you can see the icon
controls.
9. Enter your username and password, you can start to access and
control your IP Camera.
NO.
(1)
You can add different areas to
manage your device. Below the
area you can search all the
devices in LAN, then check the
IP info to add the camera.
See the picture (8):
You also can click “Manually
add” to enter the IP Info manually. See the picture (9):
Then you can view the images
and remote config the IP Camera, such as Alarm, Video, Net,
Camuser, Date, etc. Please refer
to Herospeed CMS Customer
Manual for detail.
of the software
,click it to
run.
1. Login
The picture (10) shows the login
interface:
2. List
As is shown in picture (11)
2.1 Add Camera
Click “add camera”, as is shown
in picture (12):
Edit the camera name, input the
username, password, you can
input the camera ID manually or
scan the QR code directly. Click
“finish” to finish and save it.
3. Video Mode
Click
Mode.
4.Settings
(10)
(11)
to set the Video
Click
to set the IPC.As is
shown in picture (13):
4.1 User name password management
Here you can edit the device
name, username and password.
4.2 NetWork Settings
Here you can set the local
network and WIFI according to
your need.
4.3 Basic information
Here you can view the basic
information of the IPC, including
device information, storage
information, etc.
(12)
(13)
4.4 Parameter settings
Here you can set some parameters of the IPC, including Video
quality, Time setting, Mail settings, Frequency setting, Chroma
Setting, and Visu Alangle Settings
4.5 Alarm settings
Here you can set alarms, including Motion Detect, Audio Alarm, I/
O Alarm, Privacy Covered alarm, Timing to capture, Timing to
record.
4.6 Init settings
Here you can Restore Factory Set and Restart the system of IPC.
4.7 Live View
When playing the video,
you can capture, record,
open/close the audio or
mic; If the IPC supports
PTZ, you can slide up,
down, left and right on
the screen. As shown in
figure (14).
5. Images View
4.3 NetWork Settings
Here you can set the local network and
WIFI according to your need.
4.4 Parameter settings
Here you can set some parameters of
the IPC, Including Video quality, Time
setting, Mail settings, Frequency setting,
Chroma Setting, and Visu Alangle
Settings
4.5 Alarm settings
Here you can set alarms, including
Motion Detect, Audio Alarm, I/O Alarm,
Privacy Covered alarm, Timing to
capture, Timing to record.
4.6 Init settings
Here you can Restore Factory Settings
and Restart the system of IPC.
(14)
5. Live View
(18)
When playing the video, you can
capture, record, open/close the audio or mic; If the IPC supports
PTZ, you can slide up, down, left and right on the screen. As is
shown in the following picture:
Click
“Images
View” to playback pictures.
6. Video View
Click
“Video View” to playback records.
7. About
Here you can view the information of the monitor software.
6. Images View
Access to the IP Camera via iPhone
7. Video View
Search and install the surveillance software “Danale” on line to your
mobile from App store. Then you can see the icon of the software
Click
Click
“Image” to playback pictures.
“Video” to playback records.
8. About
Here you can view the information of the monitor
software.
click it to run.
1. Login
Input username and password, click
“Login” in the login interface, you will
enter the “List” interface.
Access to the IP Camera via iPad
Search and download the surveillance software
“Danale HD” to your iPad from App store and install
2 List
As is shown in figure(15):
2.1 Add Camera
Click
to add camera, you will see
the picture on the right:
Edit the camera name, input the username, password, you can input the
camera SN manually or scan the QR
code directly.
(17)
it. Then you can see the icon of the software
,click it to run.
1. Login
Input username and password, click “Login” in the
4.1 User name password management
Here you can edit the device
name, username and password.
4.2 Basic information
Here you can view the basic
information of the IPC, including
device information, storage
information, etc.
4.3 NetWork Settings
Here you can set the local network and WIFI according to your
need.
4.4 Parameter settings
Here you can set some parameters of the IPC, including Video
quality, Time setting, Mail settings, Frequency setting, Chroma Setting, and Visu Alangle Settings
4.5 Alarm settings
Here you can set alarms, including Motion Detect, Audio Alarm, I/
O Alarm, Privacy Covered alarm, Timing to capture, Timing to
record.
4.6 Init settings
Here you can Restore Factory Settings and Restart the system of
IPC.
5. Live View
When playing the video, you
can capture, record, open/
close the audio or mic; If the
IPC supports PTZ, you can
slide up, down, left and right
on the screen. As is shown in
the right picture:
6. Images View
3. Why can not show the whole interface?
Close some options of IE.
Steps: Open IE, click ”View” and select “Toolbar”, close the
“Favorites bar”, ”Status bar” and “Command bar”.
Click
“Image” to playback pictures.
7. Video View
The Important Safety Information
Click
“Video” to playback records.
8. About
Here you can view the information of the monitor software.
Please be sure to read the following important safety information
before install and use the product.
6. I have already added the device, why it shows “Initial Failed!”?
Solution: Please delete the device and add it again.
CAUTION:
1.Why cannot capture?
If you capture failed and the storage folder cannot pop up automatically ,please check your IE, don’t select “Enable protected
mode”.
RISK OF ELECTRIC. DO NOT
OPEN
CAUTION:
TO REDUCE THE RISK OF ELECTRIC DO NOT REMOVE COVER OR
BACK NO USER SERVICEABLE PARTS INSIDE. REFER SERVICING TO
OUALIFIED SERVICE PERSONNEL.
CAUTION:
TO PREVENT ELECTRIC SHOCKS AND RISK OF FIRE HAZARDS, DO
NOT USE OTHER THAN SPECIFIED POWER SOURCE.
3. Video Mode
Click “VideoMode”on the top right to
set the mode of the video, Including
high definition, standard definition and
Automatically.
Click
to set the IPC. See the picture
(16) on the right:
4.1 User name password management
Here you can edit the device name,
username and password
(16)
4.2 Basic information
Here you can view the basic information of the IPC, including
5. Why does it show “Get Param Failed”?
1.Please check the IP information, such as port.
2.Please make sure the IP Camera connected correctly.
3.The network status is poor.
FAQ
(15)
4. Settings
4. Why cannot I watch the mobile surveillance video after entering
the login information?
A、Please check whether the settings page, server, port, user name,
password and other information are filled in correctly.
B、Please check your network to see whether your phone is connected to the external network .
C、If your device is connected to the external network via router,
please check whether the mobile port mapped in the routing .
(For mapping settings, please refer to the router manual).
D、Please check whether the IP address you have filled in is the LAN
IP (If your IP starts with the following format, it is a local area
network : 10.xx 、172.xx、192.xx. If you use such IP, you can
only be in the same LAN with the device to be connected).
E、Please check your port to ensure that it must be the mobile port.
Notes:
login interface, you will enter the “List” interface.
2. List
As is shown in figure on the right:
2.1 Add Camera
Click
to add camera, you will see the following picture:
Edit the camera name, input the username, password, you can
2.Why can not access the camera after update?
Clean browser cache.
Steps: open IE, click “Tools” and select “Internet Options”, then you
can see “Temporary Internet files” and click “Delete Files”, it will
prompt a dialog you need to check “Delete all offline content”
and click “OK”.
●The power supply must through safe attestation. Its output
voltage, current, voltage polarity and operating temperature
must match the camera’s requirement.
●When using the camera in the thunderbolt condition,please
note to mount Anti-thunder device or put off the power supply
plug and cable.
●In order to capture high quality pictures, the power supply’s
cable and video output cable should not be too long.