1
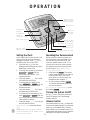
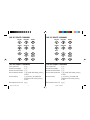
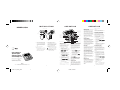
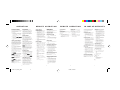
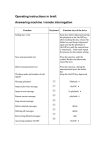
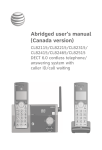
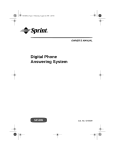
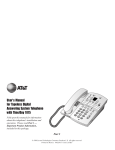
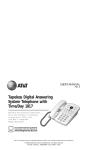
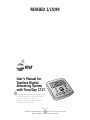
REVISED 1/15/99
1
User’s Manual for
Tapeless Digital
Answering System
with Time/Day 1717
Fold open this manual for information
about this product’s installation and
operation. Please read Part 1 –
Important Product Information,
included in this package.
Part 2
© 1998 Lucent Technologies Consumer Products L.P. All rights reserved.
Printed in Mexico. 848230009 Issue 3AT&T
INSTALLATION
TEL LINE
TEL SET
Strain
Relief Tab
Telephone
Set Cord
Modular
Telephone
Jack
Standard
Electrical
Outlet
Power Cord
1
Connect the telephone line cord.
Plug one end of the telephone line
cord into the jack labeled TEL LINE
on the back of the system. Plug the
other end into a modular telephone
jack.
2
Connect the telephone.
Telephone Line Cord
3
NOTE: If you do not want to connect a
telephone, skip to Step 3.
Connect the power cord.
Plug the power cord into the jack
labeled POWER and into an electrical
outlet not controlled by a wall switch.
Fit the power cord behind the strain
relief tab. The Message Window
flashes C to indicate that you need to
set the clock.
Use only the power cord supplied
with this product. If you need a
replacement, call 1 800 722–9125.
Input: 120V, 60 Hz.
Output: 9V AC, 400 mA.
Plug the telephone set cord from the
telephone into the jack labeled TEL
SET on the back of the system.
1
OPERATION
Displays number
of messages and
other information
Adjust volume
Set and hear
time/day
Delete all
or selected
messages
Use with other
buttons to
change/hear settings
Turn system on or off
Record and play
outgoing announcement /
Skip all or part of a message
Microphone
Play/Stop messages
Record a memo /
Repeat all or part of a message
PLAY Light indicates messages
Setting the Clock
Recording Your Announcement
You’ll need to set the clock so that it can
announce the day and time that each
message is received. Press P to
exit Setting the Clock at any time.
1 Press and hold C until the
Message Window displays C, and the
default day is announced.
2 To change the day setting, hold down
or
until the
correct day is announced. Then
release the button.
3 Press and release C. The current
hour setting is announced.
4 To change the hour setting, hold
down
or
until the
correct hour is announced. Then
release the button.
5 Press and release C. The current
minutes setting is announced.
6 To change the minutes setting, hold
down
or
until the
correct minutes setting is announced.
Then release the button.
7 Press and release C. The new day
and time are announced.
To check the clock, press and release
C.
Before using this answering system, you
should record the announcement (up to
one minute long) that callers will hear
when the system answers a call. If you
choose not to record an announcement,
the system answers with a prerecorded
announcement: “Hello. Please leave a
message after the tone.”
1 Press and hold
. The system
beeps. Speak toward the microphone
normally, from about nine inches
away. While you are recording, the
Message Window displays —.
.
2 To stop recording, release
The system automatically plays back
your announcement.
To review your announcement, press
and release
.
Turning the System On/Off
Use O to turn the system on and off.
When the system is off, the Message
Window is blank.
Volume Control
Use volume buttons (+ and -) to adjust the
volume of the system’s speaker. Press the top
button (+) to increase volume. Press the
bottom button (-) to decrease volume. The
system beeps three times when you reach the
maximum or minimum volume setting.
NOTE: In the event of a power failure,
see the instructions on the bottom of the
unit to reset the clock.
2
OPERATION
Press P to exit
— OR —
The system will time out after 30 seconds
and save any changes already made.
Answering Calls
When the system answers a call, the caller
hears the announcement you recorded,
followed by a beep. After the beep, the
system begins recording your caller’s
message. A caller can leave a message up
to three minutes long. If the message is
longer than three minutes, or if the caller
is silent for more than seven seconds, or if
the system runs out of memory, the
system beeps once and hangs up.
Callers can skip over your announcement
by pressing #.
Ring Select and Toll Saver
The Message Window displays the number
of messages that have been recorded. If
there are more than nine messages
recorded, the Message Window alternately
displays the two digits of the total number
of messages recorded. If the Message
Window displays F, then the memory is full
and you’ll need to delete messages before
new ones can be recorded.
Use Ring Select to choose how many times
the line will ring before the system
answers a call. Set for 2, 4 or Toll Saver.
When you set the system for Toll Saver, it
answers after four rings when you have no
new messages, and after two rings when
you have new messages.
1 Press and hold S for about two
seconds. The system announces the
current ring selection.
2 Press and release
or
until the system announces your ring
selection.
3 Press and release P to exit
— OR —
Press and release S to change the
Remote Access Code (follow Steps 2–5
under “Remote Access Code”).
PLAY Light
Remote Access Code
Message Window
The PLAY Light blinks when you have new
messages, and remains steady when you
have messages in memory that you’ve
already played. The PLAY Light is off
when there are no messages in memory.
You can use many features of this
answering system remotely from a touch
tone phone. Most features can be accessed
only after you enter a Remote Access Code,
which is preset to 123. You can review the
Remote Access Code by pressing and
releasing S.
You can change the Remote Access Code
to any three digit number from 100 to 999.
1 Press and hold S. After the Ring
Select setting is announced, continue
to press and release S until the
system announces the current Remote
Access Code.
2 Press and release
or
until the system announces the first
digit you want.
3 Press and release S to select the
announced digit.
4 Repeat Steps 2 and 3 for the second
and third digits of the code.
5 Press P to exit
— OR —
Press S to turn the Announcement
Monitor on or off (follow Steps 2 and
3 under “Announcement Monitor”).
Call Screening/Intercept
Set the system to answer calls, and set the
volume control so you can hear the caller’s
message. If you choose not to hear the
caller’s message, adjust the volume to the
lowest setting. The Message Window
displays 0.
If you decide to take the call, lift the
handset of any telephone on the same line.
The system stops recording and resets to
answer calls.
Feature Set Up
You can set up one feature at a time as
described below, or you can set up a feature,
and then move on to set up another feature.
After you change one feature, press and
release S until you hear the voice
prompt for the next feature you want to
change
— OR —
3
OPERATION
Announcement Monitor
Saving Messages
You can choose whether to hear the
announcement when your system answers
a call, or have it silent (off) on your end
(your caller will still hear an
announcement).
1 Press and hold S. After the Ring
Select setting is announced, continue
to press and release S until the
system announces “Monitor is on (or
off)”.
or
2 Press and release
until the system announces your
selection.
3 Press and release P or S
to exit.
The system automatically saves your
messages if you do not delete them. The
system can save about 12 minutes of
messages, including your announcement,
for a total of up to 59 messages. When
memory is full, you must delete some or
all messages before new messages can be
recorded.
Deleting Messages
Delete all messages — Hold down
D. The system announces “Messages
deleted” and permanently deletes
messages. The Message Window displays
0. If you haven’t listened to all of the
messages, the system beeps five times, and
does not delete messages.
Delete selected messages — Press and
release D while the message you
want to delete is being played. The system
beeps once, and continues with the next
message. If you want to check a message
before you delete it, you can press
to replay the message before
deleting it.
When the system reaches the end of the
last message, the messages not deleted are
renumbered, and the Message Window
displays the total number of messages
remaining in memory.
Listening to Your Messages
As the system plays back messages, the
Message Window displays the number of
the message playing. Before playing each
message, the system announces the day
and time the message was received. After
playing the last message, the system
announces “End of messages.”
Play all messages — Press and release
P. If you have no messages, the
system announces “No messages.”
Play new messages only — Hold down
P for about two seconds, until the
system begins playing. If you have no new
messages, the system announces “No new
messages.”
Repeat entire message — Press and
release
.
Repeat part of message — Hold down
for a few seconds, then release
it to resume playing. The system beeps
while the button is held down.
Repeat previous message — Press
twice, continue this process to
hear other previous messages.
Skip to next message — Press and
release
.
Skip part of a message — Hold down
for a few seconds, then release it
to resume playing. The system beeps
while the button is held down.
Stop message playback — Press and
release P.
Recording a Memo
You can record a memo to be stored as an
incoming message. The memo can be up
to three minutes long, and will be played
back with other messages.
1 Press and hold
. After the
beep, speak toward the microphone.
2 To stop recording, release
.
3 To play the memo, press P.
When Memory is Full
The system can record approximately
12 minutes of messages, including your
announcement, for a total of up to 59
messages. When memory is full, or 59
messages have been recorded, the
Message Window flashes F. Delete
messages to make room for new ones.
When memory is full, the system answers
calls after 10 rings, and sounds two beeps
instead of your announcement.
4
REMOTE OPERATION
Connect with the
Answering System
Deleting Messages
1
After you have listened to all messages and
heard the two beeps, press 3 3.
2
3
Delete All Messages
Dial your telephone number from a
touch tone phone with a different
telephone number.
When the system answers, enter your
three-digit Access Code during or
after the announcement. The system
announces the number of messages,
then beeps twice. If you don’t
hear the two beeps, wait for the
announcement to end or press # to
stop the announcement, then re-enter
the code.
The two-beep signal lets you know
the system is ready to accept a remote
command.
Delete Selected Messages
Press and release 3 while the message you
want to delete is playing.
Record Announcement
Press 7 *, and begin speaking after
the beep.
2 Press 5 when you are finished. The
system replays your new announcement.
To review your announcement — Press
1
7 1.
Record a Memo
Playing Messages
1
2
1
After the two beeps, wait four seconds,
and the system plays back messages
— OR —
Press and release 1 to play all messages
— OR —
Press and release 2 to play only new
messages. (If there are no new
messages, the system announces “No
new messages.”)
To repeat a message — Press and
release 4 while the message is
playing.
2
Press # and begin speaking after the
beep.
Press 5 when you are finished.
Room Monitor with Intercom
You can call the answering system and
listen to any activity in the room.
1 Press 9 8 to listen for 30 seconds.
2 If you wish, you can press 8 while the
monitor is active to speak to someone
in the room (up to 30 seconds).
3 Press 8 again during intercom
operation to return to listening only.
4 Press 5 at any time to exit Room
Monitor with Intercom.
To repeat part of a message —
Hold down 4. To resume playing,
release 4.
Ending the Remote Access Call
To skip a message — Press and
release 6 while the message is
playing.
Press * 9. The system announces
“The machine will now hang up,” and
disconnects the call.
To skip part of a message —
Hold down 6. To resume playing,
release 6.
Changing Remote Access Code
1
To stop message playback — Press
and release 5.
2
To save messages, hang up.
3
5
Press 9 9. The system announces
“Enter new code.”
Enter your new Remote Access Code
(any number between 100 and 999).
If a valid code is entered, the system
announces the new Remote Access
Code. If an invalid code is entered,
the system beeps five times rapidly,
then beeps twice. Repeat Steps 1
and 2.
REMOTE OPERATION
Turn System Off
Memory Full
Press 0 0.
The system answers after 10 rings, then
announces “Memory is full,” and beeps
twice, you must delete messages to make
room for new ones.
1 Enter the Remote Access Code after
two-beep signal.
2 Listen to messages, and delete some
or all of them.
3 Press 0 to make sure your system is
on before you hang up.
Turn System On
When the system is off, it answers after 10
rings, announces “The machine is off,” and
beeps twice.
1 Press 0 to turn the system on.
2 The system beeps twice and is ready
to answer calls and record messages.
If the system beeps five times, the
memory is full.
6
I N C A S E O F D I F F I C U LT Y
System Does Not Respond To Remote
Commands
If this answering system does not work
properly, try the following suggestions.
If you’re still having difficulty, call
1 800 722–9125.
•
Message Window Is Blank
•
•
Make sure the power cord is securely
connected to both the answering
system and an electrical outlet not
controlled by a wall switch.
Press O to make sure the system
is on.
•
Messages Are Incomplete
•
•
•
•
The system can accept messages up to
three minutes long. If a caller leaves a
very long message, part of it might be
lost when the system disconnects the
call after three minutes.
If the caller pauses for more than
seven seconds, the system stops
recording and disconnects the call.
If the system’s memory fills up during
a message, the system stops recording
and disconnects the call.
•
•
Power Failure Recovery
If the system is disconnected from AC
power it will not operate. Your
announcement and messages are retained
in memory during a power failure, but
you will need to reset the clock. See the
instruction label on the bottom of the unit.
System Does Not Answer After Correct
Number of Rings
•
•
•
Make sure you are calling from a
touch tone phone. When you dial a
number, you should hear tones. If you
hear clicks instead, the phone is not a
touch tone telephone.
The answering system may not detect
the Remote Access Code while your
announcement is playing. Try waiting
until the announcement is over before
entering the code.
There may be noise interference on
the phone line you are using. Press
dial buttons firmly.
Make sure you are entering your
Remote Access Code correctly.
You might be calling from a phone
that sends tones too short for your
answering system to detect.
If the Toll Saver feature is on, the
number of rings changes from four to
two when you have new messages
waiting.
In some cases, the system might be
affected by the ringing system used
by the local telephone company.
If the system’s memory is full or the
system is off, the system answers after
10 rings.
Message Window Displays
Clock needs to be reset.
Flashing – System is busy or in use
—OR—
Steady – System in Remote Access
mode.
Remote listening mode.
System Will Not Record Messages
Deleting (rotating).
When memory is full and the Message
Window displays F, saved messages must
be deleted before new messages can be
recorded.
Memory is full
—OR—
Announcement monitor is off
(shown during Setup).
Call 1 800 722–9125.
7
© 1998 Lucent Technologies Consumer Products L.P. All rights reserved.
Printed in Mexico. 848230033 Issue 2AT&T
© 1998 Lucent Technologies Consumer Products L.P. All rights reserved.
Printed in Mexico. 848230033 Issue 2AT&T
fold
○
fold
○
○
○
○
○
○
○
○
○
○
○
○
○
○
○
○
○
○
○
○
○
○
○
○
○
○
○
○
○
○
○
○
○
○
○
○
○
○
○
○
○
○
○
○
○
○
○
○
○
○
○
○
○
○
○
○
○
○
○
1
1
Tapeless Digital Answering System 1717
Tapeless Digital Answering System 1717
Remote Commands
Remote Commands
To connect with your answering system:
1 Dial your telephone number from a touch tone phone.
2 When the system answers, enter your Remote Access
Code. The system announces the number of messages
and beeps twice.
3 Wait four seconds for the system to play back all messages
— OR —
Enter a remote command from inside this card.
AT&T 1717 WC_2ATT
1
1/15/99, 11:29 AM
ONE KEY REMOTE COMMANDS
ONE KEY REMOTE COMMANDS
Play All
Play New
Delete
Play All
Play New
Delete
Repeat
Stop/Exit
Skip
Repeat
Stop/Exit
Skip
System
On
Record
Memo
Annc.
Annc.
System
On
Record
Memo
TWO KEY REMOTE COMMANDS
TWO KEY REMOTE COMMANDS
Turn system off
00
Turn system off
00
Delete all messages
33
Delete all messages
33
Review announcement 7 1
Review announcement 7 1
Record announcement
7 *, speak after beep, press 5
to stop
Record announcement
7 *, speak after beep, press 5
to stop
Room monitor
9 8, press 8 to speak with
someone in the room; press 5
to exit
Room monitor
9 8, press 8 to speak with
someone in the room; press 5
to exit
End remote access call
*9
End remote access call
*9
AT&T 1717 WC_2ATT
2
1/15/99, 11:29 AM
INSTALLATION
REVISED 1/15/99
TEL LINE
OPERATION
OPERATION
Displays number
of messages and
other information
Strain
Relief Tab
Adjust volume
Telephone
Set Cord
Modular
Telephone
Jack
Standard
Electrical
Outlet
Set and hear
time/day
Delete all
or selected
messages
Use with other
buttons to
change/hear settings
Turn system on or off
Power Cord
Record and play
outgoing announcement /
Skip all or part of a message
Telephone Line Cord
Microphone
1
2
1
Connect the telephone line cord.
Plug one end of the telephone line
cord into the jack labeled TEL LINE
on the back of the system. Plug the
other end into a modular telephone
jack.
3
Connect the telephone.
NOTE: If you do not want to connect a
telephone, skip to Step 3.
User’s Manual for
Tapeless Digital
Answering System
with Time/Day 1717
Fold open this manual for information
about this product’s installation and
operation. Please read Part 1 –
Important Product Information,
included in this package.
Play/Stop messages
Record a memo /
Repeat all or part of a message
PLAY Light indicates messages
Setting the Clock
Recording Your Announcement
You’ll need to set the clock so that it can
announce the day and time that each
message is received. Press P to
exit Setting the Clock at any time.
1 Press and hold C until the
Message Window displays C, and the
default day is announced.
2 To change the day setting, hold down
or
until the
correct day is announced. Then
release the button.
3 Press and release C. The current
hour setting is announced.
4 To change the hour setting, hold
down
or
until the
correct hour is announced. Then
release the button.
5 Press and release C. The current
minutes setting is announced.
6 To change the minutes setting, hold
down
or
until the
correct minutes setting is announced.
Then release the button.
7 Press and release C. The new day
and time are announced.
Before using this answering system, you
should record the announcement (up to
one minute long) that callers will hear
when the system answers a call. If you
choose not to record an announcement,
the system answers with a prerecorded
announcement: “Hello. Please leave a
message after the tone.”
1 Press and hold
. The system
beeps. Speak toward the microphone
normally, from about nine inches
away. While you are recording, the
Message Window displays —.
.
2 To stop recording, release
The system automatically plays back
your announcement.
To review your announcement, press
.
and release
Turning the System On/Off
Use O to turn the system on and off.
When the system is off, the Message
Window is blank.
Volume Control
Use volume buttons (+ and -) to adjust the
volume of the system’s speaker. Press the top
button (+) to increase volume. Press the
bottom button (-) to decrease volume. The
system beeps three times when you reach the
maximum or minimum volume setting.
To check the clock, press and release
C.
Part 2
NOTE: In the event of a power failure,
see the instructions on the bottom of the
unit to reset the clock.
© 1998 Lucent Technologies Consumer Products L.P. All rights reserved.
Printed in Mexico. 848230009 Issue 3AT&T
1
AT&T 1717 panels_3ATT
Connect the power cord.
Plug the power cord into the jack
labeled POWER and into an electrical
outlet not controlled by a wall switch.
Fit the power cord behind the strain
relief tab. The Message Window
flashes C to indicate that you need to
set the clock.
Use only the power cord supplied
with this product. If you need a
replacement, call 1 800 722–9125.
Input: 120V, 60 Hz.
Output: 9V AC, 400 mA.
Plug the telephone set cord from the
telephone into the jack labeled TEL
SET on the back of the system.
1
Press P to exit
— OR —
The system will time out after 30 seconds
and save any changes already made.
Answering Calls
TEL SET
2
1/15/99, 1:40 PM
When the system answers a call, the caller
hears the announcement you recorded,
followed by a beep. After the beep, the
system begins recording your caller’s
message. A caller can leave a message up
to three minutes long. If the message is
longer than three minutes, or if the caller
is silent for more than seven seconds, or if
the system runs out of memory, the
system beeps once and hangs up.
Callers can skip over your announcement
by pressing #.
Ring Select and Toll Saver
The Message Window displays the number
of messages that have been recorded. If
there are more than nine messages
recorded, the Message Window alternately
displays the two digits of the total number
of messages recorded. If the Message
Window displays F, then the memory is full
and you’ll need to delete messages before
new ones can be recorded.
Use Ring Select to choose how many times
the line will ring before the system
answers a call. Set for 2, 4 or Toll Saver.
When you set the system for Toll Saver, it
answers after four rings when you have no
new messages, and after two rings when
you have new messages.
1 Press and hold S for about two
seconds. The system announces the
current ring selection.
2 Press and release
or
until the system announces your ring
selection.
3 Press and release P to exit
— OR —
Press and release S to change the
Remote Access Code (follow Steps 2–5
under “Remote Access Code”).
PLAY Light
Remote Access Code
Message Window
The PLAY Light blinks when you have new
messages, and remains steady when you
have messages in memory that you’ve
already played. The PLAY Light is off
when there are no messages in memory.
You can use many features of this
answering system remotely from a touch
tone phone. Most features can be accessed
only after you enter a Remote Access Code,
which is preset to 123. You can review the
Remote Access Code by pressing and
releasing S.
You can change the Remote Access Code
to any three digit number from 100 to 999.
1 Press and hold S. After the Ring
Select setting is announced, continue
to press and release S until the
system announces the current Remote
Access Code.
or
2 Press and release
until the system announces the first
digit you want.
3 Press and release S to select the
announced digit.
4 Repeat Steps 2 and 3 for the second
and third digits of the code.
5 Press P to exit
— OR —
Press S to turn the Announcement
Monitor on or off (follow Steps 2 and
3 under “Announcement Monitor”).
Call Screening/Intercept
Set the system to answer calls, and set the
volume control so you can hear the caller’s
message. If you choose not to hear the
caller’s message, adjust the volume to the
lowest setting. The Message Window
displays 0.
If you decide to take the call, lift the
handset of any telephone on the same line.
The system stops recording and resets to
answer calls.
Feature Set Up
You can set up one feature at a time as
described below, or you can set up a feature,
and then move on to set up another feature.
After you change one feature, press and
release S until you hear the voice
prompt for the next feature you want to
change
— OR —
3
OPERATION
REMOTE OPERATION
Announcement Monitor
Saving Messages
You can choose whether to hear the
announcement when your system answers
a call, or have it silent (off) on your end
(your caller will still hear an
announcement).
1 Press and hold S. After the Ring
Select setting is announced, continue
to press and release S until the
system announces “Monitor is on (or
off)”.
2 Press and release
or
until the system announces your
selection.
3 Press and release P or S
to exit.
The system automatically saves your
messages if you do not delete them. The
system can save about 12 minutes of
messages, including your announcement,
for a total of up to 59 messages. When
memory is full, you must delete some or
all messages before new messages can be
recorded.
Listening to Your Messages
As the system plays back messages, the
Message Window displays the number of
the message playing. Before playing each
message, the system announces the day
and time the message was received. After
playing the last message, the system
announces “End of messages.”
Play all messages — Press and release
P. If you have no messages, the
system announces “No messages.”
Play new messages only — Hold down
P for about two seconds, until the
system begins playing. If you have no new
messages, the system announces “No new
messages.”
Repeat entire message — Press and
.
release
Repeat part of message — Hold down
for a few seconds, then release
it to resume playing. The system beeps
while the button is held down.
Repeat previous message — Press
twice, continue this process to
hear other previous messages.
Skip to next message — Press and
.
release
Skip part of a message — Hold down
for a few seconds, then release it
to resume playing. The system beeps
while the button is held down.
Stop message playback — Press and
release P.
Recording a Memo
You can record a memo to be stored as an
incoming message. The memo can be up
to three minutes long, and will be played
back with other messages.
. After the
1 Press and hold
beep, speak toward the microphone.
.
2 To stop recording, release
3 To play the memo, press P.
When Memory is Full
The system can record approximately
12 minutes of messages, including your
announcement, for a total of up to 59
messages. When memory is full, or 59
messages have been recorded, the
Message Window flashes F. Delete
messages to make room for new ones.
When memory is full, the system answers
calls after 10 rings, and sounds two beeps
instead of your announcement.
4
AT&T 1717 panels_3ATT
Connect with the
Answering System
Deleting Messages
Turn System Off
Memory Full
Delete All Messages
Press 0 0.
1
After you have listened to all messages and
heard the two beeps, press 3 3.
Turn System On
The system answers after 10 rings, then
announces “Memory is full,” and beeps
twice, you must delete messages to make
room for new ones.
1 Enter the Remote Access Code after
two-beep signal.
2 Listen to messages, and delete some
or all of them.
3 Press 0 to make sure your system is
on before you hang up.
2
Deleting Messages
Delete all messages — Hold down
D. The system announces “Messages
deleted” and permanently deletes
messages. The Message Window displays
0. If you haven’t listened to all of the
messages, the system beeps five times, and
does not delete messages.
Delete selected messages — Press and
release D while the message you
want to delete is being played. The system
beeps once, and continues with the next
message. If you want to check a message
before you delete it, you can press
to replay the message before
deleting it.
When the system reaches the end of the
last message, the messages not deleted are
renumbered, and the Message Window
displays the total number of messages
remaining in memory.
3
Dial your telephone number from a
touch tone phone with a different
telephone number.
When the system answers, enter your
three-digit Access Code during or
after the announcement. The system
announces the number of messages,
then beeps twice. If you don’t
hear the two beeps, wait for the
announcement to end or press # to
stop the announcement, then re-enter
the code.
The two-beep signal lets you know
the system is ready to accept a remote
command.
Delete Selected Messages
Press and release 3 while the message you
want to delete is playing.
Record Announcement
1
2
2
1
2
•
•
•
•
Press # and begin speaking after the
beep.
Press 5 when you are finished.
•
Room Monitor with Intercom
You can call the answering system and
listen to any activity in the room.
1 Press 9 8 to listen for 30 seconds.
2 If you wish, you can press 8 while the
monitor is active to speak to someone
in the room (up to 30 seconds).
3 Press 8 again during intercom
operation to return to listening only.
4 Press 5 at any time to exit Room
Monitor with Intercom.
To repeat part of a message —
Hold down 4. To resume playing,
release 4.
•
•
Ending the Remote Access Call
Press * 9. The system announces
“The machine will now hang up,” and
disconnects the call.
To skip part of a message —
Hold down 6. To resume playing,
release 6.
1
2
To save messages, hang up.
3
•
•
The system can accept messages up to
three minutes long. If a caller leaves a
very long message, part of it might be
lost when the system disconnects the
call after three minutes.
If the caller pauses for more than
seven seconds, the system stops
recording and disconnects the call.
If the system’s memory fills up during
a message, the system stops recording
and disconnects the call.
•
•
If the system is disconnected from AC
power it will not operate. Your
announcement and messages are retained
in memory during a power failure, but
you will need to reset the clock. See the
instruction label on the bottom of the unit.
If the Toll Saver feature is on, the
number of rings changes from four to
two when you have new messages
waiting.
In some cases, the system might be
affected by the ringing system used
by the local telephone company.
If the system’s memory is full or the
system is off, the system answers after
10 rings.
Message Window Displays
Clock needs to be reset.
Flashing – System is busy or in use
—OR—
Steady – System in Remote Access
mode.
Remote listening mode.
Deleting (rotating).
When memory is full and the Message
Window displays F , saved messages must
be deleted before new messages can be
recorded.
Press 9 9. The system announces
“Enter new code.”
Enter your new Remote Access Code
(any number between 100 and 999).
If a valid code is entered, the system
announces the new Remote Access
Code. If an invalid code is entered,
the system beeps five times rapidly,
then beeps twice. Repeat Steps 1
and 2.
Make sure you are calling from a
touch tone phone. When you dial a
number, you should hear tones. If you
hear clicks instead, the phone is not a
touch tone telephone.
The answering system may not detect
the Remote Access Code while your
announcement is playing. Try waiting
until the announcement is over before
entering the code.
There may be noise interference on
the phone line you are using. Press
dial buttons firmly.
Make sure you are entering your
Remote Access Code correctly.
You might be calling from a phone
that sends tones too short for your
answering system to detect.
Power Failure Recovery
System Will Not Record Messages
Changing Remote Access Code
To stop message playback — Press
and release 5.
Make sure the power cord is securely
connected to both the answering
system and an electrical outlet not
controlled by a wall switch.
Press O to make sure the system
is on.
System Does Not Answer After Correct
Number of Rings
•
To skip a message — Press and
release 6 while the message is
playing.
•
Message Window Is Blank
Messages Are Incomplete
Record a Memo
After the two beeps, wait four seconds,
and the system plays back messages
— OR —
Press and release 1 to play all messages
— OR —
Press and release 2 to play only new
messages. (If there are no new
messages, the system announces “No
new messages.”)
To repeat a message — Press and
release 4 while the message is
playing.
System Does Not Respond To Remote
Commands
If this answering system does not work
properly, try the following suggestions.
If you’re still having difficulty, call
1 800 722–9125.
7 1.
Playing Messages
1
Press 7 *, and begin speaking after
the beep.
Press 5 when you are finished. The
system replays your new announcement.
When the system is off, it answers after 10
rings, announces “The machine is off,” and
beeps twice.
1 Press 0 to turn the system on.
2 The system beeps twice and is ready
to answer calls and record messages.
If the system beeps five times, the
memory is full.
I N C A S E O F D I F F I C U LT Y
To review your announcement — Press
5
2
REMOTE OPERATION
Memory is full
—OR—
Announcement monitor is off
(shown during Setup).
Call 1 800 722–9125.
6
1/15/99, 1:40 PM
7
Limited One-Year Warranty
This product is warranted by RadioShack against manufacturing defects in material and
workmanship under normal use for one (1) year from the date of purchase from RadioShack company-owned stores and authorized RadioShack franchisees and dealers.
EXCEPT AS PROVIDED HEREIN, RadioShack MAKES NO EXPRESS WARRANTIES
AND ANY IMPLIED WARRANTIES, INCLUDING THOSE OF MERCHANTABILITY AND
FITNESS FOR A PARTICULAR PURPOSE, ARE LIMITED IN DURATION TO THE DURATION OF THE WRITTEN LIMITED WARRANTIES CONTAINED HEREIN. EXCEPT
AS PROVIDED HEREIN, RadioShack SHALL HAVE NO LIABILITY OR RESPONSIBILITY TO CUSTOMER OR ANY OTHER PERSON OR ENTITY WITH RESPECT TO ANY
LIABILITY, LOSS OR DAMAGE CAUSED DIRECTLY OR INDIRECTLY BY USE OR
PERFORMANCE OF THE PRODUCT OR ARISING OUT OF ANY BREACH OF THIS
WARRANTY, INCLUDING, BUT NOT LIMITED TO, ANY DAMAGES RESULTING FROM
INCONVENIENCE, LOSS OF TIME, DATA, PROPERTY, REVENUE, OR PROFIT OR
ANY INDIRECT, SPECIAL, INCIDENTAL, OR CONSEQUENTIAL DAMAGES, EVEN IF
RadioShack HAS BEEN ADVISED OF THE POSSIBILITY OF SUCH DAMAGES.
Some states do not allow the limitations on how long an implied warranty lasts or the exclusion of incidental or consequential damages, so the above limitations or exclusions
may not apply to you.
In the event of a product defect during the warranty period, take the product and the RadioShack sales receipt as proof of purchase date to any RadioShack store. RadioShack
will, at its option, unless otherwise provided by law: (a) correct the defect by product repair
without charge for parts and labor; (b) replace the product with one of the same or similar
design; or (c) refund the purchase price. All replaced parts and products, and products on
which a refund is made, become the property of RadioShack. New or reconditioned parts
and products may be used in the performance of warranty service. Repaired or replaced
parts and products are warranted for the remainder of the original warranty period. You
will be charged for repair or replacement of the product made after the expiration of the
warranty period.
This warranty does not cover: (a) damage or failure caused by or attributable to acts of
God, abuse, accident, misuse, improper or abnormal usage, failure to follow instructions,
improper installation or maintenance, alteration, lightning or other incidence of excess
voltage or current; (b) any repairs other than those provided by a RadioShack Authorized
Service Facility; (c) consumables such as fuses or batteries; (d) cosmetic damage; (e)
transportation, shipping or insurance costs; or (f) costs of product removal, installation,
set-up service adjustment or reinstallation.
This warranty gives you specific legal rights, and you may also have other rights which
vary from state to state.
RadioShack Customer Relations, Dept. W,
100 Throckmorton St., Suite 600, Fort Worth, TX 76102
We Service What We Sell
3/97