1
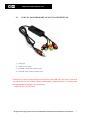
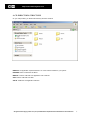
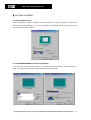
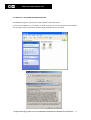
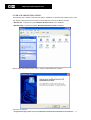
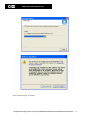
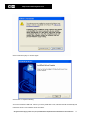
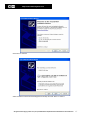
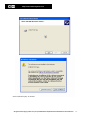
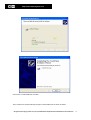
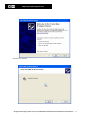
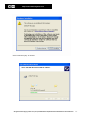
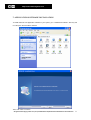
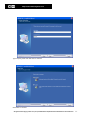
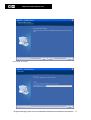
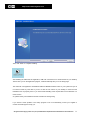
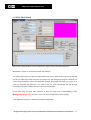
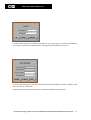
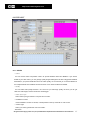
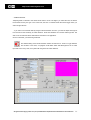
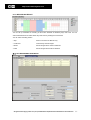
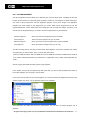
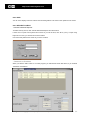
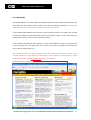
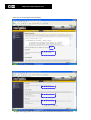
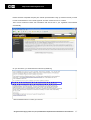
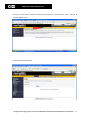
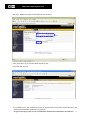
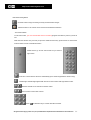
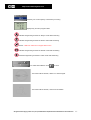
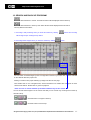
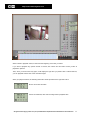
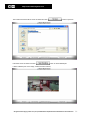
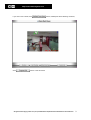
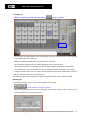
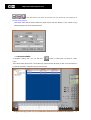
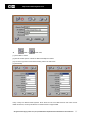
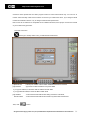
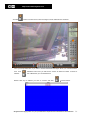
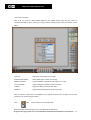
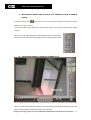
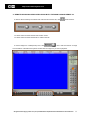
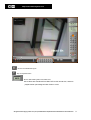
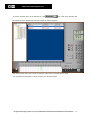
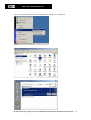
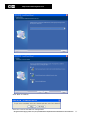
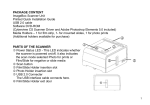
Digital Video Recording System APPLICATION SOFTWARE USER MANUAL TARGET MODEL: USB-CAP 100 Version 6 .1 .1 All information contained in this manual is subject to change COMART SYSTEM CO., LTD http://www.comartsystem.com http://www.comartsystem.com < IMPORTANT SAFETY INSTRUCTIONS > 1. Power Sources This product should be operated only from the type of power source (DC12V, 1.5A). If you are not sure of the type of power supply to your home, consult your product dealer or local power company. 2. Object and Liquid Entry Never push objects of any kind into this product through openings as they may touch dangerous voltage points or short-out parts that could result in a fire or electric shock. Never spill liquid of any kind on the product. 3. Water and Moisture Do not use this product near water – for example, near a bath tub, wash bowl, kitchen sink, or laundry tub; in a wet basement; or near a swimming pool and the like. 4. Cabinet Cover Do not remove the cabinet cover, or you may be exposed to dangerous voltage. Refer servicing to qualified service personnel only. 5. Caution If this product is shocked strongly, the product may not operate normally. In this case, consult your product dealer. All rights reserved. Copying in whole or in part is prohibited without expressed written authorization from the manufacturer 2 http://www.comartsystem.com CONTENTS 1. INTRODUCTION 4~5 2. USB-CAP 100 HARDWARE SPECIFICATION 6~7 3. PC SPECIFICATION REQUIRED 8 4. CD DIRECTORY STRUCTURE 9 5. GETTING STARTED 10~11 6. USB-CAP 100 INSTALLATION 12~20 7. APPLICATION SOFTWARE INSTALLATION 21~24 8. SETUP PROGRAM 25~37 9. MAIN PROGRAM 38~41 10. SEARCH AND BACKUP PROGRAM 42~53 11. REMOTE PROGRAM MODE 54~65 12. UNINSTALLATION & UPDATE NEW SOFTWARE 66~69 All rights reserved. Copying in whole or in part is prohibited without expressed written authorization from the manufacturer 3 http://www.comartsystem.com 1. INTRODUCTION Dear Customer, First of all, thank you for purchasing USB-CAP 100 and applications. Thank you for choosing USB-CAP 100 device as your DVR H/W solution in advance. We hope that our USB-CAP 100 device suits well for your target application software and bring you a big success in your business. If you find any software bugs, difficulties and problems, you can contact us directly for technical supports. We hope that you or your customers will enjoy using our products. We remain committed to bring you the newest and best technology in the world. If you have any comments or questions, we can be of assistance in any possible way, so don’t hesitate to contact us. Best Regards, Comart System Co., Ltd. All rights reserved. Copying in whole or in part is prohibited without expressed written authorization from the manufacturer 4 http://www.comartsystem.com - Model Description: USB-CAP 100 is a kind of USB based device that compresses videos in 30FPS (NTSC) or 25FPS (PAL) from one camera. - Model Application: USB-CAP 100 simply captures and compresses videos by itself as a USB stand-alone. It is a simple unit to record videos from one camera with MPEG4 and MJPEG video format. All rights reserved. Copying in whole or in part is prohibited without expressed written authorization from the manufacturer 5 http://www.comartsystem.com 2. USB-CAP 100 HARDWARE SPECIFICATION CLASSIFICATION USB-CAP 100 PHYSICAL FORM FACTOR 81 x 30 x 15 mm POWER CONSUMPTION 2W USB INTERFACE USB Rev 2.0 Video N INPUT 1ch. INPUT VOLTAGE 1V p.p. INPUT IMPEDANCE 75Ω FORMATS SUPPORTED 60Hz NTSC, 50Hz PAL CONNECT TYPE 1 Composite or 1 Super Video Input. CIF (DEFAULT) 352*240 4CIF 704*480 CIF (DEFAULT) 352*288 4CIF 704*576 T S Resolution C supported P A L Max. TOTAL DISPLAY FPS 30fps Max. TOTAL RECORDING FPS 30fps NUMBER OF AUDIO BUILT-IN ON BOARD 1CH INPUT / ICH OUTPUT(SOUND CARD) HARDWARE WATCHDOG NO VIDEO MOTION DETECTION BY SOFTWARE Best 1CH Comart USP-CAP 100 model for Compact application where fast monitoring & recording speed ( 30FPS : NTSC, 25FPS : PAL) are required for only one channel through USB port you can monitor and record one channel video in wherever installed CCTV camera and PC with this portable and small-sized USB-CAP 100. For video inputs, you need to select only one between Composite & Super Video inputs. USB-CAP 100 does not support DIO and TV out. All rights reserved. Copying in whole or in part is prohibited without expressed written authorization from the manufacturer 6 http://www.comartsystem.com 2-1. USB-CAP 100 HARDWARE LAYOUT & DESCRIPTION 1) USB port 2) Stereo Audio input 3) External Composite camera input 4) External Super Video camera input Please do not remove serial number at the bottom of the USB-CAP 100 device. Comart is not responsible for the products without serial number. (Warranty period: 15 months after the merchandise is shipped to the customers) -- USB-CAP 100 : U1-xxxx-xxxx All rights reserved. Copying in whole or in part is prohibited without expressed written authorization from the manufacturer 7 http://www.comartsystem.com 3. PC SPECIFICATION REQUIRED 3-1. PC MOTHERBOARD We recommend Intel chipset motherboard. I) VIA chipset : We found it works well in our test with some of VIA chipset motherboard. II) SIS chipset : We found it works well in our test with some of SIS chipset motherboard. * If you have a problem with any motherboards with Intel chipset, please contact us. 3-2. CPU We recommend Intel Pentium IV 1.7 or faster with our application to get maximum 30/25fps(NTSC, PAL). If you use slower CPU than Pentium IV 1.7, you will get less frame rate. 3-3. VGA We recommend ATI chipset built-on AGP VGA card. If you still want to try other chipset VGA card, you need to test and find one at your side. 3-4. RAM Minimum RAM required: 256MB 3-5. USB version Your system have to be installed USB device version 2.0.. 3-6. OPERATING SYSTEM AND OTHER REQUIRED SOFTWARE Operating System: Windows 2000 and XP. Required Software: DirectX 8.1 or Higher Version It is not compatible with Windows 98, 98SE, ME. 3-7. CD-ROM INSTALLATION ORDER When you install HDD (Hard Disk Drive) s and CD-ROM, make sure that you need to place CDROM drive as the last one. If this is not placed that way, you are not able to use HDDs after CDROM in our application. All rights reserved. Copying in whole or in part is prohibited without expressed written authorization from the manufacturer 8 http://www.comartsystem.com 4. CD DIRECTORY STRUCTURE On your CD provided, you will find this directory structure as below. DIRECTX: Our application requires DirectX8.1 or newer version installed on your system. DRIVERS: There is USB-CAP 100 Driver. MANUAL: There is USB-CAP 100 Application User’s manual. SDK: There is USB-CAP 100 SDK. SETUP: USB-CAP 100 Application software. All rights reserved. Copying in whole or in part is prohibited without expressed written authorization from the manufacturer 9 http://www.comartsystem.com 5. GETTING STARTED 5-1 MONITOR RESOLUTION All of our Application software is designed on Monitor Resolution at 1024 by 768 pixels. If your monitor does not support this resolution or is not set as it requires, our Application will not properly work on your system. Set your monitor as follows. 5-2 POWER MANAGERMENT & DISPLAY PROPERTIES If you select any of such the options above, our Application will conflict with the options selected. So, check out your system if there is any option selected and working as it sets. All rights reserved. Copying in whole or in part is prohibited without expressed written authorization from the manufacturer 10 http://www.comartsystem.com 5-3 DIRECTX 8.1 OR NEWER VERSION INSTALLED Our Application program is required your system DirectX8.1 software installed. If you have not installed it on your system yet, install it from the CD we provide with the board together. You can easily run the program and it will automatically install DirectX on your system. All rights reserved. Copying in whole or in part is prohibited without expressed written authorization from the manufacturer 11 http://www.comartsystem.com 6. USB-CAP 100 INSTALLATION This following step is based on Windows XP system. Installation on Windows 2000 system has the same step. But the required service pack version to install USB-CAP 100 driver is different as below. < Windows XP : required your system 'Windows XP Service Pack 1 or 2’ installed > < Windows 2000 : required your system ‘‘Windows 2000 Service Pack 4’ installed > Browse folder name called “Drivers” and run “Setup” to install USB-CAP 100 driver. Click “Next” to continue. All rights reserved. Copying in whole or in part is prohibited without expressed written authorization from the manufacturer 12 http://www.comartsystem.com Click “Continue Anyway” to continue. All rights reserved. Copying in whole or in part is prohibited without expressed written authorization from the manufacturer 13 http://www.comartsystem.com Click “Continue Anyway” to continue again. Click ‘Finish’ to complete installing. And connect between USB-CAP 100 and your PC by USB cable. Then, Windows XP will automatically find USB-CAP 100 as a new hardware device as follows. All rights reserved. Copying in whole or in part is prohibited without expressed written authorization from the manufacturer 14 http://www.comartsystem.com Click “Next” to continue. Select “Install the software automatically(Recommended)” and click “Next” to continue. All rights reserved. Copying in whole or in part is prohibited without expressed written authorization from the manufacturer 15 http://www.comartsystem.com Click “Continue Anyway” to continue. All rights reserved. Copying in whole or in part is prohibited without expressed written authorization from the manufacturer 16 http://www.comartsystem.com Click ‘Finish’ to install USB-CAP 100 Video. Then, Windows XP will automatically find again to install USB-CAP 100 Audio as follows. All rights reserved. Copying in whole or in part is prohibited without expressed written authorization from the manufacturer 17 http://www.comartsystem.com Click “Next” to continue. All rights reserved. Copying in whole or in part is prohibited without expressed written authorization from the manufacturer 18 http://www.comartsystem.com Click “Continue Anyway” to continue. All rights reserved. Copying in whole or in part is prohibited without expressed written authorization from the manufacturer 19 http://www.comartsystem.com Click ‘Finish’ to complete installing USB-CAP 100 Audio. Please check this part on the ‘Device Manager’ of the system properties to check if all the drivers are installed properly. Then you can see two drivers as below in Device Manager. You need to reboot system after installing. All rights reserved. Copying in whole or in part is prohibited without expressed written authorization from the manufacturer 20 http://www.comartsystem.com 7. APPLICATION SOFTWARE INSTALLATION To install USB-CAP 100 Application software on your system, go to “USBCAP100 INSTALL” directory and run ‘setup.exe’ file to install the software. Then, Click ‘Next’ to continue. All rights reserved. Copying in whole or in part is prohibited without expressed written authorization from the manufacturer 21 http://www.comartsystem.com Type company name and click ‘Next’ to continue Click ‘Next’ to continue. All rights reserved. Copying in whole or in part is prohibited without expressed written authorization from the manufacturer 22 http://www.comartsystem.com Click “Install” to continue. All rights reserved. Copying in whole or in part is prohibited without expressed written authorization from the manufacturer 23 http://www.comartsystem.com Then, click ‘Finish’ to complete installing. After installing the USB-CAP 100 Application, USB-CAP 100 shortcut icon will be showed on your desktop. The first time you run the Application program, it will automatically take you to the Setup page. The USB-CAP 100 Application will install M-JPEG and MPEG4 software codec on your system and you do not need to install any other files. If you do not see the icon above on your desktop, it means that the installation was not properly done or you have missed installing some required files such as DirectX8.1 or newer version. So, please check your installation with this manual from the beginning. If you have the same problem or the Setup program is not run automatically, contact your supplier or Comart technical support to help you. All rights reserved. Copying in whole or in part is prohibited without expressed written authorization from the manufacturer 24 http://www.comartsystem.com 8. SETUP PROGRAM The first time running the short cut icon in the previous page, you’ll see this Setup page above. IMPORTANT- “super” is the default username and password. You need to select options you wish and create image boxes. Prior to monitor main screen for the first time, you have to make image boxes more than one image box in File Management Program. Otherwise you cannot change password or run the main application program. The program will continue to prompt you to enter your username and password. If you need to stop this, press ‘Ctrl+Alt+Del’ and stop the task because the setup page will keep asking you username and password. In this Setup page you must make selections at least two things such as Recording & File Management(Page 31.); otherwise, it cannot run the main application program properly. !) This application supports 127 different usernames and passwords. All rights reserved. Copying in whole or in part is prohibited without expressed written authorization from the manufacturer 25 http://www.comartsystem.com In order to add or change your username and password, you need to type your username and password you’re using currently, and click Change button. Then this popup window below will come out. On this Set Password window, you need to type new username and password you want to change or add. Then click Change or Add button. Available usernames and passwords are up to 127 different usernames and passwords. All rights reserved. Copying in whole or in part is prohibited without expressed written authorization from the manufacturer 26 http://www.comartsystem.com 8-1 DEFAULT 8-1-1. VIDEO - Codec You can choose Video Compression Codec we provide between MJPG and MPEG4. If you choose MJPG as your video codec, you can get high quality images although the file size is bigger than MPEG4. Meanwhile, if you prefer smaller file size to the Video quality, we recommend you to choose MPEG4 as the compressed file size of MPEG4 is minimum three or four times smaller than MJPEG. - Quality You can select video quality between 1~30. The more you select high quality, the more you can get clear and vivid images, however its file size will be bigger. - Video Input Type Select video input type between ‘Composit’ and ‘S-Video’. - Installation Location Insert Installation Location of camera, it will be placed on the top of the left on main screen. - Camera Type Select your video type between ‘PAL’ and ‘NTSC’. - Resolution All rights reserved. Copying in whole or in part is prohibited without expressed written authorization from the manufacturer 27 http://www.comartsystem.com In our Application program, we support resolutions such as Low (352*240), High (704*480), - Display/Record FPS Select display / recording frame up to 30 for Main screen. ** Display FPS which you select is same as recording FPS. 8-1-2. PTZ If you have pan/tilt devices you want to control, click ‘Enable PTZ’ and choose the right protocol and the port you want to use among those we support. If you have any Pan/Tilt brand you wish to use, we can implement the brand into our Application software but need you to send us a sample PTZ and its protocol. 8-1-3. MOTION DETECTION You can insert motion detection zones (up to 16 zones) by clicking on the “Insert Zone” box and drawing in boxed zones. Then, click “Test”. It will display motion signs if there is any motion detected. By clicking “Insert Entire Zone”, you will select the whole box automatically. - ENABLE NIGHT MOTION During night times, it depends on camera quality but they usually take a lot of video noises. So, although you set up a right value for day times for Motion Detection, this video channel may keep recording videos all night long. To avoid this problem, you click Enable Night Motion. Then, you can set times and different value for night times. -M/D Beep To select M/D Beep, just click the box. It will automatically make some sound through pc speaker when motion detection is triggered 8-1-4. AUDIO - Select Audio Device You can select one of audio input device ‘USB-CAP100’ or ‘sound card’. It provides 1 channel Audio recording. USB-CAP: Audio through USB-CAP 100, Sound Card: Audio through PC sound card or AC97 on the motherboard - Enable Audio Click “Enable Audio” to use and set “Recording Schedule” to record audio data. - Recording Time Set record time since detected the audio. All rights reserved. Copying in whole or in part is prohibited without expressed written authorization from the manufacturer 28 http://www.comartsystem.com - SAMPLING RATE ‘Sampling Rate’ is referred to the Audio sound level to record. The higher you select the rate, the clearer the recorded sound you’ll get. In the mean time, the size of recorded Audio file will be bigger when you select a higher bit rate. - If you want to record Audio data by using this Audio Detection Function, you need to adjust the height of two red lines for the sensitivity of Audio detection. Audio data between two red lines will be ignored. The data out of two red lines will be detected and recorded in our application. Once it is detected, you will see signs like left. The default setting of this Audio Detection window is referred to 0. There is no gap between two red lines. In this case, our program could detect Audio data although there is no Audio input with some noisy. Then, the system will recognize it as Audio detected. All rights reserved. Copying in whole or in part is prohibited without expressed written authorization from the manufacturer 29 http://www.comartsystem.com 8-1-5. RECORD SCHEDULE You can set up schedules for recording in this mode. Schedule is divided by days and hours. You can select individual blocks or select all the days and hours by clicking the corner blank. You can select recording modes: * Stop Does not record at all. Monitor only. * Continuous Continuously records images * Motion Record images when motion is detected * Audio Record images when Audio is detected 8-2. FILE MANAGEMENT & NETWORK All rights reserved. Copying in whole or in part is prohibited without expressed written authorization from the manufacturer 30 http://www.comartsystem.com 8-2-1. FILE MANAGEMENT The file management function allows you to efficiently use your hard drive space. It displays the size and location of hard drives in use and free space remaining. The size of one image-box is about 100M bytes. You need to setup image-boxes that the application program uses to store images. The application program only saves images in the image-boxes you create. When all the image-boxes are full, the program deletes the one the oldest video of the image-box and can write new images. Therefore, if you want to save old image data longer, you need to add more image-boxes on your hard drive. Present Image-box : shows you how many image-boxes you have made. Max Image-box : shows how many image-boxes you can make. Remain Image-box : shows you how many more image-boxes you have available. Add Image-box : shows the number of image-boxes you can add. To add more image-boxes, click the box that is below ‘Add Imagebox’. Scroll down and select the number of image-boxes you wish to make. Then, you must click ‘Start’ button. When you install hard drives with a CD-ROM drive, the CD-ROM drive should be installed as the last drive. If you install a CD-ROM drive before any hard drives, our application can not really check HDDs after CDROM. We are using a special data recording system using Imagebox. In this system, until you fill one image-box up with video data, you are not able to playback the videos in the current imagebox you are using to record videos. If you have must-see videos in the current imagebox, you need to exit the main application first and run the Search program only. Then, you can playback videos in any imagebox. Click start button and follow the route as it shows above. You can ‘Run’ our Search program only to playback. All rights reserved. Copying in whole or in part is prohibited without expressed written authorization from the manufacturer 31 http://www.comartsystem.com 8-2-2. OSD You can set to display ‘Camera Location’ and ‘Recording Status’ to be seen on the upside of main screen. 8-2-3. SECURITY CHECK - Activate Password Request To select Security Check, click ‘Activate Password Request’ and set the time. If there are no inputs from keyboard and mouse as you set the time, then when you try to input using keyboard or mouse, you will see the screen as below User name and password are same as you set at ‘LOG IN’ - Password on Shutdown When you click the ‘EXIT’ button on our main program, you will see this screen also above, if you checked ‘Password on Shutdown’. All rights reserved. Copying in whole or in part is prohibited without expressed written authorization from the manufacturer 32 http://www.comartsystem.com 8-2-4. NETWORK Click ‘Enable Network’ if you wish to allow remote client systems to monitor, search recorded images in the main system and save images in client systems. LAN, ISDN, and PSTN are supported. Note that If the “Enable Network” box is not checked, no remote client access will be allowed. If you checked ‘Enable Network’ and “LAN” but you have no Ethernet cards on your system, then it comes up saying that ‘Address in the specified family cannot be used with this socket’. It does not shut down your system but just warns you that you have no Ethernet card on it. If you checked ‘Enable Network’ and “PSTN” but you have no PSTN (Modem) cards on your system, then it comes up saying that ‘The comport open error’. It does not shut down your system but just warns you that you have no PSTN modem on it. Click “Enable this function” on Dynamic DNS section to allow remote client systems to monitor, search recorded images in the main system and save images in client systems by Dynamic DNS. To get the Domain name, please visit to www.dyndns.org and sign up as follows; Click “sign up now” to continue All rights reserved. Copying in whole or in part is prohibited without expressed written authorization from the manufacturer 33 http://www.comartsystem.com Then, sign up window will be shown as follows; All rights reserved. Copying in whole or in part is prohibited without expressed written authorization from the manufacturer 34 http://www.comartsystem.com Please check the acceptable Use policy box and Fill up all the blacks to sign up. Please note that you need to insert e-mail address in use to obtain approval. And click “Create Account” to continue. Then Account created as below and confirmation mail will be sent to your registered E-mail address automatically. On your E-mail box, you will find below E-mail from DynDNS.Org. Click the address above to confirm your account. All rights reserved. Copying in whole or in part is prohibited without expressed written authorization from the manufacturer 35 http://www.comartsystem.com Then your account will be confirmed as below and click “Service” to add host name. Click “ Add host” at Dynamic DNS of menu. Insert Username and password. All rights reserved. Copying in whole or in part is prohibited without expressed written authorization from the manufacturer 36 http://www.comartsystem.com After log in, DDNS host register window will be shown as follows: Insert “Host name” as you want and select Domain by click. Click “Add Host” to finish. To use DDNS service, click “Enable this function” on Dynamic DNS section and insert domain name, user name and password which registered on Dyndns site. All rights reserved. Copying in whole or in part is prohibited without expressed written authorization from the manufacturer 37 http://www.comartsystem.com 9. MAIN PROGRAM When you are done setting in the setup screen, click ‘EXIT’ button. The screen will change to the main application program as above. Changing Mode Button Click to go to the ‘Setup’ screen Click to go to the ‘Search’ screen Click to go to the ‘Backup’ screen Click to go to the ‘Backup viewer’ screen All rights reserved. Copying in whole or in part is prohibited without expressed written authorization from the manufacturer 38 http://www.comartsystem.com Manual Recording Button Click this button to begin recording currently monitored video images Click this button to see current IP and connected IP address information. - PTZ Control Button To use this function, you must click ‘Enable PTZ’ in the Setup program and select a protocol you like to use. Note that some buttons may not work per protocol model because every protocol does not have all the functions listed on PTZ Control Button below. Double click to go to PTZ control mode as you see this right screen. Auto Pan: The Pan device will move automatically (some model supported this function only) Camera light: Enables night lighted flash function for PTZ camera with night flash function. Near/far: Pan/Tilt focus controls for near/far videos Zoom In/Out: Zoom In/Out controls Power and Direction Keys: Controls Pan/Tilt movement All rights reserved. Copying in whole or in part is prohibited without expressed written authorization from the manufacturer 39 http://www.comartsystem.com Indicates your current capacity of hard disk you’re using. Displays day, time and program status Indicates images being recorded in ‘Always’ mode while monitoring Indicates images being recorded in ‘Motion’ mode while monitoring Sensor : USB-CAP 100 does not support this function. Indicates images being recorded in ‘Manual’ mode while monitoring Indicates images being recorded in ‘Audio’ mode while monitoring Live audio volume Button: Click to mute. This screen will be showed, if there is no camera signal. This screen will be showed, if camera set as disable. All rights reserved. Copying in whole or in part is prohibited without expressed written authorization from the manufacturer 40 http://www.comartsystem.com - Exit Button: Click to exit. - Minimize: Click to minimize the program. - Color Setup If you click right mouse button, you will see above screen. You can adjust Brightness, Hue, Contrast, Saturation and Sharpness respectively as you like. ** support [Default] setting, if you do not want to set particularly. - TV OUTPUT USB-CAP 100 device does not support TV OUT. Please connect TV output through VGA card, if you need it. All rights reserved. Copying in whole or in part is prohibited without expressed written authorization from the manufacturer 41 http://www.comartsystem.com 10. SEARCH AND BACK UP PROGRAM Click this button to search. Then below window will be displayed same as back up. Click this button to back up. Then below window will be displayed same as search. The only difference as follows; 1. Recording is still processing when you enter this window by clicking button. But recording will be stopped upon clicking back up button. 2. Recording will be stopped when you enter this window by clicking button. You can search recorded images by Date. If image data is saved on your hard drive, it will be indicated on the calendar with blue-purple color. Clicking on a date in blue-purple will bring up Image boxe lists as next page. Then double click on one of imagebox lists, will be showed the hour blocks with color green for each camera at the bottom. Double click on green for playback. **Note: You can do search and back up the data simultaneously on this section. You can choose either image box or AVI format. Note that you can choose only one image box to back up with AVI backup. Click this button to Image box back up Click this button to AVI back up. All rights reserved. Copying in whole or in part is prohibited without expressed written authorization from the manufacturer 42 http://www.comartsystem.com The sign, o/x, shows whether Audio is recorded or not. Above data shows that Audio channel1 was recorded but else were not. The hour blocks with color green for each camera at the bottom will indicate that there are recorded videos between that time. Double click on green, then it starts playback as shown next page. All rights reserved. Copying in whole or in part is prohibited without expressed written authorization from the manufacturer 43 http://www.comartsystem.com When it starts to playback videos, it starts from the beginning of the time you select. If you want to playback any specific minute or second, click ‘Pause’ first and select a time you like to playback in pink bar. Then, when you click ‘Pause’ key again, it will display the right time you picked. With a vertical side bar, you can playback if those have some recorded images. When you playback videos, the following information will be provided on the right side of GUI. Shows current time and date. Shows recorded time, date and recording status of playback data All rights reserved. Copying in whole or in part is prohibited without expressed written authorization from the manufacturer 44 http://www.comartsystem.com Indicates recorded images were recorded in ‘Audio’ mode Indicates recorded images were recorded in ‘Motion’ mode ‘Sensor’ mode : USB-CAP 100 does not support this function. Indicates recorded images were recorded in ‘Always’ mode Indicates recorded images were recorded ‘Manually’ Resets recorded image to default Sharpens recorded video image Softens recorded video image Adjust contrast Adjust Brightness Zoom in up to six times 1 X default display size Zoom out up to six times Go back to previous mode Saving button. Note: you must pause playback before you click this button. Shows previous or the next frame All rights reserved. Copying in whole or in part is prohibited without expressed written authorization from the manufacturer 45 http://www.comartsystem.com Rewind the video data to the beginning or the end Play and reverse play button. You can use reverse play button only when it’s one full screen mode. Note that in case you want to hear recorded Audio data, the split screen mode should be one screen mode and Play Speed should be set on 0. Also, you cannot apply it when you’re using Reverse Playback. One-video display Indicates that you want to playback videos with audios Indicates that you want to playback videos only Indicates that you want to playback audios only Print the video image, Note: you must stop playback or pause. Watermark: Watermark function prevents you from being cheated on falsified image data. In order to use this function, you need to click pause button first during playback since it works for only still image before saving in BMP format.(Refer to page 50. for more details) Then, click the Watermark button. And when you apply this function, the image you apply will be turned out to prove it’s the original. At first, you will see the Watermark on the left of upside which means you have applied this function. If someone has falsified the image you applied, falsified zones will be changed into white color so that you can distinguish it’s been falsified. To use these functions shown above, you need to click ‘Pause’ button first. Playback Speed control Exit All rights reserved. Copying in whole or in part is prohibited without expressed written authorization from the manufacturer 46 http://www.comartsystem.com 11-1. Event Search The following buttons are indicated as event search buttons. To use this event search function, you must select one of event search button only after clicking on one of imagebox lists. Then it will show recorded information with green block at the bottom. This function buttons do not work during playback so, if you want to use this event search button, you have to back to the imagebox list screen. Search by all events Search by Continuous recording Sensor detection recording : USB-CAP 100 does not support this function. Search by Motion detection recording Search by Audio detection recording Search by Manual Recording All rights reserved. Copying in whole or in part is prohibited without expressed written authorization from the manufacturer 47 http://www.comartsystem.com 11-2. Saving in BMP format When you want to save a still video image in BMP format to other drives, you need to click ‘Pause’ button first during playback and then click ‘Saving Button’. Then, It creates an automatic file name with the date and the recorded time. According to the same method, you can print a video as well. Our Application is designed to keep recording although you are in this search mode. However, when you go to Setup and Backup mode, the main DVR Application will not be working. 11-3. Print All rights reserved. Copying in whole or in part is prohibited without expressed written authorization from the manufacturer 48 http://www.comartsystem.com 11-4. Watermark This watermark function is to check whether still image recorded is falsified by someone or not. Then you can verify this still image through watermark viewer whether it is falsified or not. Click watermark button. Note that you must activate it after pressing Pause button since it works for only still image before saving in BMP format. Then check “ Insert Water mark” and “ Insert Date”. Click button to save image and click button to close the window. If you want to check the image whether it is falsified or not, click “Start” button and choose “Watermark Viewer” as follows; All rights reserved. Copying in whole or in part is prohibited without expressed written authorization from the manufacturer 49 http://www.comartsystem.com Then watermark viewer will be shown as follows and click File will be shown as follows and click button to open file. button to check falsified part. If there is falsified part on the image, it will be boxed as follows; All rights reserved. Copying in whole or in part is prohibited without expressed written authorization from the manufacturer 50 http://www.comartsystem.com If you wish to see in detail, click Click button, falsified part will be flickering as follows; button to exit this viewer. All rights reserved. Copying in whole or in part is prohibited without expressed written authorization from the manufacturer 51 http://www.comartsystem.com 11-5. Back up **Note:You can back up after search by clicking button as follows; You can search recorded images by Date. If image data is saved on your hard drive, it will be indicated on the calendar with blue-purple color. Clicking on a date blue-purple will bring up Image boxes for the date. Then it will show Imagebox lists then select imagebox(es) as you want to backup. Then click backup button one of Backup type between IMG(Imagebox) and AVI(AVI format) backup. You can select more than one imagebox but, only one imagebox selection is possible for AVI backup. To backup recorded video data, we support physical hard drives (Should be installed Nero version for CD-RW, DVR-RW backup ) and AVI format backup. Our backup program will copy image boxes selected to target Drive after creating a directory ‘Back’. Backup type In our back up program, you can choose either image box or AVI format. Click this button to Image box back up Then below widow will be showed. Select the target drive and click ‘Backup’. Then, it starts to copy selected image-boxes to the Destination Drive. All rights reserved. Copying in whole or in part is prohibited without expressed written authorization from the manufacturer 52 http://www.comartsystem.com Click this button to AVI back up. Note that you can choose only one image box to back up for AVI backup. Then below widow will be showed. Select the target camera and click ‘Backup’. Then, it starts to copy selected image-boxes to the Destination Drive. 11-6. BACKUP VIEWER To playback backup data, you can click this button or select back up viewer on “Start” menu. Then “Back” folder will be shown, choose directory and double click file what you wish to see and click box in green at the bottom of program same as search mode. All rights reserved. Copying in whole or in part is prohibited without expressed written authorization from the manufacturer 53 http://www.comartsystem.com 11. REMOTE PROGRAM MODE Our remote program includes some functions such as monitoring videos and control PTZ cameras from a remote site(s), saving videos transmitted from Main DVR and playback in a remote site(PC), and playback recorded videos of the main DVR at Remote PC. Before install our Remote program, check if you have clicked ‘Enable Network’ in the Setup mode of your main DVR system and selected the right Network type. ‘Enable Network’ should be checked to work between Main and Remote program. Then, check there is a server sign on the bottom of your main screen when you press a windows key of your keyboard. Once you install our Main Application, our Server program will be installed in your pc automatically, so you don’t need to install Server program additionally. You just need to check ‘Enable Network’ and select the right Network type. All rights reserved. Copying in whole or in part is prohibited without expressed written authorization from the manufacturer 54 http://www.comartsystem.com If you can see the server sign while your main DVR program is running, it means that the main DVR program is ready to send videos and our server program is activated. There is a Remote program on the CD we provide. In the remote software directory, you can simply install our remote program on your remote system. Click ‘Setup’ file to install. After installing, you will find this shortcut icon on your windows screen. Then, double-click the icon and you will see this window on the next page. All rights reserved. Copying in whole or in part is prohibited without expressed written authorization from the manufacturer 55 http://www.comartsystem.com Click to go to ‘Setup’ mode. Then, you will see this screens below as you select a connection type between LAN, ISDN, and PSTN. z LAN users, [1] Click ‘LAN’, and then type Remote Port number of main DVR. [2] IP Address: We support both Static IP address and Dynamic DNS. If you type IP address, it should be static IP address of Main DVR. If you type Domain Name, it should be DNS of Main DVR. [3] IP address: ID and Password being used in the main DVR, Domain Name: ID and Password should be same used in Dynamic DNS of Main DVR . [4] Click ‘Setup’ All rights reserved. Copying in whole or in part is prohibited without expressed written authorization from the manufacturer 56 http://www.comartsystem.com z ISDN or PSTN users, [1] Click ‘ISDN’ or ‘PSTN’ [2] Choose modem options of PSTN or ISDN and telephone number [3] You need to type the ID and Password being used in the main DVR. [4] Click ‘Setup’ Every country has different ISDN systems. Since Korea do not have ISDN services and could not test ISDN connections, we have just followed our PSTN format to support ISDN. All rights reserved. Copying in whole or in part is prohibited without expressed written authorization from the manufacturer 57 http://www.comartsystem.com Customers have reported that our Client program works for some PSTN brands only. You now how to monitor videos remotely under LAN but it does not work for you under PSTN. Then, try to change a PSTN modem into a different version or try to change Communication speed lower. Note: If both atz or at&f0 are not acceptable as an Initialize Command, find a proper one from the manual of your modem and type it there. -LAN user connection. Click to go to ‘Setup’ mode. Then, you will see this screen below. [1]Remote Port : Internal port number of server which installed DVR Board to network. [2]IP Address : Type server’s static IP Address or Dynamic DNS. If you type IP address, it should be static IP address of Main DVR. If you type Domain Name, it should be DNS of Main DVR. [3]IP address Domain Name Then, click : ID and Password should be same being used in the main DVR, : ID and Password should be same used in Dynamic DNS of Main DVR button. All rights reserved. Copying in whole or in part is prohibited without expressed written authorization from the manufacturer 58 http://www.comartsystem.com And click button to access server. Then live image of server will be shown as follows Once you setup before then, if you want to access same Main DVR again which you connected before then click ‘REPORT’ button and you will see the screen as similar as below. It shows IP address List of Main DVR you connected before. Double click any IP address you wish to connect and click ‘Connect’ button. All rights reserved. Copying in whole or in part is prohibited without expressed written authorization from the manufacturer 59 http://www.comartsystem.com -PSTN user connection. First of all, you need to check Enable Network in the Default Setup page and click PSTN as Communication Select. Then, click to go to ‘Setup’ mode of remote program. And you’ll see this screen below. Com Port : Select port of the modem you’re using. Communication Speed : Select Speed of the modem you’re using. Initialize Command : Type the Initialize Command of the modem you’re using. Connect Number : Type the telephone number you want to connect. ID Name : Type the ID being used in the main DVR. Password : Type the Password being used in the main DVR. Note: If both atz or at&f0 are not acceptable as an Initialize Command, find a proper one from the manual of your modem and type it there. Then, click ‘Connect’ button to access Main DVR. PSTN and ISDN connection support only one Main DVR simultaneously. All rights reserved. Copying in whole or in part is prohibited without expressed written authorization from the manufacturer 60 http://www.comartsystem.com If the connection is okay and successful, you can see ‘Connect’ icon in color as above. And if it is not connected, ‘Disconnect’ icon will be in color. Once you setup before then, if you want to access same main DVR again which you connected before then click ‘Report’ button and you will see this screen as similar as below. It shows IP address List of Main DVR you connected before. Double click any address you wish to connect and click ‘Connect’ once. All rights reserved. Copying in whole or in part is prohibited without expressed written authorization from the manufacturer 61 http://www.comartsystem.com A. MONITORING VIDEOS AND CONTROL PTZ CAMERAS FROM A REMOTE SITE(S) To use this function, click button. Then, you can monitor videos remotely. You can select a screen division as you wish to monitor. If you have installed a PTZ camera with your main DVR system, you can also control the PTZ camera remotely. Click to go to PTZ control mode as you see this right screen. You should open PTZ control mode in the Main same as right screen to control the PTZ camera. B. RECORDING VIDEOS OF MAIN DVR IN REMOTE PC You can record videos from Main DVR in your remote PC as well. Click right button of the mouse on the screen you wish to record during monitoring. Then blue recording mark will be showed on the top of the right and click right button of the mouse again to stop recording. All rights reserved. Copying in whole or in part is prohibited without expressed written authorization from the manufacturer 62 http://www.comartsystem.com C. REMOTE SEARCHING VIDEOS RECORD IN BOTH THE MAIN DVR AND REMOT PC. To search videos remotely recorded in both main DVR and Remote PC, click ‘Search’ button. -To search videos recorded in Main DVR: Select ‘Server’. -To search videos recorded in Remote PC: Select ‘Remote’ To search image-box of Main(Server) DVR, click then it will show the list of image box information of the Main DVR system. Double click an image-box you want to playback. All rights reserved. Copying in whole or in part is prohibited without expressed written authorization from the manufacturer 63 http://www.comartsystem.com : Shows recorded file lists again. : Stop or Playback button : Shows data buffering status from Main DVR. Since videos are transferred from Main DVR to this remote site, it starts to playback when percentage window climbs to 100%. All rights reserved. Copying in whole or in part is prohibited without expressed written authorization from the manufacturer 64 http://www.comartsystem.com To search recorded videos in the Remote PC, click then it will show recorded data information as below. Double click one of file names you want to playback. Note that it records videos only C Drive of remote pc and it does not overwrite when C is full. You must delete recorded files in C drive of remote pc in windows explore. All rights reserved. Copying in whole or in part is prohibited without expressed written authorization from the manufacturer 65 http://www.comartsystem.com 12. UNINSTALLATION & UPDATE NEW SOFTWARE To uninstall USB-CAP 100 Application software, follow directions below. First of all, run ‘Registry Clearer’ in the setup directory of your CD provided. Then, you will see this window below. You need to click ‘Delete Registry Key’, ‘Deleting INI files’ and ‘Delete Imagebox & Etc…’ once. If you want to reinstall program, maintaining Image boxes, you just click ‘Delete Registry Key’ and ‘Deleting INI files’. Exit the program. All rights reserved. Copying in whole or in part is prohibited without expressed written authorization from the manufacturer 66 http://www.comartsystem.com Then, you need to do one thing more to delete program completely in ‘Control panel’. All rights reserved. Copying in whole or in part is prohibited without expressed written authorization from the manufacturer 67 http://www.comartsystem.com Click “Next” to continue. Click “Yes” to remove the USB-CAP 100 application. All rights reserved. Copying in whole or in part is prohibited without expressed written authorization from the manufacturer 68 http://www.comartsystem.com Click “Finish” to uninstall completely. Then, you can install any updated Comart Application software. All rights reserved. Copying in whole or in part is prohibited without expressed written authorization from the manufacturer 69 http://www.comartsystem.com Warranty All comart system products go through various processes and has tough product quality test. All comart system products are subject to a 15 months limited warranty as designed and supplied by Comart system co. ltd. This warranty does not cover: - Failure resulting from misuse, accident, modification, unsuitable and improper maintenance by you - Failure caused by alternation of the parts - Failure to follow the manual Product Name Product No. Warranty period Purchase date Company Name Name Purchaser Address Phone No. Company Name Name Vendor Address Phone No. Comart System. Co., Ltd. No.701, Ace Twin Tower 1, 212-2 Gu-ro Dong, Gu-ro Gu, Seoul, Korea (zip: 152-050) Tel) +82-2-2109-5678 Fax) +82-2-2109-5656 Email: [email protected] All rights reserved. Copying in whole or in part is prohibited without expressed written authorization from the manufacturer 70