1
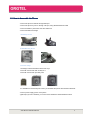
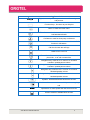
About This Guide
Thank you for your purchase ofOrgtel products ---- Orgtel entry-level IP phones. You have made an
excellent choice, we hope you fully enjoy all the features of the product.
Orgtel is an innovative IP telephone for entry-level usage, to provide you basic VoIP features and
beautiful sound quality.Orgtel fully comply with SIP protocol standard and Interconnection with the
majority of SIP interoperability of hardware and software equipment of the market.
The content of this manual would change without prior notice.
VoIP Phone User Manual V2.0
2
CONTENT
....................................................................................................................................
2
....................................................................................................................................2
ABOUT THIS GUIDE
GUIDE....................................................................................................................................
........................................................................................
5
........................................................................................5
PART ONE BEFORE USING 3195IF VOIP PHONE
PHONE........................................................................................
1-1. PACKAGE CONTENT.............................................................................................................................. 5
1-2. HOW TO ASSEMBLE THE PHONE............................................................................................................. 6
1-3. GENERAL APPEARANCE OF 3195IF PHONE.............................................................................................. 7
- LCD Display.......................................................................................................................................7
- Key Definitions................................................................................................................................. 7
.............................................................................................. 9
PART TWO PHONE INTERFACE OPERATION
OPERATION..............................................................................................
...........................................................
5IF VOIP PHONE LCD MENU AND SUB MENUS
9
...........................................................9
OVERVIEW OF 319
3195IF
MENUS...........................................................
2-1. ADJUST VOLUME................................................................................................................................. 9
2-2. ENABLE HEADSET FUNCTION..................................................................................................................9
2-3. MANAGE CONTACT LISTS.....................................................................................................................10
- Adding Contacts............................................................................................................................. 10
- Editing Contacts............................................................................................................................. 10
- Deleting Contacts........................................................................................................................... 10
2-4. MAKE A CALL....................................................................................................................................10
Regular Call...................................................................................................................................... 10
Point to Point Call............................................................................................................................. 10
2-5. REDIAL A NUMBER.............................................................................................................................11
- Redial incoming call....................................................................................................................... 11
- Redial an outgoing number............................................................................................................11
2-6. ACTIVATE HOLD FUNCTION.................................................................................................................. 11
2-7. MAKE CONFERENCE CALL....................................................................................................................11
2-8. TRANSFER A CALL.............................................................................................................................. 11
Performing a Blind Transfer............................................................................................................. 11
Performing a Half Attended Transfer............................................................................................... 12
Performing an Attended Transfer.....................................................................................................12
2-9. FORWARD A CALL.............................................................................................................................. 13
2-10. ACTIVATE DO NOT DISTURB FUNCTION................................................................................................13
2-11. CONFIGURE SPEED DIAL KEYS.............................................................................................................13
2-12. VOICE MAIL FUNCTION.....................................................................................................................13
2-13. EDIT BLACK/LIMIT LIST..................................................................................................................... 14
2-14. REJECT A CALL.................................................................................................................................14
..............................................................................................
15
..............................................................................................15
PART THREE WEB INTERFACE OPERATION
OPERATION..............................................................................................
3-1.LOGON WEB......................................................................................................................................15
3-2.BASIC............................................................................................................................................... 16
-STATUS............................................................................................................................................ 16
VoIP Phone User Manual V2.0
3
-WIZARD...........................................................................................................................................16
-CALL LOG.........................................................................................................................................16
-MMI SET..........................................................................................................................................16
3-3.NETWORK......................................................................................................................................... 16
-WAN................................................................................................................................................ 17
-LAN..................................................................................................................................................18
-SERVICE PORT..................................................................................................................................18
-DHCP SERVER.................................................................................................................................. 19
-SNTP................................................................................................................................................19
3-4.VOIP............................................................................................................................................... 20
-SIP................................................................................................................................................... 20
-IAX2.................................................................................................................................................21
-STUN............................................................................................................................................... 22
-DIAL PEER........................................................................................................................................22
3-5.PHONE........................................................................................................................................... 25
-DSP..................................................................................................................................................25
-CALL SERVICE.................................................................................................................................. 25
-PHONE BOOK.................................................................................................................................. 26
-FUNCTION KEY................................................................................................................................ 27
3-6.MAINTENANCE.............................................................................................................................. 27
-AUTO PROVISION............................................................................................................................ 27
-CONFIG............................................................................................................................................28
-UPDATE........................................................................................................................................... 28
-ACCOUNT........................................................................................................................................ 29
-REBOOT...........................................................................................................................................29
3-7.SECURITY........................................................................................................................................30
-MMI FILTER..................................................................................................................................... 30
-FIREWALL........................................................................................................................................ 31
-NAT..................................................................................................................................................31
-VPN................................................................................................................................................. 32
...................................................................................................................................... 33
SAFETY NOTICES
NOTICES......................................................................................................................................
VoIP Phone User Manual V2.0
4
Part One Before Using 3195IF VoIP Phone
1-1. Package Content
Phone package should include below items
- 3195IB VoIP Phone Base Unit.
- 1 Handset
- 1 Coiled Handset Connecting Cord
- 1 Straight Ethernet Cable
- 1 Power Supply
- 1 User Guide
- 2 Wall Mount Brackets
- 1 Table Bracket
VoIP Phone User Manual V2.0
5
1-2. How to Assemble the Phone
- Connect the phone to Internet through WAN port
- Connect the phone to your PC through LAN port, using attached Ethernet cable
- Connect handset to phone base unit with coiled cord
- Connect brackets and wedge
As Desktop Phone
As Wall Mounting Phone
Insert the wedge
The wedge could be inserted as below two ways
Insert with narrow side down as Way No.1
Insert with narrow side up as Way No.2
Way No.1
Way No.2
It is advisable to choose Way No.2 when you assemble the phone with wall mount brackets
- Connect power supply, power on the phone
- (Optional) If you has a headset, you could connect headset to realize headset function
VoIP Phone User Manual V2.0
6
5IB Phone
1-3. General Appearance of 319
3195IB
- LCD Display
WAN Mode
Date and Time
s
- Key Definition
Definitions
VoIP Phone User Manual V2.0
7
Key Button
Key Button Definitions
0 - 9, *, #
Digital, star and pound keys are also used for setting and
call process.
Function keys , functions as per silk print
Menu: to enter the main menu
Transfer: used for blind transfer, attended transfer and
half attended transfer
Conference: used for three party conference
Hold: hold the active call. Or used to enable/disable DND
function in idle status.
Call List: browse the call logs
Used to enter voice mail
Phone Book: Enter to the phonebook to save/amend
phone No., or to call out saved No.
Navigation key: used as UP in menu or to increase
handset / speakerphone volume
Navigation key: used as DOWM in menu or to reduce
handset / speakerphone volume
Navigation key: used as LEFT in menu or to reduce
handset/speaker volume
Navigation key: used as RIGHT in menu or to increase
handset/speaker volume
Speaker: activate/deactivate hands-free function
Redial: to dial a new number or redial previous outgoing
call.
M1-M5
Speed dial: to make speed dial calls saved in them
Used to enable or disable Mute function
VoIP Phone User Manual V2.0
8
Part Two Phone Interface Operation
5IB VoIP phone LCD Menu and Sub Menus
Overview of 319
3195IB
Note: When you press 【
configuration, press 【
】 , you should input default password 123 to enter menu. During the
to confirm or 【EXIT
EXIT
to quit
】to
EXIT】to
1. Adjust Volume
22-1
To adjust volume during a call
Press【
】or【
】to adjust receiver volume during a call
VoIP Phone User Manual V2.0
9
3. Manage Contact Lists
22-3
- Adding Contacts
Press【
】. Select Add. Edit Name and Number. Press【
】to Save or 【EXIT】to Quit
s
- Deleting Contact
Contacts
Press【
】. Choose Current to view saved contacts. Select the one you would like to delete
DEL
Press 【DEL
DEL】to delete
4. Make a Call
22-4
You could make regular calls or point to point calls with 3195IB
Note: All numbers would be dialed out from SIP1 as default. If you would like to dial out with SIP2, you
need to set corresponding dial rules. Please refer to Web Interface Operation for dial rules details
Regular Call
- Input your desired number, end with # to dial out
Point to Point Call
- Input #Phone IP address**server port# to dial out. Use *(star) to replace .(dot)
For example, IP of your desired side is 192.168.0.91, your server port is 5060. You should input
#192*168*0*91**5060# to dial out
VoIP Phone User Manual V2.0
10
5. Redial a Number
22-5
- Redial incoming call
Press 【
】. Choose Received. Select your desired number. Pick up the handset or press 【
】to dial out
- Redial an outgoing number
Press 【
】. Choose Dialed. Select your desired number. Pick up the handset or press 【
You could press 【
】to dial out
】to dial out the last outgoing number
6. Activate Hold Function
22-6
During conversation, press 【
】to keep line, press it again to release
27. Make Conference Call
2-7
During conversation, press 【FL 】, then dial another number plus # button,
When line connectes, press 【FL 】and 【
】 to make conference call
8. Transfer a Call
22-8
There are three ways to transfer a call
Performing a Blind Transfer
Under this mode, the call would be transferred to the transferee without prior notice
During a call, press corresponding Transfer soft key. Do one of the following steps
VoIP Phone User Manual V2.0
11
- Input the tansferring number to transfer
- Press【
- Press【
】. Get access to your desired number as LCD indicates, then press # to transfer
】. Select the appropriate list, to get access to your desired number, press # to transfer
Performing a Half Attended Transfer
Under this mode, the call would be transferred after you make sure the transferring number is on line
During a call, press 【
】. Do one of the following steps
- Enter the number that you want to transfer the call to
- Press transfer soft key, then press【
- Press transfer soft key, then【
】. Get access to your desired number as LCD indicates, then press #
】. Select the appropriate list to get access to your desired number, press #
Press transfer soft key after you hear the back ring to accomplish transfer
Performing an Attended Transfer
Under this mode, the call would be transferred after you make sure the transferee would like to answer the call
During a call, press 【
】. Do one of the following steps
- Input the number which you want to transfer the call to
- Press transfer soft key, press【
- Press transfer soft key, then press【
】. Get access to your desired number, then press #
】. Select the appropriate list to get access to your desired number, then
press #
Before completing the transfer, you could talk to the transferee, to see if he/she would like to answer. Press
Transfer soft key if you get positive response. Otherwise, hang up the phone
VoIP Phone User Manual V2.0
12
9. Forward a Call
22-9
There are three modes for forwarding calls
- To forward all incoming calls to another phone number
- To forward incoming calls to another number when current phone is busy
- To forward incoming calls to another number when nobody answer the current phone number
Press 【
】� Option � Call Forward �Choose Line or Line number as you desired � Edit
�Press【
】or【
】to choose Always/Busy/No answer as you desired
� Press Save soft key to activate call forwadr
Follow above procedures and choose Off to disable call forward
0. Activate Do Not Disturb Function
2-1
2-10
On standby, press 【
】 to enable DND function. LCD would indicate Do Not Disturb. You would not be abled to
answer incoming calls since they would be sent to Missed Calls list directly
To disable DND, press 【
】 again
1. Configure Speed Dial Keys
2-1
2-11
Press one speed dial key M1-M5
PH No./Edit
Press 【PH
No./Edit】, do corresponding name and number configuration
Press 【
】to Save
After above settings, you could press the speed dial key, pick up handset or press【
】to dial out
2. Voice Mail Function
2-1
2-12
Voice mail function could be used only if IP-PBX supports voice mail
When there is a voice mail, WMI indicating LED will flash. You could press dedicated key, then dial voice mail
number to check voice massage
VoIP Phone User Manual V2.0
13
3. Edit Black/Limit List
2-1
2-13
Press 【
】
Choose Call Feature �Black-list or Limit-list
You could do corresponding Add/Edit/Delete settings according to LCD display
2-14. Reject a Call
When there is an incoming call, you could press 【ESC/REC 】to reject. It would be forwarded to your voice mail
if you have configured voice mail
VoIP Phone User Manual V2.0
14
Part Three Web Interface Operation
You could get access to web configuration menu of 3195IF by inputting the phone’s IP address to Web Browser
Local IP/DEL
Address Field. As the phone would obtain its IP automatically, by pressing 【Local
IP/DEL】, you could see the
phone’s IP address
3-1.Logon Web
Below logon menu would pop up once you input the correct IP address and click enter
There are two logon modes
-As administrator account
Default username & password is admin
admin. You could configure the phone system with this account
-As guest account
Default username & password is guest
guest. You could only have a browse of the phone system with this account
Note: Below configurations are based on administrator mode only.
Web would show as below once you logon in successfully
VoIP Phone User Manual V2.0
15
3-2.Basic
-STATUS
Network: Shows current WAN configuration of the phone.
Includes Connect Mode – DHCP/Static State/PPPoE, MAC Address, phone IP address
Phone Number: Shows the status of SIP accounts
-WIZARD
This is a quick guide for phone configuration. You could select Static IP/DHCP/PPPoE MODE. Then do
corresponding configuration – SIP account & network, as you desired
-CALL LOG
Show outgoing call log of the phone
-MMI SET
You could select LCD display language and set greeting messages here
3-3.Network
Choose Network of the left column to do network configuration. Web would show as below
VoIP Phone User Manual V2.0
16
-WAN
You could view current network mode of the phone on this page
If you choose Static
Static: You could set network IP address, gateway, DNS etc. here
If you choose DHCP
DHCP: IP address would be obtained automatically
If you choose PPPoE
PPPoE: Once PPPoE ISP and the account are set, IP address would be obtained automatically
After above settings, you could switch Static/ DHCP/ PPPoE mode from phone unterface. Press number key 1 for
sevaral seconds to switch to Static Mode, number key 2 is for DHCP mode, while number key 3 is for PPPoE Mode
VoIP Phone User Manual V2.0
17
-LAN
You could view current LAN status and do corresponding settings
-SERVICE PORT
You could set Telnet, HTTP, RTP service port on this page
HTTP Port: To set web browse port. Default is 80. It is advisable that you change it into non-80 standard port if you
would like to enhance system safety
Telnet Port: To configure telnet port. Default is 23
RTP Initial Port: To configure RTP initial port. It would be obtained automatically
RTP Port Quantity: To configure maximum quantity of RTP port. Default is 200
VoIP Phone User Manual V2.0
18
-DHCP SERVER
You could set DHCP Lease Table here
-SNTP
You could set SNTP as you desired. Once time zone is chosen, the phone’s time and date would synchronize that
of the corresponding time zone
You could set daylight time according to web indication
VoIP Phone User Manual V2.0
19
You could also set time and date of the phone manually, instead of setting SNTP
3-4.VOIP
Choose VOIP of the left column to do VoIP configuration. Web would show as below
-SIP
SIP Line Select: Choose the SIP you would like to configure and click Load to do corresponding SIP settings
Register Status: Indicating registration status of current SIP account
Server Name: Configure Server Name here. Make it different between 2 SIP accounts
Server Address: Configure Server Address or Domain Name
Server Port: Configure SIP server signal port
Account Name/Password/Phone Number: Input your SIP account/password/phone number. Usually, Phone
Number should be the same as Account Name
Right column is to be configured if you have special needs
Advanced Set: Click to do advance SIP settings
Note: For basic usage of SIP, you just need to configure Server Address, Account Name, Password and
Phone Number. After above settings, choose Enable Register. Then click Apply to submit settings.
VoIP Phone User Manual V2.0
20
-IAX2
You could do IAX2 configuration here
Register Status: Indicating IAX2 registration status
IAX2 Server Addr: Configure IAX2 Server Addr. You could also input the corresponding domain name
IAX2 Server Port/Local Port: Set IAX2 server port/local port. The default is 4569
Account Name/Account Password/Phone Number: Do corresponding settings
Voice Mail Text: If IAX2 supports voice mail, you could set voice mail name here
Voice Mail Number: Because phone keypad could not input letters when you try to get access to voice mail box,
you could set a number in this field, which would stands for Voice Mail Text
Refresh Time: Set refresh time as you desired
Choose Enable Register/Enable G.729, then click Apply to submit
VoIP Phone User Manual V2.0
21
-STUN
STUN Set
STUN NAT Transverse: Indicating status of STUN NAT transverse
STUN Server Addr/STUN Server Port/STUN Effect Time: Set corresponding items. Click APPLY to submit
Set Sip Line Enable Stun
Choose your desired SIP and click Load
Choose Use Stun, then click APPLY to submit
-DIAL PEER
You could add/modify/delete dial peer here
VoIP Phone User Manual V2.0
22
Dial Peer Table
Table: Indicating the dial peer that you set
Add Dial Peer
Peer: Set new dial peer as per indication
Phone Number: You could set phone number as below two forms, maximun 30 digits
1) As exact matching
When you dial the set phone number, the phone would call to the set destination directly. This is peer to peer
call. For example, set phone number as 456
456, destination is 192.168.0.24
When you dial 456
456, it would be calling to 192.168.0.24
2) As prefix matching
When you dial the set phone number, the phone would call from corresponding SIP account
For example, set phone number as 789******* (10 digits), destination is 0.0.0.0
0.0.0.0(SIP 1)
When you dial a 10 digits number starting with 789, the phone would call out from SIP 1
Destination: Set target IP here if you choose to set phone number as exact matching.
If you choose to set as prefix matching, you should set SIP account that you would like to use to dial
out this number. SIP 1 is 0.0.0.0 while SIP 2 is 255.255.255.0. If left empty, the phone would call out
from SIP 1 as default.
Port: Default is 5060
Alias: You could do alias configuration here. There are 4 types as below. If there is no configuration, no alias
would be shown
Note: When doing below settings, you could only input x as lower-case letter
1) add:xxx
When you dial correspnding number, phone would add XXX in front of the dialed number automatically
For example, phone number is 134*****
134*****, destination is 255.255.255.0
255.255.255.0, alias is add:01
When you dial an 8 digits number starting with 134, the phone would call to 01134***** from SIP 2
2) all:xxx
When you dial the set number XXX, phone would dial out the corresponding number. This is similar with
setting speed dial keys. For example, phone number is 1234567
1234567, destination is 0.0.0.0
0.0.0.0, alias is all:234
VoIP Phone User Manual V2.0
23
When you dial 234, the phone would call to 1234567 directly from SIP 1
3)
rep:xxx
3)rep:xxx
When you dial set number, the first several digits would be replaced by xxx
xxx. For example, phone number is 1T
(T stands for whatever number with any length), destination is 255.255.255.0
255.255.255.0, alias is rep:95166
rep:95166, delete length
is 1
When you dial out a random number starting with 1, like 12345
12345, the phone would replace 1 with 96166 and call
to 951662345 from SIP 2
del:xxx
4)
4)del:xxx
xxx indicates length. When you dial set number, the first several digits would be deleted
For example, phone number is 12345****
12345****, destination is 255.255.255.0
255.255.255.0, alias is del
del, del length is 3
When you dial out a 9 digits number starting with 12345, the phone would delete 123 and call to 45**** from
SIP 2
Call Mode: You could choose your desired call mode, SIP or IAX2
Suffix: You could set suffix for the dial number,
For example, phone number is 1T (T stands for whatever number with any length), suffix is 3
When you dial out a random number starting with 1, like 12345
12345, the phone would add 3 at the end of
dialed number and call to 123453
Delete Length: Configure digit length that would be replaced or deleted under corresponding rep:xxx or del:xxx
alias settings. For example, phone number is 1T (T stands for whatever number with any length),
alias is rep:010
rep:010, delete length is 1
When you dial out a random number starting with 1, like 12345
12345, the phone would delete the first number,
replace it with 010
010, and call to 01023453
Dial Peer Option
Option: Select the dial peer you would like to delete/modify. Then click Delete/Modify to do
corresponding configuration
VoIP Phone User Manual V2.0
24
3-5.PHONE
Choose PHONE of the left column to do phone configuration. Web would show as below:
-DSP
Set DSP configuration as you desired
First – Fifth Codec: Set the priority level of codecs
When you make a call, the phone would use set first codec to match the other party. If fail or not
found, the phone would use second codec to match, etc.
Signal Standard: Choose the signal standard according to your needs or preferance
VAD: Science detection. If activate, G.729 Payload Length maximum is 20ms
-CALL SERVICE
You could configure relevant call service here
Call Service Setting
Hot Line: Configure hot line number. If configured, the phone would dial out the set number once you pick up the
phone. You could not dial other numbers if hot line number is set
VoIP Phone User Manual V2.0
25
No Anwer Time: Configure no answer time.While set, when there is an incoming call, the phone would hang up
automatically if nobody answers the call within the set time
P2P IP Prefix: Configure prefix for peer to peer call
For example, the IP you are calling to is 192.168.0.23. If you set 192.168.0 as P2P IP Prefix, you
could just dial #23 to call out
Do Not Disturb: Choose to activate do not disturb function. Under this mode, the phone would reject every
incoming call
Black List
List: You could add black list (the number you don’t want to receive phone call from) or delete black list here
Limit List
List: You could add limit list (the number you don’t want the phone to dial out) or delete limit list here
-PHONE BOOK
You could also set phone book through this web configuration
Phonebook Table
Table: Indicating the phone number information that you set
Add Phone Book
Book: Add name/number/ring type for the new phone book
Phone Book Option
Option: You could select the item that you would like to delete/nodify
VoIP Phone User Manual V2.0
26
-FUNCTION KEY
You could do configuration of 5 memory keys here
Name: Input name for the corresponding phone number
User ID: Input the phone number that you would like to store for corresponding Name and memory key
3-6.MAINTENANCE
Choose MAINTENANCE of the left column to do maintenance configuration. Web would show as below
-AUTO PROVISION
You could see and configure update settings according to your needs
VoIP Phone User Manual V2.0
27
-CONFIG
You could save/clear configuration by clicking corresponding buttons as web indication
Note: Clear Configuration means to reset the phone to default status.
-UPDATE
You could update firmware through Web or FTP, following corresponding indication on web page
VoIP Phone User Manual V2.0
28
-ACCOUNT
Set Keyboard Password
Password: This is the password to enter phone interface operation. Default is 123
123. You
could change and save the setting
Add Use
User: You could add new user
User Level: Root refers to administration account while General refers to guset account
Account Option
Option: You could delete or modify the saved account here
-REBOOT
You could reboot the phone by clicking Reboot button
VoIP Phone User Manual V2.0
29
3-7.SECURITY
Choose SECURITY of the left column to do security configuration. Web would show as below
-MMI FILTER
MMI Filter Table Set
Set: You could add MMI Filter Table. Then choose to enable or not
MMI Filter Table
Table: Display the set MMI Filter Table. You could modify or delete added items
VoIP Phone User Manual V2.0
30
-FIREWALL
Firewall Typ
Type: You could select firewall type and apply
Firewall Input/Output Rule Table
Table: Yo could see the set rules here
Firewall Set
Set: You could set firewall according to your needs
Rule Delete
Delete: You could choose the set input/output rule and delete
-NAT
VoIP Phone User Manual V2.0
31
Protocol Set
Set: Set the corresponding protocol
NAT Table Option
Option: You could set NAT following web indication
NAT Table
Table: You could see the added NAT
DMZ Config
Config: Click to enter DMZ configuration interface
-VPN
VPN IP
IP: Display the phone’s VPN IP
VPN Mode
Mode: Select VPN mode and choose enable
Configure UDP Tuunel or L2TP correspongdingly, click apply to submit the settings
VoIP Phone User Manual V2.0
32
Safety Notices
To care for your product, please keep it away from:
Liquids of any kind
Don’t expose your product to water, rain, extreme humidity,
sweat, or other moisture.
Dust and dirt
Don’t expose your product to dust, dirt, sand, food, or other
inappropriate materials.
Extreme heat or cold
Avoid temperatures below -10°C/14°F or above 45°C/113°F.
Cleaning solutions
To clean your product, use only a dry soft cloth.
Don’t use alcohol or other cleaning solutions.
Microwaves
Don’t try to dry your product in a microwave oven.
The ground
Don’t drop your product.
VoIP Phone User Manual V2.0
33