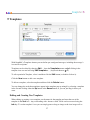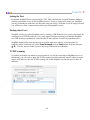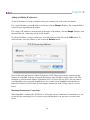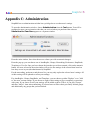
1
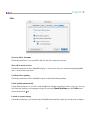
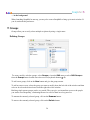
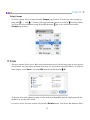
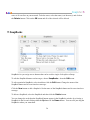
©2007 Glass Bead Software, LLC. All Rights Reserved.
http://www.glassbead.com
Rev. 10.7.06
v5.0
CHAPTER 1: GETTING STARTED ..................................................................................................... 1
What Makes SnapMail Unique?......................................................................................................................................................1
Trying, Buying, and Registering SnapMail ...................................................................................................................................2
Requirements ......................................................................................................................................................................................3
Installing SnapMail............................................................................................................................................................................3
Running SnapMail .............................................................................................................................................................................4
On-line Help ........................................................................................................................................................................................4
CHAPTER 2: SENDING MAIL............................................................................................................. 5
Basics ....................................................................................................................................................................................................5
Sending Snaps .....................................................................................................................................................................................6
Sending Attachments .........................................................................................................................................................................7
Clearing the Outbox ..........................................................................................................................................................................7
Using Templates .................................................................................................................................................................................7
CHAPTER 3: RECEIVING MAIL.......................................................................................................... 9
Reading Mail.......................................................................................................................................................................................9
Replying to Mail ...............................................................................................................................................................................10
Responding to Snaps........................................................................................................................................................................10
Trashing Mail ...................................................................................................................................................................................11
Receiving Attachments ....................................................................................................................................................................11
Accessing Web Links .......................................................................................................................................................................11
Printing and Saving .........................................................................................................................................................................12
Organizing Mail with Folders ........................................................................................................................................................12
CHAPTER 4: SNAPMAIL FEATURES .............................................................................................. 14
Searching Mail..................................................................................................................................................................................14
Return Receipts ................................................................................................................................................................................14
Reminders..........................................................................................................................................................................................15
Spell-Checking ..................................................................................................................................................................................15
Auto-Replies ......................................................................................................................................................................................16
CHAPTER 5: CUSTOMIZING SNAPMAIL ........................................................................................ 18
Preferences ........................................................................................................................................................................................18
Groups................................................................................................................................................................................................24
Users ...................................................................................................................................................................................................25
SnapBacks .........................................................................................................................................................................................26
Templates...........................................................................................................................................................................................27
Networking ........................................................................................................................................................................................28
Name and Password.........................................................................................................................................................................32
APPENDIX A: KEYBOARD SHORTCUTS........................................................................................ 34
APPENDIX B: SPELL-CHECKING DICTIONARIES ......................................................................... 37
APPENDIX C: ADMINISTRATION .................................................................................................... 38
APPENDIX D: TECHNICAL SUPPORT............................................................................................. 39
SnapMail 5
Chapter 1: Getting Started
Welcome to SnapMail, the private mail and messaging system for Macintosh and Windows networks
that's a snap to install and run, flexible, and fun to use. SnapMail runs on any Macintosh with either
Classic Mac OS (9.x) or OS X (10.1 and above) and any Windows computer running either XP,
Windows 2000, or Windows 98. SnapMail connects over your TCP/IP network. Although SnapMail
allows seamless communication between Macintosh and Windows computers, the interface has some
platform specific differences. This documentation covers the program for Macintosh users. A similar
manual for Windows users is available on our website at http://www.glassbead.com/download/.
• What Makes SnapMail Unique?
SnapMail is the complete messaging and file transfer utility for your office. Using peer-to-peer
technology over TCP/IP networks, SnapMail keeps all of your messages and documents safely inhouse. It doesn't require a mail server, Internet connection, or any administration. SnapMail can also
connect computers securely across the Internet, producing a “virtual LAN” that keeps your messages
private. Send messages, files, folders, reminders, and alerts instantly. Combining an intuitive user
interface with trouble-free installation and maintenance, SnapMail offers a dynamic and friendly
messaging system.
Easy to Install and Use
SnapMail is plug and play software. It installs in a minute and is immediately usable. SnapMail
configures itself and finds other users on the network. No system administration is ever needed.
Powerful and Flexible
SnapMail features include:
•
•
•
•
•
•
•
•
In addition to regular mail messages, send “Snaps” that notify the recipient with an alert pop-up.
Respond to Snaps directly or with a single mouse click using preconfigured “SnapBacks” (e.g.
Take a message for me, Yes, Tell them to hold, etc.)
Send attachments with your mail (including folders)
Search for old mail items with Find
Determine if your sent mail has been read (a checkmark appears in the Sent Mail folder)
Create folders to organize your mail
Proofread your messages using a while-you-type built-in spell checker with a 90,000+ dictionary
and spelling suggestions
Create templates for text or forms that you send often, including their intended recipients.
1
SnapMail 5
•
•
•
•
•
•
•
•
•
Identify these templates with color icons that give your mail a personal touch.
Print and save messages
Customize SnapMail with many preferences
Track mail that you have sent in the Sent Mail folder
Create groups, so you can send mail to a number of people with one easy selection
Send reminder messages to yourself or others that will arrive at some future time. Don't forget
your dentist appointment!
Decide how you will be notified of mail delivery with sounds, icons, and alert boxes
Access Web links in mail items by clicking on them
Find other users on your local network automatically and connect to remote users or an entire
remote office over the Internet. SnapMail also supports Apple’s Bonjour technology (not
available for OS 9 computers).
Administrate other computers on the network. This feature is secured and requires access to the
product registration code). Capabilities include transmitting of defined groups, general
preferences, templates, networking settings, SnapBacks, user lists and templates.
Fast, In-House and Secure
SnapMail does not rely on Internet servers to send mail within your local network. This makes
SnapMail very fast and particularly useful as an in-house messaging system that can complement your
Internet mail system. All of your messaging can be conducted without fear of accidentally sending
mail out of your company. In addition, with SnapMail there is no junk mail and no non-company emailing. You can be sure that everything in SnapMail is company business.
• Trying, Buying and Registering SnapMail
You can download the most recent version of SnapMail from our web site at www.glassbead.com.
SnapMail will run for 30 days. After this you will need to purchase a license.
SnapMail is sold on a per-user basis. Registration codes will work for either the Mac or the Windows
version. For example, you might buy a fifteen-user license in which case you will be sent a fifteen-user
registration code. This code could be used with any combination of Mac or Windows users. If you later
need to add four more users to your system, purchase another four-user license from our Web site and
you will get a new registration code for nineteen users. Buying a license is easy. Select Purchase
SnapMail… from the Help menu in SnapMail and you will be taken to the Web site to purchase.
You can also visit us directly at www.glassbead.com/buy.
After purchasing online, you will be sent a valid registration code by e-mail. Enter this code along with
your registration name by choosing Registration… from the Edit menu in SnapMail. You only need
to enter the registration code on one computer — all others will share this license. Note: If you are
2
SnapMail 5
connecting remote LAN's, you will need to enter the registration code on one computer in each LAN.
• Requirements
SnapMail requires a TCP/IP network. You do not need to be connected to the Internet for SnapMail to
work, but you must configure a TCP/IP network in your TCP/IP control panel (OS 9) or in the
Networking pane of the System Preferences (OS X). Under OS 9 SnapMail requires a minimum
allocation of 9M RAM though 12M is preferred.
• Installing SnapMail
To install SnapMail for OS X:
1) Launch the SnapMail5.dmg file that you downloaded from the Glass Bead Software web site.
2) Drag the SnapMail application to your hard drive.
3) Double-click on the SnapMail application.
To install SnapMail for OS 9 simply launch the SnapMail Installer and follow the instructions.
If you need a copy of the latest installers, you can get it at http://www.glassbead.com/download.
3
SnapMail 5
• Running SnapMail
The first time you run SnapMail, it will request that you enter a user name. This name can be changed
at any time from the Edit menu. SnapMail will be launched automatically when your computer starts
up. If it has been placed in the background, you can choose it from the Dock.
• On-line Help
This manual is available in PDF format or from the Web via the Help menu.
4
SnapMail 5
Chapter 2: Sending Mail
The lower area of the SnapMail window is called the Outbox. The Outbox is where you compose and
send outgoing mail.
• Basics
To send mail, follow these steps:
Choose the Template
Pick the template you want by clicking on an icon in the icon list.
Type in the Text
Type the text of your mail into the text area.
5
SnapMail 5
Select the Recipients
To select one name from the user list, simply click on it. To select more than one name, hold down the
key while clicking on each name you want to select. Select from the To pop-up menu to choose
whether you want to cc, or bcc the recipient (keyboard shortcut: -shift-T/C/B).
To select users with the keyboard, change the focus to the user list by pressing the Tab key, and then
start typing the name of the person you want to send the message to. You will see that as you type,
SnapMail will automatically start selecting the user whose name matches what you type (Your typing
will appear above the Groups pop-up, along with SnapMail's guess for which user you're selecting).
As soon as the correct user has been selected, press return to confirm that user and start typing in
another user. You can press shift-return if you want to deselect the highlighted user name and start
over.
Send the Mail
To send your mail to all selected recipients, click on the Send button (keyboard shortcut:
return).
-
To send mail to one person, you can simply double-click on the person's name.
• Sending Snaps
Snaps are mail that bring up an alert box on the recipient's screen. This gives the recipient immediate
notification of your message and also provides the ability to reply back very quickly with minimal
work interruption. To send a Snap, use the Snap button instead of the Send button (keyboard
shortcut: -option-return) or hold down the option key and double click on the name of the
recipient.
6
SnapMail 5
• Sending Attachments
The paper clip pop-up menu is used for sending attachments along with your mail.
To attach files or folders with your mail, simply drag them from the desktop onto the SnapMail
window. Or click on the paper clip and select Add Attachment... from the menu (keyboard
shortcut: -N). A file-selection window will appear, in which you can find the file you want to attach.
You may add as many attachments as you like. In OS X, you can also attach a file or folder by
dragging it to the SnapMail icon in the dock.
A number next to the paper clip indicates how many files and folders are attached. The files’ names
will be added to the attachment pop-up menu. To clear the attachments, select the Clear
Attachments option from this menu. If you hold down the option key when clicking on the pop-up
menu you will see the full path of each attached file and folder.
• Clearing the Outbox
Use the Clear button to clear the text box, clear all attachments, and deselect all users at once. This
allows you to quickly start over if you are not happy with what you have composed.
• Using Templates
Templates are preconfigured text forms that can be selected from the main window.
Use the Templates menu, click on a particular template icon, or ctrl-click in the template icon area
to select the desired template (the first 9 templates can also be selected using the keyboard shortcuts
-1 - -9). The template will fill the Outbox with its preconfigured text and also pre-select any
recipients that are part of the template.
7
SnapMail 5
Any word in the text of a template that ends with : is considered a field. Fields can be navigated using
the tab key.
Templates can be edited by choosing Edit … from the Templates menu or ctrl-clicking in the
template icon area and selecting Edit Templates … (keyboard shortcut: -T).
8
SnapMail 5
Chapter 3: Receiving Mail
• Reading Mail
The upper part of the SnapMail window contains the Filebox and the reading area. Here you can read,
file, print and respond to mail that you have received.
When you open SnapMail, new mail will appear at the top of the window. To the left of the mail is the
mail status icon. This will be
if the mail is unread. Above the Filebox are buttons to execute all of
the commands you can do to a mail item. Alternatively you can control-click on a mail item to bring
up a contextual menu with the available commands.
When a mail item is selected, you will see the text of the mail in the reading window. You can page to
the next or previous message by pressing the arrow keys.
Setting the Mail Status
To the far left of each mail item is an icon that indicates the mail's status. When mail is first received,
its status is unread (indicated by ). When mail is read, the is removed. A indicates that you
have replied to this message.
SnapMail also lets you set the mail status. This gives you the ability to mark your mail with a graphic
9
SnapMail 5
that has meaning to you. To set the status, select the mail, click on the Status pop-up and select the
desired icon. Options: , , , (no icon), , , and .
• Replying to Mail
If you want to reply to a message, select the message in the Filebox and then click on the Reply
button (keyboard shortcut: -R). SnapMail will select the person who sent the mail as well as any
other people who received the mail.
If you don’t want to include the text of the original mail item in your reply, hold down the option key
when clicking on the Reply button. A preference can be set to make this the default action.
If you reply to a message, its status icon (on the far left) will be changed to
.
• Responding to Snaps
When someone sends you a Snap, their message will pop right up on your screen in an alert box.
The
pop-up allows you to resend the Snap to yourself in the future as a reminder. Just choose
the desired delay from the pop-up.
10
SnapMail 5
The Trash button will trash the Snap and close the window. The Reply button will open SnapMail
and set up a reply for you. The Open button will open the message in SnapMail. The Ignore button
will close the Snap window but not Trash the message (it will still be in your In folder).
You can reply to Snaps by using the customizable SnapBack buttons. These buttons allow you to
respond to a Snap with a single mouse click. Each button will send back a Snap with a predefined
message. SnapBacks can be customized by choosing SnapBacks… from the Edit menu.
In addition, you can respond to a Snap with another Snap just by typing your response into the text box
and clicking on the Snap button. You can also hide the text box by clicking on the disclosure triangle
at the bottom right of the screen.
By default, if you respond to a Snap directly or use a SnapBack button, the record of the received Snap
will be trashed. At the bottom of the Snap alert window is a checkbox that you should uncheck if you
want to save the Snap in your Filebox.
• Trashing Mail
Mail items may be trashed directly from the main window by selecting them in the Filebox and
clicking on the Trash button or hitting the Backspace key on the keyboard.
By default, trashing mail causes mail items to be transferred to the trash folder. To delete them
permanently you can choose Empty Trash from the folder pop-up, or you can switch to the trash
folder and delete them individually. If you hold down the option key when trashing mail, it will
delete the mail item(s) permanently without placing them in the trash folder. Before permanently
deleting mail, SnapMail will request confirmation.
• Receiving Attachments
File attachments are indicated by a in the rightmost column of the Filebox. To extract attachments,
first select the mail item containing the attachment. Any attachments will then appear at the top of the
main window and they can be dragged to where you would like them. Once an attachment has been
detached, the paperclip icon will turn a gray color. You can also click on the attachment icons to
detach them, in which case SnapMail will bring up a Save dialog box.
• Accessing Web Links
If you receive mail that contains a Web link, SnapMail will underline and color the link. Click on the
link to open your Web browser.
11
SnapMail 5
• Printing and Saving
To print mail, select the mail item(s) and click on the Print button (keyboard shortcut: -P). To save
the mail as a text file, choose Save As... from the File menu (keyboard shortcut: -S).
• Organizing Mail with Folders
Folders allow you to organize mail. At the top left of the Filebox is a pop-up menu initially titled In.
This is the folder pop-up. If there is a blinking
to the left of the folder pop-up, then you have mail
in your In folder that you haven’t seen yet. You can jump right to the new mail by clicking on the
blinking .
The Basic Folders
There are a number of built-in folders that are always available.
All: A special folder that displays the contents of the In, Sent, and all user-created folders.
In: This is the folder where new mail appears.
Sent: This folder holds a copy of mail items that you have sent out. Note: attachments are not saved
12
SnapMail 5
with the sent mail.
Trash: Mail will be transferred to this folder when you trash it. To permanently delete all mail in your
trash folder, choose Empty Trash from the bottom section of the folder pop-up.
Creating and Deleting Folders
You can create your own folders by choosing New Folder... from the folder pop-up.
To delete a folder, select the folder and then select Delete Folder from the bottom section of the
folder pop-up. A folder must be empty in order for you to delete it. To rename a folder, select the
folder and then select Rename Folder…
Moving Mail to Folders
To move mail from one folder to another, select the mail item(s) you want to transfer and then click on
the Move pop-up to select the destination folder.
Sent Mail
When mail is placed in the Sent folder, it will initially have its status icon set to . This indicates that
the mail has not yet been delivered. Once the mail has been delivered, the status icon will be cleared.
When mail has been read by the recipient, the status icon will be changed to .
13
SnapMail 5
Chapter 4: SnapMail Features
• Searching Mail
SnapMail allows you to search your mail.
Find
To search, choose Find... from the Tools menu or click on the Find button (keyboard shortcut -F).
SnapMail will search for any mail item containing the given text. When a matching mail item is
located, the text that was found will be highlighted.
Match Text Case can be checked if you want to find only words that share the same usage of
uppercase and lowercase as the search text. Otherwise, the case of the search text is ignored.
Search Subject Only can be checked if you want SnapMail to search only the subject lines of the
mail items. This produces a faster search.
If no match is found, you will hear a beep.
Find Again
To search for the next occurrence of your text, choose Find Again from the Tools menu (keyboard
shortcut -G). This allows you to quickly search through many matches until you find the correct one.
A beep will sound when SnapMail cannot find any more matches.
Find In Next Folder
To search for the next occurrence of your text string and skip the current folder, choose Find In Next
Folder from the Tools menu (keyboard shortcut -I). A beep will sound when SnapMail cannot
find any more matches.
• Return Receipts
When you send mail to someone, it is often useful to know if the recipient has received and read the
mail. In your Sent folder, the mail status icon will be if the mail has not yet been delivered. This
status icon will disappear when the mail is delivered. When the recipient has read the mail, the status
icon will be changed to .
14
SnapMail 5
• Reminders
In SnapMail, you can send reminders to yourself or others that will be delivered some time in
the future. To send a reminder, select the time you would like to be reminded from the clock pop-up.
The clock icon will change to red to indicate that you are sending a reminder. You may send the
reminder as either a Snap or a regular piece of mail. Reminders will be placed in your Sent Mail folder
until they are delivered and they will marked with a . You can trash a reminder if you decide that
you don’t want it sent.
• Spell-Checking
As you compose outgoing messages, SnapMail will underline and colorize words that it suspects are
misspelled. (These words will not appear colorized or underlined if the message is sent.)
ctrl-click on a word to see a list of suggested spellings. SnapMail primarily suggests words that sound
like the word you typed. If you have no idea how to spell a word, try to sound it out the best you can
before requesting suggestions. You may also select Add Word To Dictionary from the pop-up if
the marked word is one that you do not want SnapMail to mark as misspelled. Any words that you
have added to your dictionary can be removed by ctrl-clicking on them again, in which case the option
to remove the word will appear on the pop-up. See Appendix B for more information on using spellchecking dictionaries.
If you have turned off automatic spell-checking, you can check the spelling of your outgoing message
by selecting Check Spelling from the Tools menu (keyboard shortcut: Ctrl-;).
15
SnapMail 5
• Auto-Replies
Turning on an AutoReply will let SnapMail automatically respond to received messages. This is useful
if you are going to be away for a while or if you simply don’t want to be disturbed. To activate an
AutoReply, select the desired reply from the AutoReplies menu. Once selected, a window will pop up
telling you that an AutoReply is active and indicating the message that will be automatically sent back
when you are mailed.
Click the Deactivate AutoReply button when you are ready to answer calls again.
16
SnapMail 5
Editing AutoReplies
For quick one-time changes to the automatic reply messages, simply edit them right in the active
AutoReply box.
To permanently edit an AutoReply, create a new AutoReply, or delete an existing AutoReply, select
Edit… from the AutoReplies menu. This brings up the AutoReplies window.
Each AutoReply can have a text message associated with it. To edit this message, select the desired
AutoReply and then click the Edit button. This brings up a window in which you can change the
name of the AutoReply and the associated text message.
To create a new AutoReply, click the New button. You can then enter the name of the AutoReply and
the text message that will be sent when this AutoReply is active.
To delete an AutoReply, select the desired AutoReply and then click the Delete button.
17
SnapMail 5
Chapter 5: Customizing SnapMail
• Preferences
To customize how SnapMail is configured, select Preferences... from the SnapMail menu
(keyboard shortcut -,).
The Preferences window is divided into five tabs. Each tab has a Factory Defaults button that
allows you to return the preferences to their original settings.
Notification Preferences
SnapMail can signal the arrival of new messages in four different ways. To change these preferences,
first pick the type to be configured (Mail or Snaps) from the Notify pop-up menu.
New messages can be indicated by:
Icon: The SnapMail icon will bounce in the dock (or flash over the Apple icon in OS 9).
Alert Box: An alert window will appear with SnapBacks.
Pop SnapMail to front: SnapMail will become the active window.
Sound: SnapMail will play the selected sound.
18
SnapMail 5
Mail Preferences
Confirm when deleting mail
If this preference is checked, SnapMail will request confirmation before permanently deleting mail.
Copy original message when replying
If you would like the text of the message to which you are replying to always be included with your
reply, check this preference. To temporarily reverse this preference, hold down the option key when
clicking on the Reply button.
Reply to all original recipients
When this preference is checked, replying to a message will select all recipients that the message was
originally sent to. Uncheck this preference if you only want SnapMail to reply to the person who sent
you the mail.
Lock message list header (override with option-click)
Check this preference if you would like the fix the sorting order of the columns of the FileBox. If the
option is chosen, you can still change the sorting order by option-clicking on the column header.
19
SnapMail 5
Play sound on send
SnapMail plays a sound when you send mail. To turn this feature off, uncheck the Play sound on
send checkbox. You can also change the sound that you would like to hear and set the desired volume
level.
Trash options
This preference allows you to decide how your trash folder will work. The following options are
available:
No trash folder: Deleted mail will be immediately and permanently deleted.
Empty trash when quitting: All trash will be automatically deleted when SnapMail quits.
Delete after…: Trashed mail that is older than the specified time period will be permanently
deleted.
Never delete: Trashed mail will never be deleted unless you empty the trash or delete mail items
manually from the trash.
By default, SnapMail will use a trash folder and delete any mail that is older than one month.
Sent mail options
This preference allows you to decide how you would like the Sent Mail folder to work. The options are
the same as the Trash options (see above), but, you cannot remove the sent mail folder since that is
where pending mail is kept.
Return undeliverable mail after:
If mail you have sent cannot be delivered, SnapMail will hold the mail and attempt to send it later. The
Return undeliverable mail after: time specifies how long SnapMail will keep trying before
returning the mail to you as undelivered. To change this time, simply change the number in the text
box and then choose minutes, hours, or days from the pop-up menu. The default retry period for mail is
three days.
20
SnapMail 5
Text Style
SnapMail allows you to display text in a variety of fonts and sizes. You can select either to change the
message body text, the text used to list mail items, or the text used to display user names. Select the
font that you want from the Font: pop-up menu and then select from the available sizes in the Size:
pop-up menu. A sample of the font and size will appear in the window below the pop-up menus.
Changing the default font and size selection only affects the way you that you see your mail; it does
not affect the way your outgoing mail looks to other users.
21
SnapMail 5
Display
SnapMail will automatically color text of particular importance. You can change the colors that are
used for the mail header information (Date, From, To, cc, etc…), misspelled words found by the
spell-checker, and Web links.
Additionally, you can choose to display header information at the bottom of the message (top if this
option is not checked).
22
SnapMail 5
Misc.
Sort user list by last name
Check this preference if you would like the user list to be sorted by last name.
Show off/on status of users
Check this preference to have SnapMail display on next to users who are currently running SnapMail
and off next to those who aren’t.
Confirm before quitting
Check this preference to have SnapMail request confirmation before quitting.
Check spelling automatically
Uncheck this preference if you don’t want SnapMail to identify misspelled words as you type. You can
still check the spelling of an outgoing message by selecting Check Spelling from the Tools menu
(keyboard shortcut: -;).
Launch at system startup
Check this preference if you want to launch SnapMail automatically when you start up your computer.
23
SnapMail 5
… in the background
When launching SnapMail at start up, you may also want to SnapMail to bring up its main window. If
you do, uncheck this preference.
• Groups
Groups allow you to easily select multiple recipients by using a single name.
Defining Groups
To create, modify, or delete groups, select Groups... from the Edit menu or select Edit Groups…
from the Groups menu located above the user list (keyboard shortcut -J).
To add a new group, click on the New button and give the group a name.
To add or remove users, select the group you want to modify from the left side of the window and then
select or de-select the desired users from the right side of the window.
Defining single-person groups can be very useful. They can give you immediate access to the people
you send to most frequently, eliminating the need to scroll to them on a long user list.
To rename the currently selected group, click on the Rename button.
To remove the currently selected group, click on the Delete button.
24
SnapMail 5
Using Groups
To select a group, choose its name from the Groups pop-up menu. You can also select a group by
using shift- -0 — shift- -9. You may still toggle individual names on or off by -clicking on them.
You may also select additional groups by holding down the key as you select them from the
Groups pop-up menu.
• Users
The users window allows you to hide users from the main user list, delete users who are no longer on
your network, and view the on-off status of the user’s as well as their current IP address. To open the
users window, select Users... from the Edit menu (keyboard shortcut -U).
To prevent users from appearing on the user list in the main SnapMail window, simply uncheck the
checkbox next to the user’s name.
If you are a server, the users window will include a Delete button. You can use this button to delete
25
SnapMail 5
users of all user lists on your network. To delete users, select the name(s) of the user(s) and click on
the Delete button. Click on the OK button and all of the selected will be deleted.
• SnapBacks
SnapBacks let you assign text to buttons that can be used for single click replies to Snaps.
To edit the SnapBack buttons and messages, choose SnapBacks… from the Edit menu.
To edit a particular SnapBack, select it and then click the Edit button. Change the name of the
SnapBack button and its associated text message.
Click the New button to add a Snapback. Set the name of the SnapBack button and its associated text
message.
To delete a SnapBack, select the SnapBack and then click the Delete button.
You can change the order that the SnapBack buttons appear in the SnapBacks window by selecting a
SnapBack in the list and clicking either the Up button or the Down button. You can also just drag the
SnapBacks where you want them.
26
SnapMail 5
• Templates
With SnapMail’s Templates feature you can define pre-configured messages, including the message’s
icon and its recipients.
Templates can be edited by choosing Edit … from the Templates menu or ctrl-clicking in the
template icon area and selecting Edit Templates … (keyboard shortcut: -T).
To edit a particular Template, select it and then click the Edit button (or double-click on it).
Click the New button to add a new template.
To delete a template, select the template and then click the Delete button.
You can change the order that templates appear in the template pop-up triangle by selecting a template
in the list and clicking either the Up button or the Down button, or you can just drag it where you
want.
Editing and Creating New Templates
When editing or creating a new template, set the name for the template and enter the text of the
template in the Text box. Any word ending with : denotes a field. Fields can be traversed using the
tab key. To set the template’s icon you can simply paste or drag an image to the icon image well or
27
SnapMail 5
you can click the Capture Icon From Screen button. Note that the icon size is 16x16 pixels. If
you paste or drag in a larger image, SnapMail will only use the top left 16x16 pixels of the image. You
may also select a group or set of recipients that will be automatically chosen when the template is used.
• Networking
SnapMail supports the TCP/IP networking protocol. To edit the networking details, select
Networking... from the Edit menu.
28
SnapMail 5
Setting the Port
By default, SnapMail listens on port number 3762. This is the Internet Assigned Numbers Authority
(IANA) port number for use by the SnapMail protocol. You may change this setting, but, SnapMail
can only communicate with users who have the same port setting. Note that if you are using a firewall
you will have to allow communication on this port for SnapMail to work.
Finding other Users
SnapMail can discover other SnapMail users by sending a UDP broadcast over your local network, by
scanning a list of TCP/IP addresses, or by using Apple's Bonjour technology. By default, SnapMail
uses UDP broadcast and Bonjour. Uncheck either of these options if you do not want them active.
SnapMail automatically scans the network to look for other users when it is first launched. To
manually initiate a network scan, select Scan Network from the Tools menu (keyboard shortcut:
-K). You may need to do this if you are not using UDP broadcast or Bonjour.
TCP/IP scanning
If you have more than one subnet on your network or you will be connecting to SnapMail users over
the Internet, you will need to check the TCP/IP scanning checkbox and then enter IP addresses and/or
ranges of IP addresses into the TCP/IP scanning list so that SnapMail can find the users at those IP
addresses.
29
SnapMail 5
Adding and Editing IP Addresses:
To add an IP address or range of addresses into your scanning list, click on the New button.
For a single IP address, enter the address and do not click the Range checkbox. The comment field is
useful for notes regarding the IP address.
For a range of IP addresses, enter the start of the range as the address, click the Range checkbox, and
then enter the end of the range for the last IP number.
To edit an IP address or range of addresses, select the address(s) and click on the Edit button. To
delete an entry, select the address(s) and click on the Delete button.
Note for firewalls and Network Address Translation (NAT): Many networks are connected to the
Internet via cable/DSL modems or firewalls that share a single IP address for the entire LAN. This
technique is called Network Address Translation (NAT). If your LAN uses NAT, you can connect
your SnapMail users to external SnapMail users (or to entire remote SnapMail networks that are
themselves behind a NAT firewall) by following the instructions in the “Using a Server” section
below.
Maximum Simultaneous Connections:
When SnapMail is scanning the TCP/IP list, it will create as many simultaneous connections as it can
to speed up the scanning process. If you are using older hardware, you may need to set this value
lower.
30
SnapMail 5
Connection Timeout:
When SnapMail is scanning the IP list, it has to know when to give up if it doesn’t receive information
back. If you are on a fast local area network (LAN) this number can be very small (1 or 2 seconds). If
you are trying to connect to somebody over the Internet in a distant country, you'll want to allow at
least 10 seconds for a connection.
Using a Server
Volunteer this computer as a server:
You can volunteer a computer to be a Server, that is, to hold mail for delivery to other computers that
may be off. To do this, simply choose one computer that will always be left on, and check the
“Volunteer this computer as a server” check box. Messages sent to users whose computers’ are off
will be forwarded to that computer for later delivery. Only one computer should be designated as a
server unless networks are being connected over the Internet and there is no VPN.
Send all mail directly to server:
Check this box if you would like all mail to be immediately sent to the server. This is useful if you
either you want to make sure that no outgoing mail stays on your computer, or if you want to keep
records of all mail sent in one place.
Setting up SnapMail to connect remote users to a network
You can configure SnapMail to allow remote users to connect into the network over the Internet. If all
of the remote users have a static IP address and the computers on your network have static IP addresses
then all you need to do is add in the IP scanning range of your network in to the TCP/IP scanning list
of the remote user. If your network is behind a NAT firewall, you will have to volunteer one computer
on your network as a server, and make sure that the NAT firewall maps the SnapMail port number
(3762) to the internal IP number of the server. Additionally, if your remote user is behind a NAT
firewall you will have to do the same for that NAT firewall. Note that you will manually have to type
in your SnapMail registration number and code in on the remote computer.
Setting up SnapMail for use on multiple networks
You can use SnapMail to communicate between multiple networks that are behind network address
translation (NAT) firewalls, such as cable and DSL modems and routers. To do this you need to
volunteer one computer as a server in each network, and add the static IP address of the other external
NAT firewalls into the TCP/IP scanning list of each server. Then set up the NAT firewalls to forward
all incoming SnapMail data (all TCP packets on port 3762) to the internal IP address of the SnapMail
server on its network. To do this you will have to refer to the user manual of your router. For
31
SnapMail 5
example, if your firewall is an Airport Base Station, what you need to do is use the Airport Admin
Utility to log into the Base Station, click on “Show All Settings” and then click on the “Port Mapping”
tab. From there you can add in the mapping between the public and private side of the Base Station.
After your firewall has been set up, the SnapMail servers will then automatically handle passing
around the user lists from each network, as well as forwarding messages to the correct server for
delivery.
Please note that while registration information will be shared on your office LAN, for security reasons,
it will not do so for remote LANs. That means that the registration information will need to be entered
on one computer on each LAN that you are trying to connect.
• Name and Password
SnapMail allows you to easily change your user name and to add password protection. To edit the
name and password settings, select Name and Password... from the Edit menu.
Changing Your User Name
To change your user name, enter your new name in the text box and click on the OK button. All user
names on the network must be unique.
32
SnapMail 5
Password Protection
If you would like to restrict others from reading the mail from your Mac, you can turn on password
protection. SnapMail provides four levels of password protection. You may specify no protection, you
may have SnapMail request your password when the application is launched, whenever it is unhidden,
or after a selected time of inactivity. To select the desired level of security, click on the appropriate
radio button.
Password protection is initially set to be off. If you choose to turn on password protection, you must
enter your password in both entry boxes. Each character that you type will appear as a large dot to
insure that no one sees your password.
If you turn password protection on, you will not be able to leave the window unless your password has
been successfully entered. Once password protection has been turned on, you will also be required to
enter your password to have access to the Name and Password window again.
Once password protection is turned on, you can select Hide and lock from the SnapMail menu
(keyboard shortcut: shift- -H). This will hide SnapMail and then later request your password,
regardless of the password settings.
WARNING: Don't lose your password! Keep it written down in a safe place so if you forget it you can
still access SnapMail.
33
SnapMail 5
Appendix A: Keyboard Shortcuts
Most commands in SnapMail have keyboard shortcuts.
General shortcuts:
-F — Open the Find window.
-G — Find again.
-H — Hide SnapMail.
-I — Find again in the next folder.
-J — Open the Groups window.
-K — Scan Network for active users.
-L — Open the Log window.
-N — Attach a file.
-O —Open/Close the selected mail item.
-P — Prints the selected mail item(s).
-Q — Quit SnapMail.
-R —Reply to the selected mail item.
-return — Send as mail.
-option-return — Send as Snap.
-S — Saves the selected mail items(s) to a file.
-T — Open the Templates window.
-U — Open the Users window.
-, — Open the Preferences window.
34
SnapMail 5
Editing shortcuts
-C — Copy the selected piece of text to the clipboard.
-V — Paste the current contents of the clipboard.
-X — Cut the selected piece of text to the clipboard.
-Z — Undo the last thing you did (if possible).
Group shortcuts
-shift-0 — Select the "All" group from the Groups pop-up.
-shift-1 — Select the first group from the Groups pop-up.
…
-shift-9 — Select the ninth group from the Groups pop-up.
Template shortcuts
-1 — Select the first template.
…
-9 — Select the ninth template.
• Keyboard Navigation in the Main Window
In SnapMail’s main window, tab moves the focus between the Outbox text area, the Outbox user list,
and the Filebox, and the icon list.
The Outbox text area
-A selects all of the current text of the Outbox text area.
The Outbox user list
The ↑ ↓ arrows moves between different users.
-A selects all of the users.
35
SnapMail 5
The Filebox
The ↑ ↓ arrows moves between different messages.
The Return key opens or closes the currently selected message.
The delete key trashes the selected message.
-A selects all of the messages in list view and the text of a mail item in read view.
• The Option Key
Holding down the option key when choosing certain commands modifies how those commands will
be executed.
Option-Reply:
Temporarily reverses the Copy Original Mail's Text to Outbox on Reply preference.
Option-Delete:
Deletes mail immediately without placing it in the Trash folder.
Option-Quit:
Quits SnapMail without requesting confirmation.
Option-Click on an icon:
Clears the current text message and chooses the new template.
Option-Select Users... from the Edit menu:
Brings up the user list with details including what version of SnapMail mail each user is running and
what computer is their server.
36
SnapMail 5
Appendix B: Spell-Checking Dictionaries
To spell-check your outgoing mail, SnapMail uses two separate word lists. In OS X these word lists
can be found in the SnapMail application package. To open the SnapMail package hold down the ctrl
key, click on the SnapMail application and choose Show Package Contents from the menu that
appears. The dictionaries are in the Resources folder which is in the Contents folder.
The word list files are plain text files which can be edited with any word processor (make sure you
save them as plain text files when you are done making changes!). The “Dictionary” file contains the
main list of words. You can replace this with an alternative list, but note that the suggestions that
SnapMail comes up with are based on English phonetics and they may be poor choices for other
languages.
If you add words to the spelling dictionary from within SnapMail, these will be added to a “User
Words” file in the SnapMail Data folder in your preferences folder. If you have a list of words that you
use often that are not recognized by the spell-checker, it may be easiest to add them directly to this file.
37
SnapMail 5
Appendix C: Administration
SnapMail has an administration tool that lets a privileged user set other users' settings.
To open the administration window, choose Administration from the Tools menu. You will be
prompted to enter your registration code that you received when you purchased the software.
Administrative Functions appears as a separate window.
From the main window, first select the users to whom you wish to transmit changes.
From the pop-up, you can choose one of AutoReplies, Groups, Networking, Preferences, SnapBacks,
Templates or User list. One you have chosen the item that you wish to transmit, click on the transmit
button. All users selected in the main window will receive the settings of the selected item based on
how they are set in your (the administrator's) SnapMail.
For the networking, preferences and the user list, you may only replace the selected users' settings. All
of their setting will be updated to reflect your settings.
For AutoReplies, Groups, SnapBacks, and Templates, you can choose to either "Replace" or to "Add
to" the users' current settings. If you choose to replace, their settings will get completely overwritten
with yours. If you choose to add, your settings will be added to theirs. That is, if you pick "Groups"
and then "Add to", then after transmitting, all selected users will have their previously defined groups
and additionally any groups that you had defined.
38
SnapMail 5
Appendix D: Technical Support
If you are experiencing any problems with SnapMail that you can't solve, please visit our Web site
where you can submit a question and many common questions are answered.
World Wide Web: http://www.glassbead.com/support/
Internet e-mail: [email protected]
39
SnapMail 5
Copyright (c) 1993 - 2007 Glass Bead Software, LLC. All rights reserved.
This manual and the SnapMail™ software are copyrighted by Glass Bead Software, LLC. None of the
software may be copied or modified, in whole or in part, for distribution to or use by others.
Please Do Not Make Illegal Copies of this Software
SnapMail™ was produced through the blood, sweat, toil and tears of many people: designers, artists,
programmers, and other dedicated workers. The costs of developing this and other software programs
are recovered through software sales. The unauthorized duplication of software raises the cost for all
legitimate users. Federal copyright law protects this software. Your cooperation in upholding the law
will insure continued low-cost upgrades and new software. Copying software for any reason other than
to make a backup is a violation of federal laws. Please report all copyright violations to: SPA, 1101
Connecticut Ave., NW, Suite 901, Washington, D.C. 20036.
Limited Warranty
All implied warranties concerning this manual and media, including implied warranties of
merchantability and fitness for a particular purpose, are limited in duration to ninety (90) days from the
date of original retail purchase of this product. In no event will Glass Bead Software be liable for
direct, indirect, special, incidental, or consequential damages resulting from any defect in the software
or manual, even if Glass Bead Software has been advised of the possibility of such damages. In
particular, Glass Bead Software shall have no liability for any programs or data used with SnapMail
(including the cost of recovering or reproducing these programs or data). The warranty and remedies
set forth above are exclusive and in lieu of all others, oral or written, express or implied. No Glass
Bead Software agent or employee or dealer is authorized to make any modification, extension, or
addition to this warranty. Some states do not allow the exclusion of limited or implied warranties or
liability for incidental or consequential damages, so the above limitation may not apply to you.
Trademarks
Apple and Macintosh are registered trademarks of Apple Computer, Inc. Windows is a registered
trademark of Microsoft, Inc. The names of other products and companies appear herein for
identification purposes only and are trademarks and registered trademarks of their respective holders.
40