1
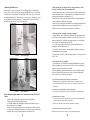
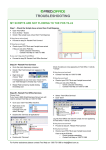
QuickPAD Technology, Corp. Infrared Transfer to Mac or PC Simple affordable, skill-building technology for today’s classroom User's Manual H45MN12 August 2005 QuickPad User's Manual QuickPad Specifications: Memory QuickPad has 128K total bytes of memory, 113K available for file storage. When QuickPad contains a lot of files and data, it's good practice periodically to check the available file and memory space. Just press "M" in Utilities menu. Tip: If QuickPad is nearly full, you can conserve memory space by uploading some important files to your PC or by deleting outdated files. System Requirements QuickPad works with all IBM or Apple compatible computers with any operating systems. To upload file you have to open any program that accepts text from the keyboard. It could be word processor, Email program, text editor like NotePad or even spreadsheet program. iMac Use If the QuickPad is to be used via a USB Port (i.e. such as with the iMac computer), a USB adapter is available through QuickPAD Technology, Corp. Please call for ordering information. Batteries and LCD Display QuickPad operates on four AA Alkaline batteries. Battery quality and life vary among different brands, but most batteries should last up to three months with typical QuickPad use (100 hours of use). Be sure never to mix different battery types, and to replace all four batteries when your batteries are low. To extend battery life, QuickPad's LCD display shuts itself off after sixty-five seconds of keyboard inactivity. Press any key and the display turns back on. Note: QuickPAD IR will detect low batteries when you turn it on, and display a low battery message for a few seconds. You will be able to continue using the QuickPAD for some time. It is best not to wait too long however. To help safeguard your files you are encouraged to do frequent backups and transferring all data on your computer. How to contact us: Toll Free . . . . . . . . . . . . . . . . . . . . . . . .(800) 373-8181 Technical Support . . . . . . . . . . . . . . . .(650) 961-9114 Fax . . . . . . . . . . . . . . . . . . . . . . . . . . . .(650) 964-2426 Web site address . . . . . . . . . . . . . . . . .www.quickpad.com E-mail . . . . . . . . . . . . . . . . . . . . . . . . . [email protected] About QuickPad The QuickPad is a powerful and versatile writing tool designed for today's teachers and students. It allows students the ability to utilize a word processor wherever they chose to work. Teachers and students key in data at their desks, in the library, at home…anywhere! Then simply open up any writing application in either a Mac or PC, point the QuickPad at the infrared receiver and press the send key. Within seconds all of the text has been transferred. We hope you find it to be a convenient and helpful tool. Please read all instructions carefully before using your new QuickPad. Unpacking Checklist QuickPad is shipped in protective foam packaging. Check to see that you have the following: QuickPad Infrared Receiver and Cables (PC MAC or USB) User's Manual Warranty Card Registration Four (4) AA Batteries Carrying Case Working with QuickPad QuickPad takes 4 AA batteries. Once the batteries are installed; QuickPad is ready to use. The infrared receiver and keyboard cable is only used for file transfer from QuickPad to PC or MAC. The process to connect is very simple, and will be explained later in the section on connecting your infrared receiver. Batteries: a) Insert 4 AA Alkaline batteries into the battery compartment. b) Be sure that the batteries make good contact with the springs. c) When the screen starts to dim, and cannot be brightened with the contrast knob, it is time to change the batteries. No data will be lost. Once the batteries are installed, wait 5 seconds, press the Power ON/OFF key to power on. "Select Folder F1 - F10" will appear. These are intended to be student or subject folders. By pressing one of the "F" keys, you will open that folder. Mailing address: QuickPAD Technology, Corp. 465 Fairchild Drive, Suite #103 Mountain View, CA. 94043 If the unit does not turn on, it could be one of two things: One of the batteries may be inserted with wrong polarity, or you may need to adjust the contrast dial on the back of the QuickPad. 12 1 Configuration Settings. Password Settings. Allow you to enable or disable the password for entering into the student writing folders. When you press P you will be prompted to enter the utility password. Once entered and accepted, you will find a list of four prompts: 1) Create a new utility password 2) Disable current utility password 3) Disable portfolio protection 4) Enable portfolio protection Numbers one and two are for altering the utility password. Numbers three and four are for enabling or disabling the password for the student writing folders or "portfolio filing system". When the password has been enabled the folder name will become the password. Folders F9 and F10 do not have a password. If you have forgotten the utility password, please call tech support at QuickPAD Technology, Corp. Configuration Settings: When “C” is pressed, you can enable or disable the following functions: * Typing tutor enable and disable. * Professional mode enable and disable. * Hawaiin characters enable and disable * Spellchecking enable and disable. In professional modes, folder “F9” becomes a Phone Directory and folder “F10” becomes a Scheduler. F9: Phone Directory To create a new Phone Directory file press F9, and then press “N” for New and you’ll see a “form” that helps you organize your information (QuickPad displays four lines at a time). Name: Phone #1: Phone #2: Address: Address: Comments: The text you enter on the Name line becomes the file name. Press ENTER to move the cursor to the next line, or use the arrow keys to move around the form. Your entries can consist of any printable character. Phone Directory’s format is a permanent part of each file you create and cannot be altered, but you can leave lines blank. Tip: In comments, pressing ENTER before the end of the first line allows you to add as many lines of information as you want (limited only by QuickPad’s memory). When you’ve finished adding a new file to Phone Directory, press ESC to save the file. F10: Scheduler: With QuickPad’s Scheduler you can check or update your calendar, and include any notes you want. Press “F10” and the screen looks like this: 8 the “Edit” command. To exit spelling check, just press the “Esc” key and the program will return to the main menu. Typing Tutor This feature teaches the student basic typing skills. The Typing Tutor has to be enabled in the utility Menu There are 4 levels to choose from. Level 1: Home Row 12 Lessons teaching “Home Row” layout. Each lesson repeats for a total of 24 trials. Level 2: Small Letter Groups 4 Lessons familiarizing keyboard layout beyond the “Home Row”. Level 3: Medium Letter Groups 4 Lessons continuing practice of entire keyboard layout. Level 4: Long Sentences & Paragraphs 1 Lesson practicing complete sentences.A review of keyboard layout. Familiarize yourself with the QuickPad first. To access the Typing Tutor, select a folder. Once you are in an individual folder (F1-F10), press “T” to enter into the Typing Tutor. The screen will prompt you to enter a level according to your current typing skills. Beginners, use level one. Press the Space Bar to start the lesson. The Typing Tutor will not allow you to advance until you have typed the correct character. You may skip the current sequence of characters by pressing the “PgUp” key. To return to the previous lesson, press the “PgDn” key. To quit the current program, press “ESC” at anytime. The screen will then show your results for the lesson. Press the “ESC” key again to return to the Folder Screen. The results of each Typing Tutor session are stored in the selected folder. Sending, Printing and Deleting Files: Sending a File To send a file the Infrared receiver must be connected to the keyboard port of your computer. (see section on IR receiver connections). Open any writing application on your PC or Mac and position your word processor's cursor where you want to begin entering the QuickPad Word Processor file. Open a folder F1-F10 on the QuickPad and locate the file you want sent. Place the > in front of your file name, point the QuickPad at the IR receiver and press the "Send File" key. The distance when sending files between the IR and QuickPad should be within the range of 10 inches up to 15 feet. Please keep Quickpad at the same level as the IR receiver. If the Characters on the computer screen are wrong or missing, most likely cause is the wrong speed of transmission. This can be adjusted under Speed in the Utility Menu. Deleting a File You may delete a file while in the folder screen or while in the text or edit mode. To delete while in the folder screen, place the > in front of the file you wish to delete, then press the "Delete File" key. While in the edit or text mode, simply press the "DeleteFile" key. Printing a File Connect the QuickPad to the special printer interface box available as a optional purchase from QuickPAD Technology, Corp. Select the file you want to print, then press the "Print" key, your selected file will be printed. Note: Your QuickPad must be connected to the printer interface box before you can use this 5 Connecting the IR Receiver: The infrared receiver can be connected in a "Pass Through" mode or wireless mode. That is, your PC or Mac keyboard cable will pass through the IR receiver then continue on into the back of your computer. Your QuickPad will also work just as a wireless keyboard through the IR receiver. The IR receiver is a passive device, allowing you to work on your computer without any interference. It stands ready to receive files from the QuickPad when they are sent. Please see pictures below: Picture 1 - With Passthrough “When uploading into my computer, there are dropped characters, added characters, or nothing seems to be transmitting at all”. 1. Make sure the correct cable is connected to the Keyboard Port of the computer and to the infrared receiver as instructed in the User’s Manual. Open a word processing document and retry uploading a file.*** 2. Make sure there is intelligible data entered in the file on the QuickPad that you are attempting to upload into your computer. 3. Make sure you are aiming at the Infrared Receiver and not the computer when you upload. QuickPad should be at least one foot from the IR receiver. 4. Make sure you have selected correct speed at PC or Mac Mode. “I’m having problems uploading into my laptop computer”. 1. Laptop computers have a different combination of keyboard and mouse ports so there may be some compatibility problems. To test if the IR will work, first connect a compatible PC keyboard to the laptop and check if it works properly. If not, contact your laptop manufacturer for help. 2. If it works with a regular keyboard, plug a regular keyboard to the passthrough port on the IR during power up. 3. If it still does not work, there is some compatibility problem. You must contact themanufacturer of your laptop. 4. You may need a special PS/2 cable for laptop computers. To order, please call 800-373-8181. “I’m losing files when I go to upload”. 1. If the batteries are very weak during an upload, QuickPad may not operate reliably. Uploading uses much more power and it may cause the voltage to the memory to get too low and result in loss of data. 2. Before uploading, make sure that the batteries are not weak (make sure that the screen intensity knob is not turned up all the way clockwise and that the screen is not dim. If so, change to new batteries. “I get a memory full warning after creating only a few documents”. 1. Most likely the cause of this problem is the memory was not initialized properly. Go to Utility and initialize the memory. You must save all data on computer prior to initialization. Picture 2 - USB Connection Your desktop computer must be off to perform these steps. (PS2 or AT Cables) a) Remove the keyboard cable from your computer's keyboard port. b) Plug your keyboard cable into the IR receiver. c) Using the supplied cable, and adapter, if needed, connect the IR receiver to the keyboard port of your computer. d) Mac users can connect the IR receiver between the mouse and the keyboard. e) After you have connected the IR receiver, you can safely turn on your desktop computer. The power LED on the Infrared receiver should be ON. 2 “Do you have a list of printers that I can print directly from?” 1. You can print into any parallel port printer with built-in fonts or with EPSON mode. “The keyboard keys are sticking”. 1. You can easily remove any key and make sure that there is no dirt or foreign material stuck between the key and the rubber switch beneath. 2. If this does not help, the keypad is defective and needs to be replaced. “It doesn’t want to upload correctly into my iMac”. Make sure that you have at least version 8.6 of the Apple Operating System. 11 function. This is an option that is available directly from QuickPAD Technology, Corp. Calculator When you press the "Calculator" key from a folder screen, QuickPad's calculator screen appears: * / + - Clr M+ MMc Mr Sign | | | | Memory: Num Lock On/Off Total: 0. 0. 0. 0. The commands, on the left of the display, are standard for a four-function calculator with memory. * / + - Multiply Divide Add Subtract Clr M+ MMc Mr Clear total (c) Add total to amount in memory (m, SHIFT +) Subtract total from amount in memory (m-) Clear memory (m, c) Copy value in memory to total (m, r) Calculator functions are entered on the keyboard as follows: Only the large white numbers on the second row will work in the Calculator mode. If you want to use green numbers, press the “Fn” key (works only in the calculator mode). If you want to use memory, you can not be in green key mode. For multiplication, press Shift 8. (*). The Clear, /, + and - commands require just one keystroke. M-, Mc, Mr and * (press SHIFT and "8") require two keystrokes. M+ requires that you use the SHIFT key when typing the plus (press "M," then SHIFT and "+"). Pressing ENTER completes an operation. QuickPad's calculator displays answers to twelve-digit accuracy. To exit the calculator, press ESC and QuickPad returns you to the Folder Screen. Keyboard Mode The QuickPad can enter text directly into your Mac or PC via infrared. Turn your QuickPad on then press the Esc key once or twice until you see "Now entering Keyboard mode". The screen will go blank. Point the QuickPad at the IR receiver and you may now type directly into your Mac or PC. To exit keyboard mode press Power ON/OFF key. Utilities Ctrl U allows you to enter the Utility mode. Ctrl U must be pressed while in the folder screen. If after pressing Ctrl U you see "Enter Utility Password" - type in the utility password. The Utility functions allows you to change the date and time of QuickPad's clock, adjust upload speed to your PC, display the version of software in your QuickPad, check available memory space, initiate password and initialize memory. From a folder screen, press "Ctrl U"and the display looks like this: (You may need to type in the utility password.) Date Time Speed Optns Init Rev Mem Kybd | | | Choose function from menu (first letter of command) QuickPad's Utilities functions appear on the left of the screen. The first letter of each function is the keyboard command. Date (D) - Available in Professional Mode only Pressing "D" allows you to adjust the date of QuickPad's clock using the arrow keys and the plus (+) and minus (-) keys. Up and down arrow keys change the month, left and right arrow keys change the day of the month, and the + and keys change the year. Press ESC and QuickPad sets the date and automatically calculates the day of the week. Time (T) - Available in Professional Mode only Press "T" to adjust the time with the arrow keys. The up and down arrow keys change the hour, and the left and right arrow keys change the minutes. "ESC" then sets the time and returns you to the Utilities menu. Note: QuickPad's clock is not designed for chronometer accuracy. It is accurate to within a few minutes a day, and provides a means of changing the date at midnight. If the precision of QuickPad's time display is important to you, you should reset the clock periodically. After replacing the batteries, date and time has to be reset. Rev ( R ) "R" displays the version of software in your QuickPad and the date of the revision. Speed (S) The Speed utility lets you slow down the upload rate when sending text from the QuickPad to your Mac or PC. Press "S" and QuickPad's screen says, "Upload transmission rate. Enter a number from 0 to 9." (Depending on the speed of your PC and your software, QuickPad may transmit data too quickly and some characters may be lost.) Entering a value of 0 selects QuickPad's slowest upload speed. If you notice you're losing characters when you upload, lower the transmission rate by selecting a lower number. After you changed the upload rate, you will have chance to select file transmission method: Apple-Mac mode or IBM-PC mode. MAC mode will work with PC as well, but transmission speed will be 50% slower. Mem (M) Pressing "M" displays the number of files and memory space currently available in QuickPad. Tip: It's good practice to delete unimportant files and past homework to ensure sufficient memory space remains available. Data loss could occur if you exceed QuickPad's memory limits. Init (I) This function initializes memory, deleting all files and data. QuickPad is designed to initialize itself automatically the very first time it's powered up, but you can also initialize QuickPad manually. Press "I", then press CTRL-SHIFT-I simultaneously to initialize QuickPad manually. (At this point, you can press ESC to abort the initialization process.) The screen says, "initializing memory," and then goes to the Folder Screen. Remember that initializing memory deletes all files and data. Kybd(K) This function enables or disables the “Sticky Key” feature. When enabled, the user can simply press the Shift key once, and the next character will be upper case, subsequent characters will be lower case. With this feature, the user does not need to hold down the Shift key while typing the character. Optns(O) 6 Under Options function you have two settings - Password Settings and 7 3. Spring contacts with batteries must be secure. Make sure that the extended spring contact for the Negative (flat) end of the battery is not bent or broken, or corroded from a leaky battery. 4. Remove one battery and put it back. This will initialize the QuickPad. “The batteries seem to be wearing out after just a few days”. 1. Be sure to actually power off the QuickPad each time you finish using it by pressing the Power ON/OFF Key. If the QuickPad is placed in its case in the sleep mode, it will continue to draw power, though very minimally, unless a key is pressed. When a key is pressed the QuickPad will continually “read” that key which will wear down the batteries. If anything such as the IR receiver, a pen, etc. is also in the case with the QuickPad, it is likely a key will be depressed since the case is snug fitting. A book, keyboard, etc. resting atop a sleeping QuickPad (or against it while inside a briefcase) will have a similar effect even though the QuickPad is in its case. 2. Be sure your not accidentally entering the Wireless Keyboard Mode when attempting to power down. When you press the Escape Key (Esc) one time past the “Select Folder F1-F10” screen you will enter the Wireless Keyboard Mode. When in the Wireless Keyboard Mode the QuickPad will appear to be off since the screen doesn’t display a character when a key is pressed. It will instead continually send, via infrared, whatever key is depressed. This will wear down the batteries very rapidly. Again, always be sure the QuickPad is powered off by pressing the Power ON/OFF key when you’ve finished using the QuickPad. “When the QuickPad is turned on, the screen displays only squares”. 1. Adjust the contrast control knob (see step #3 above). 2. Remove one or more batteries while the squares are displayed, then replace the batteries. 3. Call tech support for an RMA#: 800-373-8181 “Two lines of small squares appear on the screen”. 1. The screen did not Initialize properly upon startup and must be re-initialized. Shut the QuickPad off by pressing the Power Key (the lines should disappear). Turn the QuickPad on (press the Power Key), the lines should reappear and remain unchanged throughout these next three steps. Press the F1 Key. Press the Control (Ctrl) Key and the letter “U” Key simultaneously. Press the “I” Key. Press the Control, Shift and “I” Keys simultaneously (the lines should disappear). Press the Power ON/OFF key once and the screen should read “Select Folder F1 - F10”. 2. If the above steps do not solve the problem, call tech support for an RMA#. Contact Tech Support at 800-373-8181. “The IR cables don’t fit into the keyboard port on the back of my computer”. 1. Make sure that the correct cables were sent with your QuickPad. Macintosh should be a 4-pin cable. IBM compatible PC’s have 1 cable 6-pin, and one 6 to 5 pin adapter for AT Keyboard. 2. Be sure the cable is connected to the correct port, on your computer, it must be the Keyboard Port only.*** 10 f) Using USB port, just plug IR receiver to unused USB port. Since it is “Plug & Play” port, you don’t have to restart the computer. Windows 98 users may need to load a software driver, USB-HID (Human Interface Device). Beginning and Naming a New File: Once you open a folder you may begin a new file by pressing the "N" key. A prompt will appear asking you to name your new file. A file name can consist of any printable characters, including spaces. Once you have typed in the name of the new file, press "Enter" to begin typing the contents for that file. Begin typing your document, when you have typed to the end of the first line, the text will automatically "wrap" to the line below. Press "Esc" to return to your folder. (QuickPad stores your files in alphabetical order). To rename an existing file, press Ctrl-R. After you press “ESC” the file will be saved in Flash memory, it may take few seconds, the more files you have the longer it takes to save. Naming the Folder: To name the folder, open a folder F1-F10 then press Ctrl-F. A prompt will appear asking you to name the folder. Type in the name of your folder - up to ten characters, then press "Enter". Note- The name that you give to the folder will become that folder's password once the password system has been enabled. Saving Data All data is automatically saved whenever you close the document. There are no "save" steps to go through. When you have finished typing, press "Esc" to display that folder. Files are saved in Flash memory, so even when the QuickPad has no batteries, the files will be saved permanently. Editing a File To edit a previously written file open up the folder that contains that file using the up and down arrow keys on QuickPad's keyboard, point the arrow marker (>) to the file you want to edit. Press "Enter" and the file opens. Now you can enter text. Pressing the up, down, left and right arrows repositions the cursor. The PAGE UP and PAGE DOWN keys move the cursor three lines up or down, allowing you to "scroll" through your document. The HOME and END key returns you to the beginning or to the end of document. Text entry is always in the "insert" mode, which means that the new text you type will not overwrite any existing text. You can, however, remove text. Pressing the DELETE key removes the character at the position of the cursor, and the BACKSPACE key removes the character to the left of the cursor. To create paragraphs in your document, press ENTER twice at the end of a line and you may use the Tab key. NOTE: QuickPad does not show spaces entered at the beginning of a line. This maximizes utilization of the 40-character-wide screen. Any text you want to print out must be "uploaded" to your PC's word processor, where you can select the fonts and format your document. Word Prediction To enable Word Prediction mode press “F5” key. The suggestions will appear after third character of the word being typed. If you find the word you want please type “F1-F4” key to select that word. It will get automatically inserted into your text. If you do not find the word and want to display more suggestions press “Ctrl-j” or “Ctrl-Down Arrow” keys to go down the list and “Ctrl-k” or “Ctrl-Up Arrow” keys to go up the list. If you type the fourth character of the word in your file, the list will get smaller as some suggestions will get eliminated. To disable Word Predictor press “F5” key again. 3 Thesaurus A thesaurus is a word reference that allows you to find synonyms (words of similar meaning) for words in your document. You can use the QuickPAD thesaurus on a completed file, or one you are editing. Open the file and move the cursor (using the arrow keys) to a word you would like to check for a synonym, and press the F7 key. If there are synonyms available for this word you will see a list on the right side of the screen. In some cases there will be several synonyms available and you may scroll down through the list. Hold down the CTRL key while using the up and down arrow keys, or if more convenient, you may press CTRL-J or CTRL-K keys as well. If you see a word you like simply press the corresponding “Fx key”, as shown next to each word. It will replace the word in your document. Spanish characters settings This option allows the user to type certain Spanish characters in an edited document. The characters that are allowed are ñ, Ñ, á, é, í, ó, ú, ¡ (upside down exclamation mark), and ¿ (upside down question mark). To insert one of these characters in any text file in the QuickPAD IR simply press and release the CTRL key, then the corresponding letter. Example 1: to create ñ press and release the CTRL key, then press the letter n. Example 2: To create the capital Ñ press and release the CTRL key, press SHIFT, then the letter n. Please note that there are no capital accented vowels available, only the capital Ñ is allowed. You may transfer any files you've created with Spanish characters to the PC by IR transfer, or by file transfer using the serial cable and the QPIRFILES program. The file transfer procedure is the same for English or Spanish and is unchanged from previous versions. The keyboard IR transfer (when you press the SEND FILE key on the QuickPAD IR) requires that the receiving PC is in Spanish mode with a true Spanish keyboard. The QuickPAD IR emulates the different letter placement and function of a true Spanish keyboard. Spell Check QuickPad will check any file for spelling errors. To enter spell checking program press Spell Check key. It can be entered from a folder menu by pointing the cursor at the file to be checked. It can also be entered from the open file. If the document has no spelling errors, the program displays a message when the spell checking is finished. If the program finds an error, it will display the following screen: Bad: wurd I- Ignore R- Replace E- Edit Esc - abort 1 of 4 >kurd turd ward word “Ignore” will leave the word unchanged. “Replace” will substitute the word with one of the suggested words. To select the word, move the cursor with the up or down arrow keys. If more than 4 words are suggested, the list will scroll down. Once the corrected word is selected, press “R” to replace the bad word. If there is no suggestion or no correct suggestion, the bad word can be modified using 4 Edit Del View Prev Next Thursday June 19, 1997 Nothing Scheduled QuickPad displays today’s date, along with a list of functions available. (You may want to skip ahead to the section on Utilities and set today’s date correctly in Quickpad’s memory.) To record an appointment, first change the date displayed (this doesn’t affect today’s date in QuickPad’s memory) to the date of your appointment. The plus (+) and minus (-) keys change the year. The up and down arrows keys change the month. The right and left arrows keys change the day. QuickPad automatically calculates the day of the week. Tip: In Scheduler you don’t need to press SHIFT when using the plus key. After you’ve changed the display to the date of the appointment, QuickPad tells you either “You have an appointment!” or “Nothing scheduled.” Press “E”. If you have nothing scheduled, QuickPad displays a blank screen with a cursor, allowing you to record an appointment for that date. If you already have an appointment for that date, QuickPad displays it. Pressing “E” allow you to add appointments or to edit existing appointments. After recording an appointment, you can View or Delete them. Note: Only one appointment file can exist for any given date, but you can enter as many appointments and notes in that file as you want. A typical appointment file might look like this: 9am: 11am: Go see your boss for a raise! Call the school, arrange for Lisa’s vacation, be sure to tell them when we’ll be returning Once you’ve entered the appointment information for a given date, press the ESC key. Edit Del View Prev Next Friday June 20, 1997 You have an appointment! Using the arrow keys, you can move through various dates and Scheduler will tell you whether you have an appointment for that date. You also can use the Previous (“P”) and Next (“N”) commands. “N” skips to the next appointment file, and “P” goes back to the previous appointment file, if they exist. Pressing ESC returns you to the Folder Screen. Trouble Shooting “The QuickPad doesn’t come on when I press the Power ON Key”. 1. Check your batteries to make sure they are not worn down and/or replace with fresh batteries. Make sure batteries are inserted correctly. Refer to symbols for + positive and - negative that are on the bottom of the battery compartment. 2. Adjust the contrast control knob on the back of the QuickPad (near the QP’s PS/2 port connection). Turning the knob clockwise will produce a screen full of small squares (highest setting). Adjust as necessary. 9