1
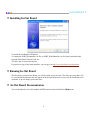
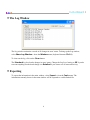
Windows Version 2.0
Eric Harris-Braun,
Adam King
&
Lisa Sawin
In-Out Board 2
©2007 Glass Bead Software, All Rights Reserved
http://www.glassbead.com
Rev. 1.3.07
2
In-Out Board 2
Chapter 1: Welcome
Welcome to In-Out Board, the people tracking software for Windows and Macintosh networks that's a
snap to install and run. In-Out Board runs on any Windows computer running XP, Windows 2000, or
Windows 98 and any Macintosh with either OS X (10.2 and above — runs in Universal Binary on 10.3
and 10.4 ) or Classic Mac OS (9.2 and above). In-Out Board connects over your TCP/IP network and
does not require any system administration or the use of a server. Although In-Out Board works
seamlessly between Windows and Macintosh computers, the interface has some platform specific
differences. This documentation covers the program for Windows users. A similar manual for
Macintosh users is available on our website at http://www.glassbead.com/download/ .
• What You Need to Run In-Out Board
In-Out Board requires a TCP/IP network. You do not need to be connected to the Internet for In-Out
Board to work, but you must configure a TCP/IP network in your Network Connections control panel.
• Trying and Buying In-Out Board
You can download the most recent version of In-Out Board from our web site at www.glassbead.com.
In-Out Board will run for 45 days. After this you will need to purchase a license.
In-Out Board is sold on a per-user basis. Registration codes will work for either the Windows or the
Mac version. For example, you might buy a fifteen-user license in which case you will be sent a
fifteen-user registration code. This code could be used with any combination of Windows or Mac
users. If you later need to add four more users to your system, purchase another four-user license from
our Web site and you will get a new registration code for nineteen users. Buying a license is easy.
Select Purchase In-Out Board… from the Help menu in In-Out Board and you will be taken to
the Web site to purchase. You can also visit us directly at www.glassbead.com/buy.
After purchasing online, you will be sent a valid registration code by e-mail. Enter this code along with
your registration name by choosing Registration… from the Edit menu in In-Out Board. You only
need to enter the registration code on one computer — all others will share this license. Note: If you
are connecting remote LAN's, you will need to enter the registration code on one computer in each
LAN.
3
In-Out Board 2
• Installing In-Out Board
To install In-Out Board for Windows:
1) Launch the IOB2_WinInstaller.exe file (or IOB2_Win98Installer.exe file) that you downloaded
from the Glass Bead Software web site.
2) Follow the on-screen instructions.
If you need a copy of the latest installers, you can get it at http://www.glassbead.com/download.
• Running In-Out Board
The first time you run In-Out Board, you will be asked for a user name. The name you enter here will
be your In-Out Board name and will appear in the In-Out Board user list on every In-Out Board user’s
computer. You can change your name later.
•
In-Out Board Documentation
You can download or view this manual in PDF format from In-Out Board’s Help menu.
4
In-Out Board 2
Chapter 2: Using In-Out Board
• The Main Window
From the main window, you can view the status of all users, examine their notes, and see the last time
their status was updated.
A grey entry indicates that the user has turned off their computer or shut down In-Out Board.
You can quickly change your status from the pop-up triangle at the bottom left of the window. From
here you can also set a custom status or change your notes by selecting Custom… Select Edit Status
Options… if you would like to create new status choices.
You can also double-click on your own entry if you would like to edit your own status and notes.
Double-click on another user's entry to view the entire text of their notes. You can also change a user’s
status or notes if they have allowed you to act as their proxy. In addition, there is a private notes
section associated with each user where you can keep your information.
5
In-Out Board 2
• The Log Window
The Log window maintains a record of all changes in users' status. To bring up the Log window,
select Show Log Window... from the Window menu (keyboard shortcut Ctrl-L).
To clear out the log, click on the Clear button.
The Standard log level tracks changes in users' status. Change the Log Level setting to Off if you do
not want anything recorded and change it to Detailed if you want to see all network activity.
• Exporting
To export the information in the main window, select Export... from the Tools menu. The
information currently shown in the main window will be exported to a tab delimited file.
6
In-Out Board 2
Chapter 3: Customizing In-Out Board
• Preferences
To customize how In-Out Board is configured, select Preferences... from the Edit menu (keyboard
shortcut Ctrl-Y).
The Preferences window is divided into two tabs. Each tab has a Factory Defaults button that
allows you to return the preferences to their original settings.
Behaviors
Notify status change of:
In-Out Board can signal a change in another user's status. First, pick the user from the pop-up menu.
Messages can be indicated by:
Flashing Window: The In-Out Board window will flash.
Sound: In-Out Board will play the selected sound (at the selected volume).
7
In-Out Board 2
Sort list by last name
Check this preference if you would like the user list to be sorted by last name.
Launch at system startup
Check this preference if you want to launch In-Out Board automatically when you start up your
computer.
… in the background
When launching In-Out Board at start up, you may also want to In-Out Board to bring up its
main window. If you do, uncheck this preference.
Place icon in System Tray
Check this preference if you want to have In-Out Board accessible from the System Tray.
… minimize to System Tray
When using the System Tray, you can also choose to have the application minimized to the Tray
when the main window is minimized.
Appearance
8
In-Out Board 2
In-Out Board allows you to display text in a variety of fonts and sizes. In addition, you can set the
colors to be used to indicate users that are online or offline. Select the font that you want from the
Font: pop-up menu and then select from the available sizes in the Size: pop-up menu. Click on the
Set… buttons to set the appropriate text color. A sample of the font, size and color will appear in the
window below the pop-up menus.
• Changing Your User Name
To change your user name, select Name... from the Edit menu. All user names on the network must
be unique.
• Users
The users window allows you to hide users from the main window, delete users who are no longer on
your network, and view the on-off status of the user’s as well as their current IP address. To open the
users window, select Users... from the Edit menu (keyboard shortcut Ctrl-U).
9
In-Out Board 2
To delete users, select the name(s) of the user(s) and click on the Delete button.
If you do not want certain users to be able to change your status and/or notes, then uncheck the proxy
checkbox next to that user. If by default you do not want new users to be able to change your status
and/or notes, uncheck the Give new users my proxy checkbox.
To prevent users from appearing in the main window, simply uncheck the checkbox next to the user’s
name.
10
In-Out Board 2
• Status Options
To edit the status list, create a new status option, or delete an existing status option, select Status
Options… from the Edit menu or from the pop-up triangle on the main window. This brings up the
Status Options window.
To edit a status option, select it and then click the Edit button or double-click on it. This brings up a
window in which you can edit the status option. To create a new status option, click the New button
and then type in the status option. To delete a status option, select the desired option and then click the
Delete button.
Use the Up and Down buttons to change the position of a selected status option.
• Networking
In-Out Board supports the TCP/IP networking protocol. To edit the networking details, select
Networking... from the Edit menu.
11
In-Out Board 2
Setting the Port
By default, In-Out Board listens on port number 23142 You may change this setting, but, In-Out Board
can only communicate with users who have the same port setting. Note that if you are using a firewall,
you will have to allow communication on this port for In-Out Board to work.
Finding other Users
In-Out Board can discover other In-Out Board users by sending a UDP broadcast over your local
network, using Apple's Bonjour technology or by scanning a list of TCP/IP addresses. By default, InOut Board uses only UDP broadcast.
In-Out Board automatically scans the network to look for other users when it is first launched. To
manually initiate a network scan, select Scan Network from the Tools menu (keyboard shortcut:
Ctrl-K).
12
In-Out Board 2
TCP/IP scanning
If you have a more than one subnet on your network or you will be connecting to In-Out Board users
over the Internet, you will need to check the TCP/IP scanning checkbox and then enter IP addresses
and/or ranges of IP addresses into the TCP/IP scanning list so that In-Out Board can find the users at
those IP addresses.
Adding and Editing IP Addresses:
To add an IP address or range of addresses into your scanning list, click the New button.
For a single IP address, enter the address and do not click the Range checkbox. The comment field is
useful for notes regarding the IP address.
For a range of IP addresses, enter the start of the range as the address, click the Range checkbox, and
then enter the end of the range for the last IP number.
To edit an IP address or range of addresses, select the address(s) and click on the Edit button. To
delete an entry, select the address(s) and click on the Delete button.
13
In-Out Board 2
Note for firewalls and Network Address Translation (NAT): Many networks are connected to the
Internet via cable/DSL modems or firewalls that share a single IP address for the entire LAN. This
technique is called Network Address Translation (NAT). If your LAN uses NAT, you can connect
your In-Out Board users to external In-Out Board users (or to entire remote In-Out Board networks
that are themselves behind a NAT firewall) by following the instructions in the “Using a Server”
section below.
Maximum Simultaneous Connections:
When In-Out Board is scanning the TCP/IP list, it will create as many simultaneous connections as it
can to speed up the scanning process. If you are using older hardware, you may need to set this value
lower.
Connection Timeout:
When In-Out Board is scanning the IP list, it has to know when to give up if it doesn’t receive
information back. If you are on a fast local area network (LAN) this number can be very small (1 or 2
seconds). If you are trying to connect to somebody over the Internet in a distant country, you'll want to
allow at least 10 seconds for a connection.
Using a Server
Volunteer this computer as a server:
You can volunteer a computer to be a Server, that is, to hold status changes for computers that may be
off. To do this, simply choose one computer that will always be left on, and check the “Volunteer this
computer as a server” check box.
14
In-Out Board 2
Setting up In-Out Board to connect remote users to a network
You can configure In-Out Board to allow remote users to connect into the network over the Internet. If
all of the remote users have a static IP address and the computers on your network have static IP
addresses then all you need to do is add in the IP scanning range of your network in to the TCP/IP
scanning list of the remote user. If your network is behind a NAT firewall, you will have to volunteer
one computer on your network as a server, and make sure that the NAT firewall maps the In-Out
Board port number 23142 to the internal IP number of the server. Additionally, if your remote user is
behind a NAT firewall you will have to do the same for that NAT firewall. Note that you will
manually have to type in your In-Out Board registration number and code in on the remote computer.
Setting up In-Out Board for use on multiple networks
You can use In-Out Board to communicate between multiple networks that are behind network address
translation (NAT) firewalls, such as cable and DSL modems and routers. To do this you need to
volunteer one computer as a server in each network, and add the static IP address of the other external
NAT firewalls into the TCP/IP scanning list of each server. Then set up the NAT firewalls to forward
all incoming In-Out Board data (all TCP packets on port 23142 to the internal IP address of the In-Out
Board server on its network. To do this you will have to refer to the user manual of your router.
After your firewall has been set up, the In-Out Board servers will then automatically handle passing
around the user lists from each network, as well as forwarding messages to the correct server for
delivery.
Please note that while registration information will be shared on your office LAN, for security reasons,
it will not do so for remote LANs. That means that the registration information will need to be entered
on one computer on each LAN that you are trying to connect.
15
In-Out Board 2
Appendix A: Keyboard Shortcuts
Most commands in In-Out Board have keyboard shortcuts.
General shortcuts:
Ctrl-B — Show/Hide the In-Out Board window.
Ctrl-H — Hide In-Out Board.
Ctrl-K — Scan Network for active users.
Ctrl-L — Show/Hide the Log window.
Ctrl-M — Minimize the selected window.
Ctrl-Q — Quit In-Out Board.
Ctrl-S — Set a custom status.
Ctrl-T — Open the Status Options window.
Ctrl-U — Open the Users window.
Ctrl-W — Minimize the selected window.
Ctrl-Y — Open the Preferences window.
Ctrl-? — Bring up the help PDF for In-Out Board.
Editing shortcuts
Ctrl-C — Copy the selected piece of text to the clipboard.
Ctrl-V — Paste the current contents of the clipboard.
Ctrl-X — Cut the selected piece of text to the clipboard.
Ctrl-Z — Undo the last thing you did (if possible).
16
In-Out Board 2
Status shortcuts
Ctrl-1 — Change status to the first listed status.
Ctrl-2 — Change status to the second listed status.
…
Ctrl-9 — Change status to the ninth listed status.
17
In-Out Board 2
Appendix B: Administration
In-Out Board has an administration tool that lets a privileged user set other users' settings.
To open the administration window, choose Administration… from the Tools menu. You will be
prompted to enter your registration code that you received when you purchased the software.
Administrative Functions appears as a separate window. Any user may test this feature if the
software is in Demo mode.
Transmitting Settings
If you would like to change the settings of other users. first click on the radio button that says "Send
settings to chosen users." Now you can select one or multiple users to receive transmitted changes. As
usual, use the Ctrl key to chose more than one.
From the pop-up, you can choose one of Networking, Preferences, Status Choices or User List. One
you have chosen the item that you wish to transmit, click on the transmit button. All users selected in
the main window will receive the settings of the selected item based on how they are set in your (the
administrator's) In-Out Board.
For Networking, Preferences and the User List, you may only replace the selected users' settings. All
of their setting will be updated to reflect your settings.
For Status Choices you can choose to either "Replace" or to "Add to" the users' current settings. If you
choose to replace, their Status Choices will get completely overwritten with yours. If you choose to
18
In-Out Board 2
add, your Status Choices will be added to theirs.
When you are doing selecting the recipients and which settings to transmit, click on the Transmit
button.
Changes names on the network
If you would like to change the name of another user, click on the radio button that says "Change name
of selected user." You may then select one user name from the list. Note that you can only change the
name of a user that is currently on.
Enter their new name into text box and then click on the Transmit button.
19
In-Out Board 2
Appendix C: Technical Support
If you are experiencing any problems with In-Out Board that you can't solve, please visit our Web site
where you can submit a question and many common questions are answered.
World Wide Web: http://www.glassbead.com/support/
Internet e-mail: [email protected]
20
In-Out Board 2
Copyright (c) 2004 Glass Bead Software, LLC. All rights reserved.
This manual and the In-Out Board™ software are copyrighted by Glass Bead Software, LLC. None of
the software may be copied or modified, in whole or in part, for distribution to or use by others.
Please Do Not Make Illegal Copies of this Software
In-Out Board™ was produced through the blood, sweat, toil and tears of many people: designers,
artists, programmers, and other dedicated workers. The costs of developing this and other software
programs are recovered through software sales. The unauthorized duplication of software raises the
cost for all legitimate users. Federal copyright law protects this software. Your cooperation in
upholding the law will insure continued low-cost upgrades and new software. Copying software for
any reason other than to make a backup is a violation of federal laws. Please report all copyright
violations to: SPA, 1101 Connecticut Ave., NW, Suite 901, Washington, D.C. 20036.
Limited Warranty
All implied warranties concerning this manual and media, including implied warranties of
merchantability and fitness for a particular purpose, are limited in duration to ninety (90) days from the
date of original retail purchase of this product. In no event will Glass Bead Software be liable for
direct, indirect, special, incidental, or consequential damages resulting from any defect in the software
or manual, even if Glass Bead Software has been advised of the possibility of such damages. In
particular, Glass Bead Software shall have no liability for any programs or data used with In-Out
Board (including the cost of recovering or reproducing these programs or data). The warranty and
remedies set forth above are exclusive and in lieu of all others, oral or written, express or implied. No
Glass Bead Software agent or employee or dealer is authorized to make any modification, extension, or
addition to this warranty. Some states do not allow the exclusion of limited or implied warranties or
liability for incidental or consequential damages, so the above limitation may not apply to you.
Trademarks
Apple and Macintosh are registered trademarks of Apple Computer, Inc. The names of other products
and companies appear herein for identification purposes only and are trademarks and registered
trademarks of their respective holders.
21