1
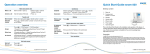
Operation overview
Quick Start Guide snom 870
Make and answer calls
Make a call
Answer a call
Dial the number > Press
Take the handset off the hook
Delivery content
Conference
OR dial the number > Take the
handset off the hook
Establish
OR press
Disconnect
Call the first participant > Press
> Call the second participant
> Drag and drop the second call into context area to start conf.
Drag and drop calls out of the context area to put the two
participants on hold
Transfer call
Blind transfer
When call is ringing, press
Attended
transfer
Press
> Dial the number > Press > Announce the call >
Hang up the handset
Mailbox
> Dial the number > Press
Retrieve new
messages
Press
Phone information and utilities
Forward call
Press
> Press 2 Call Features > 1 Call Forwarding >
Always
1 Forward All > 2 Target when Forwarding > Enter target phone
number > 1 Enable Forwarding > Choose Yes
When busy
2 Forward when Busy > 2 Target when Forwarding > Enter target
phone number > 1 Enable Forwarding > Choose Yes
On timeout
3 Forward after Timeout > 2 Target when Forwarding > Enter target
phone number > 1 Enable Forwarding > Choose Yes > 3 Call
Forwarding time > Enter time in seconds
IP address
Press
> 5 Maintenance > 1 System Info to show IP address
and firmware version
Access web
interface
Enter your phone’s IP address in the web browser’s address bar and
press ENTER
Reboot
Press
> 5 Maintenance > 3 Reboot
Your specialist retailer:
Press
Resume call
Press
6
© 2009 snom technology AG
2.
Footstand with bracket + 2 screws
3.
Handset
4.
Handset cable
5.
Ethernet cable
6.
Power supply
7.
Quick Start Guide
8.
GNU General Public License
This is the Quick Start Guide to the installation and operation of the phone. It
contains information about setting up the phone and a phone and operation overview. Further documentation is available in the snom knowledge base:
http://wiki.snom.com
© 2009 snom technology Aktiengesellschaft (v.1.07)
All Rights Reserved. This document is supplied by snom technology AG. No part of this document may be reproduced, republished or retransmitted in any form or by any means whatsoever, whether electronically or mechanically,
including, but not limited to, by way of photocopying, recording, information recording or through retrieval systems,
without the express written permission of snom technology AG.
snom technology AG reserves the right to revise this document and make changes at any time and without the obligation to notify any person and/or entity of such revisions and/or changes. Product specifications contained in this
document are subject to change without notice.
TeamSpirit ® VoiceEngine is Copyright © 1995-2009, SPIRIT
again
5
Base unit
Copyright
Hold and resume
Hold call
1.
1
© 2009 snom technology AG
© 2009 snom technology AG
Setting up the phone
Phone overview
1. Check contents of the package for completeness.
2. Connect the long end of the handset cord to the connector on the back of
the base unit. Connect the short end of the handset cord to the handset.
Place the cord in the cable guide on the right side of the phone‘s back .
4. Plug the other cables into the jacks labelled as follows:
1
NOTE: Wrong power supplies may cause damage to the phone. Use only
2a
2b
the power supply included in the package.
(a)
(b)
(c)
(d)
Ethernet/POE cable to “NET” to connect to your internal network
Power supply (if PoE is not used) to “5V DC”
PC to “PC” via second ethernet cable (not included)
Headset to the headset connector via headset cable (not included)
3
4
5
6
7
3. Attach the footstand with the bracket and the two screws. Choose between
horizontal (55° inclination) or vertical (33° inclination) placement.
5. Place the phone on an even, horizontal surface.
The phone is installed and will start the initialization. The initialization process
depends on your network environment and configuration. For further information
contact your administrator or download the user manual from our web page
www.snom.com.
2
3
© 2009 snom technology AG
1.
Call indication LED
Indicates incoming calls, calls on hold, missed calls
2.
Touchscreen
for intuitive navigation and phone use. Shows
information and activity of the phone
a. Context area
Current phone activity (in call, in conference, etc.)
b. Call appearances
Line info (active calls, calls on hold, free lines, etc.)
3.
Navigation keys
Use to navigate in the display menus and confirm &
cancel actions.
4.
MWI key with LED
Indicates messages on mailbox and missed calls.
5.
Alphanumeric keys
Enter numbers, letters and special characters
6.
Preprogrammed
function keys
Press respective key to turn on DND, enter directory,
main menu, transfer calls, and put calls on hold
7.
Audio control keys
Use to change the volume and to switch between
handset, handsfree, and headset mode
4
© 2009 snom technology AG
© 2009 snom technology AG