1
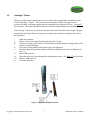
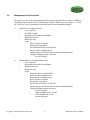
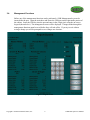
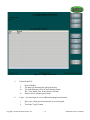
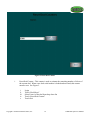
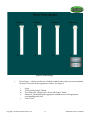
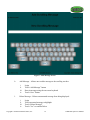
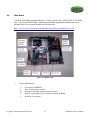
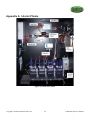
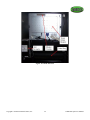
TabBOXX Operator’s Manual
[4-column Model]
The information contained in this document, provided to you in confidence, is the property of
International Gamco, Inc. It contains proprietary and copyrighted material. It may not be reproduced or
disclosed without the prior written permission of International Gamco, Inc.
REV. 2.1 – April 24, 2009
This manual is intended for personnel operating the TabBOXX Pull–Tab Dispenser. While every effort has been made to ensure the
accuracy of the information contained in this manual, International Gamco, Inc. disclaims all liability and assumes no responsibility for
any errors or omissions that may be contained herein. Also, due to International Gamco, Inc. policy of continual research and
development, we reserve the right to update any part or parts of this manual without notice.
The information contained in this manual is proprietary, confidential and protected by copyright laws. No part of this manual or any
related documentation may be copied, reproduced, revealed to or appropriated by others, in part or in whole, without the express consent
of International Gamco, Inc., the owners.
This edition applies specifically to the 4-column TabBOXX Pull–Tab Dispenser running software version 1.01.16ETD. The version of
software running can be found in the Lower Left-Hand corner of the Audit screen of the TabBOXX Pull–Tab Dispenser.
Further information and additional publications may be obtained from the following:
International Gamco, Inc.
ATTN: Production Manager
9136 Mormon Bridge Road
Omaha, Nebraska 68152
USA
Tel:
Fax:
(402) 991-7420 or (800) 270-8205
(402) 991-7419
Issue / Revision History
Version
Date
Author
Note
0.1
7/22/08
Bill Wageman
Initial Draft
1.0
11/14/08
Bill Wageman
Management Screen
Changes
2.0
2/3/09
Bill Wageman
Management screen
changes, code version
1.01.15dETD.
2.1
4/24/09
Bill Wageman
Management screen
changes and select games
method, code version
1.01.16ETD.
Copyright © 2008 International Gamco, Inc.
2
TabBOXX Operator’s Manual
Table of Contents
1.Product Overview........................................................................................................................................... 4
2.Pre-Installation................................................................................................................................................ 5
3.General Operation .......................................................................................................................................... 6
3.1.Starting TabBOXX..................................................................................................................................6
3.2.Loading of Tickets...................................................................................................................................7
3.3.Management Key Description.................................................................................................................8
3.4.Management Functions........................................................................................................................... 9
4.Parts and Service........................................................................................................................................... 19
4.1.Card Dispenser...................................................................................................................................... 19
4.2.Bill Acceptor......................................................................................................................................... 21
4.3.USB Hub............................................................................................................................................... 23
4.4.Touch Screen Monitor...........................................................................................................................24
4.5.ATX Power Supply............................................................................................................................... 25
4.6.Main Board............................................................................................................................................26
Appendix A: Interior Photos............................................................................................................................ 28
Appendix B: Troubleshooting..........................................................................................................................30
Appendix C: TabBOXX Audit Process........................................................................................................... 32
Appendix D: TabBOXX USB Key \ PIN Creation..........................................................................................33
Appendix E: PIN Creation \ Modification....................................................................................................... 34
Appendix F: Dispenser Configuration using API Tester................................................................................. 35
Appendix G: Specifications............................................................................................................................. 36
Appendix H: Warranty.....................................................................................................................................37
Table of Figures
Figure 1: Dispenser Column Extension.............................................................................................................. 7
Figure 2: Report Screen...................................................................................................................................... 9
Figure 3: Configuration Screen.........................................................................................................................10
Figure 4: Error Log Screen............................................................................................................................... 12
Figure 5: Reset Deal Counter............................................................................................................................14
Figure 6: Ticket Gauges.................................................................................................................................... 15
Figure 7: Add Message Screen......................................................................................................................... 16
Figure 8: Select/Activate Games.......................................................................................................................18
Figure 9: Ticket Dispenser................................................................................................................................ 19
Figure 10: Bill Acceptor................................................................................................................................... 21
Figure 11: USB Hub......................................................................................................................................... 23
Figure 12: Main Board...................................................................................................................................... 26
Figure 13: Inside the Cabinet............................................................................................................................ 28
Figure 14: Inside the Door................................................................................................................................ 29
Figure 15: Audit File Structure......................................................................................................................... 32
Copyright © 2008 International Gamco, Inc.
3
TabBOXX Operator’s Manual
1.
Product Overview
TabBOXX utilizes a touch-screen monitor to promote and sell Pull-Tab tickets. The animation
and ticket images displayed on-screen have absolutely no effect on the outcome of the individual
tickets dispensed. All Pull-tabs have been approved for play by the governing state in which
TabBOXX is installed.
The screen displays 4 ticket graphics which represent the Pull-Tab games loaded into the
dispenser columns inside the cabinet. The player inserts money for credit and then selects a
purchase option by touching one of the on-screen buttons (1, 5, 10, or all) displayed below the
ticket graphic. (For example, a player wishing to purchase “Shoot the Moon” Pull-Tabs would
touch one of the four buttons directly below the Shoot the Moon graphic.)
Above each ticket graphic is a ticket level meter, which represents how many tickets are
remaining for that particular column. When the meter displays a full bar, there are approximately
800 tickets remaining in that particular column dispenser. A player can touch the help button for
further information regarding the play of the game and other rules that may be in effect regarding
TabBOXX or Pull-tabs.
When there are no credits on the screen, TabBOXX cycles through various animations to attract
and entertain potential players or to advertise new games or promotions. The games and
animations can and will change as TabBOXX software evolves in the market place.
TabBOXX utilizes a secure USB Key to access the various management screens you will perform
in addition to the additional features listed below. All functions are discussed in detail later in the
manual.
•
•
•
•
•
•
•
•
•
Graphical interface for dispensing tickets with multiple vend options and attract animations
Informational help screens for players
Secure management Key to access audit and management functions using unique pin numbers
Transfer accounting data to your personal computer via management key for customized
reports
Period accounting meters simplify accounting process for the collection interval
On display ticket meter indicates remaining tickets in the dispensers
Front loading dispensers make loading tickets simple for attendant
High security bill acceptor with 500 note locking cash box
Event logs for troubleshooting purposes
Copyright © 2008 International Gamco, Inc.
4
TabBOXX Operator’s Manual
2.
Pre-Installation
***Please Read the entire manual prior to performing the Pre-Installation process***
Important – All TabBOXX main door keys are keyed the same at the manufacturing plant and
therefore it is in your best interest to install your own locks to prevent unwanted access to your
investment!
Upon receiving TabBOXX from the manufacturer, please unpack and check to make sure all
accessories are packaged. The items that are not installed in TabBOXX for shipping purposes
are: Column extensions and ticket weights (4 each), Keys to cabinet and 1 USB management
key. During shipping, there is the possibility of loosening of parts and connections to the
peripheral components inside. For this reason, it is import to follow the checklist procedure
below prior to transporting to the field for installation. Report any damage and/or missing items
immediately after unpacking to International Gamco, Inc. at 800-270-8205.
Note: This procedure is to be performed in the warehouse upon receiving TabBOXX from the
manufacturer and prior to installing in the field. Tickets and Column extensions should be
transported separately from and reinstalled at location of install. All items listed below are
discussed in detail later in the manual.
a.
Check gate height of each dispenser for proper setting and adjust if necessary. This is
essential to the proper operation of the individual dispenser! Reference instructions
illustrated on page 20 of the manual.
b.
Verify that the dispenser is securely fastened to its mounting plate (4 screws underneath).
c.
Verify that the hard drive mounting nuts are tightened
d.
Check cable connections to the following:
i.
Bill Acceptor
ii.
Dispensers
iii.
Hard Drive
iv.
Monitor
v.
Motherboard
vi.
USB Hub
e.
Power on TabBOXX and test the following functions/components
i.
USB Key/Management screen functions (USB Key must be setup, Appendix D)
ii.
Bill Acceptor
iii.
Dispensers
iv.
Touch Screen – Recalibration
Copyright © 2008 International Gamco, Inc.
5
TabBOXX Operator’s Manual
3.
General Operation
3.1.
Starting TabBOXX
Make sure that the power cord is connected through a surge protector to a 110/120V wall outlet.
Ensure that TabBOXX is securely mounted to its stand or to the wall mounting plate. Flip the
main power switch on to boot TabBOXX. The software will automatically load on boot. Contact
International Gamco Technical Support to report any failures, 1-800-270-8205.
TabBOXX Updates – Download the latest game and software updates to your TabBOXX via the
Internet. Go to the following web address and save the files to the USB key:
http://www.oasisgamingusa.com/web%20pages/gaming/tb.htm. See page 17 for upgrade
procedures.
Copyright © 2008 International Gamco, Inc.
6
TabBOXX Operator’s Manual
3.2.
Loading of Tickets
When one of the stacker columns has run out of tickets, the corresponding vend buttons on the
screen will display “Empty”. The Column must be reloaded with the same game as was
previously loaded, or the game graphic must be changed prior to playing of tickets. See page 17
for directions. The tickets should be loaded face down for optimal dispenser performance.
Note: If using 3-tab tickets, you must use the spacer plate due to the short ticket length. Weight
must be placed with the flat part facing up (curved legs rest on tickets) or damage will occur to
the Dispensers.
i.
ii.
iii.
iv.
v.
vi.
vii.
viii.
ix.
Open the main door
Remove front access panel located at the top of the column
If column is empty, load 2 inches of tickets into the column dispenser being careful so the
tickets are stacked straight.
Press the test feed button located on the back of the dispenser.
Finish loading tickets into the column until full, including the one that was dispensed in
step “iv”.
Insert USB audit key.
Reset the ticket level meter through the configuration screen. (See Page 17 for directions)
Remove USB audit key.
Close the main door.
Figure 1: Dispenser Column Extension
Copyright © 2008 International Gamco, Inc.
7
TabBOXX Operator’s Manual
3.3.
Management Key Description
The only way to access the audit/management functions of the dispenser is to insert a USB key
containing security and access level information into the USB Key port (See Figure 13). There
are 2 levels of access which unlock certain functions for the Attendant to modify.
a.
Operator Level (advanced user)
•
View Log Files
•
Test Bill Acceptor
•
Recalibrate the touch screen (hidden)
•
Shutdown the unit
•
Reboot the unit
•
Login
•
Reset Ticket Level Meter
•
Reset Deal Count Meter
•
Set Distributor ID (Key security ID)
•
Reset period accounting Meter
•
Change games (must match what is in the column dispenser)
•
Change scrolling message on screen
•
For local charity
b.
Manufacturer Level (administrator user)
•
View Log Files
•
Recalibrate the touch screen (hidden)
•
Shutdown the unit
•
Reboot the unit
•
Login
•
Upgrade software (if applicable)
•
Reset period accounting meter
•
Reset master accounting meter
•
Reset Ticket Level Meter
•
Reset Deal Count Meter
•
Set Distributor ID (Key security ID)
•
Change games (must match what is in the column dispenser)
•
Change scrolling message on screen
•
For local charity
•
When machine is out of credit
•
When machine has credit
•
System Messages
Copyright © 2008 International Gamco, Inc.
8
TabBOXX Operator’s Manual
3.4.
Management Functions
Before any of the management functions can be performed, a USB Management key must be
inserted into the port. Open the main door and locate the USB port on the right-inside portion of
the cabinet. Insert the USB key into the port and enter in the 4 digit pin # using the on-screen
keypad (shown below). The management screen will be displayed. Changes made through the
management functions must be saved before they will take affect. If you try to exit without
saving a change you will be prompted to save changes one last time.
Figure 2: Report Screen
Copyright © 2008 International Gamco, Inc.
9
TabBOXX Operator’s Manual
Figure 3: Configuration Screen
a.
Upload Audit File
i.
ii.
iii.
iv.
b.
Insert USB Key
The data will automatically upload to the Key
The audit filename will be in the following format:
ID#_Year_Month_Day_Hour_Minute_Seconds.
Remove key to return to game mode
Login – You must login to access additional management functions
i.
ii.
Enter your 4 digit password using the on screen keypad
Touch the ”Login” button
Copyright © 2008 International Gamco, Inc.
10
TabBOXX Operator’s Manual
c.
Touch Screen Recalibration
i.
ii.
iii.
d.
Touch and hold anywhere on the screen, avoiding an active button, for 10 seconds
Release touch screen to launch recalibration tool
Following instructions on the screen to complete recalibration
Logs – These are the system logs which can be used to resolve an error with the system.
i.
View Log File
1.
2.
3.
ii.
Upload Log File – Will upload logs to the USB drive for mobility
1.
2.
3.
4.
iii.
Touch the ”View Logs” button
In the window you can scroll up and down to view the log file
Touch “Exit” to return to the main menu
Touch the ”View Logs” button
Touch the “Upload Logs” button (Log file will not overwrite if one already
exists on the drive for that Dispenser. It must be deleted using another PC
prior to uploading)
Touch ”Ok” when prompted
Touch ”Exit” to return to the main menu
Clear Log File – The only time the Log File should be deleted is after they have
been uploaded to the USB Key.
1.
2.
3.
Touch the ”View Logs” button
Touch “Yes” to confirm delete
Touch “Exit” to return to main menu
Copyright © 2008 International Gamco, Inc.
11
TabBOXX Operator’s Manual
Figure 4: Error Log Screen
e.
Reboot – Reboot if necessary to recover from an unknown state.
i.
ii.
f.
Touch the ”Reboot” button
Touch the ”Yes” button
Shutdown – You must shutdown to move the dispenser for any reason. Serious damage to
the dispenser can occur if failure to shutdown prior to moving!
i.
ii.
Touch the ”Shutdown” Button
Touch the ”Yes” button
Copyright © 2008 International Gamco, Inc.
12
TabBOXX Operator’s Manual
g.
Period Meters – Accounting for the period. The period refers to the last time the meters
were reset due to cash collection. Whenever collection occurs the Period Meters must be
reset to avoid confusion at the time of next collection.
i.
ii.
iii.
iv.
h.
Login
Touch ”Reset Meters”
Touch ”Yes” to confirm reset
Touch “Exit” to return to the main menu
Master Meters – Accounting total from installation of dispenser. CAUTION: The only
time the Master meters will need to be reset is in the event it is moved to another site
location. Must have Administrative key to perform this option!
i.
ii.
iii.
iv.
Login
Touch ”Reset Masters”
Touch “Yes” to confirm reset
Touch “Exit” to return to the main menu
Copyright © 2008 International Gamco, Inc.
13
TabBOXX Operator’s Manual
Figure 5: Reset Deal Counter
i.
Reset Deal Counter – This counter is used to estimate the remaining number of tickets of
the current deal. When a new deal serial number is loaded and activated, this counter
must be reset. See Figure 5.
i.
ii.
iii.
iv.
v.
Login
Touch “Deal Meter”
Select Form # of the deal from drop down list
Touch “Reset Deal Counter”
Touch Exit
Copyright © 2008 International Gamco, Inc.
14
TabBOXX Operator’s Manual
Figure 6: Ticket Gauges
j.
Reset Gauges – whenever tickets are reloaded or added to the column you must reposition
the ticket level meter for the appropriate column. See Figure 6.
i.
ii.
iii.
iv.
v.
Login
Touch “Reset Gauges” Button
If re-filling all 4 columns, press “Reset All Gauges” button
Otherwise, touch and drag the appropriate columns meter to the appropriate
corresponding ticket level
Touch “Save”
Copyright © 2008 International Gamco, Inc.
15
TabBOXX Operator’s Manual
Figure 7: Add Message Screen
k.
Add Message – Allows one to add a message to the scrolling text box.
i.
ii.
iii.
iv.
l.
Login
Touch “Add Message” button
Enter in message using the on-screen keyboard
Touch “Save” button
Delete Message – Deletes an unwanted message from being displayed.
i.
ii.
iii.
iv.
Login
Touch unwanted message to highlight
Touch “Delete Message”
Touch “Yes” to confirm Delete
Copyright © 2008 International Gamco, Inc.
16
TabBOXX Operator’s Manual
m.
Upgrade – The upgrade must first be loaded onto the USB key from another PC. Upgrades
may contain graphical changes and system changes to the Dispenser.
i.
ii.
iii.
iv.
v.
n.
Upgrade Games – The Upgrade games button is used when a game update exists on the
USB Key. Download the latest game updates at this web address and save the zip file to
the Game_Upgrade folder on the root of USB key:
http://www.oasisgamingusa.com/web%20pages/gaming/tb.htm
i.
ii.
iii.
iv.
o.
Login
Touch the “Upgrade” button
Touch “Yes” to upgrade
Touch “Yes” to reboot
Remove USB Key from port
Login
Touch the “Update Games” button
Touch “yes” to update
Touch “OK” on added # games
Select/Activate Games – The new form number must match the graphic icon and pull-tab
in the appropriate column when finished. Column number corresponds to the 4 different
dispensers from left to right. You can sort the list by form, name and price by touching
the list header. See Figure 8.
i.
ii.
iii.
iv.
v.
Login
Touch “Select Games” button. Then perform either option 1 or 2 to change games
for a column:
1.
Touch the appropriate Form # from each of the Column’s list menu to
highlight and activate Form #. Do this for each column
2.
Touch the text box to manually enter the form number
a.
Use the on screen keyboard to enter form number
b.
Touch “Exit”
c.
Repeat for other columns if desired
Touch “Exit”.
Touch “Yes” to save.
Touch “Exit” to return to main menu.
Copyright © 2008 International Gamco, Inc.
17
TabBOXX Operator’s Manual
Figure 8: Select/Activate Games
Copyright © 2008 International Gamco, Inc.
18
TabBOXX Operator’s Manual
4.
Parts and Service
4.1.
Card Dispenser
Vendapin CTD 202 card dispenser +5VDC/+12VDC and USB interface with 800 count stacker.
Figure 9: Ticket Dispenser
a.
Removal/Installation
i.
ii.
iii.
iv.
v.
vi.
vii.
Power down the TabBOXX
Pull down on locking pin and slide dispenser out several inches
Disconnect ground wire, Power and USB cables
Slide the dispenser until it is free from the shelf
If replacing the dispenser: remove tickets, column extension and access plate.
Transfer parts to the new dispenser
Install in reverse order
Copyright © 2008 International Gamco, Inc.
19
TabBOXX Operator’s Manual
b.
Gate Adjustment
If frequent card jams or doubling occurs the gate height may need to be adjusted. The
stacker must not have any tickets loaded.
i.
ii.
iii.
iv.
v.
c.
Cleaning
i.
ii.
iii.
iv.
d.
Loosen the gate locking screw on both sides of dispenser.
Pull out on adjustment knob and rotate so that the gate is down all the way so no
card can pass through.
Load approximately 100 tickets into the dispenser.
Push the test feed button on the back of the dispenser and rotate the adjustment
knob to raise the gate (only raise the gate while the rubber roller is rotating in the
forward direction) until one card is dispensed. If the motor stops running prior to a
card exiting, repeat this step.
Push the adjustment knob in and tighten locking screws on both sides, careful not
to over tighten locking screws, which could result in damage or striping of threads.
Make sure the TabBOXX is powered off
Remove the dispenser from the TabBOXX
Using a can of compressed air, blow the paper dust from the rollers and optics area
Re-install the dispenser.
Testing the card dispenser
i.
ii.
iii.
Press the self test button on the back of the dispenser (see Figure 9)
Touch the corresponding vend in the test screen (see Figure 2)
1.
Insert USB key into the port
2.
Touch the “Test Bill / Coin” button
3.
Touch the column button to test vend
4.
Touch exit
5.
Remove key
One card should dispense only on each test. If not refer to the troubleshooting
section in this manual.
Copyright © 2008 International Gamco, Inc.
20
TabBOXX Operator’s Manual
4.2.
Bill Acceptor
Apex series 5000 bill acceptor features: high security 4 way acceptance, lockable cash box, auto
calibration, 500 note cash box and flash port for firmware updates.
Figure 10: Bill Acceptor
a.
Removal/Installation
i.
ii.
iii.
iv.
v.
b.
Power Down TabBOXX
Disconnect power/communication cable on side of bill acceptor
Remove mounting nuts
Remove the bill acceptor
Install in reverse order
Test Bill Acceptor – Will not affect accounting meters
i.
Test through the application
1.
Insert USB key
2.
Touch “Test Bill / Coin” button (see Figure 2)
3.
The LED's on the bill acceptor should be flashing
4.
Insert a bill denomination
5.
The screen will show what was inserted
6.
Remove the test bill
7.
Touch “Exit”
8.
Remove key
ii.
Self diagnostic button on side of bill acceptor.
1.
Disconnect the bill acceptor USB cable at the USB hub
2.
Follow the directions posted on the cash box
a.
Press the diagnostic button on the side of the bill acceptor
b.
Count the number of LED flashes for the corresponding code
c.
Refer to the cash box label for code number description
Copyright © 2008 International Gamco, Inc.
21
TabBOXX Operator’s Manual
d.
c.
e.
f.
g.
Clearing a bill jam
i.
ii.
iii.
d.
Option 1 - Open access door to remove bills
Option 2 - Remove cash box by sliding button and lifting up and out on the box
Remove Bill Head - For cleaning or removing a jammed foreign object
i.
ii.
iii.
iv.
f.
Remove cash box by sliding button and lifting up and out on the box
Remove jammed bill
Re-install cash box
Removing the bills
i.
ii.
e.
Perform the appropriate action to clear a jam or obstruction to the
bill path.
When finished, connect the USB cable to the USB Hub
Reboot TabBOXX
Call Technical Support for assistance 1-800-270-8205.
Disconnect the power/Communication cable by pulling out on the connector
Remove cash box
Push Head release button and pull the head out
Install in reverse order
Cleaning
i.
ii.
iii.
iv.
v.
vi.
Make sure the TabBOXX is powered off
Disconnect the connector on the side of the bill head
Remove cash box and blow out with can of air
Remove bill head
Clean with a cloth wet with a 50/50 mixture of water and isopropyl alcohol
1.
Make sure you clean both the bill head and transport lenses with the
solution
Put bill acceptor back together
NOTE – The USB cable must be connected to port number 5 on the USB HUB to work
properly with the system. Failure to do so will result in bill acceptor errors and cause the bill
acceptor to become inactive.
Copyright © 2008 International Gamco, Inc.
22
TabBOXX Operator’s Manual
4.3.
USB Hub
D-Link powered USB 2.0 Hub. It is important that components are connected to their dedicated
port labeled on the Hub. The HUB must also be connected to it's dedicated USB port on the
Motherboard! (See figure 12: Main Board).
Figure 11: USB Hub
a.
Removal/Installation
i.
ii.
iii.
iv.
Power down Dispenser
Disconnect all cables
Pull on hub to separate from the Velcro
Install in reverse order
NOTE – Make sure that all peripherals are connected to their dedicated port as shown in
the Figure 11! Failure to do so will result in errors!
Copyright © 2008 International Gamco, Inc.
23
TabBOXX Operator’s Manual
4.4.
Touch Screen Monitor
Equipped with a 3M TS controller and native resolution of 1280 x 1024.
a.
Removal/Installation
i.
ii.
iii.
iv.
v.
vi.
vii.
b.
Cleaning the touch screen
i.
ii.
c.
Use a non abrasive cloth damp with isopropyl alcohol
Clean in a circular motion and let air dry
Monitor Adjustment (See Figure 14)
i.
ii.
iii.
iv.
v.
vi.
vii.
viii.
ix.
x.
d.
Power down Dispenser
Disconnect power and VGA cable from bottom of monitor
Remove cover plate from the back of the monitor to access the TS controller
Remove the controller from the monitor
Remove the 8 mounting nuts around the monitor
Remove the monitor
Install in reverse order
Use the control board mounted towards the top of monitor
Press menu button to access main menu
Press up or down to change to the appropriate sub menu with options
Press select to access the appropriate sub menu
Uses up/down buttons to navigate to appropriate option
Press select to access the option
Press up/down to change value
Press menu to exit option
Press menu to exit sub menu
Press menu to exit
Calibration
i.
ii.
iii.
iv.
Insert USB key into Key port
Touch and hold screen for 10 seconds
Release touch screen to launch calibration tool
Following on screen instructions
Copyright © 2008 International Gamco, Inc.
24
TabBOXX Operator’s Manual
4.5.
ATX Power Supply
a.
Removal/Installation
i.
ii.
iii.
iv.
v.
vi.
b.
Power down Dispenser
Turn main power switch off
Disconnect the power cable from the power supply itself
Disconnect all other connections to supply harness
Remove Power supply bracket(if equipped) or pull on supply to separate from
Velcro mount
Install in reverse order
Configuration
i.
Make sure the power supply is set to the proper line voltage present at the outlet
(115V)
Copyright © 2008 International Gamco, Inc.
25
TabBOXX Operator’s Manual
4.6.
Main Board
Via EPIA SN180000G motherboard with a 1.0 GHz processor and 1 GB PC24200 533/667MHz
non – ecc 240-pin DDR2 DIMM. Additional information regarding the motherboard can be
obtained from its user manual found at the following link:
http://www.via.com.tw/en/products/mainboards/downloads.jsp?motherboard_id=550
Figure 12: Main Board
a.
Removal/Installation
i.
ii.
iii.
iv.
v.
Power down TabBOXX
Turn off main power switch
Disconnect all cable connections to the board
Remove 4 mounting screws careful not to drop the board
Install in reverse order
Copyright © 2008 International Gamco, Inc.
26
TabBOXX Operator’s Manual
b.
Reset CMOS
i.
ii.
iii.
iv.
Power down system and turn off main power switch; NEVER reset CMOS with
power applied to the board or DAMAGE will occur to board
Set the CMOS jumper to pins 2 and 3 for 20 seconds to clear
Return jumper to pins 1 and 2
Power up the system
NOTE – The USB Hub must be connected to the port labeled in the picture or
peripheral devices will not work correctly!
Copyright © 2008 International Gamco, Inc.
27
TabBOXX Operator’s Manual
Appendix A: Interior Photos
Figure 13: Inside the Cabinet
Copyright © 2008 International Gamco, Inc.
28
TabBOXX Operator’s Manual
Figure 14: Inside the Door
Copyright © 2008 International Gamco, Inc.
29
TabBOXX Operator’s Manual
Appendix B: Troubleshooting
Problem
Possible Cause
Solution
TabBOXX will not power on
ATX Power Supply is turned off
Turn ATX Power Supply Switch on
Failed Main power Switch
Replace or repair failed Switch
Bad Connection to Motherboard
Connect all cables to motherboard
ATX power Supply is disconnected
Reconnect power cord to bottom of
power supply
No power at wall outlet
Call electrician to restore power at
outlet
Out of Calibration
Recalibrate Touch Screen
Defective controller
Replace controller
Not properly connected
Check all connections
Defective Monitor Power Supply
Replace Monitor Power Supply
Message displayed on screen:
Hard Drive not connected
Re-connect hard drive
”insert proper boot device
Hard Drive is defective
Replace hard drive, Call International
Gamco
Bill Acceptor is not active
No connection to bill acceptor
Check and reconnect the cable to the
appropriate port on the hub and Bill
Acceptor
Defective port on Hub
Replace USB Hub
Bill Jammed
Check and clear jammed bill
Bill Head is dirty
Clean Bill Head sensors with non
abrasive cloth dampened with soap
and water. Dry sensors
Bill Acceptor is defective
Replace Bill Acceptor
Bill head is dirty
Clean Bill Head sensors with non
abrasive cloth dampened with soap
and water. Dry sensors
Cash Box is full
Empty cash box
Bill Acceptor will not accept new $5
Bill Acceptor is not updated for new
bill
Update firmware for new bill
2 cards are dispensed on one vend
command
Gate height needs to be adjusted
Adjust Gate for proper height
Dispenser motor runs but will not
dispense a ticket
Gate height is set to low and needs to Adjust Gate for proper height
be adjusted
Touch Screen not working
No Video
Bill Acceptor will not accept bills
Not enough weight on tickets
Copyright © 2008 International Gamco, Inc.
30
Ensure that the weight is being used
TabBOXX Operator’s Manual
Problem
Possible Cause
Solution
Dispenser is grayed out on screen
Ticket is jammed or stuck in chute
Clear ticket jam
No communication to dispenser
Disconnect the dispenser from the
USB Hub and reconnect to the Hub
Dispenser does not have power
Apply Power to the back of Dispenser
USB cable is not connected to
dispenser
Reconnect the USB cable to back of
dispenser
USB cable is not connected to USB
Hub
Reconnect the USB cable to the
appropriate port on the hub
Dispenser is defective
Replace the dispenser
Dispensers are not connected to their
assigned ports
Refer to Hub section of manual and
connect dispensers to the appropriate
ports
The USB Hub is defective
Replace the Hub
Error with software
Call International Gamco
Audio is turned off in the
management screen
Increase volume level in management
screen
Amplifier has been disconnected
Reconnect cables to amplifier board
Speaker is disconnected
Reconnect wires to speaker
Audio files are missing
Call International Gamco
Speaker is defective
Replace speaker
Amplifier is defective
Replace amplifier
Software has error
Reboot TabBOXX and Call
International Gamco to report issue
Error Message
“Dispenser # code:9”
is displayed on screen
All dispensers are inactive
TabBOXX has no audio or has
excessive noise
Software is not responding
USB Key will not change to the main USB Key is corrupted or not
management screen
configured
Can not login to management screen
USB Hub LED’s are all off
Software will not update with Key
Reprogram USB Key
USB extension cable is defective
Replace USB extension cable
USB Key is corrupted or not
configured
Reprogram USB Key
Touch Screen is out of calibration
Recalibrate Touch Screen
USB Hub has lost connection with the Reconnect the USB cable to the
motherboard
motherboard and the Hub
The USB Hub is defective
Replace USB Hub
Update file is missing from the USB
key
Add update file to the USB Key or
call International Gamco for
assistance
Copyright © 2008 International Gamco, Inc.
31
TabBOXX Operator’s Manual
Appendix C: TabBOXX Audit Process
To get the audit data from the TabBOXX simply insert a USB key that has been setup to allow for audit
screen access. As soon as the key is verified the audit data will be copied to the USB. The audit file will be
place on the key in the “Drive Letter:\Reports\MAC Address folder i.e.
J:\Reports\3026F4634000.
The naming convention for each file is a follows: Mac Address Date Time.CSV i.e.
3026F4634000_2008_04_16_04_07_25.CSV.
A new audit file will be placed on the USB key each time it is inserted even if the data has not changed. To
help alleviate confusion the MAC address is located on the audit screen in the upper left corner labels as
ID:xxxxxxxxxx. In the upper right of the audit screen will indicate whether the audit file was successfully
copied to the USB. It will display Retrieved: Yes is copied successfully or Retrieved: No if it failed.
The structure for the audit file (Meters.csv) is as follows:
M_BILL
P_BILL P_PLAYED_
M_RESET_TS
P_RESET_TS
_IN
_IN
VAL
3/3/2009
4500 2/22/2009 23:00
4500
4500 2/22/2009 23:00
20:18
MACHINE_ID DATA_TS
F464F5634000
The structure for the audit file (Forms.csv) is as follows:
MACHINE_ID DATA_TS FORM_ID TOT_PLAYED PRICE DEAL_COUNT
3/3/2009
F464F5634000
717
15
50
3600
20:18
3/3/2009
F464F5634000
728
0
100
3600
20:18
Figure 15: Audit File Structure
The raw format of the audit files are in comma separated values (CSV) and can easily be imported into any
spreadsheet program such as Excel.
Copyright © 2008 International Gamco, Inc.
32
TabBOXX Operator’s Manual
Appendix D: TabBOXX USB Key \ PIN Creation
In order for a USB key to be used on TabBOXX two files must to exist. The first is INSTALL.KEY located
in the root directory of the key. The INSTALL.KEY determines the user access level: user, advanced user,
administrator. The user access level will only allow access to the first audit screen. The advanced user will
allow access to the second audit screen via the login. The advanced user is allowed to reset the period meters
and add\change scrolling messages excluding system messages. The admin user can do everything the
advanced user can do plus reset the period meters and add\change scrolling messages.
The second file PIN.DAT is located in the security directory on the USB key. This file holds the pin data
used to access the second admin screen. This is only valid for advanced users and administrators.
Copyright © 2008 International Gamco, Inc.
33
TabBOXX Operator’s Manual
Appendix E: PIN Creation \ Modification
To change or add a pin to the USB key you will need the USBKeyInit.exe application. After you run
USBKeyInit.exe, you will see a window open up with the following fields: PIN, Distributor ID and USB
Key. Simply enter you four digit pin into the box, enter 6 digit Distributor ID (optional) and change the
drive letter to USB Flash drive letter and click Initialize USB Key. Now your new pin will be usable on all
TabBOXX machines.
*Notes:
The INSTALL.KEY and PIN.DAT files are completely independent of each other, allowing you to change
one or the other without affecting the other.
Copyright © 2008 International Gamco, Inc.
34
TabBOXX Operator’s Manual
Appendix F: Dispenser Configuration using API Tester
Use this program to modify settings stored in the firmware of the ticket dispenser. The dispensers need to be
set for ticket hold and write time delay of 0. The left dispenser is on COM3 and the right dispenser is on
COM4.
Procedure:
i.
ii.
iii.
iv.
v.
vi.
vii.
viii.
ix.
x.
xi.
xii.
xiii.
xiv.
xv.
Power down the TabBOXX
Connect PS2 mouse and keyboard
Reboot the TabBOXX and hold the shift key down to access the login prompt
Login information – Contact International Gamco regarding login information 800-270-8205
When windows is fully loaded, open up windows explorer
Navigate to the following directory: c:\Drivers\Utilities
Open program named CardAPItester.exe
Change to COM3 (left Dispenser) from the drop down menu
Check “activate serial port”
Click “Update Status” button
Make sure box NOT checked for Card Hold and press “Write Hold Card” button
Change the value in the box for Time Delay to 0
Click/Touch “Write Time Delay” button
Repeat steps viii – xiii for COM 4, COM 5 and COM6
Exit program
Copyright © 2008 International Gamco, Inc.
35
TabBOXX Operator’s Manual
Appendix G: Specifications
Physical Characteristics
Power Input
Operating Temperature
Power Consumption
110/120 VAC
50 to 95 °F
3A RMS Max (1.1A RMS AVG)
Dimensions
Width
Depth
Height
26”
14”
33.25”
TabBOXX Weight (Empty)
Stand Weight
105 lbs
80 lbs
Copyright © 2008 International Gamco, Inc.
36
TabBOXX Operator’s Manual
Appendix H: Warranty
Term: The term is to be set at 1 year from date of purchase.
Included in warranty:
•
All workmanship
•
Bill Acceptor
•
Flat 17” Panel LCD / with Touch screen
•
All Ticket dispensers
•
Power supply
•
Motherboard
•
Amplifier
•
Fan
•
Speaker
•
USB Panel
•
Hard Drive
This is a replacement warranty, does not include labor. All parts are to be returned and upon receipt the part
will be examined for abuse or any violations of warranty policy. All parts received will be turned around
with the replacement part in a 24 hr period.
Standard Policy
All parts that are tampered with or used ion an improper use will void all warranties. If parts are abused and
or not taking care of this may subject the warranty to be voided as well.
For Technical Support call 1-800-270-8205
All parts to be returned to :
McIntire & Associates Inc.
700 North Frwy
Fort Worth , Texas 76102
817-335-4242
Fax: 817-335-4545
Attn: TabBOXX Warranty
Please include any information needed to return parts properly.
Copyright © 2008 International Gamco, Inc.
37
TabBOXX Operator’s Manual