1
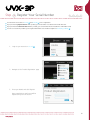
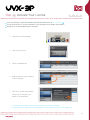
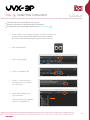
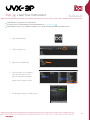
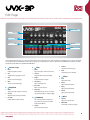
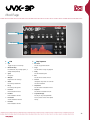
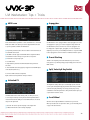
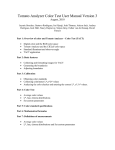
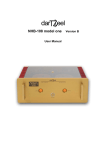
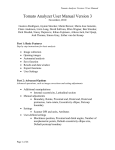
Software User Manual
Version 1.0
End User License Agreement (EULA)
Do not use this product until the following license agreement is understood and accepted.
By using this product, or allowing anyone else to do so, you are accepting this agreement.
UVX-3P (henceforth ‘the Product’) is licensed to you as the end user.
3. Ownership
Please read this Agreement carefully.
As between you and UVI, ownership of, and title to, the enclosed
You cannot transfer ownership of these Sounds and Software they
digitally recorded sounds (including any copies) are held by UVI.
contain. You cannot re-sell or copy the Product.
Copies are provided to you only to enable you to exercise your rights
under the license.
LICENSE AND PROTECTION
4. Term
This agreement is effective from the date you open this package,
and will remain in full force until termination. This agreement
1. License Grant
will terminate if you break any of the terms or conditions of this
UVI grants to you, subject to the following terms and conditions, a
agreement. Upon termination you agree to destroy and return to UVI
non-exclusive, non-transferable right to use each authorized copy of
all copies of this product and accompanying documentation.
the Product.
5. Restrictions
The product is the property of UVI and is licensed to you only for
Except as expressly authorized in this agreement, you may not rent,
use as part of a musical performance, live or recorded. This license
sell, lease, sub-license, distribute, transfer, copy, reproduce, display,
expressly forbids resale or other distribution of the sounds and
modify or time share the enclosed product or documentation.
software included in the Product or their derivatives, either as they
exist on disc, reformatted for use in another digital sampler, or mixed,
combined, filtered, resynthesized or otherwise edited, for use as
sounds, multi-sounds, samples, multi-samples, wavetables, programs
or patches in a sampler, microchip or any hardware or software
sample playback device.
You cannot sell the Product content or give it away for use by others
in their sampling or sample playback devices. In the event UVI
terminates this agreement due to your breach, you agree to return
the original and all other copies of the software and documentation
to UVI.
UVI reserves all rights not expressly granted to herein.
2. Protection of Software
You agree to take all reasonable steps to protect the product and any
accompanying documentation from unauthorized copying or use. You
agree not to modify the product to circumvent any method or means
adopted or implemented by UVI to protect against or discourage the
unlicensed use of copying of the Product.
©2014 UVI. All rights reserved.
All trademarks are the property of their respective owners.
2
Table of Contents
Introduction.............................................................................................................................4
System Requirements.........................................................................................................5
Installation
Step 1: Register Your Serial Number.......................................................................6
Step 2: Activate Your License....................................................................................7
Step 3: Install Your Instrument..................................................................................8
Step 4: Load Your Instrument...................................................................................9
UVX-3P Interface
Edit Page.............................................................................................................................10
Mod Page...........................................................................................................................12
Preset List..........................................................................................................................13
UVI Workstation: Tips and Tricks....................................................................................14
Links............................................................................................................................................15
Credits and Thanks...............................................................................................................16
3
Introduction
UVX-3P
In 1983, Roland introduced one of the first affordable
analog synths, the JX-3P. The JX-3P signaled a shift
away from control dense synths like the JUNO and
JUPITER series for a less intimidating, more entry-level
aesthetic aimed at players who wanted the Roland
sound but who may not have had a deep understanding
of synthesis techniques.
The JX-3P was in no way technically inferior, offering
many of the same components as its more expensive
siblings. The Jx-3P even boasted dual DCO’s per-voice
compared to a single in the JUNO series.
A JX-3P was fully restored to factory spec, programmed
by members of our sound design team and deeply
multi-sampled, capturing samples both dry and with the
built-in analog chorus enabled. UVX-3P was developed
with the same UVI Quality Standard as all UVI Vintage
Series Instruments. Great care was taken to capture a
wide range of the sonic capabilities of this synth, giving
you 160+ presets in all.
Explore the included sounds or design your own patches
from scratch through an immaculately prepared UI.
Take your sound design even further with the wide
range of effects available in UVI Workstation.
A very capable and expressive instrument, the JX-3P
saw use by many well known pop acts such as Stevie
Nicks, Vince Clark and The Cure as well as electronica
pioneers Orbital and The Future Sound of London.
4
System Requirements
Compatibility
Compatibility
Audio Units, VST, MAS, AAX or standalone
VST, AAX or standalone
UVI Workstation 2.5.2 or higher
UVI Workstation 2.5.2 or higher
Minimum System Requirements
Minimum System Requirements
Intel CPU
Core Duo or faster
4 GB of RAM (8 GB+ recommended)
4 GB of RAM (8 GB+ recommended)
3.1 GB of disk space
3.1 GB of disk space
Mac OS X 10.7 or higher
Windows 7 or higher
iLok account (free, dongle not required)
iLok account (free, dongle not required)
Authorize the Way You Want
Your license allows 3 concurrent authorizations on any combination of computers and iLok dongles.
License management is a simple drag-and-drop process done through iLok License Manager.
Visit ilok.com/
to download iLok License Manager and create your free account.
5
Step
1
Register Your Serial Number
1
2
3
4
You must have an account on uvi.net/ and ilok.com/ prior to registration
If you purchased a physical version of this product, your serial number is located on the inside of the box
If you purchased an electronic version of this product, your serial number will be included in a confirmation email
You can see a list of the products you’ve registered and their serial numbers anytime at uvi.net/my-products
1. Login to your account on uvi.net/
2. Navigate to the ‘Product Registration’ page
3. Enter your details and click ‘Register’
Upon completion a new license will be
deposited in your iLok account
6
Step
2
Activate Your License
1
2
3
4
iLok License Manager is required for activation, download the newest version at ilok.com/ilm.html
Your license allows up to 3 concurrent activations on any combination of iLok dongles and computers
Activations can be moved between devices at anytime
1. Launch iLok License Manager
2. Login to your account
3. Click the ‘Available’ tab
4. Drag the license to your computer
or an iLok dongle
5. Click ‘Ok’ to confirm the activation
The process is complete, your device is now authorized
»
»
To see how many authorizations you have left simply select the license and click ‘Show Details’
To deactivate your license, right-click it and select ‘Deactivate’ — doing so will return your license to the ‘Available’ tab
7
Step
3
Install Your Instrument
1
2
3
4
UVI Instruments can be stored anywhere on your system
Storing your instruments on a fast drive will improve performance
Your instruments can be downloaded at any time from uvi.net/my-products
1. Create a folder on your computer and place your UVI Instruments in it
Once this is done we need to tell UVI Workstation where to find your instruments.
We do this by creating a watch folder, follow the steps below to create your own:
2. Open UVI Workstation
3. Click the Settings page
4. Click the ‘Sound Banks’ tab
5. Click the ‘...’ button and select
the folder where you’ve placed
your instruments
6. Restart UVI Workstation and
open the Browser
Your instruments will be available under the ‘Soundbanks’ tab
8
Step
4
Load Your Instrument
1
2
3
4
UVI Workstation is required to run UVI Instruments
The newest version of UVI Workstation can be downloaded free at uvi.net/downloads
UVI Workstation can be run as a standalone program or as a virtual instrument from within your DAW of choice
1. Open UVI Workstation
2. Click the Browser icon
3. Open the Sound Banks tab
4. Select a product, in this example
we’ll choose Vector Pro, then select an instrument and patch
Double-click the patch to load it
5. The UI appears and you’re ready to jam!
9
Edit Page
1 Globals + Pages
Amplitude
2
Filter
3
4 Modwheel
Noise 6
5 Effects
The UI is divided into two pages; [Edit] and [Mod]. Main controls such as amp, filter, stereo, pitch and effects are available on the [Edit] page. Clicking the
[Mod] button at the top of the interface reveals the second page of controls, where you can access the LFO and Step Modulator. Presets are accessible
directly through the browser in UVI Workstation/MachFive.
1
Globals + Page
»Mono
3
»ADSR
Disables polyphony if active
»Arp
Typical envelope controls for the filter
Adjust the filter velocity sensitivity
»Depth
Sets the UI to the Edit page
»Mod
Depth of the filter envelope
» Cutoff Freq
Sets the UI to the Mod page
Filter cutoff frequency
»Resonance
2
Amplitude
»ADSR
Filter resonance amount
» Filter Type
Typical envelope controls for the amp
Multimode filter can be set to low-pass
» Vel Sens
Remaps Attack to Note Velocity
Speed of the tremolo (sync)
»Filter
Cutoff frequency of the Filter
5
4
Modwheel
This section provides a quick way to
map common controls to your MIDI
keyboards modwheel
»Vibrato
Effects
»Drive
Adjust drive value
»Phaser
Adjust effect mix amount
»Delay
Adjust effect mix amount
»Reverb
Adjust effect mix amount
(LP), band-pass (BP), or high-pass [HP]
Adjust the amp velocity sensistivity
» Vel > Atk
»Tremolo
» Vel Sens
Toggle built-in arpeggiator on/off
»Edit
Filter
6
Noise
»Amount
Adjust noise mix amount
»White/Pink
Select white or pink noise types
Speed of the vibrato (free)
10
Edit Page (continued)
8 Pitch
Stereo
7
7
Stereo
»Color
Utilizes neighboring samples from the
library to a unique effect
»Spread
8
Pitch
»Depth
Sets the portamento depth
»Time
Sets the glide time
Sets the stereo width
(ALT and UNI modes)
»Detune
Detunes the unison layers
(UNI mode only)
» Mode - Off
Sets the stereo mode to OFF
» Mode - Alt
Sets the stereo mode to ALT; stereo
position alternates L/R every note, width
controlled by [SPREAD]
» Mode - Uni
Sets the stereo mode to UNI; layers
multiple samples and augments them for
increased stereo presence, modify with
[COLOR] and [DETUNE]
» Mode - Chorus
Activates hardware Chorus layer
11
Mod Page
1
LFO
1
Step Sequencer
2
LFO
»Sync
Toggle LFO sync to host tempo
» Waveform Shape
LFO waveform: Sine, Triangle Square, or
Sample & Hold (random)
»Speed
LFO speed
» ED Depth
Depth of the LFO envelope
»Attack
LFO envelope attack time
»Decay
LFO envelope decay time
» LFO Pitch
Pitch modulation amount
» LFO Drive
Drive modulation amount
» LFO Volume
Volume modulation amount
2
Step Sequencer
»Resolution
Set the step speed/resolution
»Steps
Set the number of steps to playback
»Delay
Set the initial delay time
»Rise
Set the time to activate smooth
»Smooth
Interpolates step values for a smooth
LFO-like modulation
» SEQ Volume
Set the volume modulation amount
» SEQ Filter
Set the filter modulation amount
» Step Value DIsplay
Set the per-step value (draw with
mouse, double-click to enter explicit
values)
» LFO Filter
Filter modulation amount
12
Preset List
Arpeggios-Steps
A Resonant Mass
AluCart Muse
Chill Braskit
Circuit Relay
Dirty Shelf Loader
Fountains
HuberOsc Wheel
Inter Sanctum
Meteor Light
Modular 3P
Brassynth Basic
JMJ Brass
Jump Style
Very Funky Brassy
FXs
A13 Chimes Chorus
Atticus
B16 Jet
Bermuda
Chance Encounter
Excuse Me
UVIX Solead
ZimPulse Five
Neon Summit
Ritual Tweaker
Sonar Field
Step by Step Pad
Wasp Cask
Z in a Box
Flat Ripple
Gremlins
Ice Hammer
Lo-Fi Fly-By
Mayhem Verb
Road Blaster
Sick Voice
Slow Flight
Talk To Me
Ultra Minous
Vermillion
Voicy Whistle
Bass
A Godzilla
Bass Organic
Elektrik Zeel
Fat Bifth
Filter Attack
Kid Robot
NoDee
Saw Homies
Slow Spark
Square Wheel Me
Wah Bassy
X3P Nu Bass
Bells
A12 Vibraphone Chorus
A14 Celesta Chorus
Bellsichord
Chorused Analog Bells
MaLFOlet
Noisy Station B
Taxi Driver
TubulArNalog
Xpressive Bell
Brassy
A06 Brass 1 Chorus
A07 Brass 2 Basic
B05 Synth Brass 1
B06 Synth Brass 2 Uni
Keyboards
A03 Organ 1
A04 Organ 2
A05 Organ 3
A08 Elec Piano 1 Raw
A09 Elec Piano 2 Chorus
A10 Clavinet
A11 Harpsichord Alt
A15-Accordion Chorus
B13 Funky Clav
Dreamy Keys
Little Clav
SynKeys
Toy Pianalog
Leads
A16 Voice
An Syn Clear
B02 Flute Alt
B03 Oboe
B04 Song Whistle Mono
B07 DistGuitar Chorus
B11 Sync Wah Mono
Juicy Solo
Solidrive
SoloRgaN
Square Lead Me
Sync Solo
Thin Lead
Pads
Ambient Hertz
B14 Pulsar
Dark Pad
High Boa
Mystic Forest
Noisy Fluty Bed
Pad Wheel to Bright
Polysynth
B08 Juicy Funk
B10 Fat Fifth
B12 Sync Sweep
Chord Me Wheel
Cold Rez
Fatty Funk
Funky Fresh
Juicy Poly
Poly Ana
Seven Hertz
Soft Poly
Stab and Wheel
Trash Pop Corn
Strings
A01 String 1
A02 String 2
B01 Violin Mono
Baroque
MaJestiX 3P
Portanalog Violins
Super Soft Strings
Tutti Orchestra
Twin Peaks Cello
Sweeps
B09 Filter Flow
B15 Planet Alt
Cold Sweep
LFO Sweep Down
No Stress
Simple Hi Pass
Sweep One
Xtra Raw Factory
A01 String 1
A02 String 2
A03 Organ 1
A04 Organ 2
A05 Organ 3
A06 Brass 1
A07 Brass 2
A08 Elec Piano 1
A09 Elec Piano 2
A10 Clavinet
A11 Harpsichord
A12 Vibraphone
A13 Chimes
A14 Celesta
A15 Accordion
A16 Voice
B01 Violin
B02 Flute
B03 Oboe
B04 Song Whistle
B05 Synth Brass 1
B06 Synth Brass 2
B07 DistGuitar
B08 Juicy Funk
B09 Filter Flow
B10 Fat Fifth
B11 Sync Wah
B12 Sync Sweep
B13 Funky Clav
B14 Pulsar
B15 Planet Alt
B16 Jet
Xtra Waves
Basic Saw X 1
Basic Saw X 2 Big
Basic Saw X 2 Oct
Basic Square X 1
Basic Square X 2 Bih
Basic Square X 2 Oct
Hybrid Wave X 1
Hybrid Wave X 2 Big
Hybrid Wave X 2 Oct
13
UVI Workstation: Tips + Tricks
MIDI Learn
Arpeggiator
Most UVI Workstation parameters can be automated via. a convenient
UVI Workstation comes equipped with a robust arpeggiator. To insert
MIDI Learn. MIDI Learn allows you to bind a physical MIDI controller
an arpeggiator in a part, you need to display the Single view in the
to specific parameters within UVI Workstation.
UVI Workstation, then click on the note icon. The arpeggiator can
be employed as a pattern gate, arpeggiator, or even an advanced
Any FX tab parameter, Macro Knob or Slider in UVI instruments can
use the MIDI Learn feature
rhythmic processor for your live MIDI performance or sequenced MIDI
tracks. Arpeggiators can be inserted in an unlimited number of parts.
The MIDI controller type and the MIDI Channel assignment will be
saved with the multi or with your song in the host sequencer
Automation is assigned per-part
To use MIDI Learn:
1. Right-click the parameter in UVI Workstation that you want to
automate
2. After the MIDI Learn dialog appears, Trigger the desired MIDI input
controller (knob, fader etc.)
Preset Stacking
Thanks to the simplicity of the UVI Workstation you can stack as
many preset as you want by simply assign multiple part on the same
MIDI channel.
Split, Velocity & Key Switch
To remove a MIDI controller assignment:
Right-click the desired parameter and press “Delete”
Unlimited FX
The Keyswitch settings allow you to load multiple presets into two
or more parts and dynamically play and mute them from your MIDI
controller using key switching, note range, velocity range or any
combination of the three parameters. This powerful feature gives you
a great deal of real-time control.
UVI Workstation offers a wide variety of FX, or effect processors,
to cover all your audio processing needs. The FX implementation is
Scroll Wheel
robust and includes the ability to insert unlimited FX slots in several
stages of the signal flow.
All knobs can be adjusted with the scroll wheel on your mouse.
When you double-click on any knob or slider, you can manually enter
Click the “FX” tab to open the FX page on the Single view
or type in the desired value.
In Multi view the FX section is always displayed
14
Links
UVI
Home . . . . . . . . . . . . . . . . . . . . . . . . . . . . . . . . . . . . . . . . . . . uvi.net/
Download UVI Workstation and User Manuals . . . . . . . . . . . . . . . . . . . uvi.net/downloads
Your Registered Product Serial Numbers and Download Links . . . . . . . . . uvi.net/my-products
FAQ . . . . . . . . . . . . . . . . . . . . . . . . . . . . . . . . . . . . . . . . . . . . uvi.net/faq
Tutorial and Demo Videos . . . . . . . . . . . . . . . . . . . . . . . . . . . . . . . youtube.com/
Support . . . . . . . . . . . . . . . . . . . . . . . . . . . . . . . . . . . . . . . . . . uvi.net/contact-support
iLok
Home . . . . . . . . . . . . . . . . . . . . . . . . . . . . . . . . . . . . . . . . . . . ilok.com/
iLok License Manager . . . . . . . . . . . . . . . . . . . . . . . . . . . . . . . . . ilok.com/ilm.html
FAQ . . . . . . . . . . . . . . . . . . . . . . . . . . . . . . . . . . . . . . . . . . . . ilok.com/supportfaq
15
Credits and Thanks
Produced by UVI
Recording / Editing / Sound Design
Damien Vallet
Emmanuel Usai
Kevin Guilhaunou
Alain J Etchart
Nathaniel Reeves
Software + Scripting
Olivier Tristan
Remy Muller
GUI
Nathaniel Reeves
Special Thanks
Manu @ Masterwave for everything!