1
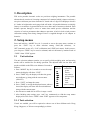
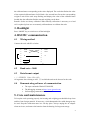
EPS SERIES
ELECTRONIC BALANCE
USER’S MANUAL
1. Description
EPS series portable electronic scales are precision weighing instruments. The portable
advanced scale consists of a housing constructed of a material which is impact resistant, a
one piece solid-state precision electronic PC board with a 5 digit LCD displayer which is
0.5 inches in height and a strain gauge load cell inside. All portable balances are initially
factory set to measure in grams and can be set to other units of measure as desired. Each
balance operates through a series of menus that enable precise calibration and the
selection of various parameters that enhances operation. A built in lock switch prevents
calibration settings from being changed. Power is supplied through an AC adapter or
batteries.
2. Setup menus
Press and hold the “MODE” key for 3 seconds to access the setup menu, continue to
press the “UNIT” key to make selection among “Unit”(unit selection), “A.
OFF”(automatic power off), “CAL”(calibration) and “END”(exit menu). In this process,
you can press “TARE” key to access a submenu, and exit the menu by another touch on
“TARE” when “END” appears.
2.1
Unit selection
The unit selection submenu permits you to specify which weighing units and operating
modes will be enabled for use during operation. The adjacent table lists the units and
modes available on the EPS series balances. Proceed as
Display
Weighing units
Follows:
Indicator
and Modes
a. Press “MODE” key for 3 seconds to access the setup
g
grams
menu, the display will show “UNIT”.
oz
ounces
b. Press “TARE” key, the display will show the grams
ozt
troy ounces
dwt
pennyweight
unit indicator (g) along with the current status
lb
pounds
(ON/OFF).
t
taels
c. Press “UNIT” to change the status.
ct
carat
d. Press “TARE” to accept the displayed status, when repc
parts counting
leased, the display will show the next unit indicator
along with the current status.
e. Set each unit or mode ON or OFF as in steps c and d.
f. After finishing units setting, press “unit” key continuously to find the setup menus
displayed in circle. Press “TARE” when “END” appears to exit setup menu.
2.1.1 Taels selection
If taels are enabled, you will be required to choose one of three different taels: Hong
Kong, Singapore, or Taiwan correspondingly as below:
2
TAEL 1=Hong Kong tael, TAEL 2=Singapore tael and TAEL 3=Taiwan tael.
2.2
Auto off
Auto off permits the selection of either OFF, 60 seconds, 120seconds or 180 seconds.
When this function is selected, the balance will turn off if it is idle for the selected period
of time (60, 120 or 180 seconds). This feature is especially useful when the balance is
operated from internal batteries.
2.2.1 View, change or disable the auto off feature
a.
b.
c.
d.
e.
f.
2.3
Press “MODE” key for 3 seconds to access the setup menu.
Press “UNIT” key continuously to find the “A. OFF” setup submenu.
Press “TARE” key to check the current auto-off status.
Press “UNIT” to change the status.
Press “TARE” key to confirm the setting.
Releasing the “TARE” key, “A. OFF” will be displayed again. Press “UNIT” key
continuously to find that “END” appears, then another touch on “TARE” to exit
setup.
Calibration
When precise weighing is necessary, please calibrate the scales as follows:
a. With no load on the pan, press and hold the “MODE” key for 3 seconds, the scale
will display “UNIT” indicating accessing the setup menu.
b. Press “UNIT” key twice to access the “CAL ON” submenu.
c. Press “TARE” key to confirm. The scale will display “SCALE” or “LINE” that can
be shifted by pressing the “UNIT” key. “SCALE” means sensitivity calibration and
“LINE” indicates linearity calibration of the scale. Press “TARE” to confirm the
desired calibration option.
2.3.1 Sensitivity Calibration
When the display shows “SCALE”, press “TARE” key to find the currently required
calibrated mass displayed on the screen. Press “UNIT” key once again shift between the
two optional calibrated masses. Pressing “TARE” key to confirm one of the two desired
for calibration, zero first flashes on the displayer, then automatically shifts to flashing
value of the calibrated mass. Put the corresponding calibrated weight on the pan and wait
for a few seconds until the displayer stops flashing and shows the value of the calibrating
mass that indicates calibration finishes and normal weighing can be done.
2.3.2 Linearity calibration
When the scale displays “LINE”, press “TARE” key to see the scale flashes. Wait for a
few seconds, the scale flashes half of the value of the full load specified. Put onto the pan
3
the calibrated mass corresponding to the value displayed. The scale then flashes the value
of the required calibrated mass for full load a few seconds later. Put on the corresponding
weight to wait till the scale stops flashing and displays the value of the calibrated mass
loaded, thus the calibration finishes, normal weighing can be done.
Remark: Scales are factory calibrated. When linearity calibration is necessary or a load
cell is replaced, please use an accurately calibrated mass to calibrate the scale.
3. Backlight
Press “MODE” key to switch on or off the backlight.
4. RS232C communication
4.1
Wiring method
Connect the scale with PC as below:
1
2
3
4
5
6
7
8
9
Empty
RXD
TXD
G
Empty
4.2
Baud rate = 9600
4.3
Data format output
1
2
3
4
5
6
7
8
RXD
TXD
G
9
+(-)XXX.XX Unit < CR ><LF>
All segments above belong to ASC Ⅱ in which the unit can be that set for the scale.
4.4
Demonstrating software of communication
a. The super end under Win9x/NT/2000/XP,
b. The debugging assistant on http://www.gjwtech.com,
c. Self-arranging communication software.
5. Care and maintenance
To keep the scale operating properly, the housing and weighing pan should be kept clean
and free from foreign material. If necessary, a cloth dampened with a mild detergent may
be used. Keep the calibration mass in a safe dry place. Always unplug the AC adapter
when not in use, and remove the batteries from the housing for long-term storage.
4
6. Error codes
The following list describes the various errors that may appear on the display and the
suggested remedies:
Display description:
ERR 0 With the weighing pan on, this indicates the pan is too light, make it heavier
properly. If this error still occurs, the sensor (load cell) or the circuit board may be
destroyed. The scale must be sent to the manufacturer to be serviced.
0. LOAD This indicates that the weight loaded on the scale exceeds the capacity
specified. If this error occurs when the loaded weight is in the range of the capacity of the
scale, please re-calibrate the scale with an accurate calibration mass.
7. Troubleshooting
SYMPTOM
PROBABLE CAUSE
REMEDY
No display
Power adapter not
ready
Dead battery
Check power supply
Replace the power
source or batteries
Low battery
indicator
Weak battery
Recharge the battery
Incorrect
weight
reading
Scale is not tared
before use
Scale not properly
calibrated
With no load on the
pan, press “TARE”
before weighing
Re-calibrate
Can not be
calibrated
accurately
Inaccurate weights
being used in
calibration
Use properly
calibrated weights
8. Packing list
1.
An electronic scale, 2. An AC adapter, 3. User’s manual.
9. Limited warranty
There is a year’s free guarantee with the scale dating from the time when it leaves the
factory, including free check, maintenance and parts replacement. But the followings are
excluded from our guarantee:
Faults due to mal-use of the scale, erosion by radioactive or corrosive materials that result
in foreign materials permeating the scale.
Damage due to improper check and maintenance by any unauthorized person.
Sensor (load cell) destroyed due to man-made factors.
5