1
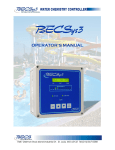
MWP SERIES High Precision 1. INTRODUCTION------------------------------------------------1 2. INSTALLATION---------------------------------------------------2 2.1 2.2 2.3 2.4 2.5 Unpacking--------------------------------------------------------------- 2 Illustration of the installation for plastic shield-------------------2 Selecting the Location----------------------------------------------- 3 Leveling the scale----------------------------------------------------- 3 Connecting Power----------------------------------------------------- 3 2.5.1 AC power------------------------------------------------------3 2.5.2 Battery power------------------------------------------------- 4 2.6 Initial Calibration------------------------------------------------------ 4 3. OVERVIEW OF DISPLAY INDICATORS AND KEYBOARD FUNCTIONS-------------------------------------5 3.1 Display Symbols------------------------------------------------------- 5 3.2 Keyboard Functions--------------------------------------------------- 6 4. OPERATIONS-----------------------------------------------------7 4.1 Weighing mode---------------------------------------------------------7 4.1.1 Units Selection--------------------------------------------------7 4.1.2 Zero Function---------------------------------------------------7 4.1.3 Tare Function--------------------------------------------- ------7 4.1.4 Over load alarm------------------------------------------------8 4.2 Counting mode-------------------------------------------------------- 8 4.3 Percentage (%) mode------------------------------------------------9 5. PARAMETER SET-UP------------------------------------------10 5.1 Calibration---------------------------------------------------------------11 5.2 To choose the initial unit while turning on------------------------12 5.3 To choose the “UNIT” you need------------------------------------13 5.4 To choose the time of AUTO OFF----------------------------------14 5.5 To choose output transmission method---------------------------15 5.6 Baud rate setting for RS232 interface-----------------------------16 5.7 To choose the range of stability-------------------------------------17 5.8 To choose the Zero display range----------------------------------18 5.9 To choose the Zero Recovery display range -------------------19 5.10 To choose the auto-average in sampling on counting mode-20 5.11 To choose Backlight mode-----------------------------------------21 6. AUTO CALIBERATION----------------------------------------- 22 7. RECOVERY OF THE DEFAULT VALUES FROM MEMORY----22 8. ERROR MESSAGES------------------------------------------- 22 9. SPECIFICATION OF RS -232 INTERFACE --------------23 10. CONVERSION UNITS TABLE FOR WEIGHTS---------25 11. TABLE LIST FOR FULL CAPACITY------------------------25 12.TECHNICAL D ATA------------------------------------------26 1. INTRODUCTION The scale is very simple to use and are applicable for general weighing.The user can also use the parts counting and percent weighing functions for special applications. Special functions are available for weighing in up to 8 different units of weight. For safe and dependable operation of this scale, please comply with the following safety precautions: ● Verify that the input voltage printed on the AC Adapter and the plug type matches the local AC power supply. ● Make sure that the power cord does not pose a potential obstacle or tripping hazard. ● Disconnect the scale from the power supply when cleaning the scale. ● Do not operate the scale in hazardous or unstable environments. ● Do not immerse the scale in water or other liquids. ● Do not drop loads on the platform. ● Use only approved accessories and peripherals, as available. ● Operate the scale only under ambient conditions specified in these instructions. ● Service should be performed by authorized personnel only. ● It must not be bump against other items or overloaded with excessively heavy weights (The load must not exceed the maximum capacity of the balance). 1 2. INSTALLATION 2.1 Unpacking Unpack and verify that the following components have been included: ● Scale ● Steel pan ● Instruction Manual ● AC Adapter ● CD-ROM (for the scale with USB interface only) ● USB Cable (for the scale with USB interface only) ● Five pieces of wind shield Save the packaging material. This packaging ensures the best possible protection for the storage or transport of the product. 2.2 ILLUSTRATION PLASTIC SHIELD OF THE 2 INSTALLATION FOR 2.3 Selecting the Location Operate the scale on a firm, level surface. Avoid locations with rapid temperature changes, excessive dust, moisture, air currents, vibrations, electromagnetic fields, heat or direct sunlight. 2.4 Leveling the scale Adjust the leveling feet until the bubble is centered in the circle of the level indicator(located on the front panel). NOTE: Ensure that the scale is level each time its location is changed. 2.5 Connecting Power 2.5.1 AC Power Verify that the intended AC power source matches the AC adapter rating. Connect the supplied AC adapter to the power input receptacle at the back of the scale. Plug the AC adapter into a properly grounded power outlet. 3 2.5.2 Battery Power The battery will begin charging with the AC adapter connected accordingly. An LED indicator below and to the left of the scale shows the status of battery charging: ● Green-battery is fully charged ● Yellow-battery is partially charged and charging ● Red -battery is nearly discharged When AC power is not available, the scale will operate on the internal rechargeable battery. The scale will automatically switch to battery operation if there is a power failure or the power cord is removed. Low battery charge is indicated by the annunciator. Before using the scale for the first time, the internal rechargeable battery should be fully charged for up to 12 hours. A fully charged battery can operate the scale for approximately 80 hours independent of AC power. The battery is protected against overcharging and the scale can remain connected to the AC power line. NOTE: ● The battery must be recharged every 3 months if the scale is not used for a long time. ● Dispose of the lead acid battery according to local laws and regulations. 2.6 Initial Calibration When the scale is operated for the first time, a Span Calibration is recommended to ensure accurate weighing results. Before performing the calibration, be sure to have the appropriate calibration weights. Refer to Section 5.1 for Span Calibration procedures and Section 6 for AUTO CALIBRATION. 4 3. OVERVIEW OF DISPLAY INDICATORS AND KEYBOARD FUNCTIONS 3.1 Display Symbols 1 2 3 4 5 6 7 8 9 10 11 Zero- Is displayed when the “Zero” key is pressed. Tare-Is displayed when the “Tare” key is pressed. Stable-Stable indication, scale is in stable condition. Mode-Is displayed when the “Mode” key is pressed. Setup-Is displayed when the “Setup” key is pressed. CAL-Is displayed when the scale in Calibration Mode. - Power indication. Use key to change-Used to prompt the user while navigating through the menu system. Press Enter –Used as a prompt to the user to press the Enter key. The menu item displayed is selected. Press Esc- Used as a prompt to the user to press the Esc key to return to last menu or exit Setup Mode. Symbols for weighing units and modes, include: ct -Carats lb -Pounds oz -Ounces GN -Grain ozt -Ounces troy dwt -Pennyweight t1.T -Tael pcs -Parts counting % -Percent weighing ℃ -Temperature 5 3.2 Keyboard Functions : ON/OFF switch : Function key to choose weighing, counting, percentage :”Unit” selection, 8 units are available : Sample key to set the unit weight of sample : Tare key to deduct the container weight : Zero key, press this key, the weight will become “0” : Confirmation key and print key : Selects various menus : Return to last menu or exit Setup Mode : Travels to the left through menus : Travels to the right through menus : Travels up through menus : Travels down through menus 6 4.OPERATIONS Press the key for power on ,the scale will be on the weighing mode using the initial units of weight selected. 4.1 WEIGHING MODE 4.1.1 Units selection Press the key to choose the weighing units and the display will be changed to the new value with the units shown.There are up to 8 units of weight that can be enabled. 4.1. 2 Zero Function If the zero shifts during operation, press the key to set it to zero. The Zero function is only active over ±2% of full capacity. 4.1. 3 Tare Function Tare weight is the weight of a container and can be subtracted by placing an empty container on the scale. When the display is stable, press the key. The display will become zero and the display will have a tare indication. Cancel the tare function by pressing the scale. Tare range is the full capacity of the scale. 7 key with no weight on the 4.1. 4 Over load alarm When the weight on the scale is more than Max. capacity, the display shows”-----OL------“ at the same time the buzzer sounds. Please take off the weight at once. Otherwise the scale will be easily damaged. 4.2 COUNTING MODE The scale will count parts by weighing a preset number of samples and setting the display to show the number. Then, as more samples are added, the display will increase. If necessary, place a container on the scale and press key before beginning. After selecting parts counting with the , key, press the or key to select the sample size (10,20,50,100 pcs). Put the sample number (same as selected) on the scale and press key. When the symbol” C” disappears the sampling procedure is finished and you can start to use the counting function. If the unit weight is too small(less than 0.2 of a scale division), the display will show:”----or----pcs.” It would be best to use larger parts or to use ten times as many parts as required and reduce the displayed values to 1/10th. 8 4.3 Percentage (%) mode After selection % Weighing with the key press the or , key to choose either 100.0%, 100.00%. Put the item to be considered 100% onto the pan and press the key to sample, at the same time the symbol “Mode” flash, after several seconds the symbol” Mode” disappears and the buzzer sounds the sampling procedure is finished and you can start to use the percentage function. When the value of the sample is smaller than 0.2d, the display will show”----or----”. It means that the sample is too small, larger parts should be put on. NOTE: ● When you finish the procedures of selecting the sample size in the counting mode or percentage(%) mode, press the key to change back to the weighing mode. Press the key to return to counting or percentage mode. The scale will memorize the previous data automatically so that you can continue to count parts or weigh in percentage. ● The memory of sampling size data will be cleared automatically when the two modes of counting and percentage switch reciprocally. 9 5. PARAMETER SET-UP Press key to enter SETUP PARAMETER mode during in weighing mode, and the display shows “CAL”. The functions will change by pressing , key. The functions are: 5.11 5.1 5.2 5.10 5.3 5.9 5.4 5.8 5.5 5.6 5.7 10 5.1 Span Calibration When the display shows “CAL”, press the key to enter Auto calibration. Please use , and , key to key in the mass values which you are going to calibrate, then press key to confirm the value. When the display is flashing and showing the weight values, put the mass on scale. While scale is stable, the scale will return back to weighing mode. The calibration procedure is finished. NOTE: ● Mass Value: Any over (full calibration×10%)weight of key in value is acceptable to calibrate. ● Suggestion: Generally. If the calibrated weight is over half load capacity or full load capacity, it will be good for getting the precise accuracy. Another method for auto calibration, please see the section 6 “AUTO CALIBRATION”. ● During in calibration procedure, you can press the to exit calibration function. 11 key 5.2 To choose the initial unit while turning on Please press or key to confirm. Press , key to select the unit, then press key to return to last menu or exit. (Factory setting: ”g”) 12 5.3 To choose the “UNIT” you need (Total 8 units, you can choose some of them you need to use ) Press or , key to move the units, press key to choose “ON” or “OFF” and press key to return to last menu or exit. (Factory setting: total 8 units are on) 13 , key to confirm . Press 5.4 To choose the time of AUTO OFF Press , key to select the time of auto off .i.e.no,2,5 or 8 minutes,then press key to confirm. Press last menu or exit. (Factory setting: ”no”) 14 key to return to 5.5 To choose output transmission method Press , confirm. Press key to select “stable transmit”, press key to return to last menu or exit. (Factory setting: ”close”) “CLOSE”=output disabled “tb”= Transmit by pressing “stb”= Stable transmit key “disp”= Transmit the display data 15 “ser”= Series transmit key to 5.6 Baud rate setting for RS232 interface Use , 9600,Press key to select the baud rate you need 1200,2400,4800, key to confirm. Press or exit. (Factory setting:2400) 16 key to return to last menu 5.7 To choose the range of stability Press press , key to select the range of stability from 1 to 15.Then key to confirm. Press key to return to last menu or exit. The bigger the figures you choose, the quicker the stability of display will be got. (Factory setting:”05”) 17 5.8 To choose the Zero display range Press , key to select the zero display range from 0 to 3 Divisions, then press key to confirm. Press last menu or exit. (Factory setting:”1”) 18 key to return to 5.9 Press To choose the Zero Recovery display range , key to select the display range of zero recovery from 0 to 3 divisions, press key to confirm. Press return to last menu or exit. (Factory setting:”2”) 19 key to 5.10 To choose the auto-average in sampling on counting mode Please , key to select the auto-average (Yes or No).Then press Key to confirm. Press exit. (Factory setting: “YES”) 20 key to return to last menu or 5.11 To choose Backlight Mode Please , chosen). Then press key to select the backlight mode (1,2,3 can be Key to confirm. Press to last menu or exit. (Factory setting: bl.l) “bI.1”=Auto backlight “bI.2”=Backlight will always be on “bI.3”=No backlight 21 key to return 6. AUTO CALIBRATION Press the key for about 3 seconds. The display will show the “Calibration weight value.” Put the same weight on the pan. When the “CAL” symbol disappears, the calibration procedure is finished. 7. RECOVERY OF THE DEFAULT VALUES FROM MEMORY During in weighing mode, hold down the key for 3 seconds. The scale will come back with a default calibration values. 8. ERROR MESSAGES During self test the scale verifies operation and the load cell. Error messages are: “ ” messages. These messages may also be shown if the pan is not installed correctly or the environment is not suitable. Contact your dealer for assistance. E1 EPROM data lost Re calibrate E2 Loaded when scale is turning ON Unload the load and turn the scale on Loaded when tray is not in proper position Unload the load and turn the scale on 22 Load cell zero value is out of range Re calibrate Load cell damage Change load cell OL Overload 9. SPECIFICATION OF OUTPUT INTERFACE Mode: ElA-RS-232 C’s UART signal, or USB signal. Format: Baud rate: 2400 BPS ,4800 BPS Data bits: 7 BITS Parity bit: 1 EVEN Stop bit: 1 BIT Code: ASCII RS-232 connector is a 9 pin D-subminiature socket. Input Pin 2 Output Pin 3 Signal Ground Pin 5 Starting bit LSB data bit MSB Parity bit Stop bit DATA FORMAT: HEAD1 , 12 3 HEAD2 45 , 6 DATA UNIT 7 8 9 10 11 12 13 14 15 16 17 18 HEAD1 (2 BYTES) HEAD2 (2BYTES) OL-Overload, NT-NET Mode ST-Display is Stable GS-Gross Weight 23 CR 19 20 US-Display is Unstable DATA(8BYTES) 2D (HEX)=”-”(MINUS) 20(HEX)=” ”(SPACE) 2E (HEX)=”.”(DECIMALPOINT) UNIT(4BYTE) g-20 ( HEX ) ; 20 ( HEX ) ; 20 ( HEX ) ; 67 ( HEX ) Ib-20 ( HEX ) ; 20 ( HEX ) ; 6c ( HEX ) ; 62 ( HEX ) Tl.T-74 ( HEX ) ; 6C ( HEX ) ; 2E ( HEX ) ; 54 ( HEX ) Transmit Example: EX+0.876g,when it is stable and net value as: HEAD, HEAD, ST , NT , + DATA UNIT CR 0.876 g 0D 0A EX-1.568lb, when it is unstable and net value as: HEAD, HEAD, US NT , - , DATA 1.568 UNIT lb CR 0D 0A EX+15.24tl.T,when it is stable and net value as: HEAD, HEAD, ST, NT DATA UNIT CR , +15.24 tl.T 0D 0A 24 10. CONVERSION UNITS TABLE FOR WEIGHTS 1 ct (MET.CARAT) =0.1999694 g 1 lb(AVOIRDUPOIS POUND) =453.59237 g 1 oz(AVOIRDUPOIS OUNCE) =28.349523125g 1 GN(GRAIN)(U.K) =0.06479891 g 1 ozt (TROY OUNCE) =31.1034768 g 1 dwt(PENNYWEIGHT) =1.55517384 g 1 t1.T(TAEL)(TWN) =37.799375 g 11. TABLE LIST FOR FULL CAPACITY 150g× 300g× 600g× 1500g× 3000g× 0.005g 0.01g 0.01g 0.05g 0.1g g 150.045 300.09 600.18 1500.45 3000.9 ct 750.18 1500.45 3000.9 7501.8 15004.5 lb 0.33018 0.66045 1.3009 3.3018 6.6045 oz 5.2018 10.5045 21.009 52.018 100.045 25 GN 2300.9 4601.8 9204.5 23009 46018 ozt 4.8018 9.6045 19.009 48.018 96.045 dwt 96.045 190.09 380.18 960.45 1900.9 tl.T 4.0018 8.0045 16.009 40.018 80.045 12. TECHNICAL DATA Capacity x Readability Maximum Displayed Resolution Construction 150Х 0.005g 300Х 0.01g 600Х .02g 1500Х 0.05g 3000Х 0.1g 300Х 0.005g Full capacity ≦±2% of full capacity Display G, ct, Ib, oz, GN, oz t, dwt, tl, T Weighing, Counting and percentage (%) 6 digits LCD (40Х95mm) with auto backlight ≦2 seconds Stabilization time Operating Temperature Humidity Range Power 0 to 40℃/ 32 to 104℉ ≦90% relative humidity, non-condensing AC Adapter 12V DC/500mA & Internal rechargeable lead acid battery Calibration Automatic external Battery life 80 hours continuous use with 12 hours recharging time Interface Pan Size 3000x 0.05g ABS plastic, stainless steel platform Zero range Application Modes 1200Х 0.02g 1:30000 1:30000 1:30000 1:30000 1:30000 1:60000 1:60000 1:60000 1:60000 Tare range Weighing Units 600Х 0.01g RS-232 or USB output(Option) 150g~600g : Ø 116mm (round) 1200g ~ 3000g: 124Х144mm (square) Scale Dimensions 200Х80Х250mm (WxHxD) 26