1
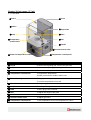
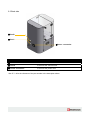
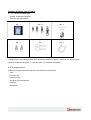
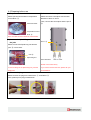
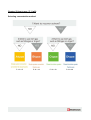
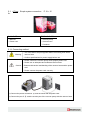
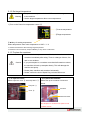
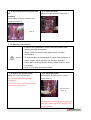
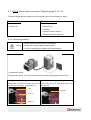
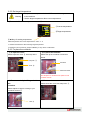
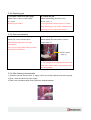
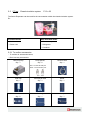
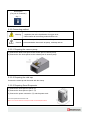
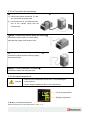
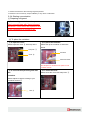
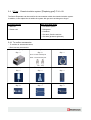
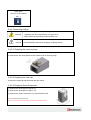
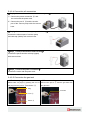
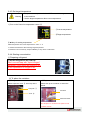
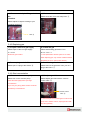
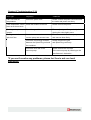
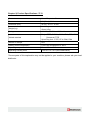
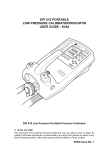
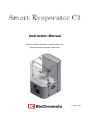
Instruction Manual
Please read this instruction manual before use.
Follow the basic procedure as shown.
<151014-US>
Chapter 1) Introduction / P 2
Smart Evaporator has two features below:
・Can be used for evaporating volatile solvents.
・Can be used for keeping a temperature.
This instruction manual explains product summary, operation, trouble processing,
maintenance and storage below;
・Must read this instruction manual before use.
・Must understand the ‘Warning’ and the ‘Caution’ in this manual before use.
・Adhere to the instruction manual.
・Keep the machine out of the reach of children.
・All rights are reserved.
・If the instruction manual has mistakes or anything unpleasant, please ask local distributors.
・Please note that the product specification is subjected to the alternation without any notice.
・The instruction manual has some pictures which are pumps, containers and traps.
However, please notice that these systems are not included in the product.
・Don't use cold trap with ''liquid nitrogen'' because it could cause explosion due to the liquefaction of
oxygen in air.
・Please notice that a vacuum pump is not included in the product.
-2-
Chapters
Chapter 1) Introduction / P 2
Chapter 2) To use safely / P 4∼6
Chapter 3) Part names / P 7∼8
3-1 Front side / P 7
3-2 Back side / P 8
Chapter 4) Before use / P 9∼10
Chapter 5) How to use / P 11∼29
5-1 Simple system connection
P 12∼15
5-2 Simple system connection【Replacing gas】P 16∼18
5-3 Closed circulation system
P 19∼23
5-4 Closed circulation system【Replacing gas】P 24∼29
Chapter 6) Troubleshooting / P 30
Chapter 7) Question and Answer / P 31
Chapter 8) Limited Warranty / P 32
Chapter 9) Product Specifications / P 33
-3-
Chapter 2) To use safely / P 4∼6
2-1 Important safety instructions
There are two messages below;
Warning
May result in death and serious injury
Caution
May result in minor injury and property damage
・Use for volatile solvents only.
・Please protect the machine from water, inflammable gas and
explosive gas. Insufficient protection may result in a fire,
Warning
malfunctioning or break down.
・Don't expose the unit to avoid shock hazard.
・Please follow safety instructions during use.
・If you use the Smart Evaporator for in different ways other than
instruction in this manual, we are not liable for any damages arising.
-4-
2-2 Setting up the machine
・Don’t use the Smart Evaporator outside laboratory.
・Avoid watery area or water splash.
・Avoid tilt, vibration and shock.
Warning
・Keep the machine and the power cord away from heat.
・Connect the power cord properly.
・Don’t place something on power cord to avoid accidents.
・Don’t use multiple-tap electricity with the Smart Evaporator.
・Place the machine horizontally.
Caution
・Keep enough space around the Smart Evaporator to avoid heat
accumulation.
・Don't place objects on the Smart Evaporator.
Power source
You can use the machine in countries / regions where the power supply is on 120V AC.
2-3 Before use
・Must confirm a normal running for electric switch and temperature
Warning
control before use.
・Must connect with the power cord to the outlet properly.
・If you find out any trouble or damage, don’t use the Smart Evaporator.
Example
Caution
・The power cord and outlet have damages.
・The Smart Evaporator has damages.
・The temperature control panel has damages.
2-4 While in use
・Avoid tilt, vibration and shock during running.
Caution
・Avoid sucking solvents and trashes directly.
・Don’t put solvents, trash, water, etc into ports of the Smart
Evaporator.
-5-
2-5 Storage
・Keep temperature from 10 to 40 ℃. (Avoid direct sunlight)
・Keep humidity from 20 % to 70 % (Not condensation)
・Avoid conditions below;
Explosive gas, flammable gas and Corrosive gas,
Warning
Chemical and Water
Tilt, Vibration and Shock
Dust, Iron powder and Oily smoke
Environment may cause adverse effect for the electric circuit
Severe temperature changes
2-6 Maintenance
・Don't expose the unit to avoid shock hazard.
・Don't do anything to the unit for the maintenance except the
description in this manual.
Warning
・If the Smart Evaporator need repair, please ask your distributor
immediately.
・In case of spilling water or solvents, please clean it off after
turning off the power immediately.
2-7 Disclaimer
The company is not liable for any damages arising from earthquakes, lightning, storms, floods or other
natural disasters, as well as fires, actions by third parties, other accidents, intentional or mistaken
operation by the customer, or use under other unusual conditions outside the responsibility of the
company.
The company is not liable for any damages ( loss of business income, disruption of business and etc. )
arising from use of or inability to use the product.
The company is not liable for any damages from using in different ways other than instruction in this
manual.
.
-6-
Chapter 3) Part names / P 7∼8
3-1 Front side
①Port A
⑥Cover
②Orifice
⑦Snap locks
③Joint
⑧Plate
④Temperature
⑨Dial
control block
⑩Handle
⑪Vacuum control valve
⑤Power for temperature control
⑫Temperature control panel
Part name
Function
① Port A
In case of the replacing gas, connect the gas tube
② Orifice
In case of the replacing gas, leak gas
③ Joint
To connect the plug
④ Temperature control block
To regulate the temperature
*Please put aluminum beads in before use
⑤ Power for temperature control
To supply electricity to temperature control block
To turn the temperature unit on/off
⑥ Cover
For replacing gas
⑦ Snap lock
To seal replaced gas inside
⑧ Plate
To set a plug to the container
⑨ Dial
To adjust the height of the plate
⑩ Handle
Used to carry the machine
⑪ Vacuum control valve
To adjust gas influx
⑫ Temperature control panel
To set temperature from room temperature to 100℃
-7-
3-2 Back side
⑬Port B
⑭Port C
⑮Power connection
Part name
Function
⑬ Port B
To connect the circulation hose
⑭ Port C
To connect the vacuum hose
⑮ Power connection
To connect the power cord
*See P 7∼8 for the reference of the part number in the description above.
-8-
Chapter 4) Before use / P 9∼10
4-1 To confirm accessories
・Confirm all accessories below;
・Don't lose any accessories
Aluminum beads
Spiral Plug units
Instruction Manual
Qty : 1
Qty : 4
Qty : 1
Hose splices *1
Plugs *2
Power cord
Qty : 2
Qty
Qty : 1
*1 Please select a moderate a hose splice with outer diameter of 9mm or 12mm for the vacuum pump.
*2 On the shipment, the port A ① and the orifice ② inside are connected.
4-2 To prepare items
Please notice that these items below are not included in the product.
・Tools
・Vacuum hose
・Vacuum pump
・Container for concentration
・Cold trap
・Refrigerant
-9-
4-3 Preparing before use
1) Prepare aluminum beads
3) Connect the hose splice
Please put aluminum beads in temperature
Please choose a hose splice with the outer
control block ④.
diameter of 9mm or 12mm.
Then, connect the hose splice and the port C
Aluminum beads
⑭
Temperature control
block ④
Don't use other aluminum beads to avoid troubles.
2) Connect the Spiral Plug unit and
the joint
Port C ⑭
Please connect the Spiral Plug unit and the
joint ③ until it clicks.
Joint ③
Spiral Plug unit
Outer diameters
9mm or 12mm
Please connect them firmly.
In case of taking out the Spiral Plug unit, push the
If you need to choose other size, please ask your
metal point.
local distributor.
4) Remove the plug
Please remove the plug from inside Port A ① and Orifice ②.
Then, please put on plugs outside them.
- 10 -
Chapter 5) How to use / P 11∼30
Selecting concentration method
P 12∼15
P 16∼18
P 19∼23
- 11 -
P 24∼29
5-1
A Type
Simple system connection
P 12∼15
Ex :
Included items
Not included items
・Machine
・Vacuum pump
・Power cord
・Vacuum hose
・Container
5-1-1 Connecting method
・Turn off machine and pump power before connecting them with a
Warning
vacuum hose.
・Confirm specifications for power supply before use.
・Please confirm the vacuum pump works properly before use.
・Please use an adequate and moderate vacuum hose.
Caution ・Please avoid tension and bending of the vacuum hose and the power
cord.
・Please connect the power cord correctly.
1) Connect the power connection ⑮ and the outlet with the power cord.
2) Connect the port C ⑭ and the suction port of the vacuum pump with the vacuum hose.
- 12 -
5-1-2 Set target temperature
・Keep the max temperature below 100℃ to avoid damages
to the machine.
Warning
・Set the target temperature above room temperature.
1) Turn on the Power for temperature control ⑤.
①Current temperature
②Target temperature
③
key for setting temperature
Select temperature from room temperature to 100℃ *1 *2
*1 Please use this device after reaching target temperature.
*2 Please do not touch the key except for
key. It may cause a malfunction.
5-1-3 To place the container
・Don't touch the temperature control block, aluminum beads and the
container immediately after using. There is a danger of burns, fire
and / or an accident.
Caution
・If you put samples in a container more than half container volume,
the machine will suck up samples directly. This will damage the
machine and pump.
・Please place machine and container horizontally.
・Please confirm the size of Spiral Plug unit size before use.
1) To open the cover
2) To place the container
Please open the cover ⑥ with snap locks ⑦.
Please set up the container in aluminum
beads.
Snap lock ⑦
Container
Cover ⑥
Aluminum beads
Put samples in a container from quarter to half
container volume.
- 13 -
3) To connect the Spiral Plug unit with
the
4) To close the cover
Please close the cover with snap locks ⑦.
container
Please adjust a height according to your
container the dial ⑨.
Dial ⑨
5-1-4 Starting concentration
・In case of using temperature control, start concentration after
reaching the target temperature.
・Please confirm to close the valve tightly before you begin
concentration.
Caution
・To avoid sample loss and damages to machine and pump due to
sudden suction, adjust gas influx with the valve gradually.
・If the machine sucks up samples directly, please close the valve
immediately.
・Don't suck up dusts and foreign matters.
1) To turn on the vacuum pump
2) To adjust gas influx
Please turn on the vacuum pump.
Please adjust gas influx with the vacuum
Close the valve tightly before you begin
control valve ⑪.
concentration.
If you use your pump, please confirm a manual
provided by thw manufacturer.
Vacuum control
valve ⑪
To avoid sample loss and damages to machine and
pump due to sudden suction, adjust gas influx with
the valve gradually.
- 14 -
5-1-5 After finishing concentration
1) Close the vacuum control valve ⑪ tightly. Then, turn off the machine and vacuum pump.
2) Take out the container after cooling down the heated container.
- 15 -
5-2
B Type Simple system connection【Replacing gas】P 16∼18
The Smart Evaporator can replace the air inside with gas such as Nitrogen or Argon.
Included items
Not included items
・Machine
・Vacuum pump
・Power cord
・Vacuum hose
・Container
・Gas tank, Gas line and etc.
・Gas tube (pressure tightness)
5-2-1 Connecting method
・Please connect the vacuum tube completely.
Caution
・Please take out plugs before replacing gas.
・In case of replacing gas, please leak the gas always.
1) Connect the power connection ⑮ and the outlet with the power cord.
2) Connect the port C ⑭ and the suction port of vacuum pump with the vacuum hose.
3) To take out plugs
4) To connect the gas tube
Please take out plugs by pushing the root of
Connect the port A ① and the gas tank with
the plug from the port A ①and Orifice ②.
the gas tube.
Plug
Gas tube
Port A ①
Orifice ②
- 16 -
5-2-2 Set target temperature
・Keep the max temperature below 100℃ to avoid damages
to the machine.
Warning
・Set the target temperature above room temperature.
1) Turn on the Power for temperature control ⑤.
①Current temperature
②Target temperature
③
key for setting temperature
Select temperature from room temperature to 100℃ *1 *2
*1 Please use this device after reaching target temperature.
*2 Please do not touch the key except for
key. It may cause a malfunction.
5-2-3 To place the container
1) To open the cover
2) To place the container
Please open the cover ⑥ with snap locks.
Please set up the container in aluminum
beads.
Snap lock ⑦
Container
Cover ⑥
Aluminum beads
Put samples in a container from quarter to half
container volume.
3) To connect the Spiral Plug unit with
the
4) To close the cover
Please close the cover with snap locks ⑦.
container
Please adjust a height according to your
container the dial ⑨.
Dial ⑨
- 17 -
5-2-4 Replacing gas
1) To open a valve of a gas supply
2) To flow the gas
Please open a valve of a gas supply.
Please start flowing gas about 2 min.
Ex : Gas line
at 10 L / min. *1
Must have gas overflow.
*1 Gas replacement with the system is not 100%.
When replacing gas, only use the containers that fit
Spiral Plug P1 or P2. (some work with P3.)
5-2-5 Start concentration
1) To turn on the vacuum pump
2) To adjust gas influx
Please turn on the vacuum pump.
Please adjust gas influx with the vacuum
Close the valve tightly before you begin
control valve ⑪.
concentration.
If you use your pump, please confirm a manual
provided by a manufacturer.
Vacuum control
valve ⑪
To avoid sample loss and damages to machine and
pump due to sudden suction, adjust gas influx with
the valve gradually.
5-2-6 After finishing concentration
1) Close the vacuum control valve ⑪ tightly. Then, turn off the machine and vacuum pump.
2) Then, close the valve of the gas supply.
3) Take out the container after cooling down the heated container.
- 18 -
5-3
C Type
Closed circulation system
P 19∼23
The Smart Evaporator can be used for the concentration within the closed circulation system.
Ex :
Included items
Not included items
・Machine
・Circulation system
・Power cord
・Refrigerant
・Container
5-3-1 To confirm accessories
・To confirm all accessories below;
・Don't lose any accessories.
Vacuum pump
Hose splices
Vacuum hose
Qty : 1
Qty : 2
Qty : 1
Fine : For the exhaust port
Thick : For the suction port
Fine Thick
Cold trap
Erlenmeyer flask
Stand
Qty :1
Qty : 1
Qty : 1
Holder
Cut ring
Clamp
Qty : 2
Qty : 1
Qty : 1
- 19 -
Hose splice
(For port of circulation)
Qty : 1
5-3-2 Connecting method
・Don't use cold trap with ''liquid nitrogen'' because it could cause
Warning
explosion due to the liquefaction of oxygen in air.
・Must confirm all connecting method before use.
・As much as possible, use the Smart Evaporator with our
Caution
recommendation items such as pump, cold trap and etc.
5-3-2-1 Preparing the vacuum pump
1) Connect the thick hose splice to the suction port of vacuum pump.
2) Connect the fine hose splices to the exhaust port of vacuum pump.
5-3-2-2 Preparing the cold trap
Connect the cold trap and the stand with the clamp.
5-3-2-3 Preparing Smart Evaporator
1) Connect the hose splice to port B ⑬.
2) Connect the hose splice to port C ⑭.
3) Connect the power connection ⑮ and the power cord.
*Two hose splices are the same ones.
See P 8∼9 for the reference of the part number in the description above.
- 20 -
5-3-2-4 Connection all accessories
<Step1:Connect the machine and the vacuum pump>
1) Connect the power connection ⑮ and
the outlet with the power cord.
2) Connect the port C ⑭ and the suction
port of the vacuum pump with the
vacuum hose.
<Step2:Connect the vacuum pump and cold trap>
Connect the exhaust port of vacuum pump
and cold trap (under) with vacuum hose.
<Step3:Connect the machine and cold trap>
Connect the port B and the cold trap (upper)
with vacuum hose.
<Step4:Connect the power connection>
Connect the outlet with the power cord.
5-3-3 Set target temperature
・Keep the max temperature below 100℃ to avoid damages
Warning
to the machine.
・Set the target temperature above room temperature.
1) Turn on the Power for temperature control ⑤.
①Current temperature
②Target temperature
③
key for setting temperature
Select temperature from room temperature to 100℃ *1 *2
- 21 -
*1 Please use this device after reaching target temperature.
*2 Please do not touch the key except for
key. It may cause a malfunction.
5-3-4 Starting concentration
(i) Preparing refrigerant
1) Put the refrigerant in the cold trap
Don't use cold trap with ''liquid nitrogen''
because it could cause an explosion due
to the liquefaction of oxygen in air.
(ii) To place the container
1) To open the cover
2) To place the container
Please open the cover ⑥ with snap locks.
Please set up the container on aluminum
beads.
Snap lock ⑦
Container
Cover ⑥
Aluminum beads
Put samples in a container from quarter to half
container volume.
3) To connect the Spiral Plug unit with
the
4) To close the cover
Please close the cover with snap locks ⑦.
container
Please adjust a height according to your
container the dial ⑨.
Dial ⑨
- 22 -
5-3-5 Start concentration
1) To turn on the vacuum pump
2) To adjust gas influx
Please turn on the vacuum pump.
Please adjust gas influx with the vacuum
Close the valve tightly before you begin
control valve ⑪.
concentration.
If you use your pump, please confirm a manual
provided by a manufacturer.
Vacuum control
valve ⑪
To avoid sample loss and damages to machine and
pump due to sudden suction, adjust gas influx with
the valve gradually.
5-3-6 After finishing concentration
1) Close the vacuum control valve ⑪ tightly. Then, turn off the machine and vacuum pump.
2) Take out the container after cooling down the heated container.
- 23 -
5-4
D Type
Closed circulation system【Replacing gas】P 24∼29
The Smart Evaporator can be used for the concentration within the closed circulation system.
In addition, it can replace the air within the system with gas such as Nitrogen or Argon.
Included items
Not included items
・Machine
・Circulation system
・Power cord
・Refrigerant
・Container
・Gas tank, Gas line and etc.
・Gas tube (pressure tightness)
5-4-1 To confirm accessories
・To confirm all accessories below;
・Don't lose any accessories.
Vacuum pump
Hose splices
Vacuum hose
Qty : 1
Qty : 2
Qty : 1
Fine : For the exhaust port
Thick : For the suction port
Fine Thick
Cold trap
Erlenmeyer flask
Stand
Qty :1
Qty : 1
Qty : 1
Holder
Cut ring
Clamp
Qty : 2
Qty : 1
Qty : 1
- 24 -
Hose splice
(For port of circulation)
Qty : 1
5-4-2 Connecting method
・Don't use cold trap with ''liquid nitrogen'' because it could cause
Warning
explosion due to the liquefaction of oxygen in air.
・Must confirm all connecting method before use.
・As much as possible, use the Smart Evaporator with our
Caution
recommendation items such as pump, cold trap and etc.
5-4-2-1 Preparing the vacuum pump
1) Connect the thick hose splice to the suction port of vacuum pump.
2) Connect the fine hose splices to the exhaust port of vacuum pump.
5-4-2-2 Preparing the cold trap
Connect the cold trap and the stand with the clamp.
5-4-2-3 Preparing Smart Evaporator
1) Connect the hose splice to port B ⑬.
2) Connect the hose splice to port C ⑭.
3) Connect the power connection ⑮ and the power cord.
*Two hose splices are the same ones.
See P 8∼9 for the reference of the part number in the description above.
- 25 -
5-4-2-4 Connection all accessories
<Step1:Connect the machine and the vacuum pump>
1) Connect the power connection ⑮ and
the outlet with the power cord.
2) Connect the port C ⑭ and the suction
port of the vacuum pump with the vacuum
hose.
<Step2:Connect the vacuum pump and cold trap>
Connect the exhaust port of vacuum pump
and cold trap (Under) with vacuum hose.
<Step3:Connect the machine and cold trap>
Connect the port B and the cold trap (upper)
with vacuum hose.
<Step4:Connect the power connection>
Connect the outlet with the power cord.
5-4-2-5 Connection the gas tank
1) To take out plugs
2) To connect the gas tube
Please take out plugs by pushing the root of
Connect the port A ① and the gas tank with
the plug from the port A ①and Orifice ②.
the gas tube.
Plug
Gas tube
Port A ①
Orifice ②
- 26 -
5-4-3 Set target temperature
・Keep the max temperature below 100℃ to avoid damages
to the machine.
Warning
・Set the target temperature above room temperature.
1) Turn on the Power for temperature control ⑤.
①Current temperature
②Target temperature
③
key for setting temperature
Select temperature from room temperature to 100℃ *1 *2
*1 Please use this device after reaching target temperature.
*2 Please do not touch the key except for
key. It may cause a malfunction.
5-4-4 Starting concentration
(i) Preparing refrigerant
1) Put the refrigerant in the cold trap
Don't use cold trap with ''liquid nitrogen''
because it could cause an explosion due
to the liquefaction of oxygen in air.
(ii) To place the container
1) To open the cover
2) To place the container
Please open the cover ⑥ with snap locks.
Please set up the container on aluminum
beads.
Snap lock ⑦
Container
Cover ⑥
Aluminum beads
Put samples in a container from quarter to half
container volume.
- 27 -
3) To connect the Spiral Plug unit with
the
4) To close the cover
Please close the cover with snap locks ⑦.
container
Please adjust a height according to your
container the dial ⑨.
Dial ⑨
5-4-5 Replacing gas
1) To open a valve of a gas supply
2) To flow the gas
Please open a valve of a gas supply.
Please start flowing gas about 2 min.
Ex : Gas line
at 10 L / min. *1
Must have gas overflow.
*1 Gas replacement with the system is not 100%.
When replacing gas, only use the containers that fit
Spiral Plug P1 or P2. (some work with P3.)
3) Put on a plug to the Orifice
4) Remove the gas tube
Please put on a plug to the Orifice ②.
Please remove the gas tube. Then, put on a
plug to the Port A ①.
5-4-6 Start concentration
1) To turn on the vacuum pump
2) To adjust gas influx
Please turn on the vacuum pump.
Please adjust gas influx with the vacuum
Close the valve tightly before you begin
control valve ⑪.
concentration.
If you use your pump, please confirm a manual
provided by a manufacturer.
Vacuum control
valve ⑪
To avoid sample loss and damages to machine and
pump due to sudden suction, adjust gas influx with
the valve gradually.
- 28 -
5-4-7 After finishing concentration
1) Close the vacuum control valve ⑪ tightly. Then, turn off the machine and vacuum pump.
2) Then, close the valve of the gas supply.
3) Take out the container after cooling down the heated container.
- 29 -
Chapter 6) Troubleshooting / P 30
Error type
Inspection
Treatment
Can't use and set
Check the power cord.
Please connect the power connection and
temperature
If the temperature control
the outlet with power cord firmly.
Check the duration of the use.
Please turn off the power.
Check the gas influx.
Please adjust gas influx gradually after
block is too hot to touch
Sucking and splash
sample
closing the valve tightly once.
Can't generate the
Check the connection between
Please connect the vacuum pump
spiral air flow
vacuum pump and vacuum hose.
and vacuum hose firmly.
Check the connecting condition
Please connect the joint
between the Spiral Plug unit and
and Spiral Plug unit firmly.
the container.
Check the flow rate of the
Please confirm the flow rate
vacuum pump.
of the vacuum pump by referring to the
manufacturer’s instruction .
*If you can't resolve any problems, please feel free to ask our local
distributor.
- 30 -
Chapter 7) Question and Answer / P 31
Q.1 How long can I use the Spiral Plug unit?
Answer:
It depends on the frequency of use.
However, we recommend to replace the old Spiral Plug unit with a new one periodically.
Q.2 I'm worried about the contamination from the Spiral Plug unit.
Answer:
It depends on the solvent.
However, materials (PTFE, PFA and THV) are resistance to organic solvents.
Q.3 Which containers are recommended?
Answer:
The Smart Evaporator can be used with various types of containers.
We recommend using flat-bottom containers for efficient concentration.
Q.4 Do you have a recommended pump?
Answer:
Yes, we have a recommended pump.
Please ask our local distributor.
Q.5 How do I wash the plug unit?
Answer:
Please wash with moderate solvent or pure water according to your sample.
Please use it after the complete
In addition, it can be put in autoclaves or ultrasonic washing machines.
- 31 -
Chapter 8) Limited Warranty / P 32
We are willing to repair the machine in the case of troubles caused by normal use abided by quality
assurance provisions below. Please contact the local distributor from which you purchased it, then
provide it with product code and details such as the date of purchase and troubles.
8.1 Parts for Quality Assurance
Machine
8.2 Term of Guarantee
1 year after the purchase
*Please notice that the fees for repairing are charged after the period, which includes costs for parts,
transportation and repairing work.
8.3 Exception for Quality Assurance
Please note that you are liable for the cost of repairs in the case below.
・Troubles and damages caused by careless use
・Troubles and damages caused by accidents such as falling and shock during transportation after the
purchase
・Troubles and damages because of using non-designated voltage and frequency in this manual
・Troubles and damages because of unsuitable repairs
・Troubles and damages because of the alternation to machine and disassembling
・Unrelated alternations to the function and performance such as color change, noise and vibration
・Reaching part life due to the frequent use of the machine
・Consumable parts
・Troubles and damages due to natural disaster, fire and other external causes
・Troubles and damages caused by storing the machine under harsh conditions such as exposure to high
temperature, high humidity, harmful chemicals, corrosive gas
・Troubles and damages caused by contaminants with sand, mud, water and reagents
・Troubles and damages caused by using the machine for other applications that are not described in this
manual
- 32 -
Chapter 9) Product Specifications / P 33
Product name
Smart Evaporator C1
Product code
C1-[Color]-120-A
Outer size (mm)
W 220 * D 270 * H 389
Weight (kg)
Rating
Net 5.3kg
Gross 8.5kg
AC120V 50/60Hz 100W
1A
Body : PTFE, SUS304, C3604, THV, PBT, NBR,
Wetted materials
Denatured PTFE
Spiral Plug Unit : PTFE, PFA, POM, FKM
Number of sample
One
Heating control temperature
From room temperature to 100°C
Operating temperature limits
From 10°C to 40 °C
Operating humidity limits
From 20 % to 70 % (No condensation)
*If some parts of this explanation may not be applied to your machine, please ask your local
distributor.
- 33 -
Distributor
Manufacturer
BioChromato USA
BioChromato, Inc.
http://biochromato.com/
http://www.bicr.biz/
E-mail: [email protected]
E-mail: [email protected]
7098 Miratech Drive,
1-12-19 Honcho,
Ste. 100,
Fujisawa-shi, Kanagawa-Ken,
San Diego, CA 92121
2510053, Japan
TEL : (858) 385-2006
TEL : 0081-466-23-8382
- 34 -