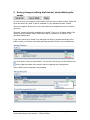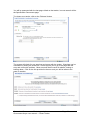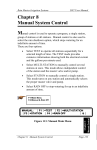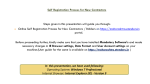
1
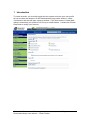
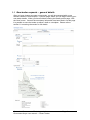
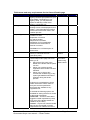
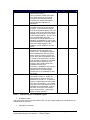
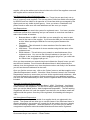
Queensland Government eTendering website Government buyer user manual Create Tender Version 2.0 July 2011 eTender Help Desk phone 07 3836 0141 Table of contents 1 Introduction ......................................................................................................... 1 1.1 New tender requests – general details ........................................................ 2 1.2 New tender requests – selecting respondents ............................................ 9 1.3 New tender requests – briefings................................................................ 12 1.4 Contacts (Agency Contacts)...................................................................... 13 1.5 Uploading specification documents ........................................................... 17 1.6 Specification Documents (No Electronic Documents) ............................... 20 1.7 Specification Documents (With Electronic Documents) ............................ 22 1.8 Saving your tender .................................................................................... 24 2 Saving changes (editing draft tender) and publishing the tender ...................... 25 © Queensland Government Chief Procurement Office (Department of Public Works), 2011. 1 Introduction To create a tender, you must be logged into the system and have your user profile set up to create new tenders. On the Administration page under ‘Actions’, select ‘Create New’ and this will open a pop up window. If you don’t see the ‘Create New’ option it means that your profile is not set up to create tenders. Contact the eTender Help Desk to modify your account. Queensland Government eTendering website Government buyer user manual – Create Tender Page 1 1.1 New tender requests – general details After you have chosen to create a new tender, you will be presented with a new session called the ‘New Request – General’ page, where you can begin entering your new tender details. When you have finished entering the details on this page, click the ‘Next’ button. Once all the mandatory information has been filled in on this page it is possible to save the tender as either a draft or a template. Please refer to section 1.8 on saving the tender for full details. Queensland Government eTendering website Government buyer user manual – Create Tender Page 2 Field names and entry requirements for the General Details page Field name Public Authority Briefing/Site Visit Request Type Type of Work Invitation List Description This will default to your registered agency business group based on your login details. Depending on your agency setup, you may have the option of selecting a lower level agency or business unit. Ticking the Check box enables the briefing screen to be displayed for this tender. If not ticked then the briefing screen will not be shown later in the creation process. Choose from the following options: Invitation to Offer Expression of Interest For sale by tender Request for information Application for Pre-qualification Forward Procurement Advice Draft for comment See Note 1 for a full description of these terms. You can choose from ‘Works’ (capital works) or ‘Goods & Services’ (everything else). This option will allow you access the ‘Select Respondent’ page which will allow you to: Set the level of access to the details of the tender that the public can see. Allows you to advise specific suppliers that the tender has been released. Allows you to change who receives the 'senders copy of any system generated emails sent to suppliers during the tender process. Field Type Dropdown list Mandatory Yes Check box No Dropdown list Yes Radio buttons Yes Check box then select option using radio buttons No If this box is unchecked then all the tender information will be visible to everyone and the specification documents are available to any registered user. If checked the following options are available for setting the level of access to the tender information. ‘Restricted’ – Access is restricted to logged in invited respondents (users) only (none of the tender details are visible to anyone else). ‘Invited’ – Anyone can view the tender title, but only the logged in invited respondents can view the rest of the Queensland Government eTendering website Government buyer user manual – Create Tender Page 3 Field name Title Request No. Description ICT Tender Release Date Closing Date Description information or submit a response. (Tender visible to the public, included on notification emails). ‘Supplier Notification’ – Anyone can view the tender details and all registered users can download the specification documents and submit a response, however the suppliers included in the notification list will receive an email specifically advising that this tender has been released whether or not it fits their normal notification profile. (The tender visible to the public, and is included on notification emails.) This is the title of the tender. This field is limited to a maximum of 200 characters. This is the unique tender reference number within your agency’s account and is alpha-numeric. You cannot include spaces or symbols in the request number otherwise you will get an error message. This field is limited to a maximum of 20 characters. This is a description of the tender. Your description should provide enough information so that potential tenderers will know if they can provide the required works, goods or services without having to download or request the tender documents. You are provided with a number of formatting options for this field including the ability to cut and paste information from Word. Occasionally some formatting options may result in an error message. If your tender is for Information and Communication Technology products or services then choose the ‘Yes’ option, for all others choose the ‘No’ option. This is the date that the tender is to be released to the public via the eTendering site. It will default to today’s date. If the tender is released today then it will publish within the next 10 minutes. If a date in the future is selected then the tender will publish just after midnight on that date. This is the closing date of the tender. It will default to today’s date. Use the pop-up calendar to firstly select the month, then the closing time and then the date. This is a 24 hour clock, if you manually enter 2:00 then the Queensland Government eTendering website Government buyer user manual – Create Tender Field Type Mandatory Text Yes Text Yes Text Yes Radio buttons Yes Date Yes Date/time Yes Page 4 Field name Published Date Unpublished Date Estimated Advertising Date UNSPSC % Electronic Tender Box Physical Tender Box Description tender will close at 2am. Only visible if Forward Procurement Schedule (FPS) is selected as Request Type. This is the date that the FPS is to be released to the public. Only visible if Forward Procurement Schedule (FPS) is selected as Request Type. This is the date and time that the FPS is to be removed from the public view. Only visible if Forward Procurement Schedule (FPS) is selected as Request Type. This field shows the public when the actual tender is expected to be released. This allows for either an exact date ‘30/06/2011’, an estimated date ‘June 2011’ or a rough estimate ‘Late 2011’ This field refers to the United Nations Standard Products and Services Coding system used by the Queensland Government eTender website. It is an international coding system used to classify goods and services. You can select up to three different codes to match the major Works/Goods or Services component/s that the tender is for. This is one of the criteria suppliers use to be notified of new tenders. Selecting an incorrect code may result in you justifying your choice to a supplier who missed out on responding because they weren’t aware that the tender had been released. See Note 2 for how to select a UNSPSC code. This field refers to the percentage allocation you have made to a UNSPSC category. The total of these three boxes must equal 100. Choose the electronic tender box location from the dropdown list to allow electronic responses (and/or alternatively choose a Physical Tender Box location). You must select at least one tender box, either Electronic or Physical. If you don’t see a tender box that matches your requirement please contact eTender Helpdesk for assistance. Choose the physical tender box location from the dropdown list for hardcopy responses (and/or Queensland Government eTendering website Government buyer user manual – Create Tender Field Type Mandatory Date Yes Date/time Yes Text Yes Number Yes (first one only) Number Yes (first one only) Dropdown Yes Dropdown Yes Page 5 Field name Ask a Question Online Forum Region Selector Description alternatively choose an Electronic Tender Box location). You must select at least one tender box, either Electronic or Physical. If you don’t see a tender box that matches your requirement please contact eTender Helpdesk for assistance. Allows suppliers to email the nominated contacts for the tender a question. The nominated contacts, must be a registered agency user, will receive a task in their task list and will be able to respond via an email, back to the enquirer/supplier. This is a one on one relationship and if the information should be advised to all suppliers an addendum or forum post should be added to the tender. Please refer to the section/guide ‘Ask a Question’ for full details on how this works. When this option is selected it allows suppliers to post questions to an online forum. The registered agency users selected with ‘Receive Forum Posts’ receives a task to review the Forum Post and can publish the post or create a new post with the answer. If the question is specific to a supplier then that answer should be sent directly to the supplier rather than posted as a forum post. The forum is available to anyone who has downloaded the documents. Please refer to the section/guide ‘Online Forum’ for full details on how this works. Allows you to select the region/s that your tender covers, i.e. where the works/goods or services are to be delivered or carried out. To select all regions in Queensland click the check box next to ‘State Wide’. Your tender may also cover other regions such as interstate and international. If this is the case, click on the check boxes next to those options. At least one region must be selected. Field Type Mandatory Check box No Check box No Check box Yes Note 1. Full description of Request Types Invitation to Offer This is the most common type of tender where you are inviting suppliers to provide pricing for Works/Goods or Services. Expression of Interest Queensland Government eTendering website Government buyer user manual – Create Tender Page 6 This is normally used for the first stage of a multi-stage tender. Pricing is not normally requested at this point in the tender process. The outcome of this process will normally be a short list of suppliers which should be published on the eTender system. For sale by tender This is used if you are selling goods or services to the public, often used for surplus goods. Request for information This is used when you are not sure what the market place is capable of providing. There will be no outcome published for this tender type, in fact it is not possible to award this type of request. This should not be used as a free consultancy service to write your specification. Application for Pre-qualification This is used when you are setting up an arrangement for a list of pre-qualified suppliers. Please remember that if suppliers are able to join the arrangement over the life of the arrangement then how will suppliers: o Get copies of the tender documents, o Submit their replies as they can’t go through either the Government Tender Box at Decipha or the systems electronic tender box as both of these require a set closing date. Forward Procurement Schedule Is used when outlining anticipated significant procurements, as required in Section 9.1 of the State Procurement Policy. Draft for comment Is used when you have a specification or requirement that you want to release to the market for public comment. Note 2 - Adding a UNSPSC code The UNSPSC is made up of four levels of codes, Segment, Family, Class and Commodity, each more specific than the one above. Each code has an eight digit code number. The first two digits are the Segment; the next two are the Family and so on. For example: Segment: 22000000 – Building and Construction Machinery and Accessories. Anywhere you see a number ending in six or seven zeros it means it is a Segment level code (highest and broadest level code). Family: 22100000 – Heavy construction machinery and equipment. Anywhere you see a number ending in four or five zeros it means it is a Family level code Class: 22101900 – Building construction machinery and accessories. Anywhere you see a number ending in two or three zeros it means it is a Class level code. Commodity: 22101901 - Concrete mixers or plants. Anywhere you see a number not ending in two zeros means it is a Commodity (most specific) level code. Suppliers have the option of using a free notification service that emails the supplier a list of tenders that match their profile. The normal supplier’s profile is configured to notify of tenders issued for a region/s and/or UNSPSC code/s. The supplier chooses Queensland Government eTendering website Government buyer user manual – Create Tender Page 7 a top-level (Segment) UNSPSC category, and will be notified of any new nonrestricted tenders issued under the top-level category or any of its sub-categories (Family, Class or Commodity levels) that match their nominated profile. You may select up to 3 UNSPSC codes for your tender. To select a UNSPSC code, either type the code directly into the ‘UNSPSC/Category 1’ field, if known or click the ‘Add/Edit’ button next to the right of this field. On the Add/Edit pop up window, there are 2 ways of selecting a code. 1. Use the dropdown boxes to drill down to the category you wish to use. This works best if you are familiar with the UNSPSC. After you find the category you wish to use click the ‘Select’ button, you will be returned to the ‘General’ page. You will see the code number in the ‘UNSPSC/Category 1’ field, repeat for fields ‘UNSPSC/Category 2’ and ‘UNSPSC/Category 3’ if required 2. Use the ‘Select via Search’ option where you can search for a specific word, for example ‘computer’. You will see all the codes with the word computer in them, in this case 61 matches. If you don’t find a match for what you are looking for try a different keyword. If you use multiple words in your search it will find matches for any of the words. Clicking on the code will return you to the ‘General’ page. You will see the code number in the ‘UNSPSC/Category 1’ field. Repeat for fields ‘UNSPSC/Category 2’ and ‘UNSPSC/Category 3’ if required. If you are having trouble choosing the correct UNSPSC category please contact the eTender Help Desk for assistance. Queensland Government eTendering website Government buyer user manual – Create Tender Page 8 1.2 New tender requests – selecting respondents If you checked the ‘Invitation List’ box you will then be presented with the following screen for selecting respondents for your tender. This page is broken down into 6 sections with each section shown in Blue text. These sections are: Selected Respondents: You can add respondents either by using a ‘Distribution List’ or via the ‘Add Respondent’ option. After your have added registered respondents, the suppliers’ name will appear in this section. To see the email address/s that will be sent the email you will need to click on ‘Show Contacts’ to the right of the supplier’s name. The email address will show up in the brackets. We do recommend to suppliers to have one registration for each business address, however the system does allow for multiple individual registrations for a supplier and you may need to select the company name several times, from the list of respondents to get all the email addresses you wish to include. When you click on the ‘Show Contacts’ button you will see all the emails under that business registration. If you see an email address that you don’t want the tender/invitation to go to, simply untick that user. If you have selected the wrong Queensland Government eTendering website Government buyer user manual – Create Tender Page 9 supplier, click on the white cross in the red circle to the left of the suppliers name and that supplier will be removed from the list. Add Respondents Using Distribution Lists: You can add respondents using distribution lists. These lists are previously set up lists of commonly used suppliers. The lists are either Public lists which are managed by QGCPO and are visible to all agencies or Private lists which are managed by the agency and are only visible by that agency. Once you select a ‘Distribution List’ please check to make sure the email addresses are the ones you require. Add Respondents: In this section you can search the system for registered users. You have a number of different options when searching and you can search on more than one field to reduce the number of matches. Business Name or ABN – In this field you can search for any word or part word in the name of the supplier. If you know the ABN you can also search on this. When inputting the ABN do not use any spaces between the numbers. First Name – This will search for close matches of the first name of the registered user. Last Name – This will search for close matches using the last name of the registered user. Email Address – This will allow you to search on email addresses of the registered users. You can use the full email address or just part of it, for example, in the email address [email protected]; you could look for ‘Robert Law’ or ‘@qgcpo.qld.gov.au’. Once you have entered your search criteria and clicked the ‘Search’ button you will see the list of matches. You will see the Business Name in bold followed by the address, then the registered user, then the phone number and finally in the brackets you will see the email address/s for that user. Once you find the correct entry, click on the ‘Select’ button to add that supplier to the ‘Selected Respondents’ section. Check the ‘Show Contacts’ button in the ‘Selected Respondents’ section to ensure that you have all the required email addresses. After you have finalised the first supplier continue searching for any additional suppliers until all of the email addresses you need, that are registered with eTender have been included. Selected Unregistered Respondents: This section has the headings, ‘Business Name’, ‘ABN’, ‘First Name’, ‘Last Name’, ‘Email Address’ and Registered. The first five of these headings will be populated when you use the below section ‘Add Unregistered Respondent’. The last heading ‘Registered’ will show ‘No’ until the supplier uses the link in the invitation email and registers with the system. Once they have registered, this heading will change to ‘Yes’. Add Unregistered Respondent: In this section you can add the details for a supplier that is not registered in the system. The system will not allow you to use this feature if the ‘Business Name’ is already registered in the system or if a match for all the words in the entry, already exist in an existing registration. What this means is if you were trying to add an unregistered respondent called Australian Minerals and there was a registered Queensland Government eTendering website Government buyer user manual – Create Tender Page 10 supplier called Australian Minerals and Resources then you would get an error. If you get an error you will need to register the supplier by contacting an existing user for that supplier if the supplier already exists or using the ‘Register New Supplier’ function on your dashboard. You will need to make entries for all the fields in this section including ABN number. If the supplier you are adding doesn’t have an ABN then enter ‘noabn’ in this field. Once you have filled in the fields, click the ‘Add’ button and the company will appear in the ‘Select Unregistered Respondents’ section. Sender’s Email: The last section deals with you receiving the agency copy of any emails that the system sends to suppliers regarding this tender. This email will show exactly what the suppliers will see plus a section which shows all the people who were sent the email. This list only appears on the ‘Sender’s Copy’. The default comes from the registered email address for the user who creates the tender, but you can change the address to any email address you need. When you have completed all the respondents and made any required change to the ‘Sender’s Email’ click the ‘Next’ button to go to the next page. Queensland Government eTendering website Government buyer user manual – Create Tender Page 11 1.3 New tender requests – briefings If the ‘Briefing’ check box was selected on the General page, then the Briefing page will be available. Choose the tender briefing location from the dropdown list of locations registered with your agency, or select ‘Other’ and manually enter the details for a location not listed in the system. As with the ‘Closing Date’ on the General page, use the pop-up calendar to firstly select month, then the closing time and then the date for the briefing/site visit. Check the ‘Site Visit’ check box if you require a site visit rather than a briefing. If respondents must attend the briefing/site visit, select the ‘Mandatory’ check box. ‘Special Instructions’ gives you 200 characters to detail any particulars regarding the briefing/site visit. For example, if safety clothing must be worn, or there is a limit on the number of representatives from each supplier that may attend. If you have multiple times and dates for briefing/site visits then we suggest you don’t use this page and detail the requirements in your tender documents. Click ‘Next’ when you have finished. Queensland Government eTendering website Government buyer user manual – Create Tender Page 12 1.4 Contacts (Agency Contacts) This section has two purposes, first is to add the contact details suppliers will use to seek clarification regarding the tender and second is to identify who should receive system messages regarding this tender. System messages include any questions asked through the eTender system, tender status updates such as tender closed and any new forum posts if that option is selected. Please remember if you do not select a specific person or persons to receive the system messages then everyone in your business group will receive them. When this page first opens you will see two sections, ‘Other Contact Details’ and ‘Contact Person Search’. However, depending on the entries you make, there are two further sections available ‘Other Contacts’ and “Contact People’. Other Contacts This section displays contacts for the tenders that you have manually entered in the ‘Other Contact Details’ section. You can edit the details that you have entered by clicking on the ‘Edit’ button (page and pencil icon) to the left of the name. Or if you have made an error your can delete the entry by clicking on the ‘Delete’ button (white cross on a red circle icon). These contacts do not have the option of receiving system messages regarding the tender. Queensland Government eTendering website Government buyer user manual – Create Tender Page 13 Contact People This section displays the details of the people selected from the ‘Contact Person Search’. You can change which information fields are displayed but the information itself defaults from the details registered in the system and cannot be changed here. To edit the details of a person, that person will need to log in and update their details using the ‘Edit My Details’ function. You have the option to edit or delete an entry. The deletion works the same as the ‘Other Contacts’ however the edit feature is quite involved. The ‘Contact People’ section is broken up into four sub sections, ‘Optional Contact Functions’, ‘Display What Details’, ‘Display Contact Details Where?’ and ‘Tender Specific Privileges. Optional Contact Functions This section has two fields, the ‘Name’ which is defaulted from the registered users account and cannot be changed and the ‘Contact Role’. The ‘Contact Role’ is the only field in the Contact People section that its contents can be changed. The default entry is ‘Enquiries’ however this can be changed to ‘Technical Enquiries’ or ‘Contractual Enquiries’ etc if required and this will display on the public view of the tender. Display What Details This section shows what contact options will display on the public view of the tender. Email – is a default ticked setting and this means that unless changed to crossed (inactive) the email address registered for this user will display on the tender display page. All registered users have an email. Phone – is the other default ticked entry and is taken from the user’s registration. If the user was created without an office phone number then on the public display of the tender it will have the icon for phone but a blank space next to it. Queensland Government eTendering website Government buyer user manual – Create Tender Page 14 Mobile – is not ticked but can be selected if required. If selected it will only display if a mobile number has been included on the government users account otherwise it will display the icon but no entry for it. Fax – is not ticked but can be selected if required. If selected it will only display if a fax number has been included on the user’s registration otherwise it will display the icon but no entry for it. Company – is not ticked but can be selected if required. This is rarely used but would normally be used if you have selected a government user from a different agency. It will show the agency or sub agency that the user is registered under. Display Contact Details Where? The section only has one option, whether you want this contact to be visible on the public display page of the tender. The default setting for this is ticked, displaying on the display page. The next section details why you would select a contact but not display them on the website. Tender Specific Privileges This section is broken down into ‘Receive Notifications’ and ‘Receive Forum Posts’ Receive Notifications Previously all ‘agency officer’ users registered under the same business group on the eTendering website, received system generated emails regarding tasks and updates relating to a tender, e.g. tender closing in 5 days, tender has closed etc. Queensland Government eTendering website Government buyer user manual – Create Tender Page 15 This option’s default is crossed (not active) and if all of the users listed in the ‘Contact People’ section remain this way, every user in the business group issuing the tender will receive the system emails regarding this tender, as per the previous functionality. If one or more users in the ‘Contact People’ section have this ticked (active), it means that only those users ticked, will receive the system emails regarding this tender. Receive Forum Posts This option’s default is ticked (active). This option’s default is based on whether the contact has the activity to edit forums. Users with the ‘Agency Officer’ eTender role (most users) will have this option ticked. Users with the ‘Review Panel’ eTender role will be crossed (not active) and will not be able to be changed, unless their eTender profile is updated. Unless the ‘Online Forum’ box is ticked on the ‘General’ page, the ‘Receive Forum Post’ option will not do anything. If the Online Forum box is ticked, any contact with the ‘Receive Forum Post’ option ticked will receive email notification, and a task on their task list to review posts made to the forum by suppliers. These users will be able to create, publish and unpublish forum posts from the public view of the forum. When you have added all the required contacts, click the ‘Next’ button to go to the next page. Queensland Government eTendering website Government buyer user manual – Create Tender Page 16 1.5 Uploading specification documents This page will allow you to upload electronic tender documents for this tender. If you don’t have any electronic documents, click the ‘Next’ button to go to the next page. It is possible to have both online and offline material such as CD/DVD or hardcopies of the tender documents available. When the ‘Uploading specification document’ page first opens you should see a Java icon flash on the screen. When Java finishes loading you will see the Upload directory, ‘Browse’ button and ‘Go’ button appearing. If this does not occur it is likely you do not have the correct version of Java on your machine. Please refer to the User Manual “System Requirements and Administration” section on Java. It is recommended that you create a folder on your hard drive that will contain only those files you want uploaded to the tender. If you need to add addition files, such as addenda to the tender later on, they should also be saved into this folder. Make sure you don’t have any of these files open when you go to upload the files. Queensland Government eTendering website Government buyer user manual – Create Tender Page 17 Please note: The system will not allow executable files to be loaded but most other formats PDF, MS Word, MS Excel, Jpeg, Bitmap, Zip etc. are acceptable. It is recommended that any file that suppliers don’t need to edit and return be converted to PDF. The system has a limitation of 115 individual specification files per tender. This limit includes files added after the tender goes live. A zip file is counted as one (1) file no matter how many files are contained in the zip file. The system will allow individual files in excess of 100mb to be loaded and will allow the total size of files to exceed 500mb. However, please remember that suppliers need to download the tender documents so every effort should be made to minimise the total file sizes. As a guide a 16mb file will take 95 minutes on a 28kb/s modem, 48 minutes on a 56kb/s, 21 minutes on a 128kb/s and 5 minutes on a 512kb/s. In the case of very large files it may be worthwhile considering also making the files available offline on CD/DVD or in hardcopy. To upload files click on the ‘Browse’ button and find the folder you have saved the tender documents in. When located, click on folder name and you will see the folder name appear in the ‘File Name’ field. You will not be able to drill down to the individual file names. Once you have selected the folder, click on the ‘Choose Folder’ button. This will display all the files from that folder in the ‘Upload Directory’ table. These files will be highlighted in green with the ‘Upload’ box ticked as they have not yet been uploaded. Check to make sure that there are no additional files showing. This may require you to use the scroll bar to see all the files. If there is a file you don’t want, simply click on the ‘Upload’ box to remove the tick and that file will not load. Please note that the total file path including file name should not exceed 190 characters. If it does, move the files closer to the top of the file path. Queensland Government eTendering website Government buyer user manual – Create Tender Page 18 Once you are sure that the files are correct, click the ‘Go’ button to upload the files. Queensland Government eTendering website Government buyer user manual – Create Tender Page 19 1.6 Specification Documents (No Electronic Documents) If you haven’t loaded any electronic documents this is the page you will see. If you have loaded electronic document then go to the next section 1.7 Specification Documents (Electronic Documents). This screen allows you to detail any tender material that is available offline, such as hardcopies of the tender documents or CD/DVDs. Suppliers will then be able to request through the eTender system to have the material sent to them. You can nominate how the offline material is available, the options are posted, faxed or available to collect the material from a nominated address. It is possible to release a tender without electronic or hardcopy documents, however you will receive a warning when you go to release the tender advising you that there are no tender documents. This screen is broken down as follows: Title – this is the title for this manually issued item. In most cases you will bundle all the original documents and any supporting material such as CD/DVDs under the one title. If you need to, you may list each document separately with its own title. Description – here you can list a brief description of the document or documents included in this title. Revision – If you need to issue updated versions of the documents you can update the revision number to a new version. Queensland Government eTendering website Government buyer user manual – Create Tender Page 20 File(s) – this refers to the file type, with hardcopy documents it will always be blank. Collection – tick this box if the supplier can collect this document. Ticking this box will bring up a new box called ‘Order Required’ Order Required – only visible if Collection is ticked. This box should be ticked if the supplier needs to contact you to arrange for the documents to be ready before they turn up to collect them. Post – tick this if the document/s are available to be posted out to suppliers. If ticked this will allow suppliers to request the documents through the eTender site and the nominated contacts or all users in your business group will receive a task on their ‘Dashboard’ to post the documents. Fax – tick this if the document/s are available to be faxed out to suppliers. If ticked this will allow suppliers to request the documents through the eTender site and the nominated contacts or all users in your business group will receive a task on their ‘Dashboard’ to post the documents. Once you have added in all the details, click on the ‘Add’ button to go to the next screen. This screen will show the: Published Documents (not visible at this stage, unless you are updating a previously created tender/draft or template), Unpublished Documents will show any document not yet saved to the tender, if you log out without saving then these documents will disappear. This section shows the Title in bold followed by the Version number and date in brackets, the description and how the documents are available. You will see to the left of each document an ‘Edit’ and a ‘Delete’ icon. Clicking on the ‘Edit’ icon will allow you to correct any data on the document. ‘Add a Document’ button allows you to add an additional hardcopy document. Queensland Government eTendering website Government buyer user manual – Create Tender Page 21 ‘Collection Point’ will display the list of registered addresses in eTender for your business group. If you need an additional address added please contact the Help Desk. ‘Order by’ is only visible if you have selected ‘Order Required’. If so, then this calendar drop down allows you to nominate the cut off date and time by which suppliers need to order the hardcopy documents. ‘Collect at’ is only visible if you have selected ‘Collection’. If so, then this calendar drop down allows you to nominate the first date and time that suppliers will be able to collect the documents. 1.7 Specification Documents (With Electronic Documents) When you get to this screen after uploading your electronic documents you will see the files you just uploaded in the ‘Unpublished Documents’ section. You also have the option of adding material available offline by clicking on the ‘Add a Document’ button. If you have included a file by mistake please use the ‘Delete’ icon to remove that file. If you click the ‘Delete’ icon on the wrong file, use the ‘Previous’ button to return to the upload page and upload that file again. You also have the option to ‘edit the title, add a description, update the revision number or make this file available offline for collection, posting or faxing. Queensland Government eTendering website Government buyer user manual – Create Tender Page 22 Title – changing the title will not change the actual file name just how it displays on the website. Description – you can add additional data to the description of the file. You are limited to 200 characters in this field. Revision - is the version number of the file, leave this as the system setting unless there is a compelling reason to change it. Never change it to the same version of an already published document. File - will show the file name for this item. The file name cannot be changed here. If you do need to change the file name, delete the file, change the name on your system drive and then reload the file. Apply Selections To All Documents – this will allow you to make all of the electronic files available offline using the same methods without needing to mark each electronic file individually. If you have a large number of files it would be better to add a single offline document covering all the original tender documents. Collection – tick this box if the supplier can collect this document. Ticking this box will bring up a new box called ‘Order Required’ Order Required – only visible if Collection is ticked. This box should be ticked if the supplier needs to contact you to arrange the documents to be ready before they turn up to collect them. Post – tick this if the document are available to be posted out to suppliers. If ticked this will allow suppliers to request the documents through the etender site and the nominated contacts or all users in your business group will receive a task on their ‘Dashboard’ to post the documents. Fax – tick this if the document are available to be faxed out to suppliers. If ticked this will allow suppliers to request the documents through the etender site and the nominated contacts or all users in your business group will receive a task on their ‘Dashboard’ to post the documents. After you have made your changes to the file you can either click on the ‘Update’ button to save the file or click ‘Cancel’ to discard the changes. If you click ‘Update’ and depending on the offline options you may have selected you may have the following fields: ‘Collection Point’ will display the list of registered addresses in eTender for your business group. If you need an additional address added please contact the eTender Help Desk. ‘Order by’ is only visible if you have selected ‘Order Required’. If so, then this calendar drop down allows you to nominate the cut off date and time by which suppliers need to order the hardcopy documents. ‘Collect at’ is only visible if you have selected ‘Collection’. If so, then this calendar drop down allows you to nominate the first date and time that suppliers will be able to collect the documents. Queensland Government eTendering website Government buyer user manual – Create Tender Page 23 1.8 Saving your tender After you have added all the documents you have 3 options. ‘Save as Draft’ - this will allow you to save the information you have entered without publishing the tender. The tender will be available in the ‘Draft’ section of your ‘Dashboard’. This tender will remain in this section, even when it reaches the release date, until you go to the edit tender action and then click the ‘Release’ button. ‘Save as Template’ - if you go out regularly for the same thing you can set up a template to cover this work. Depending on the amount of data you re-use, you may only need to change the ‘Tender Number’, ‘Opening Date’ and ‘Closing Time and Date’. ‘Release’ - when you click to release (publish) the tender, the system will run some system check to make sure all the required data has been provided and that the dates match up. Any problems with the tender and you will be taken to the ‘Errors and Warnings’ page. You will need to acknowledge by ticking the box for any warnings and fix any errors. To fix errors you will need to go to the page with the error and make the correction. Once the ‘Errors and Warning’ is created you will always still be able to see it if you edit the tender but it will show no errors or warnings. When this is blank you don’t need to fix anything. If everything is ok you will go to the ‘Request Saved Successfully’ page. Click on the ‘Close Tender Wizard’ button to exit back to your ‘Dashboard’ Queensland Government eTendering website Government buyer user manual – Create Tender Page 24 2 Saving changes (editing draft tender) and publishing the tender In order to save your changes to the tender click the ‘Save as Draft’ button, which will save the tender as a draft. It will be available on your dashboard under “Drafts”. “Save as template” allows you to save the tender as a template that can be used in the future. “Release” makes the tender available to the public. There is a 10 minute delay if the tender is being released today. Otherwise it will be released at 12:05am on the specified release date. If you have saved your tender as a draft and now wish to release the tender to the public, locate your tender under Manage Requests and ‘Drafts’ on your dashboard. You now need to edit your draft tender. You do this by hovering over the actions icon on the right hand side of the screen near the opening and closing dates. Select ‘Edit’ from the dropdown list provided. Queensland Government eTendering website Government buyer user manual – Create Tender Page 25 You will be presented with the last page visited on that tender, in most cases it will be the Specification Documents page. To release your tender, click on the ‘Release’ button. The system will check for any warnings and errors with the tender. Warnings can be overridden by ticking the check box. Errors require you to go to the page with the error and correct the problem. Most errors will be the result of release, closing or briefing dates. Click on the link provided in the error and you will be taken to the page in question. Queensland Government eTendering website Government buyer user manual – Create Tender Page 26 You will be presented with the following screen indicating that your request has been saved successfully. Click the ‘Close Tender Wizard’ button. Your new tender will now be sitting on your dashboard under ‘Pending Release’, unless it is being released today, in which case it will be published directly to the web once the 10 minute refresh cycle has run. Queensland Government eTendering website Government buyer user manual – Create Tender Page 27