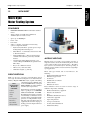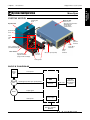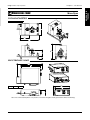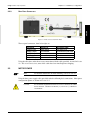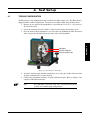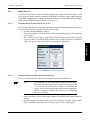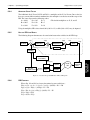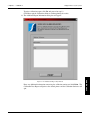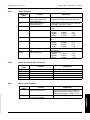
1
Micro Dyne System
User’s Manual
Purchase Record
Please record all model numbers and serial numbers of your Magtrol
equipment, along with the general purchase information. The model
number and serial number can be found on either a silver identification
plate or white label affixed to each unit. Refer to these numbers
whenever you communicate with a Magtrol representative about
this equipment.
Model Number:
_____________________________
Serial Number:
_____________________________
Purchase Date:
_____________________________
Purchased From:
_____________________________
While every precaution has been exercised in the compilation of this document to ensure
the accuracy of its contents, Magtrol assumes no responsibility for errors or omissions.
Additionally, no liability is assumed for any damages that may result from the use of the
information contained within this publication.
Copyright
Copyright ©2007 Magtrol, Inc. All rights reserved.
Copying or reproduction of all or any part of the contents of this manual without the express
permission of Magtrol is strictly prohibited.
TRADEMARKS
National Instruments™ is a trademark of the National Instruments Corporation.
First Edition, revision A – October 2007
Safety Precautions
•
•
•
•
•
Secure all grounding wires to the appropriate locations to reduce the chance of shock and
damage to the equipment.
Make sure all wiring and connections have been properly made.
Always wear safety glasses when working around Micro Dyne equipment.
Do not wear loose clothing or ties when operating the Micro Dyne equipment.
Ensure motor under test is properly mounted to the motor fixture.
Revisions To This Manual
The contents of this manual are subject to change without prior notice. Should revisions be necessary, updates to all
Magtrol User’s Manuals can be found at Magtrol’s web site at www.magtrol.com/support/manuals.htm.
Please compare the date of this manual with the revision date on the web site, then refer to the manual’s Table of
Revisions for any changes/updates that have been made since this edition.
Revision Date
First Edition, revision A – October 2007.
Table of Revisions
Date
10/21/07
Edition
1st Edition, rev. A
06/13/07
1st Edition
Change
Added option to print calibration data results at end of
calibration procedure.
Finalized version of preliminary manual
ii
Section(s)
6.3
various
Table of Contents
Safety Precautions..........................................................................................................................i
Revisions To This Manual................................................................................................................ii
Revision Date..................................................................................................................................................................ii
Table of Revisions.......................................................................................................................................................ii
Table of Contents...........................................................................................................................iii
Table of Figures.......................................................................................................................................................... v
Preface................................................................................................................................................ vi
Purpose of This Manual......................................................................................................................................... vi
Who Should Use This Manual.............................................................................................................................. vi
Manual Organization............................................................................................................................................. vi
Conventions Used in This Manual...................................................................................................................vii
1. Introduction.................................................................................................................................1
1.1
1.2
Unpacking the Micro Dyne........................................................................................................................... 1
1.1.1 Packaging............................................................................................................................................... 1
1.1.2 Parts List................................................................................................................................................. 1
Data Sheet............................................................................................................................................................. 3
2. Installation/Configuration.....................................................................................................8
2.1
2.2
2.3
2.4
2.5
2.6
Dynamometer Setup........................................................................................................................................ 8
2.1.1 Unlocking the Shipping/Restraining Bolt............................................................................ 8
2.1.2 Dynamometer Leveling.................................................................................................................. 8
Electrical Connections............................................................................................................................... 9
2.2.1 Earth Ground....................................................................................................................................... 9
2.2.2 Speed Pickup Connection.............................................................................................................. 10
2.2.3 Rear Panel Connectors................................................................................................................ 11
Motor Power..................................................................................................................................................... 11
2.3.1 Power Configuration Options................................................................................................... 13
Motor Testing Software............................................................................................................................. 14
2.4.1 Software Installation.................................................................................................................. 14
2.4.2 M-TEST Communication.................................................................................................................. 14
Communication Check.................................................................................................................................. 15
Initial Calibration........................................................................................................................................ 15
3. Testing Considerations...........................................................................................................16
3.1
3.2
Safety................................................................................................................................................................... 16
Power Dissipation............................................................................................................................................ 16
3.2.1 Power Absorption Curve.............................................................................................................. 17
3.3 Shaft Alignment............................................................................................................................................. 17
3.4 Windage................................................................................................................................................................ 17
3.5 Friction................................................................................................................................................................ 18
3.6Vibration............................................................................................................................................................. 18
3.7 Dynamometer Leveling............................................................................................................................... 18
3.8 Cogging................................................................................................................................................................ 18
iii
Table of Contents
Magtrol Hysteresis Dynamometers
3.8.1 Avoiding Cogging............................................................................................................................. 19
3.8.2 Removing Cogging........................................................................................................................... 19
3.9 Eddy Currents.................................................................................................................................................. 19
3.10 Temperature Rise............................................................................................................................................ 19
4. Test Setup......................................................................................................................................20
4.1
4.2
4.3
Torque Configuration................................................................................................................................. 20
Motor Mounting.............................................................................................................................................. 21
4.2.1 Shaft Coupling.................................................................................................................................. 21
4.2.2 Adapters................................................................................................................................................ 21
4.2.3 Clamping Strap.................................................................................................................................. 22
4.2.4 Stage Adjustment............................................................................................................................. 22
Software Configuration............................................................................................................................ 23
4.3.1 Motor Reversal................................................................................................................................ 24
5. Operating Principles................................................................................................................26
5.1
5.2
5.3
5.4
Torque Measurement................................................................................................................................... 26
5.1.1 Torque Calculation ...................................................................................................................... 26
Speed Measurement....................................................................................................................................... 27
Controller and the PID Loop................................................................................................................... 27
5.3.1 P (Proportional Gain)..................................................................................................................... 27
5.3.2 I (Integral)........................................................................................................................................... 27
5.3.3 D (Derivative)...................................................................................................................................... 27
5.3.4 Additional Scale Factor............................................................................................................. 28
5.3.5 How the PID Loop Works................................................................................................................ 28
5.3.6 PID Equations...................................................................................................................................... 28
DC Wattmeter.................................................................................................................................................... 29
6. Calibration...................................................................................................................................30
6.1
6.2
6.3
Calibration Software Installation.................................................................................................... 30
Calibration preparation............................................................................................................................ 30
6.2.1 Dynamometer Rear Panel Removal........................................................................................ 30
6.2.2 Calibration Weights....................................................................................................................... 31
Calibration Procedure............................................................................................................................... 31
7. Troubleshooting........................................................................................................................37
Appendix A: Hardware Commands............................................................................................38
A.1 Data Format....................................................................................................................................................... 38
A.1.1 Codes for CR - LF................................................................................................................................ 38
A.2 Micro Dyne Command Set........................................................................................................................... 38
A.2.1 Communication Commands......................................................................................................... 39
A.2.2 Ramp Commands................................................................................................................................ 39
A.2.3 Setup Commands............................................................................................................................... 40
A.2.4 Speed Commands............................................................................................................................... 40
A.2.5 Torque Commands........................................................................................................................... 41
A.2.6 Power Analyzer and Relay Commands................................................................................. 41
A.2.7 Miscellaneous Commands.......................................................................................................... 41
A.2.8 Calibration Commands................................................................................................................. 42
iv
Table of Contents
Magtrol Hysteresis Dynamometers
Appendix B: Schematics................................................................................................................43
B.1
B.2
B.3
Core Block Diagram..................................................................................................................................... 43
Main SCHEMATIC................................................................................................................................................ 44
DC Wattmeter.................................................................................................................................................... 45
Appendix C: Calibration Record..............................................................................................46
Magtrol Limited Warranty..........................................................................................................47
Claims.............................................................................................................................................................................. 47
Service Information.......................................................................................................................48
Returning Magtrol equipment for Repair and/or Calibration...................................................... 48
Returning Equipment to Magtrol, Inc. (United States)............................................................. 48
Returning Equipment to Magtrol SA (Switzerland).................................................................. 48
Table of Figures
2. Installation/Configuration
Figure 2–1
Figure 2–2
Figure 2–3
Figure 2–4
Figure 2–5
Figure 2–6
Figure 2–7
Figure 2–8
Figure 2–9
Micro Dyne Dynamometer........................................................................................................................8
Dynamometer Earth Ground.....................................................................................................................9
Speed Pickup...........................................................................................................................................10
Electronics Unit Rear Panel....................................................................................................................11
Electronics Unit Front Panel...................................................................................................................12
Basic Motor Power Circuit......................................................................................................................12
Basic System Configuration.....................................................................................................................13
Relay Configuration................................................................................................................................13
Motor Drive Configuration.....................................................................................................................14
3. Testing Considerations
Figure 3–1 Micro Dyne Power Absorption Curve.....................................................................................................17
Figure 3–2 Hysteresis Brake Cross-Section...............................................................................................................18
4. Test Setup
Figure 4–1
Figure 4–2
Figure 4–3
Figure 4–4
Figure 4–5
Figure 4–6
Dynamometer, Inside View......................................................................................................................20
Micro Dyne Motor Fixture......................................................................................................................21
Motor Fixture Adapters...........................................................................................................................22
M-TEST Configure Hardware Window....................................................................................................23
M-TEST Power Supply Configuration.....................................................................................................24
Curve Test Parameters with Motor Reversal...........................................................................................25
5. Operating Principles
Figure 5–1 Illustrated Torque Principle....................................................................................................................26
Figure 5–2 Micro Dyne Rotor....................................................................................................................................27
Figure 5–3 Control Loop and PID System Block Diagram.......................................................................................28
6. Calibration
Figure 6–1 Dynamometer Rear Panel Removal.........................................................................................................30
Figure 6–2 COM Port Selection.................................................................................................................................31
Figure 6–3 Enter Mass of Calibration Weight...........................................................................................................32
Figure 6–4 Reset ZERO.............................................................................................................................................32
Figure 6–5 Dynamometer Calibration.......................................................................................................................33
Figure 6–6 Calibration Routine Status......................................................................................................................34
Figure 6–7 Calibration Sequence Successful.............................................................................................................34
Figure 6–8 Calibration Error....................................................................................................................................35
Figure 6–9 Calibration Data Results Prompt............................................................................................................35
Figure 6–10 Additional Report Information..............................................................................................................36
Preface
Purpose of This Manual
This manual contains all the information required for the setup and general use of Magtrol’s Micro
Dyne System. To achieve maximum capability and ensure proper use of the system, please read
this manual in its entirety before operating. Keep the manual in a safe place for quick reference
whenever a question should arise.
Who Should Use This Manual
This manual is intended for bench test operators who are going to use the Micro Dyne System in order
to determine the torque and power of a miniature/micro motor in relation to its speed. It is assumed
that the user has sufficient knowledge in mechanics and electronics to be able to install/operate the
dynamometer and its corresponding electronics unit without risk.
Manual Organization
This section gives an overview of the structure of the manual and the information contained within it.
Some information has been deliberately repeated in different sections of the document to minimize
cross-referencing and to facilitate understanding through reiteration.
The structure of the manual is as follows:
Chapter 1:
Introduction – Contains the technical data sheet for Magtrol’s Micro Dyne
System which describes the system and all of its components, and provides detailed
technical characteristics. A complete parts list, along with unpacking instructions,
is also included in this section.
Chapter 2:
INSTALLATION/CONFIGURATION – Provides information needed for setup of the
Micro Dyne System, primarily electrical connections and power configuration.
Chapter 3:
TESTING CONSIDERATIONS – Provides information on a number of factors
that must be taken into consideration before running a test, including: safety, power
dissipation, and influences that affect the apparent accuracy of the torque readout.
Chapter 4:
TEST SETUP – Provides instructions on how to set up a motor test, including
dynamometer setup, motor mounting and software configuration
Chapter 5:
OPERATING PRINCIPLES – Information pertaining to the theory of operation
including torque measurement, speed measurement and the PID control loop.
Chapter 6:
CALIBRATION – Step-by-step instructions for the calibration procedure.
Chapter 7:
TROUBLESHOOTING – Solutions to common problems encountered during setup,
testing and calibration.
Appendix A:HARDWARE COMMANDS – Provides command reference tables for users who
wish to write their own application.
Appendix B:
SCHEMATICS – Contains a core block diagram, main schematic and wattmeter
schematic.
Appendix C:
CALIBRATION RECORD – Data record for tracking calibration results.
vi
Preface
Magtrol Micro Dyne System
Conventions Used in This Manual
The following symbols and type styles may be used in this manual to highlight certain parts of the
text:
Note:
Caution:
This is intended to draw the operator’s attention to complementary
information or advice relating to the subject being treated. It
introduces information enabling the correct and optimal function
of the product.
This
is used to draw the operator’s attention to information,
directives, procedures, etc. which, if ignored, may result in damage
to the material being used. The associated text describes the
necessary precautions to take and the consequences that may
arise if these precautions are ignored.
WARNING!
This introduces directives, procedures,
precautionary measures, etc. which must be
executed or followed with the utmost care
and attention, otherwise the personal safety
of the operator or third party may be at risk. The reader must absolutely take note of the
accompanying text, and act upon it, before
proceeding further.
vii
Introduction
1.1
Unpacking the Micro Dyne
1.1.1
Packaging
GENERAL
INFORMATION
1.
Your Micro Dyne System was shipped in its own hard-sided carrying case with shock-resistant
packing foam. The packaging is designed to protect the instruments during normal handling.
Inspect the contents for any evidence of damage in shipping. In the event of shipping damage,
immediately notify the carrier and Magtrol’s Customer Service Department.
1.1.2
Note:
Save all shipping cartons and packaging material for reuse when
returning the instrument for calibration or servicing.
Parts List
Make sure the case contains all the following:
A. Dynamometer with attached motor fixture
B. Electronics unit
Caution:
The
dynamometer and electronics unit are shipped already
connected to one another by a series of cables
( bundled
together). Use caution when lifting out of the case.
C. CD-ROMs
1. M-TEST 5.0 CD-ROM
2. Micro Dyne Supplemental Programs and Utilities CD-ROM
3. Magtrol User Manual CD-ROM
D.Bag of cables
1. USB cable
2. Three power supply cables with dual banana plugs on both ends
3. Main IEC power cord
E. A second bag of parts contains the following:
1. Circular weight and fastening (hex key) screw for torque configuration
2.Hardware for motor fixturing
a. Two motor fixture adapters
b. Small Allen wrench (hex key)
c. Two small hex screws
3. Three bags of rubber couplings
a. Ten pieces of 0.5 mm inside diameter tubing, each 25 mm in length
b. Ten pieces of 0.8 mm inside diameter tubing, each 25 mm in length
c. Ten pieces of 1.6 mm inside diameter tubing, each 25 mm in length
4. Two calibration weights, one 5 g and one 10 g, tagged and labeled.
Chapter 1 – Introduction
Calibration documentation
a. Calibration certificate for Micro Dyne
b. Calibration test report for wattmeter
c. Calibration test report for dynamometer
Accessory tools
a. Tweezers
b. Medium Allen wrench
c. Large Allen wrench
d. Five cable ties
GENERAL
INFORMATION
5.
6.
Magtrol Micro Dyne System
Chapter 1 – Introduction
Magtrol Micro Dyne System
Micro Dyne
Data Sheet
Micro Dyne
Motor Testing System
FeatureS
•
DESIGNED SPECIFICALLY for miniature and micro
motors
Torque: Easily convertible from 2.0 mN·m to
4.0 mN·m (0.28 oz·in to 0.57 oz·in)
Speed: up to 100,000 rpm
Power: 4 W
Low inertia
Sold as a complete, out-of-the-box motor testing
system. Components include:
• Hysteresis Dynamometer: provides precise torque
loading independent of shaft speed
• Motor Fixture: accommodates motors from 5 mm
to 30 mm in diameter.
• Dedicated Electronics: all-in-one dynamometer
controller, DC wattmeter, power relay and USB
interface
• Comprehensive Motor Testing Software: new
version of Magtrol’s M-TEST 5.0, updated for the
Micro Dyne
• Easy-to-use calibration software
• All necessary connection cables
• Calibration weights: 5 g and 10 g
•
•
•
•
•
DeScription
With over 50 years’ experience in dynamometer design
and torque measurement, Magtrol has revolutionized the
industry. Magtrol’s NEW Micro Dyne, capable of measuring
extremely low torques (2.0 mN·m can be
resolved to 0.0004 mN·m), is designed
motor
characteristics
EXCLUSIVELY for testing miniature
measured/
and micro (low-torque) motors.
calculated:
• Torque
• Speed
• Amps
• Volts
• Horsepower
• Efficiency
• Input Watts
• Output Watts
For the utmost convenience, the Micro
Dyne is packaged as a COMPLETE
MOTOR TESTING SYSTEM.
Everything that is needed to accurately
and efficiently test miniature motors
and micro motors is included with the
purchase of a Magtrol Micro Dyne.
The only component that needs to be
supplied by the customer is a laptop or
desktop personal computer and motor
power supply.
applicationS
Magtrol motor test systems can be found in test labs, at
inspection stations, and on the manufacturing floors of most
of the world’s leading motor manufacturers. The Micro
Dyne system is used exclusively for closed-loop testing of
miniature motors and micro motors used in low-torque/highspeed applications.
Motor sub-types include, but are not limited to, the
following:
• Brushed and brushless DC motors
• Miniature stepper motors
• Gearmotors
• Brushless DC servomotors
• Vibrator motors
• Miniature air motors
These mini/micro motors are used in a diverse range of
industries and products, including:
• Medical and laboratory equipment
• Robotics and automation
• Toys
• Handheld communication devices
• Audio/video equipment
• Optics and photonics
• Aerospace and defense
• Security and instrumentation
• Industrial machinery
www.magtrol.com
1
GENERAL
INFORMATION
1.2
M
AGTROL
Data
Sheet
Chapter 1 – Introduction
Magtrol Micro Dyne System
Micro Dyne
SyStem moDel
Electronic Unit
functions as a:
• Dynamometer Controller
• DC Wattmeter
• Power Relay
• USB Interface
shipping bolt
knob
Dynamometer
dynamometer
shaft
motor
under
test
motor
power IN
terminals
motor
power OUT
terminals
motor clamping strap
(with knurled cam grip)
Motor Fixture
motor fixture
adjustment knobs
(height, width and depth)
motor
electrical
connection
fiber optic speed pickup
voltage
sense
terminals
leveling knobs
Block Diagram
Motor
Under
Test
motor power
Slotted
Disc
speed signal (via fiber optic speed pickup)
Brake
torque signal
DSP
Firmware
USB cable
PC with
M‑TEST 5.0
and calibration
software
Power Supply
brake power
Mains
(IEC 80 – 240 V AC,
60/50 Hz)
M AGTROL
GENERAL
INFORMATION
System Configuration
Chapter 1 – Introduction
Magtrol Micro Dyne System
Micro Dyne
SyStem componentS
Dynamometer
Motor Fixture
T h e M ic r o D y n e
dynamometer absorbs
power with Magtrol’s
u n ique Hysteresis
Bra k ing System.
Because it does not
require speed to create
torque,
the
dy na momet er ca n
conduct a full motor
ramp—from free-run
to locked rotor.
I n add it ion to a
dedicated motor
fixture,
the
dynamometer base plate also includes leveling knobs and
motor power terminals. The housing of the dynamometer
protects all the moving parts of the brake.
Electronic Unit
At the hub of the
Micro Dyne
system is a
multifunctional
electronic unit.
The unit employs
DSP technology
for h igh-sp e e d
data acquisition and complete PC control of the dynamometer.
A USB receptacle enables easy connection to a personal
computer. An integrated DC wattmeter reads volts and amps,
and calculates watts; and a built-in power relay controls motor
power (on/off).
The front panel includes the terminals for motor power
in/out and voltage sensing. LED power and communication
indicators are located on the rear panel of the unit.
Attached to the dynamometer base plate
is a motor fixture designed expressly for
micro/miniature motors. The base of the
fixture features an XYZ stage with 3-axis
positioning for excellent adjustability and
motor centering. With the included
adapters, motors from 5 mm to 30 mm
in diameter can be easily mounted. The
fixture is keyed to help secure the motor
under test and a rubber strap with knurled
cam grip provides motor clamping.
Motor Testing Software
Magtrol’s M-TEST 5.0 is
a st at e - of-t he -a r t
comprehensive motor
testing program designed
for use with Windows®
operating systems for
PC-based data
acquisition. The software
measures and calculates
a motor’s performance
characteristics by employing these user-configurable testing
methods:
Ramp:
Select from average ramp down/up or ramp
down with inertia correction factor. Also allows
extrapolation of free-run and locked-rotor data,
plus interpolation of specific speed or torque
data points.
Curve:
Test speed, torque, amps, watts input, watts
output and open loop parameters, and compares
actual values to user-defined limits. Capable of
adjusting sampling rate and using step or ramp
from one load point to the next.
Pass/Fail: Checks amps, input watts, speed, torque and
output watts against user-defined values.
The data generated can then be stored, displayed and printed
in tabular or graphic formats, and is easily imported into a
spreadsheet.
operating principleS
Speed Measurement
Torque Measurement
The Micro Dyne contains a reflective fiber optic speed pickup.
Each rotor slot that passes by the sensing end of the fiber optic
generates an electronic pulse, which is then converted to a
speed reading (in rpm).
A hysteresis brake is used to develop a resistance to rotation
of a mechanical shaft. A torsional force is produced by the
test motor and applied to the brake’s rotor-shaft assembly.
Reaction torque is measured by the angle of the brake
pendulum assembly and is interpreted by the Micro Dyne
system software (M-TEST 5.0).
M AGTROL
GENERAL
INFORMATION
System Information
Chapter 1 – Introduction
Magtrol Micro Dyne System
Micro Dyne
Dynamometer
The Micro Dyne offers two different torque configurations in one unit. Depending on the motor’s maximum torque rating,
the user can easily switch between the 2.0 mN·m and 4.0 mN·m torque settings via the dynamometer’s rear access panel. The
ratings are the same for either configuration.
Maximum
Torque
Nominal
Input Inertia
mN·m
4.0 or 2.0
Maximum Kinetic Power
5 minute
continuous
Maximum
Speed
kg·cm²
W
W
rpm
5.43 × 10⁻⁴
4
4
100,000
Accuracy
Torque
< 1% of
full scale
Speed
< 0.02% of
reading
Maximum
Rated Torque 4.0
Based on the maximum kinetic power ratings,
the curve below represents the maximum power
(heat) that the dynamometer can dissipate over
time. The area under the curve equals the
maximum speed/torque combinations for both
a motor test of less than 5 minutes (intermittent
duty), and a continuous-duty motor test.
TORQUE (mN·m)
Power Absorption Curve
3.0
2.0
1.0
0
0
20 000
40 000
60 000
SPEED (rpm)
80 000
100 000 Maximum
Rated Speed
DyNAMoMETEr ENvIroNMENTAl rEqUIrEMENTS
Operating Temperature
0 °C to +70 °C
Relative Humidity
< 60% without condensation
In accordance with
EMC
IEC 61326:2002
electronic unit
GENErAl ElECTrICAl CHArACTErISTICS
Fuse (5 × 20 mm)
IEC 315 mA 250 V T
Power Requirements
14 VA
Voltage Requirements
85 – 264 V AC, 60/50 Hz
ENvIroNMENT
Operating Temperature
0 ºC to +70 ºC
Relative Humidity
< 60% without condensation
PowEr MEASUrEMENT (DC)
Current Input (isolated)
±5 A
Voltage Input (isolated)
±30 V DC
Conversion Rate
15/second/input
Accuracy
Up to 0.02%
50 V DC
Isolation, to earth
Isolation, channel-to-channel 100 V DC
motor Fixture
MoTor ACCoMMoDATIoN
Motor Diameter
Motor Length
Motor Shaft Diameter
Maximum Load
5 mm – 30 mm
5 mm – 50 mm
0.75 mm – 3 mm
100 g
ADjUSTAbIlITy
X/Y/Z Adjustable Range
Controllable Motion
Travel per Knob Revolution
±5 mm (all axes)
0.005 mm
0.318 mm
M AGTROL
GENERAL
INFORMATION
Specifications
Chapter 1 – Introduction
Magtrol Micro Dyne System
GENERAL
INFORMATION
Dimensions (mm)
Micro Dyne
Dynamometer
Weight
4.2 kg
9.3 lb
140
113
229
180
75
34
electronic Unit
(316)
(264)
245
3 DIMENSIONAL, FRONT VIEW
3 DIMENSIONAL, REAR VIEW
(209)
Weight
1.5 kg
3.2 lb
190
71.3
Due to the continual development of our products, we reserve the right to modify specifications without forewarning.
magtrol inc
70 Gardenville Parkway
Buffalo, New York 14224 USA
Phone: +1 716 668 5555
Fax: +1 716 668 8705
E-mail: [email protected]
magtrol Sa
Centre technologique Montena
1728 Rossens / Fribourg, Switzerland
Phone: +41 (0)26 407 3000
Fax: +41 (0)26 407 3001
E-mail: [email protected]
Subsidiaries in:
• Germany
• France
• Great Britain
• China
Worldwide Network
of Sales Agents
MD-US 07/07
www.magtrol.com
2. Installation/Configuration
2.1
Dynamometer Setup
Shipping bolt knob
SETUP
Motor electrical connection
Bubble level
Leveling knobs
Figure 2–1 Micro Dyne Dynamometer
2.1.1
Unlocking the Shipping/Restraining Bolt
Before dynamometer operation, the shipping/restraining bolt must be unlocked. A knob attached
to the bolt is located on the top of the dynamometer housing, as shown in Figure 2–1. To unlock,
lift up on the knob and turn it clockwise 90° to the “Unlock” position.
2.1.2
Dynamometer Leveling
Simply level the dynamometer with the two leveling knobs at the front of the base plate, using the
embedded bubble level as a guide.
Chapter 2 – Installation/Configuration
Magtrol Micro Dyne System
2.2
Electrical Connections
The Micro Dyne is shipped with the dynamometer and the electronics unit already connected to
one another by a set of cables. These four cables are bundled together at the dynamometer end, and
branch out into the following for connection to the electronics unit:
Connection Cable
Earth ground
Attaches To
Mounting plate of speed
pickup
Bifurcated fiber optic cable Speed pickup
Dynamometer brake cable BRAKE Output
2.2.1
ENCODER Input
Reads speed measurement.
Delivers power from electronics unit to
dynamometer brake.
Quadrature encoder; reads torque
measurement.
Earth Ground
For your safety, the dynamometer has been earth grounded and shipped with the ground strap already
in place. This protective wire provides an alternate path to ground in case of short circuits or heavy
electrical currents.
The dynamometer connection point is located on the rear of the base plate and is clearly marked
with the earth ground symbol.
Ground lug
Ground strap
Figure 2–2 Dynamometer Earth Ground
The other end of the ground strap should be connected to the metal tab attached to the speed pickup
mounting plate, located on the Micro Dyne Electronics Unit. See Figure 2–3 Speed Pickup.
The complete earth ground path is as follows:
Dynamometer —> Electronics unit —> Main power cord —> Earth
SETUP
15-pin instrument cable
Description
Provides safety against electric shock.
Chapter 2 – Installation/Configuration
2.2.2
Magtrol Micro Dyne System
Speed Pickup Connection
Plastic cover
Organize
speed pickup
cables here
(Partial) side view of electronics unit
(shown in “up”/unlocked position)
Insert fiber optic
cable ends here
Earth ground
connection
Figure 2–3 Speed Pickup
To connect the speed pickup to the dynamometer:
1.Lift up the plastic cover.
2. Slide the fiber connection mechanism up.
3.Locate the two openings in the sliding mechanism and insert the bifurcated ends of the fiber
optic cable, inserting as far as the mechanism will allow.
Note:
It does not matter which fiber optic sensing end goes into which
opening.
4. Slide the fiber connection mechanism down in order to lock.
10
SETUP
Fiber connection mechanism
Chapter 2 – Installation/Configuration
Magtrol Micro Dyne System
2.2.3
Rear Panel Connectors
SETUP
Figure 2–4 Electronics Unit Rear Panel
The rear panel connectors, from left to right, are:
Connector
POWER Input
BRAKE Output
SPEED Output
USB Port
ENCODER Input
Attaches To
Power source
Dynamometer
External speed sensor
Personal computer
Dynamometer
Connection Cable
Main power cord
Dynamometer brake cable
6-pin sensor cable
USB cable
15-pin instrument cable
Using the table above, make the necessary connections with the cables provided. As noted in Section
2.2 – Electrical Connections, some of the cables have been installed prior to shipping.
2.3
Motor Power
Note:
For detailed instructions on motor mounting, refer to Section 4.2.
Using the three power supply cables provided, make the following basic connections. Other power
configuration options are shown in Section 2.2.1.
Caution:
Pay attention to which pin on the banana plug is positive and which
(+) and black (–) terminals
accordingly.
one is negative. Connect to the red
11
Chapter 2 – Installation/Configuration
Terminal on
Electronics Unit
Motor Power In
Magtrol Micro Dyne System
Connected To
Description
User’s power supply
Allows power measurement and on/off
switching from electronics unit.
Outputs power to the motor.
Controlled by relay inside electronics unit which
turns motor power on/off.
Measures voltage directly from the motor, thus
eliminating voltage drop.
Results in increased power measurement
accuracy and efficiency.
Motor Power Out
Motor connection point on
dynamometer
Voltage Sense
Motor connection point on
dynamometer
SETUP
Figure 2–5 Electronics Unit Front Panel
Figure 2–6 illustrates the internal wattmeter and relay layout, showing the complete basic power
circuit from power supply to motor.
+
Relay
MOTOR
POWER
IN
+
Motor
power
Supply
DC
Source
Voltage
Meter
Current
Meter
–
–
MOTOR
POWER
IN
A
MOTOR
POWER
OUT
Banana
plugs on
dynamometer
power terminal
V
–
+
VOLTAGE
SENSE
inside Micro Dyne Electronics box
MOTOR
POWER
OUT
Figure 2–6 Basic Motor Power Circuit
12
Motor
Chapter 2 – Installation/Configuration
Magtrol Micro Dyne System
2.3.1
Power Configuration Options
2.3.1.1
Basic Configuration
This standard Micro Dyne setup shows a (customer-provided) motor power supply wired to the Micro
Dyne Electronics Unit. This setup allows the Micro Dyne’s electronics to control on/off power to
the motor under test, and to monitor input power.
Micro Dyne Electronics unit
–
Voltage Sense Leads
Motor
Leads
Motor
powEr
out
USB
Motor
powEr
in
+
PC
M-tESt
Motor
Power
In
er Out
Motor Pow
– +
(Customer)
Motor Power Supply
Micro Dyne
Dynamometer
Figure 2–7 Basic System Configuration
2.3.1.2
Relay Configuration
To run a motor in both clockwise and counter-clockwise directions, without having to rewire during
the middle of a test, a relay card is required. A National Instruments™ PCI relay card (available for
purchase from Magtrol) allows for the automatic reversing of motor leads when the motor power
supply is connected to the relay card. Like the basic system configuration, the Micro Dyne controls
on/off power to the motor under test and monitors motor input power. For more information regarding
motor reversal, refer to Section 4.3.1.
Micro Dyne Electronics unit
–
Voltage Sense Leads
Motor
Under
Test
Motor
Leads
voltAgE
SEnSE
Motor
powEr
out
Motor
powEr
in
USB
Motor
Power In
+
Relay
Card
er Out
Motor Pow
– +
(Customer)
Motor Power Supply
Micro Dyne
Dynamometer
Figure 2–8 Relay Configuration
13
PC
M-tESt
SETUP
Motor
Under
Test
voltAgE
SEnSE
Chapter 2 – Installation/Configuration
2.3.1.3
Magtrol Micro Dyne System
Motor Drive Configuration
This setup allows for the addition of a motor drive unit. The advantage to this is that the Micro
Dyne is now measuring the drive/motor efficiencies, instead of the just the motor alone. This is
especially beneficial when the motor is dependent on the motor drive for operation. With the power
supply unit attached to the Micro Dyne relay, the power to the motor drive can be controlled through
M‑TEST.
Micro Dyne Electronics unit
–
Motor
powEr
out
+
PC
Motor
Power Out
Motor
Leads
–OUT+
– IN +
Motor
Drive
Micro Dyne
Dynamometer
USB
Motor
powEr
in
Motor
Power
In
M-tESt
– +
(Customer)
Motor Power Supply
Figure 2–9 Motor Drive Configuration
2.4
Motor Testing Software
2.4.1
Software Installation
For detailed installation instructions, refer to Magtrol’s M-TEST 5.0 User’s Manual.
2.4.2
M-TEST Communication
In order to use M-TEST with the Micro Dyne, the COM port to which the USB interface is connected
must first be determined.
1. Power up the Micro Dyne.
2. Find the COM port.
For Windows 95/98/2000: Go to Start menu > Settings > Control Panel > System > Hardware
> Device Manager > Ports. Look for the USB Serial Port and note the COM port number
in parenthesis.
For Windows XP: Go to Start menu > Control Panel > Switch to classic view > System >
Hardware > Device Manager > Ports. Look for the USB Serial Port and note the COM port
number in parenthesis.
Note:
To configure M-TEST for the Micro Dyne, refer to Section 4.3
– Software Configuration.
14
SETUP
Voltage
Sense
Leads
Motor
Under
Test
voltAgE
SEnSE
Chapter 2 – Installation/Configuration
Magtrol Micro Dyne System
2.5
Communication Check
When powering up the Micro Dyne, check to make sure that all four LEDs on the rear panel of the
electronics unit (see Figure 2–4) are illuminated according to the table below.
LED
USB
24 V
CPU
5V
Color
Yellow
Green
Yellow
Green
Indicates
Flashing: USB communication is taking place.
The 24 volt power is OK.
The power-up sequence has been initiated.
The 5 volt power is OK.
SETUP
2.6Initial Calibration
After communication is verified, it is highly recommended to calibrate the dynamometer before
performing any tests. Refer to Chapter 6 – Calibration for a detailed procedure.
15
3. Testing Considerations
A number of factors must be taken into consideration before running a test, including: safety,
power dissipation, and influences that affect the apparent accuracy of the torque readout (such
as shaft alignment, windage, friction, vibration, dynamometer leveling, cogging, Eddy currents
and temperature rise). The following sections describe these factors, and their effects, in further
detail.
Note:
3.1
Safety
Warning!
For general safety considerations, please
follow these few common-sense rules:
•
Make sure all wiring and connections have been properly made.
•
Secure all grounding wires to the appropriate locations to reduce the chance of shock and
damage to the equipment.
•
Always wear safety glasses when working around Micro Dyne equipment.
•
Do not wear loose clothing or ties when operating the Micro Dyne equipment.
•
Ensure motor under test is properly mounted to the motor fixture.
Power Dissipation
All Magtrol dynamometers are power absorption instruments. As a dynamometer loads a test
motor, it is absorbing power from the motor into the hysteresis brake. The brake is converting this
mechanical energy into heat.
There are finite limits to the amount of energy and resulting temperature rise that any absorption brake
can withstand. Excessive power over extended periods of time may result in more obscure damage
including breakdown of bearing lubricants and degradation of magnetic coil insulation. Extreme
temperatures due to inappropriate operation can not only warp the rotor and surrounding housings,
but also alter the magnetic characteristics. Absolute best-case scenario under such circumstances
would be a reduced torque output from the brake assembly, if complete dynamometer failure were
not realized.
16
OPERATION
3.2
If you have not already done so, please take a moment to familiarize
yourself with the Micro Dyne System’s technical specifications.
See Section 1.2 – Data Sheet.
Chapter 3 – Testing Considerations
Magtrol Micro Dyne System
3.2.1
Power Absorption Curve
Based on the maximum kinetic power ratings, the curve represented in Figure 3–1 illustrates the
maximum power (heat) that the dynamometer can dissipate over time. The area under the curve equals
the maximum speed/torque combinations for both a motor test of less than 5 minutes (intermittent
duty), and a continuous-duty motor test.
Conditional Environmental Parameters
Maximum brake temperature 100 °C (212 °F)
Ambient temperature
25±5 °C (77±9 °F)
3.0
2.0
1.0
0
0
20 000
40 000
60 000
SPEED (rpm)
80 000
100 000 Maximum
Rated Speed
Figure 3–1 Micro Dyne Power Absorption Curve
3.3
Shaft Alignment
In motor testing, shaft alignment is one of the most important factors to consider. An improper
coupling and/or shaft alignment can lead to unwanted side loads and vibration, damaging both the
test equipment and motor. To accommodate micro motor sizes, while preventing side loading on
the dynamometer shaft, a coupling of small flexible rubber tubing should be used. The friction of
the rubber tube on the shaft alone suffices as a clamping agent. Several pieces of rubber tubing, in
various diameters, are included with the Micro Dyne for this purpose. Refer to Section 4.2.1 – Shaft
Coupling for detailed coupling instructions.
3.4
Windage
Windage is proportional to the square of speed. The air friction is tangential to the surface and
impinges upon the stationary field assembly. This acts as viscous drag and becomes part of the motor
load and torque reading. There is also a small amount of air dissipated as pumping loss. Since this
appears as a load on the motor, not measured by the dynamometer, it becomes a source of error.
Considering the size of the parts affected by windage in the Micro Dyne, this source of error will
be less pronounced then if similar speeds were seen on larger dynamometers.
17
OPERATION
TORQUE (mN·m)
Maximum
Rated Torque 4.0
Chapter 3 – Testing Considerations
3.5
Magtrol Micro Dyne System
Friction
Friction of the carrier bearings is a measurable load. When correctly loaded and lubricated, the
friction is insignificant. During actual motor testing there is usually enough system vibration to
“settle” negating frictional effects. If excessive drag is present, mechanical realignment may be
required. In the design of the Micro Dyne, careful attention was paid to carrier bearing friction for
the proper operation of the pendulum assembly; mainly in ensuring the pendulum returned to the
zero position within the published error bands.
Note:
3.6
Friction is the largest source of error in the Micro Dyne but it is
relatively small in comparison to the overall range and accuracy
(< 1%) of the dynamometer.
Vibration
Caution:
Severe
vibration left unattended could ultimately lead to
permanent damage to the test equipment or the motor under
test.
3.7
Dynamometer Leveling
An improperly leveled dynamometer will alter the torque calculations in proportion to the deviation
from a true level surface. The base plate of the Micro Dyne is equipped with two leveling knobs
and an embedded bubble level for easy leveling.
3.8
Cogging
Rotor Poles
Case
Pole
Rotor
Assembly
N
N
N
S
S
S
Figure 3–2 Hysteresis Brake Cross-Section
18
OPERATION
All rotating dynamometer assemblies are precision balanced. At high speeds, some vibration and
noise are inevitable but not necessarily harmful. However, excessive resonant vibrations caused by
bent shafts and poor alignment will produce data errors and are a safety hazard.
Chapter 3 – Testing Considerations
Magtrol Micro Dyne System
This cross-section shows (by one tooth) the magnetic relationship of the hysteresis brake elements.
If the dynamometer shaft is at rest with the torque applied, and if the torque control is then reduced
to zero, a magnetic salient pole will be temporarily imposed on the rotor of the brake.
If the shaft is then rotated slowly, the magnetic poles on the rotor will attempt to align with the
adjacent case-pole tooth form. This is often referred to as “cogging”. The action is sinusoidal. First
it tries to resist rotation and then, as the rotor passes through the tooth form, it subsequently supports
rotation.
The most obvious results of cogging are uncontrolled oscillations within the torque/speed curve. It
will become difficult for the motor under test to tune in the PID loop, along with a possible increase
in resonant noise from the dynamometer and motor.
3.8.1
Avoiding Cogging
To avoid magnetic cogging, before the shaft comes to rest, slowly reduce the torque control to
zero.
3.8.2
Removing Cogging
3.9
Eddy Currents
There is some Eddy current generation within the brake rotor. These magnetically-induced currents
cause an increase in braking torque proportional to speed. While more pronounced in larger
dynamometers (which exhibit higher rotor surface velocities), in a pure loading system it becomes a
benefit of the dynamometer. Since the Eddy currents effect the rotor surface, this torque is measured
by the torque pendulum and becomes another load source (and not a source of error).
3.10Temperature Rise
Temperature rise has a more complex effect on hysteresis brake load torque and is difficult to quantify.
As the temperature of the brake increases, differential expansions cause dimensional changes that
tend to increase torque. Conversely, electrical resistance in the rotor increases with temperature,
resulting in decreased Eddy current generation and load, all in a variable frame.
Caution:
Under no circumstances should the maximum wattage ratings for
the dynamometer be exceeded. The resulting rise in temperature
can cause permanent damage to the rotating assembly, including
altering the magnetic properties of the rotor itself.
19
OPERATION
To most effectively remove cogging, once established, reapply current on the dynamometer. Then,
slowly ramp the current to zero while maintaining a very low speed (only a few rpms). The current
ramp to zero can be increased slightly in speed when the dynamometer rotation is sped up during
this process.
4. Test Setup
4.1Torque Configuration
The Micro Dyne can be configured to either a 4 mN·m or 2 mN·m torque scale. The Micro Dyne is
shipped with the 2 mN·m configuration. To convert it to 4 mN·m, follow the procedures below.
1. Remove the rear panel of the dynamometer as described in Section 6.2.1 – Dynamometer
Rear Panel Removal.
2.Locate the small parts bag that contains a single circular weight and fastening screw.
3. Once the inside of the dynamometer is accessed, move the pendulum in either direction in
order to expose the threaded hole located at the center of the pendulum.
Circular weight for
4 mN·m torque scale
Figure 4–1 Dynamometer, Inside View
4. Attach the circular weight with the provided hex screw, using the smaller of the two Allen
wrenches included in the accessory tool bag.
5. Calibrate the dynamometer with the 10 gram calibration weight. Refer to Chapter 6 for
complete calibration instructions.
Note:
Re-calibration is necessary after every conversion between the
2 mN·m and 4 mN·m torque configurations.
20
OPERATION
Pendulum
Chapter 4 – Test Setup
Magtrol Micro Dyne System
4.2
Motor Mounting
Clamping strap
Vertical
adjustment
knob
Knurled cam
grip
Horizontal
adjustment
knob
Depth
adjustment
knob
4.2.1
Shaft Coupling
If the motor shaft diameter is 0.5 mm to 1.6 mm, it is highly recommended to use one of the provided
rubber couplings to adapt the motor shaft to the 2.0 mm Micro Dyne Dynamometer shaft.
1. Trim the tubing to allow about 2 mm of tubing over the dynamometer shaft and 3 mm of
tubing over the motor shaft.
2. Place the tubing snugly around the dynamometer shaft, being careful not to bend the
shaft.
3. After the motor is mounted, as described in Sections 4.2.2, 4.2.3 and 4.2.4, place the other
end of the rubber tubing around the motor shaft.
4.2.2
Adapters
When testing motors with diameters less than 20 mm, the appropriately-sized adapter must be
used.
Motor Diameter
5 mm – 10 mm
10 mm – 20 mm
20 mm – 30 mm
Adapter
V-Adapter I
V-Adapter II
No adapter necessary
Attach the adapters to the fixture using the provided hex screws and Allen wrench. The threaded
holes are found in the groove of the V-adapters.
Note:
The adapter should be secured in place but be careful not to
overtighten.
21
OPERATION
Figure 4–2 Micro Dyne Motor Fixture
Chapter 4 – Test Setup
Magtrol Micro Dyne System
Adapter
Motor Fixture
with
V-Adapter I
Motor Fixture
with
V-Adapter II
Motor Fixture
without
adapter
Figure 4–3 Motor Fixture Adapters
4.2.3
4.2.4
Note:
Ideally, the clamping strap should be secured at the middle of the
motor.
Stage Adjustment
For precise motor alignment, the stage of the motor fixture may be axially adjusted using the three
colored adjustment knobs.
Knob Color
Red
Yellow
Green
Note:
Axis
X
Y
Z
Adjustment Direction
Horizontal (side-to-side positioning)
Vertical (shaft height)
Depth (of motor to input shaft of
dynamometer)
The entire motor fixture can also move (as one unit) along the length
of the dynamometer base plate, in line with the bolt pattern. The
fixture is locked in place by screwing into the tapped holes with
the provide hex key screws.
22
OPERATION
Clamping Strap
1. Place the motor under the rubber strap.
2. Tighten by pulling on the strap. A knurled cam will lock the strap in place when the strap
is let go.
3. To release the motor, rotate the cam upward and the strap will loosen.
Chapter 4 – Test Setup
Magtrol Micro Dyne System
4.3
Software Configuration
This section only provides very basic instructions for setting up M-TEST to run with the Micro
Dyne. For detailed information about selecting, configuring and running a test, refer to Magtrol’s
M-TEST 5.0 User’s Manual.
1. Power up the Micro Dyne.
2. Start M-TEST.
3. Open the Configure Hardware window.
OPERATION
Figure 4–4 M-TEST Configure Hardware Window
4. Enter the following settings:
a. Under Dynamometer Controller, select “Micro Dyne” for the Model.
b. For the Interface, select the COM port where the USB interface is connected
(as determined in Section 2.4.2 – M-TEST Communication).
c. Under Power Measurement, select “Micro Dyne” as the Device.
Note:
For increased power measurement capabilities, other power
analyzers (such as Magtrol’s 6510e or 6530) may be used in
conjunction with the Micro Dyne. If applicable, the supplemental
power analyzer should be selected as the “Device.” If using a
third-party measurement device not found on the list, by selecting
“None”, M-TEST will no longer be responsible for measuring the
input power.
23
Chapter 4 – Test Setup
4.3.1
Magtrol Micro Dyne System
Motor Reversal
If it is desired to perform a motor test in both clockwise and counter-clockwise directions, a relay
card is required. Motor direction is configured in M-TEST and requires a power supply supported
by M-TEST. Supported power supplies are found in the Device text box, under the Power Supply
options in the Configure Hardware window. See Figure 4–5.
4.3.1.1
Reversing Motor Direction Before Test is Run
To reverse the motor direction and keep the direction of rotation constant throughout the entire test,
use the Configure Hardware window for motor reversal setup.
1. Open the Configure Hardware window.
2. Under Power Supply, click on the Device text box and scroll through for a list of supported
power supplies.
3. After selecting a power supply, set the voltage and current output for that voltage supply. If
a negative voltage is entered, M-TEST switches relays to change the polarity of the motor
voltage and, in turn, reverses the direction of rotation (for a DC motor).
Figure 4–5 M-TEST Power Supply Configuration
4.3.1.2
Automatic Reversal of Motor Direction During Test
Curve tests and Pass/Fail tests allow for reversing the motor direction during a test.
Note:Because Ramp tests do not allow motor voltage control, the motor
must ramp up and down in the same direction for the entire test. To
reverse the direction of rotation for a ramp test, after running the
first test, enter a negative power supply voltage in the Configuration
Hardware window (as described in Section 4.3.1.1) and then run
the test a second time.
1. If not already done so, select a power supply supported by M-TEST in the Configure Hardware
window.
2. Open the Configure Test window. If Curve Test or Pass/Fail Test is selected, an extra column
in the Control Data table, under Test Parameters, labeled “Volts” should appear.
24
OPERATION
Chapter 4 – Test Setup
Magtrol Micro Dyne System
3. To have the motor direction reversed during a test, simply enter a negative voltage, as shown
in Figure 4–6.
25
OPERATION
Figure 4–6 Curve Test Parameters with Motor Reversal
5. Operating Principles
5.1Torque Measurement
An innovative approach to measuring small torques is implemented in the Micro Dyne. The design
employs a very small pendulum and brake assembly hung in a precision-machined carrier. The basic
concept, a textbook physics problem, is described below.
Brake
Torque = Lcm mg sin (θ)
θ
Lp
Pendulum
mp gp cos (θ)
mp gp sin (θ)
mp gp
Represents
Lp
the length to the center of mass of the pendulum
mp gp
the force applied by the mass and gravity
mp gp sin (θ)
the force in the radial direction
Figure 5–1 Illustrated Torque Principle
5.1.1
Torque Calculation
At calibration time, a known mass at a known distance is applied to the pendulum system and a
precise calibration is accomplished.
Lp mp gp sin (θ) = Lc mc gc cos (θ)
Symbol
Represents
Lc
the length from the center to the calibration weight
mc gc
the force applied by the known mass and gravity
The coefficient Lp mp gp is calculated and stored. Torque data is calculated using this coefficient,
along with position data.
26
OPERATING
PRINCIPLES
Symbol
Chapter 5 – Operating Principles
Magtrol Micro Dyne System
5.2
Speed Measurement
The Micro Dyne contains a reflective fiber optic speed pickup. As each rotor slot passes by the
sensing end of the fiber optic, an electronic pulse is generated, which is then converted to a speed
reading (in rpm). The incoming pulses from the speed pickup can be resolved down to 5 Hz or 5
pulses per second. With 6 slots on the rotor, this results in a minimum speed setting of 50 rpm. (The
speed reading will drop to zero at 50 rpm.)
Note:
The rotor/speed measuring mechanism of the Micro Dyne has been
optimized for motors running from 10,000 rpm to 100,000 rpm.
Figure 5–2 Micro Dyne Rotor
5.3
Controller and the PID Loop
Other important variables include:
• Set point - desired load or speed
• Error - difference between the set point and the actual measurement
• Additional scaling – used to broaden the range of the control loop
5.3.1
P (Proportional Gain)
With proportional gain, the controller output is proportional to the error or to a change in measurement.
Deviation from the set point is usually present. Increasing the proportional gain will make the PID
loop unstable. Increasing the integral value will eliminate this instability. For best loop control, set
the proportional gain as high as possible without causing the loop to become unstable.
5.3.2
I (Integral)
With integral, the controller output is proportional to the amount of time the error is present. Increasing
the integral value eliminates the offset from the set point. If the response becomes oscillatory,
increase the derivative value.
5.3.3
D (Derivative)
With derivative, the controller output is proportional to the rate of change of measurement or error.
Derivative can compensate for a changing measurement. Derivative takes action to inhibit more
rapid changes of the measurement than proportional gain.
27
OPERATING
PRINCIPLES
The Micro Dyne has PID adjustment capability for both the speed and torque modes to provide the
best system response. The PID Loop comprises the following three variables:
P = proportional gain
I = integral
D = derivative
Chapter 5 – Operating Principles
5.3.4
Magtrol Micro Dyne System
Additional Scale Factor
The Additional Scale Factor (PS, IS and DS) is a multiplier of the P, I or D term. Due to the fact
there are so many different motor combinations, this multiplier is needed to extend the range of the
PID. The letters represent the following values:
A = 0.001
D = 0.05 G = 1
* The default multipliers are G, G, and G
B = 0.005
E = 0.10 H = 5
C = 0.010
F = 0.50
I = 10
Using the multiplier, PID values from 0.001 (0.001 × 1%) to 990 (10.0 × 99%) may be inputted.
5.3.5
How the PID Loop Works
The following diagram demonstrates the correlation between the variables in the PID Loop.
e(t)
Yd(t)
Derivative
Set Point
Yp(t)
Yt(t)
Proportional
-
+
Scale
Ys(t)
+
Integral
Reading
Yi(t)
0 to 120,000 rpm
0 to 20 kHz
SPEED (rpm)
TORQUE
Speed
Filter
Position
Brake
Coil
Figure 5–3 Control Loop and PID System Block Diagram
5.3.6
PID Equations
Where Skp, Ski and Skd are factory-determined system coefficients…
Yd(t) = (e(t) - e(t-3) + 3 * [e(t-1) - e(t-2)]) * (10/Skd) * D% * DS
Yp(t) = (e(t) + Yd(t)) * (10/Skp) * P% * PS
Yi(t) = Yi(t-1) + [e(t) + Yd(t)] * (10/Ski) * I% * IS
Yt(t) = Yp(t) + Yi(t)
Ys(t) = Scale * Yt(t)
28
Power
Wattmeter
0 to 1
OPERATING
PRINCIPLES
0 to 75°
0 to 6826 counts
Filter
Chapter 5 – Operating Principles
Magtrol Micro Dyne System
5.4
DC Wattmeter
The data acquisition stage in the hardware of this DC power measurement instrument is very simple.
The input voltage is divided by an amplifier circuit and applied directly to a LTC2515 A/D converter.
The input is differential and isolated from the amps circuitry. The input current is applied to a shunt
resistor and the resulting voltage is amplified and applied directly to a LTC2515 A/D converter. The
input is differential and isolated from the voltage circuitry. The wattage presented is a multiplication
of the amps and voltage. See Section B.3 – DC Wattmeter Schematic.
OPERATING
PRINCIPLES
29
6. Calibration
6.1
Calibration Software Installation
1. Insert the “Micro Dyne Supplemental Programs and Utilities CD” into your CD-ROM
drive.
2. The USB Driver Utility will auto start. Just press EXIT.
3. Start Windows Explorer.
4.Locate the directory where M-TEST 5.0 is installed.
5. Copy the entire “Calibration Sequence rev 1.0” folder into the same folder as the M-TEST
program. If the default directory was used, the location is C:\Program Files\M-Test 5.0\.
6. Once copied onto the hard drive, locate the MD-CAL.exe application file. This is the
executable file for the Micro Dyne Calibration Software.
6.2
Note:
Create a shortcut to the calibration program by clicking the
MD‑CAL.exe file and dragging it to the desktop.
Calibration preparation
1. Disconnect motor.
2. Remove coupling.
3. Disconnect all wiring and power supply cables from motor connection point.
4. Remove the rear panel of the dynamometer as described in Section 6.2.1.
5.Level the dynamometer as described in Section 2.1.2 – Dynamometer Leveling.
6.2.1
Dynamometer Rear Panel Removal
MAINTENANCE
Rear panel screws
Ground lug
Figure 6–1 Dynamometer Rear Panel Removal
30
Chapter 6 – Calibration
Magtrol Micro Dyne System
1. Remove the three rear panel screws with the smaller of the two Allen wrenches provided in
the accessory tool bag.
2. Remove the ground lug with the larger Allen wrench.
3. Using a small flathead screwdriver for leverage, gently pry open the dynamometer rear
panel and remove.
6.2.2
Calibration Weights
Two calibration weights are included with the Micro Dyne System. They are tagged and labeled
with their exact weight at time of manufacture. The 10 gram weight is used for the 4 mN·m torque
configuration and the 5 gram weight is used for the 2 mN·m torque configuration.
6.3
Calibration Procedure
The Micro Dyne Calibration Software walks the user through every step in the calibration process.
Simply follow the instructions and prompts that appear on the screen.
1. Start the Micro Dyne Calibration Software by opening the MD-CAL.exe application file
mentioned in Section 6.1. The COM Port Selection dialog box will appear.
2. Select the COM port to which the USB interface is connected, as previously determined in
Section 2.5.2 – Verify Communication with M-TEST, and click OK.
3. The main window of the Calibration Software will appear, displaying the version of your
Micro Dyne System at the top.
31
MAINTENANCE
Figure 6–2 COM Port Selection
Chapter 6 – Calibration
Magtrol Micro Dyne System
Figure 6–3 Enter Mass of Calibration Weight
4. Enter the exact weight as labeled on the weight’s tag. Refer to Section 6.2.2. – Calibration
Weights for more information.
5. Click Continue. The Reset ZERO dialog box will appear.
MAINTENANCE
Figure 6–4 Reset ZERO
32
Chapter 6 – Calibration
Magtrol Micro Dyne System
6. To zero the pendulum at its current rest state (without weights), click Send Zero. After the
dialog box displays a value of “0” consistently (for a few seconds), click Continue.
7. The next prompt asks the user to hang the calibration weight, starting with the right side.
Carefully hang the appropriate calibration weight from the calibration peg, as show in Figure
6–5. Tweezers have been included in the accessory tool bag for your convenience.
Calibration peg
Calibration weight
Pendulum
Figure 6–5 Dynamometer Calibration
8. Continue to follow the prompts on the screen, alternating between hanging the weight on
opposite sides of the pendulum and removing the weight. This entire cycle will be performed
a total of five times. After each cycle, the message/instruction bar will display the status of
the calibration routine. The blue progress bar will also update.
Note:
After clicking Continue, the Continue button is grayed out purposely
in order to prevent accidental double-button pressing which would
result in a skipped step.
MAINTENANCE
33
Chapter 6 – Calibration
Magtrol Micro Dyne System
Figure 6–6 Calibration Routine Status
9. After the message/instruction bar displays “Calibration routine steps 5/5 Completed”
one of two dialog boxes will appear, dependent upon whether or not the calibration was
successful.
MAINTENANCE
Figure 6–7 Calibration Sequence Successful
34
Chapter 6 – Calibration
Magtrol Micro Dyne System
Figure 6–8 Calibration Error
10. If calibration was successful, click Continue and proceed to step 11.
If a calibration error occurs, it is most likely due to the pendulum not fully returning to
zero after the weight is removed. Make sure that the dynamometer is level and then click
Continue to restart the calibration sequence. If the Calibration Error message is displayed
after repeated calibrations, contact Magtrol Technical Support.
11. A dialog box will appear asking the user whether or not they would like to print a copy of
the calibration data results.
MAINTENANCE
Figure 6–9 Calibration Data Results Prompt
35
Chapter 6 – Calibration
Magtrol Micro Dyne System
To print a calibration report, click Yes and proceed to step 12.
Click No to quit the Calibration Software without printing the results.
12. The Additional Report Information dialog box will appear.
Enter any additional information concerning the calibration routine and click Print. The
Calibration Data Report will print to the default printer and the Calibration Software will
quit.
36
MAINTENANCE
Figure 6–10 Additional Report Information
7. Troubleshooting
Problem
Speed Measurement
Speed is eratic or there is no
speed reading.
Calibration
Micro Dyne revision is not
displayed in the calibration
software window.
Calibration Error message
appears at completion of
calibration procedure.
Reason
Solution
Speed pickup is in incorrect
mode.
Switch speed pickup to SHS
Mode.
Lost communication with
electronics unit.
Check USB connections.
Pendulum not fully returning
to zero after the weight is
removed
Make sure the dynamometer
is level and restart calibration
procedure.
If you require additional assistance, please contact Magtrol Customer Service at 1-716-668-5555.
MAINTENANCE
37
Appendix A: Hardware Commands
Although most motor tests can be performed with M-TEST, the following command reference tables
are included for users who wish to write their own application.
A.1
Data Format
Speed-torque data is a fixed-length string in ASCII format with a floating point decimal. Use the
following string format:
SdddddTdddd.R(cr)(lf)
Or
SdddddTdddd.L(cr)(lf)
Where…
S = Speed in rpm. (No leading zeroes are used.)
d = Decimal digit 0 through 9.
T = Torque in mN·m. (The torque value always contains a decimal point.)
L = Counterclockwise dynamometer shaft rotation (left).
R = Clockwise dynamometer shaft rotation (right).
. = Decimal point. (The decimal point location depends on the specific dynamometer and
torque range in use.)
Note:
The (cr) and (lf) characters will not display.
Example
If a motor is running at 1725 rpm clockwise, with the dynamometer loading the motor to
22.6 oz.in., the Micro Dyne will return:
S 1725T22.60R
By manipulating the string, the speed-torque and shaft direction (if required) can be extracted.
Then separate numerical variables can be assigned to them for data processing.
A.1.1
Codes for CR - LF
CR =
LF =
A.2
BASIC
CHR$(13)
CHR$(10)
HEX
0D
0A
DEC
13
10
Micro Dyne Command Set
38
APPENDICES
When entering a command code:
1. Type all characters in uppercase ASCII format.
2. End all commands with a CR-LF (hex 0D-0A).
3. Do not string multiple commands together in one line.
Appendix A: Hardware Commands
Magtrol Micro Dyne System
The character # represents a floating-point numerical value following the command. Leading zeroes
are not required.
A.2.1
Communication Commands
Command
Code
*IDN?
B0
B1
OD
A.2.2
Function
Explanation
Returns Magtrol Identification
and software revision.
Brake Off.
Brake On.
Returns speed-torque value.
Example: “MD 1.4 FP 2”
Micro Dyne REV 1.4 and FPGA REV 2
----Output Data prompt to return data string with
this format:
SxxxxxTxxxxxRcrlf
or
SxxxxxTxxxxxLcrlf
R or L is the shaft direction indicator, as viewed
looking at the dynamometer shaft where:
R = right; clockwise (CW)
L = left; counterclockwise (CCW)
Ramp Commands
Command
Code
DILXX.XX
DPLXX.XX
DS#
PD#
PR
PU#
S#
Function
Explanation
39
APPENDICES
Sets dynamic scale coefficient. When using dynamic scaling, XX.XX is
multiplied by the I term to give the end I value.
Sets dynamic scale coefficient. When using dynamic scaling, XX.XX is
multiplied by the P term to give the end P value.
Enable or disables dynamic
Values for # are:
scaling.
0 = disable
1 = enable
Program Down: Sets ramp
Specify speed range (F#) AND a stop
down rate to #rpm per second speed (S#) before using this command. This
and starts ramp.
command programs a decreasing shaft speed
at a rate of #rpm per second.
• Resets ramp up or down.
This command resets the ramp function, halting
• Sets speed to maximum
the ramp’s progress, and returns the motor to
speed.
free run.
• Turns brake off.
Program Up: Sets ramp up rate Specify speed range (F#) AND a start
to #rpm per second and starts speed (S#) before using this command. This
ramp.
command increases the shaft speed at a rate
of #rpm per second.
Sets start or stop speed for
When this command is used with the PD
ramp to #RPM.
command, the controller will ramp down to this
speed and halt. When this command is used
with the PU command, the controller will load
immediately to this speed and ramp up to freerun.
Appendix A: Hardware Commands
A.2.3
Setup Commands
Command
Code
R
RQ1
A.2.4
Magtrol Micro Dyne System
Function
Explanation
Resets as follows:
• Brake OFF.
Resets quadrature counter.
Use this command to cancel any previous
commands.
Use this command to reset torque count to
zero.
Speed Commands
Command
Code
F#
N
N#
ND#
NDS#
NI#
NIS#
NP#
NPS#
Function
Explanation
Sets maximum speed to # rpm. Sets a speed range for the controller. Must
be specified before using the speed or ramp
mode. Sets the range of the PID calculation.
• Resets speed point to
Use this command, sent alone, to reset
maximum speed.
any previous speed-stabilized setting to the
• Sets speed mode OFF.
maximum speed range.
• Sets brake OFF.
• Sets speed point to #.
Use this command to load the motor under
• Sets brake ON.
test to a specific speed value #. Issue a speed
range command (F#) first for best dynamic
response. The controller is functioning with the
dynamometer as a closed loop system. Adjust
the speed PID values to tune the response.
Sets speed derivative to #.
Derivative value (#) can be any number from 0
to 99.
Sets scaling factor.
Values for # are:
A (0.001)
D (0.05)
G (1)
B (0.005)
E (0.10)
H (5)
C (0.01)
F (0.50)
I (10)
Sets speed integral to #.
Integral value (#) can be any number from 0 to
99.
Sets scaling factor.
Values for # are:
A (0.001)
D (0.05)
G (1)
B (0.005)
E (0.10)
H (5)
C (0.01)
F (0.50)
I (10)
Sets speed proportional to #
Proportional gain value (#) can be any number
gain.
from 0 to 99.
Sets scaling factor.
Values for # are:
A (0.001)
D (0.05)
G (1)
B (0.005)
E (0.10)
H (5)
C (0.01)
F (0.50)
I (10)
APPENDICES
40
Appendix A: Hardware Commands
Magtrol Micro Dyne System
A.2.5
Torque Commands
Command
Code
Q
QD#
QDS#
Sets scaling factor.
QI#
Sets torque integral to #.
QIS#
Sets scaling factor.
QP#
Sets torque proportional gain
to #.
Sets scaling factor.
QPS#
Resets any previous torque-stabilized
command, and returns the motor to free run.
Closed-loop command with its own set of PID
parameters. Units are in mN·m.
Derivative value (#) can be any number from 0
to 99.
Values for # are:
A (0.001)
D (0.05)
G (1)
B (0.005)
E (0.10)
H (5)
C (0.01)
F (0.50)
I (10)
Integral value (#) can be any number from 0 to
99.
Values for # are:
A (0.001)
D (0.05)
G (1)
B (0.005)
E (0.10)
H (5)
C (0.01)
F (0.50)
I (10)
Proportional gain value (#) can be any number
from 0 to 99.
Values for # are:
A (0.001)
D (0.05)
G (1)
B (0.005)
E (0.10)
H (5)
C (0.01)
F (0.50)
I (10)
Power Analyzer and Relay Commands
Command
Code
OA1,0
OV1,0
OW1,0
PWR0
PWR1
A.2.7
Explanation
• Resets torque to 0.0.
• Turns torque mode OFF.
• Turns brake OFF.
• Sets torque point to #.
• Turns brake ON.
Sets torque derivative to #.
Q#
A.2.6
Function
Function
Explanation
Reads amps.
Reads volts.
Reads watts.
Switches off the power relay.
Switches on the power relay.
-----------
Miscellaneous Commands
Command
Code
Function
Explanation
Sets current output to #.
SAVE
Saves present configuration of unit
to non-volatile memory.
41
The Micro Dyne power supply outputs a
fixed value of current. Use any value (#)
between 0 and 99.99%. (99.99% = FS).
--APPENDICES
I#
Appendix A: Hardware Commands
A.2.8
Magtrol Micro Dyne System
Calibration Commands
Command
Code
CAL
FSA=X.XXX
FSV=X.XXX
ZERO
GL=xxxx
GR=xxxx
ZL=xxxx
ZR=xxxx
Function
Explanation
Sets current output to #.
Takes the full scale amps reading.
X.XXX is the applied current.
Takes the full scale volts reading.
X.XXX is the applied voltage.
Takes zero reading for both volts
and amps.
Sets average gain after calibration
on left side.
Sets average gain after calibration
on right side.
Sets average of Zero calibration
reading on left side.
Sets average of Zero calibration
reading on right side.
Displays “CALCOMPLETE”
Displays “FSA=X.XXX” prompting the user
to apply zero full scale amps.
Displays “FSV=X.XXX” prompting the user
to apply zero full scale volts.
Displays “ZERO” prompting the user to
apply zero volts and zero amps.
Input, floating point
Input, floating point
Input, floating point
Input, floating point
APPENDICES
42
A
Appendix B: Schematics
B.1
Core Block Diagram
RESET
GA56
GA54
GA52
GA50
GL4
GA46
GA43
GA37
GA36
GA34
GA39
GA41
GA27
GA28
GA19
GA20
GA21
GA22
GA32
GA25
GA9
GA1
GA2
GA3
GA13
GA14
GA15
GA8
2.5V
TP18
CORE BLOCK
3.3V
3.3V
1
3
5
7
9
11
13
15
17
19
21
23
25
27
29
31
33
35
37
39
41
43
45
47
49
51
53
55
57
59
61
63
65
67
69
71
73
75
77
79
JP2
81
83
85
87
89
91
93
95
97
99
101
103
105
107
109
111
113
115
117
119
121
123
125
127
129
131
133
135
137
139
141
143
145
147
149
151
153
155
157
159
82
84
86
88
90
92
94
96
98
100
102
104
106
108
110
112
114
116
118
120
122
124
126
128
130
132
134
136
138
140
142
144
146
148
150
152
154
156
158
160
2
4
6
8
10
12
14
16
18
20
22
24
26
28
30
32
34
36
38
40
42
44
46
48
50
52
54
56
58
60
62
64
66
68
70
72
74
76
78
80
CONN_80PIN_080
SAMTEC# BSE-040-01-F-D-A
GA57
GA55
GA53
GA51
GA49
GA48
GA44
GA42
GA45
GA35
GA38
GA40
GA33
GA26
GA17
GA18
GA29
GA30
GA31
GA23
GA24
GA16
GA10
GA11
GA12
GA4
GA5
GA6
GA7
RAM
128K x 24
RS232
DRIVER
FLASH
1M x 8
SST SST39LF080
3.3V
GSI GS73024AB
3.3V
EEPROM
93C66A
JP1
48 FBGA
119 PBGA
JP2
1
2
3
DSP
MOTOROLA DSP56303GC100
3.3V
XTAL
8 MEG
A
4
FPGA
RESET
TP19
B
ACTEL APA075
2.5V
2.5V REG
144 BGA
196 PBGA
C
JTAG-2
JTAG-1
MT2
MOUNT HOLE .128" DIA
U1
78B212_CORE_DSP_REVB
3.3V
COREV(3.3)
D[D0..D23]
D[D0..D23]
WR
RD
RESET
B
A[A0..A19]
A[A0..A19]
3
D15
D14
D13
D12
D11
D10
D9
D8
D7
D6
D5
D4
D3
D2
D1
D0
A3
A2
4A1
A0
TIO2
TIO1
TIO0
AA2
TP16
1
3
5
7
9
11
13
15
17
19
21
23
25
27
29
31
33
35
37
39
41
43
45
47
49
51
53
55
57
59
61
63
65
67
69
71
73
75
77
79
JP1
2
4
6
8
10
12
14
16
18
20
22
24
26
28
30
32
34
36
38
40
42
44
46
48
50
52
54
56
58
60
62
64
66
68
70
72
74
76
78
80
MODB
MODC
MODD
MODA
RS RXD
RS TXD
3.3V
3.3V
PD1
PD2
PD4
PD5
PC2
PC1
PC4
PC5
PD0
PD3
PC0
PC3
PB11
PB9
PB10
PB6
PB8
PB7
PB5
PB4
PB3
PB2
REV DATE
ECN
REVISIONS
5
RESET
GA56
GA54
GA52
GA50
GL4
GA46
GA43
GA37
GA36
GA34
GA39
GA41
GA27
GA28
GA19
GA20
GA21
DESCRIPTION
GA22
GA32
GA25
GA9
GA1
GA2
GA3
GA13
GA14
GA15
GA8
2.5V
TP18
TP17
JP2
1
81
82 24
3
83
84 6
5
85
86 8
7
87
88 10
9
89
90
11 91
92 12
13 93
94 14
15 95
96 16
17
97
98 18
19
99
100 20
21
101
102 22
23
103
104 24
25
105
106 26
27 107
108 28
29 109
110 30
THIS DRAWING
AND SPECIFICATION
31
32
CONTAINS PROPRIETARY
INFORMATION
111
112
TO MAGTROL
INC. ANY DISCLOSURE
33
34
113 OF THIS
114DOCUMENT
OR REPRODUCTION
35 WRITTEN AUTHORIZATION
WITHOUT
FROM
115
116 36
MAGTROL
37 INC. IS EXPRESSLY PROHIBITED
117
118 38
DRAWN39
BY:
DATE:
119
120 40
41SDS
42
2/22/04
121
122
43 BY:
44
APPROVED
123
124DATE:
45PJ 125
46
126 3/13/06
47 BY:127
48
CHECKED
128DATE:
49DG
50
3/13/06
129
130
51
52
131
132
53
54
133
134
55
56
135
136
57
137
138 58
59 139
140 60
61 141
142 62
63 143
144 64
65 145
146 66
67
147
148 68
69
149
150 70
71
151
152 72
73
153
154 74
75 155
156 76
77 157
158 78
79 159
160 80
CONN_80PIN_080
SAMTEC# BSE-040-01-F-D-A
CONN_80PIN_080
SAMTEC# BSE-040-01-F-D-A
GA57
GA55
GA53
GA51
GA49
GA48
GA44
GA42
GA45
GA35 Magtrol Inc.
GA38 70 Gardenville Pkwy.
GA40 Buffalo NY, 14224
GA33 USA
TITLE
GA26
SCHEMATIC,
GA17 CORE BOARD
GA18
SIZE
CAGE CODE DWG NO.
REV.
GA29
C GA30
78B212
B
03692
GA31
SCALE: NONE
Sheet 1 of 3
GA23
GA24
6
GA16
GA10
GA11
GA12
GA4
GA5
GA6
GA7
TP19
RS232
D
DRIVER
EEPROM
93C66A
JP1
RESET
XTAL
8 MEG
C
MT2
MOUNT HOLE .128" DIA
43
D
APPENDICES
MT1
1
PWM_DRIVE
D15
D14
D13
D12
D11
D10
D9
D8
D7
D6
D5
D4
D3
D2
D1
D0
R14
2.2K
+3.3V
+5V
AC(L) V+
FG
AC(N) V-
DCDC2
RESET
SWITCH PUSH BUTTON
SW1
A3
A2
A1
A0
2
D[D0..D23]
A[A0..A19]
D[D0..D23]
RESET
1
5
2
24V
AC(N) V-
AC(L) V+
DCDC1
3
4
3
4
APPENDICES
44
A[A0..A19]
MT1
MT2
MT3
MT4
MT5
MT6
EARTH
AC(N)
AC(L1)
2
TIO1
C16
2.2UF
1
3
5
7
9
11
13
15
17
19
21
23
25
27
29
31
33
35
37
39
41
43
45
47
49
51
53
55
57
59
61
63
65
67
69
71
73
75
77
79
CPU
TIO1
TIO0
WR_
RD_
PB11
PB9
PB10
PB6
PB8
PB7
PB5
PB4
PB3
PB2
MODD
JP1
+3.3V
USB
R1
10K
2
4
6
8
10
12
14
16
18
20
22
24
26
28
30
32
34
36
38
40
42
44
46
48
50
52
54
56
58
60
62
64
66
68
70
72
74
76
78
80
L4
FERRITE
L3
FERRITE
TP2
TP1
RXE#
TP3
C1
.01
Q3
2N3904
QUAD1_A
QUAD1_B
QUAD1_IND
QUAD RESET 1
J1
CORE BOARD
Q4
2N3904
C4
220UF
10V
CLK
SDOV
SDOA
PVCS
CPU
USB
RS RXD
RS TXD
TXE#
RELAY
R2
10K
+5.0V
L2
FERRITE
L1
FERRITE
GND
JP2
GA4
+3.3V
2
R8
2.2K
+5.0V +24V
TP5
OUT
U1
LT1117
81
83
85
87
89
91
93
95
97
99
101
103
105
107
109
111
113
115
117
119
121
123
125
127
129
GA22
131
133
135
137
GA1
139
GA2
141
GA3
143
145
147
149
151
153
155
157
159
24V COM
3
IN
C2
47UF
35V
24V COM
+24V
8
7
82
84
86
88
90
92
94
96
98
100
102
104
106
108
110
112
114
116
118
120
122
124
126
128
130
132
134
136
138
140
142
144
146
148
150
152
154
156
158
160
PS2702-1
INTERNAL RESISTOR
C17
2.2UF
USB
+24V
CPU
+5V
C7
.1
+3.3V
RESET
C18
2.2UF
+3.3V
(TOP LED)
(BOTTOM LED)
L6
FERRITE
L5
FERRITE
TACH2
LED 1
YELLOW
LED 2
GREEN
LED 3
YELLOW
6
5
3
4
C6
47UF
35V
LED 4
GREEN
DS1
C5
.1
2
1
TP4
C3
2.2UF
1
2
3
4
5
6
7
8
9
10
11
12
USB
DLP-USB245M
BOARD ID
GND
RESET#
RESETO#
GND
3V3OUT
GND
SLEEP
SND/WUP
VCC-IO
EXTVCC
PORTVCC
U2
D0
D1
D2
D3
D4
D5
D6
D7
RD#
WR
TXE#
RXF#
PWM_DRIVE
C15
2.2UF
24
23
22
21
20
19
18
17
16
15
14
13
QUAD1_A
TXE#
RXE#
D[D0..D7]
R12
10K
C9
.047uF
+12V
TACH2
QUAD1_IND
U3
DECUP
+3.3V
R11
1K
D0
D1
D2
D3
D4
D5
D6
D7
C14
0.1uF
+3.3V
QUAD1_B
1A
1B
2A
2B
3A
3B
4A
4B
EN
4
3
2
1
4
Q2
2N3904
R13
10K
+12V
IR2117SPBF
NC
NC
HO
VB
C12
0.1uF
C11
0.1uF
5
6
7
8
D1
DIODE, 1N914
C8
120 pF
VS
2
10
9
14
15
12
+3.3V
2
1
6
7
4
COM
IN
VCC
U4
INVERTER
NC7S14
U6
DS34LV86TM
4Y
3Y
U3B
DS34LV86TM
2Y
1Y
EN
+3.3V
LAST DESIGNATORS USED:
R14, C18, L6
13
11
5
3
U3A
R7
15K
R5
100
R4
100
R3
100
4
3
2
1
24V COM
+24V
SHDN
GND
C1+
C2C2+
Voltage Regulator
VCC
VOUT
C1-
G
1
2
3
P1
U5
LTC1263
R10
3.3 OHMS
C10
.047uF
R6
15K
+3.3V
D
Q1
IRLL110
RELAY
CLK
SDOV
SDOA
PVCS
8
7
6
5
6
5
4
3
2
1
+5.0V
RS232
J4
24V COM
D2
1N5819HW
1A
S
+24V
INDEX /
INDEX
ENCODER A
ENCODER /A
ENCODER B
ENCODER /B
1
9
2
10
3
11
4
12
5
13
6
14
7
15
8
+5.0V
RS TXD
RS RXD
TIO1
RESET
Header 8
1
2
3
4
5
6
7
8
P2
C13
10UF
25V
+5.0V
+12V
1.0 OHMS
1W
50V
R9
17
16
+24V
GATE
24V COM
BANER
J5
WATTMETER INPUT
TO 78P216 BOARD ASSEMBLY
1%
1
3
2
D Connector 15
FEMALE
J3
BRAKE CIRCUIT
BROWN WIRE
WHITE WIRE
BLUE WIRE
+5.0V
BRAKE
FIBER-OPTIC CABLES TO DYNO
B.2
1
1
Appenidix B: Schematics
Magtrol Micro Dyne System
Main SCHEMATIC
45
D
C
B
A
1
J1
J3
30 VOLTS RATING
DESIGN FOR 50
2
1
VOLTAGE SENSE
2 WATTS
1%
R2
0.01 OHMS
2
1
MOTOR POWER IN
Q1
2N3904
NPN
13
4
1
RLY1
9
8
11
6
16
*
C28
.01
C24
.01
C21
.01
2
TP9
TP7
TP5
TP3
5 AMPS RATING
DESIGN FOR 7.5
2
J2
MOTOR POWER OUT
1
C17
.01
5 V IN
2
2
R22
249K
GND A V
C29
120PF
R21
249K
3
R23
15.0K
U2A
OP291
R15
15.0K
R17
249K
C26
.01
1
1
U1A
OP291
R16
249K
C25
120PF
3
2
R11
332K
C19
.01
R3
332K
R9
10.0K
C22
120PF
C18
120PF
R5
10.0K
R10
10.0K
GND A A
R4
10.0K
TP10
TP8
GND A V
5VAV
TP6
TP4
GND A A
C32
.1
1
2
3
4
1
2
3
4
3
NC1
NC2
VIN
NC3
SHDN VOUT
GND
NC4
U6
LT1461AIS8-3
U1B
OP291
U2B
OP291
7
GND
VIN
5
6
8
7
6
5
5
6
8
7
6
5
DCDC2
DCDC NKE
1
2
NC1
NC2
VIN
NC3
SHDN VOUT
GND
NC4
7
OV
GND
R7
10K
GND A V
R24
10K
R19
10K
C30
.01
3 Volts
0 to 3 volts in
C23
.01
3 Volts
0 to 3 volts in
3
4
3
4
GND A A
R12
10K
OV
+V
+V
VIN
DCDC1
DCDC NKE
1
2
U3
LT1461AIS8-3
5 V IN
C31
10UF
5VAA
5 V IN
3
GND A V
C27
2.2UF
5VAV
GND A A
C20
2.2UF
5VAA
C9
10UF
C1
10UF
1
2
3
4
5
6
7
8
1
2
3
4
5
6
7
8
GND
VCC
REF+
REFIN+
INGND
GND
U7
LTC2415
GND
VCC
REF+
REFIN+
INGND
GND
U4
LTC2415
GND
GND
Fo
SCK
SDO
CS
GND
GND
GND
GND
Fo
SCK
SDO
CS
GND
GND
GND D A
C11
.1
5VDA
GND D V
C3
.1
5VDV
4
16
15
14
13
12
11
10
9
16
15
14
13
12
11
10
9
L4
FERRITE
L3
FERRITE
L2
FERRITE
L1
FERRITE
4
TP2
TP1
C4
.1
R26
1K
GND A V
R14
1K
1
2
3
Q2
GND A A
5
4
U1C
OP291
5VAA
GND A V
U2C
OP291
5VAV
Q3
5
4
TINY_LOGIC(NC7SZ14)
1
2
3
3
4
5
3
4
5
C15
.1
C7
.1
PS9115
U10
2
1
5
ECN
-
PS9115
U13
PS9115
PS9115
U12
U11
2
1
PS9115
PS9115
U9
U8
B
2/19/07
REV DATE
5VDV
R25
470
GND D V
5VDV
5VDA
R13
470
3
4
5
3
4
5
C14
.1
C6
.1
5VDA
C13
.1
C5
.1
GND D A
TINY_LOGIC(NC7SZ14)
GND D V
GND D A
GND A A
C12
.1
5VAA
GND A V
GND A A
C10
10UF
C2
10UF
5VAV
5
3
4
5
3
4
5
5 V IN
5 V IN
REVISIONS
RELEASE TO PRODUCTION
DESCRIPTION
2
1
2
1
2
1
2
1
R20
470
R18
470
R8
470
R6
470
1
3
6
13
10
8
9
11
12
MM74HC14M
U5F
MM74HC14M
U5E
MM74HC14M
U5D
MM74HC14M
U5C
MM74HC14M
U5B
MM74HC14M
7/18/06
7/21/06
DATE:
DATE:
SS
DG
CHECKED BY:
06/09/06
DATE:
APPROVED BY:
DG
DRAWN BY:
THIS DRAWING AND SPECIFICATION
CONTAINS PROPRIETARY INFORMATION
TO MAGTROL INC. ANY DISCLOSURE
OR REPRODUCTION OF THIS DOCUMENT
WITHOUT WRITTEN AUTHORIZATION FROM
MAGTROL INC. IS EXPRESSLY PROHIBITED
5
4
2
U5A
L5
FERRITE
RELAY
5 V IN
P1
70 GardenVille Pkwy.
Buffalo NY, 14224
USA
Magtrol
03692
CAGE CODE
6
SCALE: NONE
C
SIZE
Sheet 1
78B216
DWG NO.
of 1
B
REV.
SCHEMATIC,
MICRODYNE, WATT METER INPUT
TITLE
IMPED CHIP, 1K OHM 300mA
L6
FERRITE
TO 78P213 BOARD ASSEMBLY
6
D
C
B
A
DC Wattmeter
APPENDICES
RELAY
2
D1
1N914
1
8
4
8
4
1
2
3
4
5
6
7
8
CLK
SDOV
SDOA
PVCS
IC1
IC2
IC3
IC4
IC5
B.3
R1
1K
1
Magtrol Micro Dyne System
Appenidix B: Schematics
Appendix C: Calibration Record
DATE
DYNAMOMETER
MODEL/SERIAL #
APPLIED
TORQUE
INDICATED
TORQUE
ERROR
TESTER
APPENDICES
46
Magtrol Limited Warranty
Magtrol, Inc. warrants its products to be free from defects in material and workmanship under normal use and service
for a period of twenty-four (24) months from the date of shipment. Software is warranted to operate in accordance
with its programmed instructions on appropriate Magtrol instruments. This warranty extends only to the original
purchaser and shall not apply to fuses, computer media, or any other product which, in Magtrol’s sole opinion, has
been subject to misuse, alteration, abuse or abnormal conditions of operation or shipping.
Magtrol’s obligation under this warranty is limited to repair or replacement of a product which is returned to the
factory within the warranty period and is determined, upon examination by Magtrol, to be defective. If Magtrol
determines that the defect or malfunction has been caused by misuse, alteration, abuse or abnormal conditions of
operation or shipping, Magtrol will repair the product and bill the purchaser for the reasonable cost of repair. If the
product is not covered by this warranty, Magtrol will, if requested by purchaser, submit an estimate of the repair
costs before work is started.
To obtain repair service under this warranty, purchaser must forward the product (transportation prepaid) and a
description of the malfunction to the factory. The instrument shall be repaired at the factory and returned to purchaser,
transportation prepaid. MAGTROL ASSUMES NO RISK FOR IN-TRANSIT DAMAGE.
THE FOREGOING WARRANTY IS PURCHASER’S SOLE AND EXCLUSIVE REMEDY AND IS IN LIEU
OF ALL OTHER WARRANTIES, EXPRESSED OR IMPLIED, INCLUDING BUT NOT LIMITED TO ANY
IMPLIED WARRANTY OF MERCHANTABILITY, OR FITNESS FOR ANY PARTICULAR PURPOSE OR USE.
MAGTROL SHALL NOT BE LIABLE FOR ANY SPECIAL, INDIRECT, INCIDENTAL, OR CONSEQUENTIAL
DAMAGES OR LOSS WHETHER IN CONTRACT, TORT, OR OTHERWISE.
Claims
Immediately upon arrival, purchaser shall check the packing container against the enclosed packing list and shall,
within thirty (30) days of arrival, give Magtrol notice of shortages or any nonconformity with the terms of the order.
If purchaser fails to give notice, the delivery shall be deemed to conform with the terms of the order.
The purchaser assumes all risk of loss or damage to products upon delivery by Magtrol to the carrier. If a product is
damaged in transit, PURCHASER MUST FILE ALL CLAIMS FOR DAMAGE WITH THE CARRIER to obtain
compensation. Upon request by purchaser, Magtrol will submit an estimate of the cost to repair shipment damage.
45
Service Information
Returning Magtrol equipment for Repair and/or Calibration
Before returning equipment to Magtrol for repair and/or calibration, please visit Magtrol’s Web site at
http://www.magtrol.com/support/rma.htm to begin the Return Material Authorization (RMA) process. Depending on
where the equipment is located and which unit(s) will be returned, you will be directed to either ship your equipment
back to Magtrol, Inc. in the United States or Magtrol SA in Switzerland.
Returning Equipment to Magtrol, Inc. (United States)
When returning equipment to Magtrol, Inc.’s factory in the United States for repair and/or calibration, a completed
Return Material Authorization (RMA) form is required.
1.Visit Magtrol’s Web site at http://www.magtrol.com/support/rma.htm to begin the RMA process.
2.
Complete the RMA form online and submit.
3.
An RMA number will be issued to you via e-mail. Include this number on all return documentation.
4.
Ship your equipment to:
Magtrol, Inc.
70 Gardenville Parkway
Buffalo, NY 14224
Attn: Repair Department
5.
After Magtrol’s Repair Department receives and analyzes your equipment, a quotation listing all the necessary
parts and labor costs, if any, will be faxed or e-mailed to you.
6.
After receiving your repair estimate, provide Magtrol with a P.O. number as soon as possible. A purchase
order confirming the cost quoted is required before your equipment can be returned.
Returning Equipment to Magtrol SA (Switzerland)
If you are directed to ship your equipment to Switzerland, no RMA form/number is required. Just send your equipment
directly to Magtrol SA in Switzerland and follow these shipment instructions:
1.
Ship your equipment to:
Magtrol SA
After Sales Service
Centre technologique Montena
1728 Rossens / Fribourg
Switzerland
VAT No: 485 572
2.
Please use our forwarder : TNT • 1-800-558-5555 • Account No 154033
Only ship ECONOMIC way (3 days max. within Europe)
3.
Include the following documents with your equipment:
• Delivery note with Magtrol SA’s address (as listed above)
• Three pro forma invoices with:
•Your VAT number
•Value - for customs purposes only
• Description of returned goods • Origin of the goods (in general, Switzerland)
• Noticed failures
4.
A cost estimate for repair will be sent to you as soon as the goods have been analyzed. If the repair charges
do not exceed 25% the price of a new unit, the repair or calibration will be completed without requiring prior
customer authorization.
46
Testing, Measurement and Control of Torque-Speed-Power • Load-Force-Weight • Tension • Displacement
Magtrol Inc
70 Gardenville Parkway
Buffalo, New York 14224 USA
Phone: +1 716 668 5555
Fax: +1 716 668 8705
E-mail: [email protected]
Magtrol SA
Centre technologique Montena
1728 Rossens / Fribourg, Switzerland
Phone: +41 (0)26 407 3000
Fax: +41 (0)26 407 3001
E-mail: [email protected]
www.magtrol.com
Subsidiaries in:
• Germany
• France
• Great Britain
• China
Worldwide Network
of Sales Agents