1
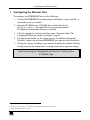
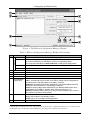
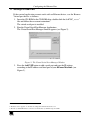
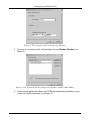
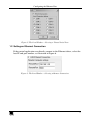
Kramer Electronics, Ltd.
ETHERNET Configuration
(FC-11)
GUIDE
Contents
Contents
1
1.1
1.2
Configuring the Ethernet Port
Setting a Virtual Port
Setting an Ethernet Connection
1
3
5
Figures
Figure 1: The Ethernet Configuration Manager Window
Figure 2: The Virtual Serial Port Manager Window
Figure 3: The Virtual Serial Port Properties Window
Figure 4: The Virtual Serial Port Properties Window (COM 3 and COM 4)
Figure 5: The Port Window – Selecting a Virtual Serial Port
Figure 6: The Port Window – Selecting a Remote Connection
2
3
4
4
5
5
Tables
Table 1: Ethernet Configuration Manager Window Functionality
2
i
Configuring the Ethernet Port
1
Configuring the Ethernet Port
To configure the ETHERNET port, do the following:
1. Connect the ETHERNET port and configure the Ethernet card on your PC, as
described in your user manual.
2. Insert the CD-ROM in the CD-ROM drive, double click the Set
Setfc11eth_confxx.exe1 file and follow the on-screen instructions2.
The Ethernet Configuration Manager is installed.
3. Click the appropriate shortcut in the Start menu’s Programs folder. The
Configuration Manager window (see Figure 1) opens.
4. Click the Search button3 (or the Action menu’s, Search Board command).
The MAC Address for the found ETHERNET port appears in the Device List.
5. Change the settings according to your network requirements and then click the
Config button (or the Action menu’s, Config command) to apply the settings.
Note that clicking the Config button will alter the IP settings of the
ETHERNET port
1 File names are liable to change from time to time
2 The latest version appears on our Web site at http://www.kramerelectronics.com
3 To automatically search for devices
1
Configuring the Ethernet Port
Figure 1: The Ethernet Configuration Manager Window
Table 1: Ethernet Configuration Manager Window Functionality
#
Menu bar
1
Feature
File
Function
The Exit command closes the Configuration Manager application
Action
Set MAC1
The Search Board command seeks the Kramer Machine device that connects to the
PC via the ETHERNET port, and displays it and its corresponding settings;
The Config command adjusts the Kramer Machine according to the displayed data
For factory use only (click the Password command to enter the password)
About
Displays software information, including the software version
2
3
4
5
6
Device List
Progress Bar
Status Bar
Version
Device Network
Settings Area
7
Action Buttons
8
Exit Button
Displays the MAC Address
Shows the progress
Shows the status
Displays the firmware version
DHCP1 Mode Check Box: When selected, configures the Ethernet port to obtain an IP
address automatically from the DHCP server. When cleared, manual configuration of
the Ethernet port is required to obtain an IP address (Static IP)
IP Address: A 32-binary digit number obtained from your Network Administrator that
identifies the Ethernet port that is currently being configured
Subnet: A 32-binary digit number obtained from your Network Administrator, which
combined with the IP Address, identifies which network your device is on
Gateway: A network position serving as an entry to another network or to the Internet
(only relevant in the Active Routing mode)
Search: seeks the devices that connect to the PC via the ETHERNET port, and
displays them and their corresponding settings
Config: adjusts the according to the displayed data
Closes the Configuration Manager application
1 Dynamic Host Configuration Protocol - Allows the network administrator to distribute IP addresses from a central point and
automatically send a new IP address when an Ethernet point is plugged into a different network location
2
KRAMER: SIMPLE CREATIVE TECHNOLOGY
Configuring the Ethernet Port
1.1 Setting a Virtual Port
If the control application cannot work with an Ethernet driver, use the Kramer
Virtual port driver as follows:
1. Insert the CD-ROM in the CD-ROM drive, double click the SetKVSP_xx.exe1
file and follow the on-screen instructions2.
The virtual serial port is installed.
2. Run the Virtual Serial Port Manager Application.
The Virtual Serial Port Manager window appears (see Figure 2).
Figure 2: The Virtual Serial Port Manager Window
3. Press the Add VSP button to add a serial port and type the IP settings
according to the IP address and local port of your Kramer Machine3 (see
Figure 3).
1 File names are liable to change from time to time
2 The latest version appears on our Web site at http://www.kramerelectronics.com
3 The factory default IP address is 192.168.1.39 and the factory default local port is 5000
3
Configuring the Ethernet Port
Figure 3: The Virtual Serial Port Properties Window
4. You can set a virtual port for each local port on your Kramer Machine (see
Figure 4).
Figure 4: The Virtual Serial Port Properties Window (COM 3 and COM 4)
5. In the control application, choose the COM-port connection according to your
virtual serial port connections (see Figure 5).
4
KRAMER: SIMPLE CREATIVE TECHNOLOGY
Configuring the Ethernet Port
Figure 5: The Port Window – Selecting a Virtual Serial Port
1.2 Setting an Ethernet Connection
If the control application can directly connect to the Ethernet driver, select the
host IP and port number, as illustrated in Figure 6.
Figure 6: The Port Window – Selecting a Remote Connection
5