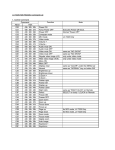
1
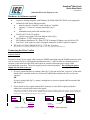
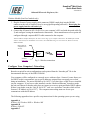
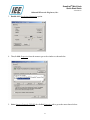
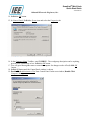
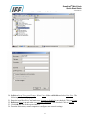
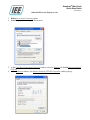
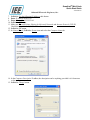
ScanVue5® Mini Kiosk
Quick Start Guide
37681 Rev E
Industrial Electronic Engineers, Inc.
Quickstart Guide
For Scanvue5
Models
ScanVue5 with color LCD
ScanVue5 with VFD
ScanVue Value+ with Blue/White LCD
ScanVue Value+ with VFD
1
ScanVue5® Mini Kiosk
Quick Start Guide
37681 Rev E
Industrial Electronic Engineers, Inc.
TABLE OF CONTENTS
Introduction ......................................................................................................................3
Hardware & Software required......................................................................................4
Connecting the Price Verifier .........................................................................................4
Ethernet Models.................................................................................................................................... 4
Wireless Models (ScanVue5 models only)........................................................................................... 5
Installing ScanVue5 Demo Software ..............................................................................6
Starting the ScanVue5 Demo Program..........................................................................6
Verifying Network Connectivity.....................................................................................7
Changing Scanvue5 Settings ...........................................................................................7
Factory default network settings ....................................................................................8
Appendix A .....................................................................................................................10
Configure the IP Address on your Laptop (Win98/SE/ME) ............................................................... 10
Appendix B .....................................................................................................................12
Configure the IP Address on your Laptop (Windows 2000)............................................................... 12
Appendix C .....................................................................................................................18
Configure the IP Address on your Laptop (Windows XP).................................................................. 18
2
ScanVue5® Mini Kiosk
Quick Start Guide
37681 Rev E
Industrial Electronic Engineers, Inc.
Introduction
This guide documents a step-by-step procedure for setting up and demonstrating a ScanVue price
verifier on a local desktop or laptop computer. The network settings of your computer must be
changed so that it can communicate with a factory default ScanVue5. If you need to set your
computer back to its original settings, note down all the original settings before you make the
changes. If your computer is already setup to operate on a private company network we suggest
you talk to your IT group before performing this procedure.
Each version of the Windows operating system (98/SE/ME, 2000, XP) has its own appendix with
specific setup instructions for its network settings.
ScanVue5 comes from the factory with either ‘Ethernet only’ or ‘RF ready’ option (Ethernet plus a
socket for a Wi-Fi radio). Some early units were manufactured ‘RF only’ without an Ethernet
connection. These are no longer built, however the Wireless section covers setting them up. They
can be run by replacing the hub in Fig 2 with an access point. The procedure for setting up an
access point is not covered in this document.
Κ We recommended using the Ethernet connection during this setup.
Several programs will be installed on your computer that allow you to demonstrate the capabilities
of Scanvue5 and configure the unit for your network, making use of the tools and utilities provided
on the SDK CD-ROM. These programs are used to get Scanvue operational—that is connected to
your computer or used for off-line configuration of production units or to demonstrate using it
when connected to a server.
The utility and setup programs are on a CD-ROM supplied with ScanVue. An image of the CDROM programs is also available on the IEE FTP website. Appendix J of the ScanVue User Guide
has instructions how to download any or all of these programs.
3
ScanVue5® Mini Kiosk
Quick Start Guide
37681 Rev E
Industrial Electronic Engineers, Inc.
Hardware & Software required
♦
♦
♦
♦
♦
♦
♦
Laptop or desktop computer with Windows 98/SE/Me/2000/XP (Win95 is not supported)
Hardwired or RF Ready Ethernet models:
♦
network interface card (NIC card) with driver1 installed.
♦
category 5 “crossover” network patch cable (fig 1)
OR
♦
standard network patch cable and hub (fig 2).
Wireless 802.11b Wi-Fi models:
♦
wireless access point (AP) with Ethernet cable (fig 3)
MS Windows TCP/IP1 network protocol.
MS Windows installation CD. When TCP/IP is changed, Windows may ask for the CD
ScanVue5. If the model you have has pigtail connectors, an RJ45 coupler is required.
IEE ScanVue5 SDK CDROM (IEE P/N 37720 Rev D or later)
1
If these items are not already installed on your computer, have your IT dept install them for you.
Connecting the Price Verifier
Ethernet Models
Plug the Scanvue5 power supply cable connector (DIN8F round plug) into the DIN8M connector at the
rear of Scanvue5 (may be on a pigtail depending on model). Value+ models are normally powered
from the system network cable (PoE) and require an external wall mount power supply when
performing this procedure. The power supply must be ordered separately. Do not plug the power
supply into the wall socket yet.
1. If you are connecting directly without a hub (fig 1), plug one end of the “crossover” patch cable
into the RJ45 connector at the rear of Scanvue5 and the other end into the NIC card in your
computer
OR
If you are using a hub (fig 2), connect a straight (not a crossover) patch cable between the hub
and ScanVue5.
2. If your ScanVue has a pigtail with an RJ45 connector, use the RJ45 coupler provided to
connect the network patch cable to the pigtail.
Κ If a radio is installed, the bootup sequence automatically selects it and configures the unit for wireless. If your Scanvue has
a radio installed you must scan the barcodes WN0000 (hardwired Ethernet) and KQ0001 (Save and Reboot) after you plug the
unit in to prevent it continuously looking for an access point.
Other
device
Laptop
Laptop
ScanVue5
Hub
Computer
Computer
ScanVue5
Crossover
patch cable
Straight
patch cable
Fig 1—direct connection
Fig 2—hub connection
4
ScanVue5® Mini Kiosk
Quick Start Guide
37681 Rev E
Industrial Electronic Engineers, Inc.
Wireless Models (ScanVue5 models only)
3. Plug the Scanvue5 power supply cable connector (DIN8F round plug) into the DIN8M
connector at the rear of Scanvue5 (may be on a pigtail depending on model). Do not plug the
power supply into the wall socket yet.
4. Connect the AP (must be 802.11b Wi-Fi) to your computer’s NIC card with the patch cable (fig
3) and configure it using the manufacturers instructions. Most manufacturers access points are
configured through a separate RS232 cable connected to the computer.
Κ The IP Address and Input Mask of the AP must be in the range of your computer and Scanvue. The ESSID of the AP and
Scanvue must match (note: the ESSID is case sensitive). Recommended settings are: IP=10.0.10.13, Mask=255.255.0.0,
ESSID=INSTALL
RS232 cable for
configuration of
AP only
Laptop
Computer
Standard
patch cable
Wireless
Access
Point
Wireless
ScanVue5
Fig 3—Wireless connection
Configure Your Computer’s Networking
Barcodes required for unit reconfiguration can be printed from the “barcodes.pdf” file in the
documentation directory of the SDK CD-ROM.
Your computer will be configured as a network server with one client. Scanvue5 comes factory set
for DHCP as this is an automatic way to get IP addresses assigned from a network server when
doing an installation. The unit will default to 10.0.0.227 if you don’t have a DHCP server installed
on your computer. If you have a radio installed, scan the “hardwired Ethernet” barcode to make
the unit use Ethernet so that the radio does not connect to an access point and find a DHCP address.
If there is any doubt, scan the “Unit IP 10.0.0.227” and “save and reboot” barcodes which will set
Scanvue’s IP Address to [10.0.0.227]. The computers networking must now be set up to
communicate with this IP address.
The following appendixes have specific setup instructions for the operating system you are using.
Appendix A
Windows 98, Windows 98SE or Windows ME
Appendix B
Windows 2000/NT.
Appendix C
5
ScanVue5® Mini Kiosk
Quick Start Guide
37681 Rev E
Industrial Electronic Engineers, Inc.
Windows XP.
Installing ScanVue5 Demo Software
1. When your computer has finished booting insert the ScanVue5 SDK CDROM.
2. Open Windows Explorer and click on the SDK CDROM icon to view the files.
3. Dclick on SetupServer.exe—the install program will start. Accept the default directory [C:\POS].
The installation program will copy all the necessary programs to run and demonstrate Scanvue5’s
capabilities into that directory.
4. Dclick on UnitConfig.exe—the install program will start. Accept the default directory
[C:\IEE\UnitConfig] The installation program will copy the UnitConfig program into that
directory. UnitConfig is a server based tool for making configuration changes to Scanvue5.
Scanvue5 must be running on the network before it can be used.
5. Dclick on the C:\POS folder to open it. Rclick on Demoserv.exe and dclick Create Shortcut from
the pop up menu. Drag the shortcut to the desktop.
6. Dclick on the C:\IEE\UnitConfig folder to open it. Rclick on UnitConfig.exe and dclick Create
Shortcut from the pop up menu. Drag the shortcut to the desktop.
7. Rclick on C:\POS folder and when the pop up box appears Lclick Properties
8. In the pos Properties box, Lclick the Sharing tab and in the window click the Shared As radio
button. POS will appear in the text box.
9. Lclick the Apply button and click Yes on the Sharing message that appears. A new window Add
Users will appear. Select The World and Lclick the OK button
10. Close the window and close Explorer.
Starting the ScanVue5 Demo Program
Κ demoserv must be running before Scanvue5 is powered up.
11. Restart the computer
12. Dclick the Demoserv icon—the program will load
13. Plug Scanvue5’s power supply ‘brick’ into a power outlet. Scanvue will start booting.
ΚThe screens are yellow characters on a blue background if the unit is set to hardwired Ethernet and black characters on a
green background if set to wireless.
6
ScanVue5® Mini Kiosk
Quick Start Guide
37681 Rev E
Industrial Electronic Engineers, Inc.
Using the Demo Programs
Demoserve (for Scanvue with V6.x software)
Demoserve emulates a server price-lookup table on your computer that exactly duplicates what an
operating networked ScanVue5 running V6.x software will do. Demoserve works for both LCD
and VFD displays. Two sets of barcodes are provided one for LCD displays and one for VFD
displays. LCD barcodes which display multicolor images are ignored by VFD display units.
LCD displays—two status screens showing the unit settings will display for 5 seconds followed by
the IEE logo and then the clock slideshow will load and continuously display.
VFD display units, three status screens showing the unit settings will display for 5 seconds
followed by “Welcome to Century” then “Scan Your Item Here” which continuously displays until
a barcode is scanned.
Webserve (for Scanvue with web browser software)
Webdemo is a demonstration webserver application for Scanvue running V7.15 browser software.
The browser software runs only on LCD display units. When Scanvue boots, two status screens
showing the unit settings will display for 5 seconds followed by the IEE logo and then the browser
screen. The factory default home page URL setting will direct it to the Webdemo where it will
load the home page. Scanning the demo LCD barcodes will load item pages that correspond to the
items scanned.
Verifying Network Connectivity
Scanvue may not be connected to your computer if 1) the clock slideshow doesn’t load and run on
an LCD display unit 2) a VFD unit doesn’t respond to a demo barcode scan with the correct
price/description 3) the home page doesn’t load on a browser unit.
" If you are trying to connect on an existing network rather than a stand alone computer as show, you must make sure the IP Address
assigned to ScanVue is unique. If you pick an IP that is already being used the unit will not work.
Check connectivity by PINGing Scanvue (default IP Address 10.0.0.227) from your computer by
opening a DOS box and entering the command PING 10.0.0.227 at the commend prompt. If
Scanvue doesn’t respond to the PING, it isn’t connected and there is a problem in your cabling or
network setup.
Connectivity can also be verified by running UnitConfig (see Changing ScanVue5 Settings below)
Changing Scanvue5 Settings
" This program will not run if ScanVue5 isn’t network connected to your computer or server.
" It is not normally necessary to run this program or make any setting changes to use the demo programs
7
ScanVue5® Mini Kiosk
Quick Start Guide
37681 Rev E
Industrial Electronic Engineers, Inc.
1. Dclick on the desktop shortcut to UnitConfig. The program will load. Scanvue5 must be
connected to the network to use UnitConfig
2. When the program first starts all boxes are blank. Enter the IP Address of the Scanvue5 unit in the
Unit IP Address box.
3. Lclick the Read Modes button—all the Modes and their Contents (values) will be read from the
unit and displayed in the table. See the User Manual in the Documentation directory on the
CDROM for details of the modes and their use.
4. To change a parameter, click on the New Content box in the same row as the parameter you want
to change. Enter the new value in the box and click the Set Mode button. If the value is accepted,
the box and button will turn green (if it is not accepted, the box and button will turn red). Click on
the Commit button to save the change to flash memory in the ScanVue unit (multiple changes can
be made before clicking the commit button). After committing the changes, click on Restart
Unit. The ScanVue unit will reboot with the new parameters.
Factory default network settings
IP Address:
Sub-Net Mask:
Unit ID:
Username:
Windows Server:
Password:
Windows Share:
10.0.0.227
255.255.0.0
ScanVue5
Guest
SVSERVE
None
POS
8
ScanVue5® Mini Kiosk
Quick Start Guide
37681 Rev E
Industrial Electronic Engineers, Inc.
9
ScanVue5® Mini Kiosk
Quick Start Guide
37681 Rev E
Industrial Electronic Engineers, Inc.
Appendix A
Configure the IP Address on your Laptop (Win98/SE/ME)
Κ Note: Lclick—means left mouse button: Rclick—means right mouse button; Dclick—means double click left mouse button.
Bold means an action; italic means a name
1.
2.
3.
4.
Lclick Start, Settings, Control Panel
Dclick Network icon—Network window pops up
Lclick Configuration tab
In the text box Lclick TCP/IP
5. Lclick Properties button—TCP/IP Properties pops up
10
ScanVue5® Mini Kiosk
Quick Start Guide
37681 Rev E
Industrial Electronic Engineers, Inc.
6. Lclick IP Address tab
7. Lclick Specify an IP Address
8. Enter IP Address 10.0.10.13
9. Enter Subnet Mask 255.255.0.0
10. Lclick OK button
11. Lclick File and Printer Sharing button
12. Lclick both option boxes—boxes will be checked.
13. Lclick OK button
14. Lclick Identification tab on Network window
15. Enter SVSERVE in Computer Name. Anything can be
in Workgroup and Computer Description provided it is
8 characters or less , no spaces
16. Lclick Access Control tab
17. Lclick Share level access control button
18. Lclick OK button—returns to Control Panel
19. Lclick X to close Control Panel
20. Restart computer to configure new network settings
11
ScanVue5® Mini Kiosk
Quick Start Guide
37681 Rev E
Industrial Electronic Engineers, Inc.
Appendix B
Configure the IP Address on your Laptop (Windows 2000)
Κ Lclick—means left mouse button: Rclick—means right mouse button; Dclick—means double click left mouse button.
Bold means an action; italic means a name.
1. Lclick Start, Settings, Control Panel.
2. Dclick Network and Dial-up Connections icon—The window below pops up.
12
ScanVue5® Mini Kiosk
Quick Start Guide
37681 Rev E
Industrial Electronic Engineers, Inc.
3. Double click Local Area Connection option.
4. Then, Lclick Properties from the menu to get to the window as shown below.
5. Select Internet Protocol (TCP/IP) then Lclick Properties tab to get to the menu shown below.
13
ScanVue5® Mini Kiosk
Quick Start Guide
37681 Rev E
Industrial Electronic Engineers, Inc.
6. Lclick the Use the following IP Address radio button.
7. Enter IP Address 10.0.10.13.
8. Enter Subnet Mask 255.255.0.0.
9. Lclick the Use the following DNS Server Addresses radio button.
10. Enter Prefered DNS Server 10.0.10.13.
11. Lclick Advanced and check all the following settings to match.
14
ScanVue5® Mini Kiosk
Quick Start Guide
37681 Rev E
Industrial Electronic Engineers, Inc.
12. Lclick the OK button until the window shown below is reached.
13. Make sure File and Printer Sharing for Microsoft Networks and Internet Protocol (TCP/IP)
CheckBoxes are checked (Lclick to check).
15
ScanVue5® Mini Kiosk
Quick Start Guide
37681 Rev E
Industrial Electronic Engineers, Inc.
14. Lclick the OK button.
15. In Control Panel, Dclick the System icon and select the Properties tab.
16. In the Computer Name TextBox, enter SVSERVE . The workgroup description can be anything,
provided it is 8 characters or less. Lclick the OK button.
17. You will get a MessageBox note to restart the computer for changes to take effect, Lclick OK
button.
18. Lclick OK button until the Control Panel window is shown.
19. Double Click Administrative Tool from Control Panel. In the next window, Double Click
Computer Management.
16
ScanVue5® Mini Kiosk
Quick Start Guide
37681 Rev E
Industrial Electronic Engineers, Inc.
20. Lclick on Local Users and Groups. Select Users folder and Rclick and select New User. The
following window will pop up.
21. Enter the word RealScan5 and make sure Account is disabled is not checked. Click on Create.
22. Dclick on Guest icon and make sure Account is disabled is not checked. Click on Create.
23. Click OK and exit all the open windows.
24. From the Start menu, restart computer to configure new network settings.
17
ScanVue5® Mini Kiosk
Quick Start Guide
37681 Rev E
Industrial Electronic Engineers, Inc.
Appendix C
Configure the IP Address on your Laptop (Windows XP)
Κ Lclick—means left mouse button: Rclick—means right mouse button; Dclick—means double click left
mouse button. Bold means an action; italic means a name.
1. Lclick Start, Settings, Control Panel.
2. Dclick Network Connections icon—Network Connections window pops up.
18
ScanVue5® Mini Kiosk
Quick Start Guide
37681 Rev E
Industrial Electronic Engineers, Inc.
3. Rclick Local Area Connection option.
4. Lclick Properties from the pull–down menu.
5. In the Local Area Connection Properties window, select the General tab, Lclick Internet Protocol
(TCP/IP).
6. Lclick Properties button—the Internet Protocol (TCP/IP) Properties window pops up.
19
ScanVue5® Mini Kiosk
Quick Start Guide
37681 Rev E
Industrial Electronic Engineers, Inc.
7. Lclick the Use the following IP Address radio button.
8. Enter IP Address 10.0.10.13.
9. Enter Subnet Mask 255.255.0.0.
10. Lclick the OK button.
11. Make sure File and Printer Sharing for Microsoft Networks and Internet Protocol (TCP/IP)
CheckBoxes are checked (Lclick to check).
12. Lclick the OK button.
13. In Control Panel, Dclick the System icon and select the Computer Name tab.
14. In the Computer Description TextBox, the description can be anything, provided it is 8 characters
or less , no spaces.
15. Lclick the Change button.
20
ScanVue5® Mini Kiosk
Quick Start Guide
37681 Rev E
Industrial Electronic Engineers, Inc.
16. Enter SVSERVE in Computer Name, anything can be in Workgroup, provided it is 8 characters or
less , no spaces.
17. Lclick OK button in Computer Name Changes.
18. You will get a Message Box note to restart the computer for changes to take effect, Lclick OK
button.
19. Lclick OK button in System Properties.
20. You will get an Input Box note asking to restart the computer now, Lclick No button.
21. In Control Panel, Dclick the User Accounts icon.
22. If the Guest icon says Guest account is on, go to step 29.
23. Or, if the Guest icon says Guest account is off, Lclick the icon.
24. Lclick the Turn On the Guest Account button.
21
ScanVue5® Mini Kiosk
Quick Start Guide
37681 Rev E
Industrial Electronic Engineers, Inc.
25. Close the User Accounts window, you are done.
26. Re-start computer to configure new network settings
22