1
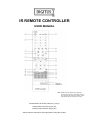
IR REMOTE CONTROLLER
USER MANUAL
Note: Please peel off the sticker before application.
The lower part for PTZ IP camera sticks a sticker
with a protective film. Remove the sticker, and the
protective film will soon be taken away easily.
Control buttons for PTZ IP Camera: (1) to (8).
Control buttons for NVR: (9) to (19).
OTHER control buttons: (20) to (22).
Please read the instructions thoroughly before using this product.
FEATURES
1.
2.
3.
IR emission distance: straight line is 10m; transmit at left and right angle of 22.5° is 8m
Enables different IDs
Current consumption: AAA size battery × 2*
OPERATIONS
PTZ IP CAMERA
1)
Auto
Press this button to enter the auto pan mode of the PTZ IP camera.
2)
Preset:
Press to set the preset points of the PTZ IP camera.
Press “◄“ / “►“ to move the cursor.
Press the “ENTER” button to enter the submenu, and confirm the selection.
Press the “Camera Menu” button to enter the menu mode, confirm the change and exit the menu
mode.
3)
GoTo
Press the button to go to the preset point of the PTZ IP camera.
4)
Menu
In the PTZ IP camera control mode, press this button to enter the main menu of the PTZ IP camera.
5)
Zoom max /
Press the “
Press the “
” button, and the image of the PTZ IP camera will be zoomed in to the maximum size.
” button, and the image of the PTZ IP camera will be zoomed out to the minimum size.
Zoom + /
6)
Zoom min
Zoom –
Use these buttons to adjust the optical zoom in / out ratio of the PTZ IP camera.
Focus Near /
7)
Focus Far
Click to adjust the focus of the image.
8)
IRIS /
IRIS
This two buttons are designed for the PTZ IP camera which uses Pelco-D to control. IRIS LEVEL is
to adjust the aperture size of your lens based on different light conditions. The larger the value, the
larger the aperture size.
NVR
9)
ID (This function is available only when the NVR supports.)
To allow this controller to control two or several NVRs, assign an IR ID in your NVR for IR remote
control first. Then, press & hold this button, and enter the IR ID set in your NVR (ex. 002). Later,
press “ENTER”.
10)
Audio channel selection
Press to select the live or playback sound of the audio channels.
11) Digital zoom
Press to enlarge the image of the selected NVR channel (2X zoom). And press again to exit.
12) SEQ.
Press to activate the full sequence mode, and press again to exit.
13) List
Press to quickly search the recorded files by four event lists: RECORD LIST / MOTION LIST /
ALARM LIST / SYSTEM or TIMER LIST, or select FULL LIST to show all the event logs.
To quickly search the time you want, select “QUICK SEARCH”. Select the log you want, and press
“ENTER” to play the selected file.
14) NVR Menu
Press to enter the main menu of the NVR.
15)
(Up) /
(Down) /
(Left) /
(Right) /
(Enter)
Press one of the direction buttons, “ ”, “ ”, “ ” or “ ”, to move the cursor up / down / left / right,
or control the movement of the PTZ IP camera.
Press “
” to confirm the selection / enter a submenu mode.
(Slow Playback)
16) ■ (Stop) /
Under the video playback mode:
Press “■” to stop the video playback, and return to the live mode of the NVR.
Press “
” to slow down playback the playback file.
17) ◄◄ (Fast rewind) / ►► (Fast forward)
Under the video playback mode:
Press “◄◄” to rewind the playback file.
Press “►►” to forward the playback file.
18) ► (Play) /
(Pause)
Under the video playback mode, press to start playing the latest recorded file.
Press “ ” to pause the video playback, and press again to resume.
19) Channel Selection Buttons
Press “
”, “
”, “
”, or “
” button to select the 16 / 9 / 6 / 1 channel display mode.
OTHERS
20) Power
Press “POWER” to turn off the power of NVR.
21) NVR / CAM
In the NVR control mode, press this button and the channel number that the PTZ IP camera is
connected to control the PTZ IP camera.
22) Number selection buttons
Press these numbering selection buttons to select numbers / to select the channel.