1
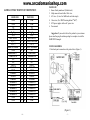
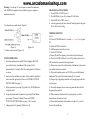
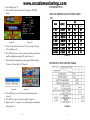
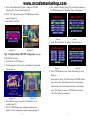
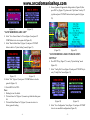
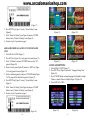
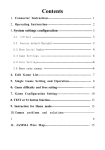
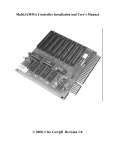
www.arcadomaniashop.com
CATALOG
1. FEATURE INTRODUCTION……………………………….2
2. PARTS LIST………………………………………………….3
3. SYSTEM ASSEMBLY……………………………………….3
4. SYSTEM OPERATION………………………………………4
5. SYSTEM SETTING………………………………………….5
6. COIN AND CREDIT VALUE SETTING TABLE…………...5
7. SYSTEM FUNCTION SETTING TABLE…………………...5
8. GAME LIST HIDE/SHOW…………………………………...5
9. SAVE MODIFIED GAME LIST……………………………...8
10. ONE GAME BUSINESS MODE……………………………..8
11. DELETE GAME FROM GAME LIST……………………….9
12. ADD GAMES FROM ALL GAME LIST
TO ONE OF GAME LISTS…………………………………….10
13. LANGUAGE SETTING……………………………………....11
14. NEW GAMES UPDATE……………………………………...11
15. GAME CONFIGURATION SETTING…….…………………11
Type 1: Original setting is on screen setting mode……………...11
SAVE MODIFIED GAME CONFIGURATION SETTING…... 13
Type 2: Original setting is DIP SW setting mode…………….…14
Type 3: Special setting mode…………………………………....15
16. CHANGE 2P or 4P PLAY MODE…………………………......16
17. TROUBLE SHOOTING……………………………………….17
18. JAMMA CONNECTOR PIN OUT DEFINITION…………….18
-1-
www.arcadomaniashop.com
GAMES FAMILY USER MANUAL
Thank you for purchasing this product. For your convenient to
understand this system operation, we hope you read this manual detail.
FEATURE INTRODUCTION:
1. Protect JAMMA I/O from damage of incorrect connection
2. Use Intel G31 motherboard, Celeron Daul-Core CPU, 1G DDRⅡ
memory.
3. Installed multi game emulators software.
4. Allow coins inserted before game selection.
5. After power on player can insert coin at any time
6. Support 4 people play mode.
7. Support one game / multi games business mode.
8. Support 3D games.
9. Support video mode: VGA (31KHZ).
10. Support two-channel stereo audio.
11. Faster I/O response and more stable system operation.
12. Classified all games to Stage, Flying/Shooting, Wrestle/Fighting,
Maze/Puzzle, Adult, Sport, Misc./Others, and Special/Classical
game list.
13. Each game list can be hided or showed.
14. Each game in list can be deleted or called back.
15. Support simple Chinese and English.
16. Game configurations are adjustable.
17. Support coin counter.
18. Set all games coin and credit value by one DIP SW.
19. Support new games update.
-2-
www.arcadomaniashop.com
JAMMA CONNECTOR PIN OUT DEFINITION:
SOLID SIDE
GND
GND
+5V
+5V
N.C.
+12V
KEY NO PIN
N.C.
N.C.
RIGHT SPEAKER
GND
VIDEOGREEN
VIDEO SYNC
N.C.
N.C.
COIN 2
2P START
2P UP
2P DOWN
2P LEFT
2P RIGHT
2P SHOOT 1
2P SHOOT 2
2P SHOOT 3
2P SHOOT 4
2P SHOOT 5
GND
GND
A
B
C
D
E
F
H
J
K
L
M
N
P
R
S
T
U
V
W
X
Y
Z
a
b
c
d
e
f
1
PART SIDE
GND
2
3
4
5
6
7
8
9
10
11
12
13
14
15
16
17
18
19
20
21
22
23
24
25
26
27
28
GND
+5V
+5V
N.C.
+12V
KEY NO PIN
COIN COUNTER
N.C.
LEFT SPEAKER
N.C.
VIDEO RED
VIDEO BLUE
N.C.
N.C.
COIN 1
1P START
1P UP
1P DOWN
1P LEFT
1P RIGHT
1P SHOOT 1
1P SHOOT 2
1P SHOOT 3
1P SHOOT 4
1P SHOOT 5
GND
GND
PARTS LIST:
1. Games Family mainboard. (Double deck).
2. 3&4p connector board with a Cable wire.
3. A/V wires. (8 wires for 3&4P audio and video input).
4. 5 line wires. (For 1P&2P shooting button 5th& 6th).
5. ATX power supplier with an AC power wire.
6. User manual.
Suggestion: If you need to deliver this product to your customer
please mind keeping the cushion package box complete to avoid the
HARD DISC damaged.
SYSTEM ASSEMBLY:
1. Finish each parts connection as the picture below (Figure 1):
(Figure 1)
- 18 -
-3-
www.arcadomaniashop.com
Warning: Use a wrong A.C. power input or connect the mainboard
with JAMMA slot opposite direct would destroy power supplier or
mainboard seriously.
SYSTEM OPERATION:
1. Switch on machine power and ATX Power Supplier (DO NOT
press switch bottom of mainboard. The system will start
automatically in 3 seconds). After 90 seconds game list will shows
on screen
2. Insert coins first and than select game. (It also could be adjusted to
insert coins after game select. Please see SYSTEM FUNCTION
SETTING TABLE on page 5.)
3. Select game name by moving 1P joystick. Press 1P Start Button to
start game mode.
4. Escape from game mode to game list by pressing 1P Start Button
(or pressing 1P start and A button, Please see SYSTEM
FUNCTION SETTING TABLE on page 5.) for 3 seconds.
5. Change game list by pressing 1P button A or B.
CHANGE 2P or 4P PLAY MODE:
1. Switch ON bit 4 of SW2 (Figure 3).
2. Press MODE key (Figure 28) to change 2P or 4P mode.
3. Switch OFF bit 4 of SW2 (Figure 3).
4. enter any game and play once then exit from the game to the game
list ,It will save the setting
.
TROUBLE SHOOTING
Q & A:
Q: Pressed 1P START button for 3 seconds, also can’t back to game
list.
A: Switch off SW2 bit 4 and bit 3.
Q: 3&4P connector board doesn’t work.
A: Switch ON SW2 bit4.
Q: During 3P and 4P are playing, video mode always be changed.
A: Check bit 4 of SW2 whether it’s set at ON position, please set it at
OFF position after corrected video output mode.
Q: After power on, press the switch bottom of mainboard, system can’t
start and the fan have no rotation.
A: After switch machine power on, DO NOT press switch bottom of
mainboard. The system will start automatically in 3 seconds.
Q: Changed 2p or 4p playing mode but can’t keep playing mode after
next power on.
A: After mode changed, please excuse any game and then exit from
the game to the game list.
Q: When connected 2 machines for 4 people playing, one of the
chassis always be destroyed, why?
A: Please install transformer into machine to isolate A.C. power of
chassis with another one.
-4-
- 17 -
.Two channel stereo audio circuit (Figure 2):
(Figure 2)
3. Counter connect circuit (Figure 2.1)
(Figure 2.1)
www.arcadomaniashop.com
3. Press ADJ2 (Figure 27).
4. Select “Dip Switches” item (Figure 39) and press 1P START
button.
(Figure 40)
(Figure 41)
5. Select “Service Mode” item and set “On” by moving 1P joystick
left or right (Figure 40).
6. Press ADJ2 key (Figure 27) to close the current setting window and
modify configuration setting by 1P joystick (Figure 41).
7. After finished all configurations setting, press ADJ2 key (Figure
28) and set “Service Mode” Off (Figure 42).
(Figure 42)
SYSTEM SETTING
COIN AND CREDIT VALUE SETTING TABLE:
SW1:
COIN
CREDIT
1 COIN
SW1
4
2
1
1 CREDIT
OFF
OFF
OFF
1 COIN
2 CREDITS
ON
OFF
ON
1 COIN
3 CREDITS
ON
ON
OFF
1 COIN
4 CREDITS
ON
ON
ON
2 COINS
1 CREDIT
OFF
OFF
ON
3 COINS
1 CREDIT
OFF
ON
OFF
4 COINS
1 CREDIT
OFF
ON
ON
(TABLE 1)
SYSTEM FUNCTION SETTING TABLE
(Figure 43)
8. Press ADJ2 key (Figure 27) to delete the small setting window
(Figure 43).
9. Press ESC key (Figure 27) to back to game list (Figure 28).
10. Operate step 6 to 11 on page 13 for saving the game configuration
setting (Figure 32).
- 16 -
(TABLE 2)
-5-
GAME LIST HIDE/SHOW
www.arcadomaniashop.com
joystick left or right (Figure 36).
5. After setting modified, select “Return to Main Menu” (Figure 37)
and press 1P START button to back to main menu (Figure 38).
6. Select “Return to Game” (Figure 38) and press 1P START button
to back to game mode (Figure 34).
7. Press ESC key (Figure 27) to back to game list (Figure 28).
8. Some of games will appears the dialog window (Figure 29) after
press ESC key (Figure 27), please select “Quit Game” item by 1P
joystick and press 1P START button to back to game list (Figure
28).
9. Operate step 6 to 11 on page 13 for saving the game configuration
setting (Figure 32).
it 4 o1.Switch ON b f SW2 (Figure 3).
(Figure 3)
(Figure 4)
(Figure 36)
(Figure 37)
2.Keep system working at game list (Figure 4).
3. Press SETUP key (Figure 5) to entry “System Setting” menu
(Figure 6).
3&4P CONNECTOR BOARD
(Figure 5)
-6-
(Figure 38)
(Figure 39)
Type 3: Special setting mode (Example: NAMCO SYSTEM 1 serial etc).
1. Switch ON bit 4 of SW2 (Figure 3).
2. Select the game that will be set (Ex. Tank Force) and start the
game (Figure 39).
- 15 -
www.arcadomaniashop.com
9. Select “Back to Main Menu” (Figure 31) and press 1P START
button to back to “System Setting” (Figure 30).
10. Select “Exit” (Figure 30) and press 1P START button to back to
game list (Figure 33).
11. Switch OFF bit 4 of SW2.
4. Select “Game List Setting” item by 1P joystick (Figure 6) and press
1P START button to entry “Game List Setting” menu (Figure 7).
(Figure6)
(Figure 7)
5. Select “Show/Hide Game list” item by 1P joystick (Figure 7).
(Figure 32)
(Figure 33)
Type 2: Original setting is DIP SW setting mode. (Example:
CAPCOM CPS1 serial etc).
1. Switch ON bit 4 of SW2 (Figure 3).
2. Select the game that will be set (Ex. Street fighter II’) and start the
game (Figure 34).
(Figure 8)
(Figure 9)
6. Press 1P START button to entry “Show/Hide Game List” menu
(Figure 8).
7. Select game list item by 1P joystick and press 1P START button to
decide show or hide. Dark square means show and light square
stands for hide. After finish all game lists Show or Hide setting,
select “Exit” (Figure 8) and press 1P START button to back to
“Game List Setting” menu (Figure 9).
(Figure 34)
(Figure 35)
3. Press ADJ2 key (Figure 27) and select “Dip Switches” by 1P
joystick (Figure 35).
4. Press 1P START button to entry configuration setting menu
(Figure 36). Select setting item or modify setting by moving 1P
- 14 -
-7-
www.arcadomaniashop.com
5. Some of games will appears the dialog window (Figure 29) after
press ESC key (Figure 27), please select “Quit Game” item by 1P
joystick and press 1P START button to back to game list (Figure
28).
(Figure 10)
(Figure 11)
* SAVE MODIFIED GAME LIST*
8. Select “Save Current Game List” item (Figure 9) and press 1P
START button twice to save game list (Figure 10).
9. Select “Back to Main Menu” (Figure 11) and press 1P START
button to back to “System Setting” menu (Figure 12).
(Figure 28)
(Figure 29)
*SAVE MODIFIED GAME CONFIGURATION
SETTING*
6. Press SETUP key (Figure 27) to entry “System Setting” mode
(Figure 30).
7. Select “Config Files” item (Figure 30) and press 1P START key to
entry “Config Files” menu (Figure 31).
(Figure 12)
(Figure 13)
10. Select “Exit” (Figure 12) and press 1P START button to back to
game list (Figure 13).
11. Switch OFF bit 4 of SW2.
Note:
1. Working list can’t be hided.
2. “Restore Game List” (Figure 11) means to get back the older game
list.
3. “Restore Default Game List” (Figure 11) means to retrieve to
factory game list setting.
-8-
(Figure 30)
(Figure 31)
8. Select “Save Configuration” item (Figure 31) and press 1P START
twice to save modified configurations (Figure 32).
- 13 -
NEW GAMES UPDATE:
www.arcadomaniashop.com
About new game update information please ask to vender. We’ll
deliver new games and tools to all of our venders when new games
announce.
GAME CONFIGURATION SETTING:
Type 1: Original setting is on screen setting mode.
(Example: SNK NEO GEO, CAPCOM CPSII serial etc).
ONE GAME BUSINESS MODE:
1. Select a favorite game and entry to game mode.
2. Switch on SW2 bit 3 (Figure 14).
3. “Escape to game menu” function will be disabled.
1. Switch ON bit 4 of SW2 (Figure 3).
2. Select the game that will be set (Ex. Metal Slug 3) and start the
game (Figure 25).
(Figure 14)
DELETE GAME FROM GAME LIST
(Figure 25)
(Figure 26)
3. Press ADJ1 key (Figure 27) to entry the game original setting
mode (Figure 26).
1. Switch ON bit 4 of SW2 (Figure 3).
2. Select the game name that will be deleted at game list (Figure 15)
and press DEL key (Figure 17). The game will disappear from game
list (Figure 16).
3&4P CONNECTOR BOARD
.
(Figure 27)
4. After finished the game setting and exited to the game mode
(Figure 25), press ESC key (Figure 27) to back to game list (Figure
28).
- 12 -
(Figure 15)
(Figure 16)
-9-
www.arcadomaniashop.com
(Figure 17)
2. Press SETUP key (Figure 5) to entry “System Setting” menu
(Figure6).
3. Select “Game List Setting” item (Figure 6) and press 1P SART
button to entry “Game List Setting” menu (Figure 9).
4. Execute step 6 to 9 operations on page 7.
ADD GAMES FROM ALL GAME LIST TO ONE OF GAME
LISTS
1. Switch ON bit 4 of SW2 (Figure 3).
2. Press LIST key (Figure 18) to entry game lists menu (Figure 19).
3. Select “All Games” and press 1P START button to entry “All”
game list (Figure 20).
4. Select a favorite game (Figure 20) and press “ADD” key (Figure
18) to entry game lists menu (Figure 21).
5. Select a destination game list and press 1P START button (Figure
21). The game will be added to the game list (Figure 22).
6. Press SETUP key (Figure 5) to entry “System Setting” menu
(Figure 6).
7. Select “Game List Setting” item (Figure 6) and press 1P SART
button to entry “Game List Setting” menu (Figure 9).
8. Execute step 6 to 9 operations on page 7.
(Figure 18)
- 10 -
(Figure 19)
(Figure 20)
(Figure 21)
(Figure 22)
LANGUAGE SETTING:
1. Switch ON bit 4 of SW2 (Figure 3).
2. Press SETUP key (Figure 6) and select “Language Setting” item
(Figure 23).
3. Press 1P START button to change language from English to simple
Chinese or simple Chinese to English (Figure 23,Figure 24).
4. Switch OFF bit 4 of SW2.
(Figure 23)
(Figure 24)
- 11 -