1
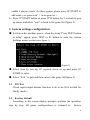
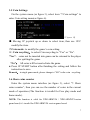
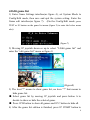
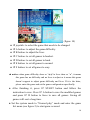
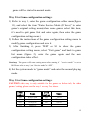
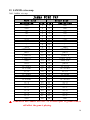
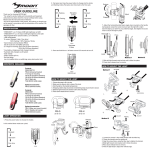
Contents
1. Connector Instruction------------------------------------- 1
2. Operating Instruction-------------------------------------- 2
3. System settings configuration ---------------------------------- 3
3.1
I/O Test --------------------------------------------------------- 3
3.2
Factory default(Upright)------------------------------------- 3
3.3 Show Serial Number ----------------------------------------- 4
3.4 Game Settings ---------------------------- -------------- 4
3.5 Coin Settings -----------------------------------------------6
3.6 Show coins counter ---------------------------------------------6
4. Edit Game List--------------------------------------------- 7
5. Single Game Setting and Operation------------------- 8
6. Game difficulty and lives setting------------------------------------8
7. Game Configuration Setting---------------------------- 10
8. TEST or S1 button function----------------------------------------- 13
9. Instruction for Home mode-------------------------------------- 13
10.Common
1
problems
and
solutions------------------------------4
11. JAMMA Wire Map--------------------------------------- 15
1、Connector Instruction:
(Figure 1, Game board instruction)
CAUTION: The function of JAMMA connector power and J2 power is
same; do not use them together that would destroy game board.
Trackball connection
1
Remark: The picture of user menu only for reference, any difference, please
refers to the products.
Please connect the trackball 1P (A) and 2P (B) to J6 connector accordingly
2
Remark: The picture of user menu only for reference, any difference, please
refers to the products.
2. Operation instruction
Connect the game board and switch on the machine power, after
the logo of the “GAME ELF” disappear, then enter game list menu as
the figure 2.
(Figure 2)
● Caution: press 1P C button to check the instruction.
1)Insert coins first and select game. (No needs to insert coin for Free play
or free browse)
2)Select game by moving 1P joystick down or up, and left or right
moving is to check game list.
3)Press 1P START button to enter game.
4)If Coin recycling is set to“No”, after entering the game, all coins
the player insert will be inserted into the game automatically. If
Coin recycling is set to“Yes”,Press 1P START button or 1P D
button for 3 seconds to pop up menu, and select “continue” to
insert coins.
5) Some games need 2 coins and press 2P START button first to
2
enable 2 players mode, for these games please press 2P START to
add coins. (see games with“﹡”in the game list.)
6)Press 1P START button or press 1P D button for 3 seconds to pop
up menu, and select “exit” to back to the game list (figure 2).
3. System settings configuration
● Switch on the machine power, when the string“Press TEST button
to setup” appear, press TEST or S1 button to enter the system
Settings menu (see the below figure 3).
(Figure 3)
● Select item by moving 1P joystick down or up and press 1P
START to enter.
● Select “Exit” to quit and then enter to the game list(figure 2) .
3.1
I/O Test
Check input/output buttons function is ok or no.(It is invalid for
family mode.)
3.2
Factory default
According to the screen display prompts, perform the operation
step by step. All game configurations is returned to
factory
4
configuration and loaded of Upright mode.
3.3 Show Serial Number
This serial number is only marked number, we suggest that our
customers note this number and be convenient for getting service in
future.
3.4 Game Settings
● On the system menu (as figure 3), select item “6.Game Settings”
to enter the games setting menu(as figure 4).
(Figure 4)
● Moving 1P joystick up or down to choose item, then 1P-C modify
item.
● SW1 switch on game board adjust Display Mode.
● After finishing modification, press 1P-Start to save setting(as
figure 5),then press 1P-A to return system menu(as figure 3).
Select "Exit" to exit, the new configuration is valid after system
automatically restarts.
5
(Figure 5)
1) Display mode
This game board support both VGA and CGA display modes,
see the below setting way.
VGA mode (31.5 KHz): Set BIT1 of SW1 ON and the VGA
monitor plug the VGA output connector.
CGA mode (15.75 KHz): Set BIT1 of SW1 OFF to use a
regular JAMMA cabinet.
VGA port works well for Both CGA and VGA mode.
Before switching on the machine power, set BIT2 of SW1 ON
with the VGA output resolution of 640x480, and 1024x768 on the
OFF state.
▲ In addition: after the power of game board is on, and during the
system starts, please don’t please don’t switch SW1 on/off. Thanks!
▲ 3.5.2 System Mode
Edit game list/Game difficult/Lives setting/Game configuration
need to enter “Config/Edit Mode”. If you don’t need to adjust these
items, please adjust to “Game Mode (Normal play mode)” for
improving system stability.
6
3.5 Coin Settings
On the system menu (as figure 3), select item “7.Coin settings” to
enter Coin setting menu(as figure 6).
(Figure 6)
● Moving 1P joystick up or down to select item, then use 1P-C
modify the item.
1 Coin mode: to modify the game’s coin setting.
○
2 Coin recycling:to select Coin recycling to “Yes” or “No”.
○
“Yes”: coins not be inserted into game can be returned to the player
after quitting the game.
“No”: All coins will be inserted into the game.
● Press 1P START button after finishing the setting and follow the
instruction to save.
Remark: in single game mode, please change to "NO" in the coin recycling.
3.6 Show coins counter
Enter the system menu interface (as figure 3), select "7. Show
coins counter”, then you can see the number of coins in the current
mode of operation (The function is invalid for Free play mode and
home mode).
NOTE: The function is valid for XIN1ARMV26 / XIN1ARMV27version
game board, it’s invalid for XIN1ARMV24 version game board.
7
4.Edit game list
1) Enter Game Settings interface(as figure 4), set System Mode to
Config/Edit mode, then save and quit the system setting. Enter the
Game edit interface(as figure 7). (On the Config/Edit mode, press
TEST or S1 button on the game list menu (figure 2) to enter the below menu
also)
(Figure 7)
2) Moving 1P joystick down or up to select “2-Edit game list” and
enter the “edit game list” menu as figure 8.
(Figure8)
3) The item“*” means to show game list, no item “*” that means to
hide game list.
● Select game list by moving 1P joystick and press button A to
decide to show or hide the selected game.
● Press 1P B button to show all games and 1P C button to hide all.
4) After the game list edition is finished, press 1P START button to
8
enter the save menu as figure 9 .Please follow the instruction to
save.
(Figure9)
5) After editing the game list, please enter the Game settings again
(figure 4), set system mode to “Normal play” mode and save. The
game will be started in normal after the system reboot.
5.Single game setting and operation
1) Please refer to “edit game list” as above, and enter the edit game
list menu (see figure8)
2) Select game list by moving 1P joystick and press 1P D button to
set. If it shows “SET” in front of game title you selected, that
means the setting is successful.
3) Enter the Game settings menu as figure 4, set the Game mode to
Single mode, and System mode to “Normal play” mode and save.
The single game will be started after entering the game.
Remark: in single game mode, please change to "NO" in the coin recycling.
7.Game difficulty and lives setting
1) Enter the Game settings (figure 4), set system mode to Config/Edit
mode, save and then enter the menu(figure 7). Select the item
“3.edit game difficulty” to enter the menu as below figure 10.
9
(figure 10)
● 1P joystick: to select the game that needs to be changed.
● 1P A button: to adjust the game difficulty.
● 1P B button: to adjust the lives
● 1P C button: to set all games to hardest.
● 1P D button: to set all games to hard.
● 1P E button: to set all games to normal.
● 1P F button: to set all games to easy.
▲ notice: when game difficulty show as “x(x)”or lives show as “x”, it means
this game has no difficulty and no lives to adjust or it means this game
doesn’t support to adjust game difficulty and lives. If it is the latter,
please enter the game and set the game configuration specifically.
● After finishing it, press 1P START button and follow the
instruction to save. Press 1P A button to save the modified games
and press 1P D button to force to save all games. Saving all
games will cost a long time.
● Set the system mode to “Normal play” mode and enter the game
list menu (see figure 2) to start game as usual.
10
8.Game configuration settings
Way 1 for Game configuration settings:
1) Enter the Game settings menu as figure 4, set System mode to
“Config/Edit” mode, save and quit the system settings menu, then
enter the game list menu (figure 2).
2) Moving 1P joystick down or up to select the game you want to
change, Press 1P 1P START to start game and enter the game
configuration editor menu as figure11.(Part of the game into the void,
see Way 2 for Game configuration settings)
(Figure 11)
(Figure 12)
3) Move 1P joystick to select“Dip Switches”and press 1P A button
to enter the setting menu(see figure 11). This operation is invalid
for some games, please refer to way 2 for details.
4) Select option by moving 1P joystick down or up, and press 1P C
or D button is to change.
5) Select “return to main menu” to quit the setting menu after setting,
and select “Exit game” to back game list (see figure 2). Restart
the game, then new settings is valid.
6) Please go on to set other games if there are, and if not, please set
System mode to “Normal play” mode. Enter the game list and the
11
game will be started in normal mode.
Way 2 for Game configuration settings:
1) Refer to way 1, enter the game configuration editor menu(figure
11), and select the item “Enter Service Mode (If have)” to enter
game’s original setting menu(when some games select this item,
it’s need to quit game first and enter again, then enter the game
configuration setting menu )
2) Follow the instructions of the game configuration setting menu to
modify game configuration and save it.
3) After finishing it, press TEST or S1 to show the game
configuration setting menu, select “Exit game” and back to game
list menu (figure 2), enter the game again and the new
configuration takes effect.
Caution: The game willl enter setting menu after starting if “service mode”is set to
ON.Please refer to way 1,set “Service mode”to “OFF”.
4) Set the system mode to “game mode” and enter the normal playing
mode.
Way 3 for Game configuration settings:
CAUTION: this way is only suitable for the games as below tab, for other
games’ setting, please see the way 1 or way 2 as above.
Item
number
498
522
523
524
Game
Robotron
Defender
Stargate
Bubbles
Item
number
Game
525
526
527
Joust
Blaster
Splat
12
1) Refer to Way 2, select the item “Enter Service Mode (If have)” to
enter game’s original setting menu,or start game, press 2P
ADVANCE button(F button) to enter game test menu at any time .
(On the Config/Edit mode)
2) After enter game test menu, continue to press ADVANCE* button
to the game setting and then it can be set. Please see the below
detail setting ways. (Remark *: for Defender game, press 2P E +F
button to switch setting items.)
On the configuration setting mode, define 2P D button, E button,
F button as below.
2P D button: High score reset
2P E button: AUTO
2P F button: Advance
Remark:For the above definitions, they are only valid when System
mode is set to Config/Edit mode, and only valid for above
games.
3) After setting, press ADVANCE button to quit the setting mode
menu and back to game list(or press S1button,and select “Exit
game” to back game list. )
4) Restart the game, then new settings is valid.
5) Set the system mode to “game mode” and enter the normal playing
mode.
13
9. TEST or S1 button function
1) System setting button, press TEST or S1 button to enter the system
setting menu when the screen show “Press TEST to setup”(figure
3).
2) On the Normal play mode, press TEST or S1 button to quit and
back to the game list (Figure 2).
3) On the Config/Edit mode, press TEST or S1 button in the game to
pop up or hide the configuration setting menu(figure 11). And
press TEST or S1 button on the game list menu (Figure 2) to enter
the edit game list.
10.Instruction for Home mode
1) PS2 game controller
Plug-in J5 USB port of game console (figure 1-1) to PS2 game
controller, switch on the power, after the game controller defected,
then the system will enter the home mode.
One player: connect one of PS2 game controller to J5 USB port of
game console
Two players: add one USB 2.0 hub, connect two PS2 game
controllers to hub, and then connect hub USB port to J5
socket of game console.
2) Free play
No free play on the home mode. Press SELECT to insert coins, and
then press START to begin game. Set the game configuration settings
to get free playing is available for most games. Please refer to page
10 to get more information.
14
3) Define 1P PS2 game controller as below.
(图 13)
Press 1P G and 1P H bottom at the same time to quit game.
4) Sleep mode
The idle PS2 game controller will enter sleep mode when power is on.
Caution: When the controller is in sleep mode, the power switch of
controller is invalid, you must press START button to wake it up,
return to normal working state.
11.Common problems and solutions
Problem: the game screen is not synchronized in the CGA mode
when game start.
Solution: Adjust the horizontal stabilizer in the game monitor until
the image is clearly visible.
15
12. JAMMA wire map
Tab3. JAMMA wire map
JAMMA WIRE PAP
Part side
Definition
GND
GND
+5V
+5V
/
+12V
/
/
JMA9
SPEAKER+
JMA11
VIDEO R
VIDEO B
GND
TEST
1P-COIN
1P-START
1P-UP
1P-DOWN
1P-LEFT
1P-RIGHT
1P-A
1P-B
1P-C
1P-D
1P-E
1P-F
GND
PIN
1
2
3
4
5
6
7
8
9
10
11
12
13
14
15
16
17
18
19
20
21
22
23
24
25
26
27
28
PIN
1
2
3
4
5
6
7
8
9
10
11
12
13
14
15
16
17
18
19
20
21
22
23
24
25
26
27
28
Soild side
Definition
GND
GND
+5V
+5V
/
+12V
/
/
JMB9
SPEAKERJMB11
VIDEO G
VIDEO SYNC
SERVICE
JMB15
2P-COIN
2P-START
2P-UP
2P-DOWN
2P-LEFT
2P-RIGHT
2P-A
2P-B
2P-C
2P-D
2P-E
2P-F
GND
▲ Caution:Do not connect the PIN27 of JAMMA port to ground lead, it
will affect the game’s playing.
16
Special note
1. This price is just for the computer hardware equipment.
2. Customers get the software by their own (including the
purchase from the software provider or download free software from
related web).
3. The way to get the software:
(1) Purchase the software from the software provider.
(2) Download the software from the related web.
4. Users assume all the legal consequences due to wrong
download and use the software, it is unrelated with the equipment
manufacturers and distributors.
17