1
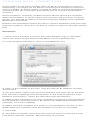
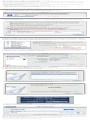
WELCOME
PantherPad is an amazing new way to access your computer –with five completely different and wildly innovative ways to navigate your computer. The Panther Pad turns your
iPad into a supercharged trackpad. With the touch of a finger you can navigate, point and
click, switch between apps and perform sophisticated editing.
If you have motor disabilities, you’ll discover a whole new world of control and power. And
now there’s no need to have a computer keyboard, trackpad, or mouse taking up space.
Simply use PantherPad as the main hub of your digital universe.
PantherPad features include
•
•
•
•
•
Choice of 5 access modes
Choice of 7 different looks
Intuitive alternative ways to click, drag, edit, etc.
Button bar location can be at top or bottom
Hold times to avoid accidental hits.
Here’s how to make the Panther Pad work best for you!
CONNECTING
To use Panther Connect, you must first download Panther Link to your
computer. You only need to do this once.
You can get Panther Link at panthertechnology.com/support. Panther
Link is a free download. (Go to our site with your computer’s web
browser as Panther Link will run on your computer, not your iPad.)
Click on the link for Panther Link on Panther’s Support Page. Follow
instructions to download. Panther Link will start automatically whenever
you start your computer or exit Sleep Mode.
Don’t forget! Panther Connect will only connect to your computer via
Wi-Fi if Panther Link is running!
THE FIVE DIFFERENT MODES
Panther Connect lets you choose one of five different modes simply by
touching a button on start up. You can also set the Mode any time you
want by touching the Panther logo in the bottom right of the trackpad
area. Lastly, you can also choose a Mode from inside from the Settings
Menu.
Panther Connect's modes offer many types of innovative access.
They're fun. They're efficient. And they also offer powerful new access
for people who have trouble with movement.
Explore and find the trackpad configuration that works best for you.
Basic Trackpad – The Basic Mode simply turns Panther Connect
into a large track pad. It works just like any track pad, but it’s larger
– to allow better access. It also offers a much wider range of speed
controls, so you can take full advantage of the iPad’s large area,
moving with greater or lesser precision.. Don’t forget to go into the
Panther Connect’s settings and choose a speed works best for
you.
2-Axis – In this mode, the Panther Connect confines the cursor
movement on your computer to either vertical or horizontal movement. A great setting for people with limited motor control.
4-Axis – In this mode, the Panther Connect confines cursor movement on your computer to the vertical, horizontal axes, as well as
any 45 degree angle. A great setting for people who have reasonable motor control yet difficulty with consistent movement.
Split Speed – This unique mode lets you use two speeds on one
iPad! First touch the side of the Panther Connect that shows the
rabbit, and the cursor moves quickly. Then touch the side with the
turtle, and the cursor moves much slowly. That means you can
navigate across a large computer screen, yet still be able to zero in
on what you want when you get near it. Don’t forget to go into settings and choose a speed that let’s the Panther Connect work best
for you in this mode. Global speed settings will help adjust both of
the speeds in Split Speed mode.
Mini-Track – This mode provides a much smaller track pad area.
Perfect for individuals who have a hard time with larger areas, but
also want all the customization and power of Panther Connect..
Don’t forget to go into settings and choose a speed that let’s the
Panther Connect work best for you!
MAIN BUTTONS
Music – Touching the Music Icon opens a row of buttons that let you
control iTunes. iTunes must be open and active in order to use this
panel. (You can open it with the Launcher. See next feature.) The icons
indicate the same functions you find in iTunes.
Application Launcher – Touching the Launcher icon brings up images
of all the applications you have on your computer. When you touch one
of these icons, its application opens. It’s a great and way to start apps
without having to navigate to them. (If an app is already open, hitting the
icon will have no effect.)
Document Switcher – Touching the Switcher icon brings up images of
every document currently open on the computer and allows you to
switch between them simply by touching an icon. Simply touch what you
want to work on and it will become the active document, no matter
which application it's in.
The Center Mouse Click Image – Tapping dark rectangle in the middle
of the buttons creates a simple mouse click. Tapping twice creates a
double click. (If you want to be able to create a click by tapping
anywhere on the track pad, you can choose that in settings.)
Mouse Operations – Panther Connect has made it simple and efficient
to access more complex mouse functions - like drag and drop, highlight,
and edit text. When you tap the Mouse icon, you’ll see Action Keys that
provide you with many of the alternate mouse functions associated with
multiple keystrokes, such as drag, double click, etc.
Editing - Located within the Mouse menu, the Edit key opens a menu
that provides powerful editing functions with minimum navigation. It’s
like using keyboard combinations to perform shortcuts within an
application. “Go Back” returns you to the Mouse menu.
Scroll – Located within the mouse Menu, the Scroll icon turns the
Panther Connect surface into a large vertical scroll bar. When this icon
is highlighted, the Panther Connect will scroll through the document or
window. “Go Back” returns you to the Mouse menu.
MENUS & FILES
The Panther Connect lets you navigate the many menu items in your
applications simply by using the buttons at the bottom of the screen.
Here are some of he commands you'll want to take advantage of.
New – Creates a new document. As with all new documents, you must
name and save it before closing.
Open – Brings up the Open Doc menu from the current app and
provides arrows keys to navigate to the document you want. Of course,
you can also navigate files using the main trackpad surface.
Save – Saves the current document and returns to usage mode.
Print – Brings up the Printing Dialog box and takes you to a submenu
for your commands. Simply hit RETURN to accept settings and print.
Close – Closes the current document.
Menu Bar – Takes you directly to the menu bar at the top of your
computer. You can then use the submenu of arrows, tab, and return,
(which will appear as the Panther Connect's action keys) to choose to
any of the menu headings, navigate the dropdown menus, or select the
item or command you want.
Keyboard – Touching the keyboard icon brings up the simple Apple
Keyboard on your iPad. You can use this to enter text into any area you
are working in.
SETTINGS
The Panther Connect’s many powerful settings like any individual create
a unique and personalized experience to maximize their interaction with
their computer.
User Preferences
Speed – Controls the speed of the cursor on the computer screen.
Mode – Chooses the access mode of the Panther Connect.
Button Bar Location – Moves the button bar to the top of the iPad.
Skin – Customize your Panther Connect to a look that best suits
you!
Touch Settings
Hold Time – Tells the Panther Connect to stop recognizing
movement if you hold your finger in place for a specified period of
time. Great if you have a hard time taking your hand off the surface
of the iPad without adding unwanted touches or movement.
Tap Pad for Click – Lets you decide whether or not to use the
entire surface of the Panther Connect for clicking.
Two Finger Scroll – Lets you decide whether or not you can scroll
by swiping two fingers.
Two Finger Swipe – Lets you decide whether or not you can swipe
using two fingers.
Pinch to Zoom – Lets you decide whether or not pinching will
change the computer screen.
Help
Quick Start Guide – A quick summary of Panther Connect Basics.
User Manual – You’re reading it.
About Panther Connect – Version numbers, etc.
Rate Panther Connect – Tell us what you think!
Go to Panther Website – Discover all the other great stuff at
Panther
Network Preferences
Show Computer Links – Shows computers which you can link to
with Panther Connect. If more than one computer is
connected via Wi-Fi, you will see them all. If there is only one
computer, you will not see this.
Network update Rate – Lets Panther Connect know if you have a
slow network
IP Address – Let's you set up a direct IP connection between your
Panther Connect and your computer.
ACCESSIBILITY
The Panther Connect was created with deep Universal Design insights
in order to best meet the needs of people with motor disabilities. It’s
sophisticated User Interface is elegant and efficient, intuitive and
powerful, and designed to provide a broad range of diverse access
methods to help you do things you might not have been able to do
before.
For example, since Panther Connect lets you navigate a screen and
click areas much more efficiently, you should be able to use websites
that weren’t accessible before. In programs like Word or Pages, where
you’ll want to edit lines of text, our 2-Axis mode will help you create
straight cursor movements. And, if you’ve been struggling with a
trackball or trackpad – trying to wrestle your way to just where you want,
the Panther Connect will now let you finally gain precision – and
because it’s all on the iPad, you’ll have what you need on one piece of
hardware.
You’ll notice some great things about Panther Connect. Everything you
need to access is within easy reach. You can change the Pad’s layout,
change the way you click things. Even change the look of what you’re
doing. It’s all based on our commitment to Universal Design – making
sure we are bringing access to today’s technology to everyone.
Here are some tips on using the Panther Connect most effectively.
Turn off the iPad’s Multitasking Gestures – To maximize your
PantherConnect’s functionality, make sure Multitasking Gestures is
turned off in your general iPad settings. To do this go to
Settings>General in iPad (not Panther Connect). Toward the bottom
of that page, you’ll see Multitasking Settings. Choose Off. Once this
is done, you’ll be able to move your cursor with the heel of your
hand, a fist, two fingers, or whatever!
Explore the different Access Modes. – Start by exploring each of
our five unique user modes and see which one best fits your needs.
You can bring up the Modes by hitting the Panther logo in the
bottom right of the track pad surface. The modes should all be
intuitive to use. But you can find explanations of how they work in
this manual
Explore different Speeds – The Panther Connect will feel very
different based on the speed you choose. Go into settings and
experiment with a few.
Choose a Button Bar Location – You can move the button bar
from the bottom of the iPad to the top. This is helpful if you find
yourself accidentally hitting these buttons.
Decide how to “click” – The simple mouse click button is in the
bottom center of the Panther Connect. But if you go into settings,
you can also tell the Panther Connect to allow a click by touching
anywhere on the pad surface. If you have better motor control, you
might want to try that.
Explore Hold Times – Some individuals have a hard time lifting
their finger off the screen without accidentally moving the mouse.
For that, there’s a hold time. It will lock the screen after you hold
your finger steady for a specified period of time, between 0.25 and
5 seconds.
Skin Choice – Design motivates us. So choose a look for the
Panther Connect that’s right for you.
Panther Connect is one piece of software that can work in diverse ways
for people with diverse needs.
CREATING AN I.P. CONNECTION
Some public areas block certain types of Wi-Fi connections. If this is
happening, you might not be able to connect your Panther Connect to
your computer. In many cases, you will be able to use this procedure to
create a direct IP connection that allows you to connect the Panther
Connect.
Some locations, however, locations block almost all but the simplest
Wi-Fi connections. In those cases, this process will not work. In those
cases, you will still be able to connect using the slightly more complex
Bluetooth connection.
Please note that these issues are due to device hardware and lock-outs
built into systems. They are not due to a lack of effort on the part of Panther.
Directions
1. Click on the Panther Connect Icon (the Panther logo) in the Mac
menu bar and from the Drop Down Menu choose Preferences.
2. In this Preferences Pane, click on the Network icon
3. Now, in the middle of the box, note the Server IP address and the
Server Port.
4. On your iPad, make sure you’re in Panther Connect. Go to the Panther Connect’s Settings and scroll down to the bottom where it says
Network Connection. Open the Item that says IP address.
5. Write in the numbers from your computer, inserting a colon between
the IP address and server Port. IE: Server IP Address:ServerPort (for
example, 10.0.0.3.5:18843)
6. Make sure the numbers you enter in your Panther Connect on the
iPad match the numbers from the Panther Connect on your Mac
7. Click OK
8. The blue Computer Links box will come up and you will see a new
Link there with this number. Tap this entry to connect.
BLUETOOTH CONNECTION
If you don’t have a WIFI connection, or if your WIFI connection is not a strong one, you
may prefer using a Bluetooth connection.
This is a bit tricky to set up the first time, but once you have it done, you’ll find it a great
alternative for the times that WIFI is not available.
To use the this connection method your system must meet the following requirements:
System Requirements
•. Mac OS X 10.6.5 (Lion is not officially supported)
•. iPad or iPad 2 with iOS 4.3 or higher
•. The Mac and iPad must be within Bluetooth range (typically 30 feet)
SETUP PROCEDURE
1. Go to System Preferences on the Mac and choose ‘Bluetooth’.
2. Make sure that Bluetooth is ‘On’ and ‘Discoverable’:
SNOW LEOPARD
3. Click on ‘Advanced’, and enable ‘Share my Internet connection with other Bluetooth
devices’ and click OK:
LION
3. Click on ‘Sharing Setup’. Make sure Internet Sharing is enabled to computers using:
Bluetooth PAN. Note you need to disable Internet Sharing in order to change the sharing
options, then enable Internet Sharing again. Also if Bluetooth PAN is not shown, continue
to the next steps, and then come back to this step.
4. Bring up the main System Preferences page (press Show All) and choose ‘Network’
5. Check to see if ‘Bluetooth PAN’ is listed in the left hand column, if not then add it:
6. Click on the + and choose: ‘Bluetooth PAN’:
7. Click ‘Create’, then ‘Apply’
8. On the iPad turn on Bluetooth under Settings, Bluetooth
9. Back on the Bluetooth preferences page on the Mac, click the ‘+’ button. This will bring
up the Bluetooth Setup Assistant Window:
10. Click on the name of your iPad and click Continue.
11. A number will be shown on your Mac as well as the iPad.
12. Click ‘continue’ on the Mac.
13. Tap pair on the ‘iPad’:
14. Once pairing is done, click ‘Quit’ on the Bluetooth Setup Assistant.
15. On the iPad, tap on the name of your Mac to connect.
16. When connected, the name of the Mac will be shown with ‘Connected’ next to it:
17. Once connected, make sure Panther Link is running on the Mac.
18. Exit the iPad settings, and start Panther Connect on the iPad
19. Panther Connect should see your Mac in the Server Browser. Tap on the name of the
Mac to connect as normal. (Note: you may have to wait a minute for the Bluetooth connection to be fully established).
If you have trouble with this procedure, contact tech support at
[email protected] for help.