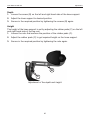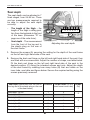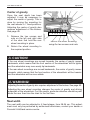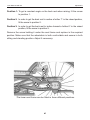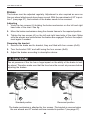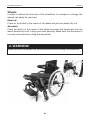
1
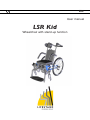
USER MANUAL
EN
User manual
LSR Kid
Wheelchair with stand-up function
User Manual LSR Kid
Where to find LifeStand
Contact us if you have any questions regarding servicing or sales in the area
where you live.
For the United Kingdom
Permobil UK
Oceanic
Ground Floor
Navigation Business Park
Waters Meeting Road
Bolton
BL1 8SW
Tel. (+44) (0)1484 722 888
Fax (+44) (0)1484 723 013
E-mail:[email protected]
For all other countries:
LifeStand France SAS
5 Rue Clément Ader
69740 Genas
France
Tel. : (+33) (0)4 37 26 27 28
Fax : (+33) (0)4 37 26 27 29
Email : [email protected]
3
LSR Kid
Wheelchair with stand-up function
Produced and published by Permobil AB, Sweden
Version: 2, 2014-02
Order no.: 205276-UK-0
User Manual LSR Kid
Contents
Indications and Contraindications for the Use of Stand-up Wheelchairs ..................................... 6
Important information....................................................................................................................... 8
General information.......................................................................................................................... 9
Technical support..................................................................................................................... 9
Spare parts & accessories........................................................................................................ 9
Scrapping.................................................................................................................................. 9
Warranty................................................................................................................................... 9
Incident reporting..................................................................................................................... 9
Product approval....................................................................................................................... 9
Safety rules and regulations.................................................................................................. 10-19
Design & function........................................................................................................................... 20
General - overview................................................................................................................. 20
Raising function...................................................................................................................... 21
Control panel for raising function........................................................................................... 22
Operation........................................................................................................................................ 23
General .................................................................................................................................. 23
Armrests................................................................................................................................. 23
Raising function...................................................................................................................... 24
Driving Rules ......................................................................................................................... 28
Adjustment..................................................................................................................................... 32
Legrest and footplate . ........................................................................................................... 32
Knee supports ...................................................................................................................... 34
Seat depth ............................................................................................................................ 36
Center of gravity ................................................................................................................... 37
Seat width . .......................................................................................................................... 37
The height of the armrest ..................................................................................................... 38
The length of the armrest ..................................................................................................... 40
Back rest angle . ................................................................................................................... 41
Height of the Push handles/Back rest frame . ...................................................................... 42
Height of the Back rest ......................................................................................................... 44
Replacing/Reconfiguration of the backrest straps . .............................................................. 45
Equalization system . ............................................................................................................ 46
Anti-tip protection . ................................................................................................................ 48
Brakes .................................................................................................................................. 49
Transport........................................................................................................................................ 50
Wheels.................................................................................................................................... 51
Back rest................................................................................................................................. 52
Lifting points .......................................................................................................................... 53
Maintenance and repairs................................................................................................................ 54
General................................................................................................................................... 54
Batteries, storage.................................................................................................................... 55
Charging batteries.................................................................................................................. 56
Cleaning.................................................................................................................................. 57
Wheels.................................................................................................................................... 58
Serial number label ...................................................................................................................... 59
Power Module .............................................................................................................................. 60
The emergency standing-sitting function . ............................................................................ 60
Recommended Seat Cushions .................................................................................................... 61
Technical specifications................................................................................................................. 63
5
User Manual LSR Kid
Indications and Contraindications for the Use of Stand-up Wheelchairs
Indications and Contraindications for the Use of Stand-up
Wheelchairs
Advice: These indications and contraindications are based on general observations. The conditions for regular standing training varies from person to person
and should be individually agreed with a doctor or therapist.
Only a doctor or therapist can decide which method and safe standing training
can be achieved with the Lifestand wheelchair.
Indications
Lifestand wheelchairs were specifically developed for people who have lost their
ability to stand (e.g. paraplegia, multiple sclerosis, cerebral palsy etc.). Standing
is used for therapy and prophylaxis of:
-
Osteoporosis
Without regular standing / vertical stress of the bones, bone density can
steadily decrease. This leads to the risk of bone fractures and other complications.
-
Decubitus prophylaxis
Whilst standing the pressure on the ischial tuberosity is reduced to a minimum.
-
Skeletal misalignments / back pain
Whilst seated the spinal column is naturally elongated (kyphosis/hunchback). Standing facilitates a natural spinal position and therefore better
upper body stability. This prevents the risk of a scoliosis.
-
Muscular atrophy
Without regular leg movement, the risk of muscle shortening increases
(muscular atrophy) and consequently contractures may develop. Regular,
self-standing training help as movement therapy, thereby avoiding contractures and preventing possible associated pains and expensive operations.
-
Tonus regulation of spasticity
Frequent standing helps to reduce spasticity and facilitates seat movement
and positioning in the wheelchair or bed. This supports a peaceful sleep.
6
User Manual LSR Kid
Indications and Contraindications for the Use of Stand-up Wheelchairs
-
Deeper respiration
Straightening the upper body through standing decreases the pressure of
the abdominal cavity on the lungs. This improves and deepens respiration,
facilitates breathing and can also help reduce the risk of pneumonia.
-
Gastrointestinal complications
As with breathing, standing also reduces the pressure on the digestive
system. This facilitates digestion (intestinal peristalsis) and helps with the
improvement of bowl and bladder functions.
Contraindications
Warning: A Lifestand wheelchair can only be used upon prescription by a doctor. Here are the most common contraindications for the use of a Lifestand
wheelchair.
-
Reduced bone density
Should the bones already be very weak it is not recommended to stand. This
could lead to fractures. In this case consult your doctor for a bone density
measurement.
-
Poor circulation
For heart or circulatory diseases standing should only occur under medical
supervision (cardio training). Please consult a doctor in this case.
-
Severe mobility limitations or severe contractures
7
User Manual LSR Kid
Important information
Important information about the user manual
Congratulations on choosing a LifeStand stand-up wheelchair. Our aim is your
continued satisfaction with your choice of supplier and wheelchair.
Before you start using your wheelchair, it is important to read and understand
this user manual and in particular the section on Safety.
The user manual is primarily intended to inform you about the functions and
capabilities of your wheelchair and to advise you on the best way of using it.
It also contains important safety and maintenance information and describes
some of the problems which might arise when you drive the wheelchair.
Always keep the user manual on or near your wheelchair, as you may need to
consult it for essential information on use, safety and maintenance.
You can also find information on our products on our website. You will find us at
www.permobil.com.
All information and all photographs, illustrations and specifications are based
on the product information that was available at the time this user manual was
printed. Fig.s and illustrations that appear in the user manual are typical examples
and are not intended to be exact depictions of different parts of the wheelchair.
We reserve the right to make changes to the product without prior notification.
If you are visually impaired, this document can be viewed in PDF format at
www.permobil.com or alternatively ordered in large text.
Benefits of a Daily Standing Regimen
The use of any stand-up device should be done only under the prescription and
supervision of a medical professional. At the outset, it is recommended that
your introduction to regular standing be closely monitored by your Physical or
Occupational Therapist.
It has been documented that the regular and cyclical activity of going
from the seated to the standing position may offer many benefits to those
that are no longer able to stand on their own. The benefits are two fold:
1) there is the ability to once again function in daily activities that necessitate
standing (reaching file cabinets and equipment in the workplace, accessing
cupboards/stoves/shelving at home, as well as the ability to interact eye to eye);
and, 2) the potential of physical benefits that result from repeated standing
(these benefits may include improved; range of motion, bone density, circulation,
bowel and bladder function, etc.).
8
User Manual LSR Kid
Technical support, warranty, etc.
Technical support
In the event of technical problems, you should contact your dealer or Permobil
Life Stand Service Center at + 31 (0)45 564 54 90.
Always state the wheelchairs serial number when contacting Permobil to ensure
that the correct information is provided.
Spare part & accessories
Spare parts and accessories must be ordered through your dealer. The expected
service life of this product is 5 years.
Scrapping
Contact Permobil BV or your dealer for information about scrapping agreements
in force.
Warranty
All wheelchairs are supplied with a two-year product guarantee. Batteries and charger are supplied with one year warranty.
Incident reporting
If an incident occurs please contact your nearest Permobil representative.
Normally the same person you contacted at purchase day. To prepare this
contact there is a link on our homepage, on the internet, at www.permobil.com.
Open up your country page and the contact page. Here is the needed contact
information and a guidance document in what information we need to investigate
the incident. Complete the information as much as possible. This is of great help
for us.
To increase the product quality and to ensure that our product is safe through
the whole life cycle we need you to send in Incident Reports. It is also stated
in MEDDEV 2.12-1 and Annex 9 that the manufacturer shall “Encourage users
or those given specific responsibility for reporting incidents that have occurred
with medical devices and that meet the criteria within these guidelines to report
the incidents to the Manufacturer and or to the Competent Authority in accordance with national guidance”.
To meet the requirements and to ensure that our products shall remain safe in
your hands we need your assistance. We hope you never need to use the information on this page but if there is an incident please contact us.
Product approval
This product fulfill the requirements according to EN 12183, ISO 7176-16:1997,
ISO 7176-8 and ISO 7176-14:2008.
9
User Manual LSR Kid
Safety rules and regulations
Safety rules and regulations
A stand-up wheelchair is a complicated product. Therefore, you need to be
very careful when you use and handle it. It is important to read and follow the
instructions and safety rules given in this user manual before starting to use
your wheelchair, as incorrect use could lead to injury to the user or damage to
the wheelchair.
Warning labels
The user manual contains the following "warning labels" which are intended
to draw attention to situations which could lead to problems, near-accidents,
personal injury or damage to the wheelchair, etc.
m CAUTION!
Take care here.
m WARNING!
Take extra care here.
Risk of personal injury or damage to the wheelchair and its surroundings.
Permobil accepts no liability for personal injury or damage to property
which may arise from the failure of the user or other persons to follow the
recommendations, warnings and instructions given in this user manual.
10
User Manual LSR Kid
Safety rules and regulations
Safety rules and regulations
Your wheelchair may have been adjusted precisely to your needs on delivery, so
you should always ask the advice of the person who provided the seat for you
before making changes or adjustments to the wheelchair. Certain adjustments
may impair the wheelchair's safety/functions or its suitability for your needs.
It is also extremely important to take the necessary time to familiarize yourself
with the raising function of the wheelchair before you start using it.
Do not make your first attempt to stand up on your own. Make sure you have
assistance close by if you should need help.
To ensure that the seat has not been damaged during transport to you, please
check the following before initial use:
•
Check that all products ordered are included in the delivery. If you suspect
that something is missing, contact your mobility aids center or Permobil as
soon as possible for further information.
•
Check that no transport damage or other damage has occurred to the seat
or its accessories. If you discover any damage or notice any other problem,
contact your mobility aids center or Permobil as soon as possible for further
information before continuing your inspection.
Also check that the air pressure in the wheelchair tires is correct before you start
using the wheelchair.
If, in any situation, you find that the wheelchair does not behave as expected or
you suspect that something is wrong, contact your service contact or Permobil
for information.
11
User Manual LSR Kid
Safety rules and regulations
Safety rules and regulations
m CAUTION!
Operation
Do not allow children to drive the wheelchair unsupervised. Do not use the
wheelchair on public streets and roads. Follow local regulations for pedestrians
and remember that vehicle drivers may find it difficult to see you.
Do not drive the wheelchair if you are under the influence of alcohol. Alcohol
may affect your ability to use the wheelchair safely.
Some physical limitations or the ingestion of medicines, either prescription or
over the counter medicines, may limit your ability to use the wheelchair safely.
Always consult your physician about your limitations and medicines.
m WARNING!
Maintenance and service
Carry out only the servicing and maintenance activities indicated in this user
manual. All other servicing, changes and interventions in the wheelchair
should be carried out by a qualified service engineer or a person with adequate
knowledge to undertake this in an expert manner. In case of doubt, always
contact a qualified service engineer or Permobil.
Weight limits
The maximum user weight for your wheelchair is specified in the specifications
section of this user manual. If the wheelchair is used by anyone who weighs
more than the maximum permitted user weight, the result may be personal
injury or damage to property, including damage to the wheelchair. This may
also invalidate the wheelchair's warranty.
Do not carry passengers on the wheelchair. This can lead to personal injury
and damage to the wheelchair.
12
User Manual LSR Kid
Safety rules and regulations
Safety rules and regulations
m WARNING!
Driving on sloping surfaces
When you drive up a slope, ensure that you drive the wheelchair straight up the
slope (vertically). If you drive at an angle, there is an increased risk of tipping
over or falling. Be extremely careful when you drive up a slope.
Always avoid driving on slopes covered with snow, ice, gravel, clay, sand, wet
leaves or similar, or where the surface is uneven.
m WARNING!
Operation - turning/cornering
The risk of the wheelchair tipping over increases at high turning speed, in tight
curves, on uneven surfaces, with fast changes of direction and if you drive from
a place with low friction (for example a lawn) to a place with high friction (for
example a gravel road).
To avoid tipping over, with the risk of personal injury or damage to property that
entails, you should always drive slowly when turning/cornering and changing
direction.
Driving on steps and stairs
Wherever you come across obstacles, you should always approach them
slowly, preferably in the company of another person watching or helping you.
The front wheels can be raised from the ground by your carer by treading on
the anti-tip protection on the rear of the chair and pulling back and down on the
carer handle at the same time. Although it is not recommended for the chair
to be tipped back any further (the anti-tip protection will touch the floor), it is
possible. This is done by turning the anti-tip protection to the upper position
(see page 48).
Make sure to put the anti-tip protection into operational mode again once the
procedure is complete.
Driving on inclines
When moving uphill, always lean forwards and avoid changing direction
suddenly. When moving downhill, always lean backwards. It is also important
to keep speed and direction under control.
Make sure that the wheelchair is facing up or down the hill. Never try to drive
diagonally or swing down a slope.
13
User Manual LSR Kid
Safety rules and regulations
Safety rules and regulations
m WARNING!
Passengers
The wheelchair is not designed to transport passengers, whatever their age.
Nor is it designed for taking heavy items other than the user's personal belongings. The maximum user weight specified in the user manual for the seat in
question must not be exceeded. Ignoring this could impair the wheelchair's
maneuverability and stability.
Operation in different climates
Avoid exposing the wheelchair to very low temperatures, prolonged moisture,
heavy rain/snowfall and similar situations.
Do not use the wheelchair when it is icy or slippery outdoors. These conditions
may impair the performance and safety of the wheelchair, which could result
in accident, personal injury and damage to property, including damage to the
wheelchair.
Keep in mind that certain areas of the wheelchair, when exposed to external
sources of heat (e.g. sunlight), can increase in temperature.
14
User Manual LSR Kid
Safety rules and regulations
Safety rules and regulations
m WARNING!
Seat belt (Optional)
The seat belt is only designed to hold the user in place and not as protection
in the case of collision/accident. Check the condition of the belts regularly in
case any damage or worn places have developed. If damage has occured,
contact your equipment provider for replacement.
Getting in and out of the chair
Make sure the wheelchair brakes are activated before getting into or out of
the wheelchair.
When getting into or out of the wheelchair, you should take all precautions to
reduce the distance between the wheelchair and the point to which the user is
moving. If this distance is increased, it could result in the user losing balance
or falling over.
We recommend that users get in and out with another person present to keep
an eye on the operation or to help.
Be careful when bending down or reaching out to get something.
Do not use the foot plates or armrests as supports when getting into or out
of the wheelchair. The foot plates and armrests are not intended to support
heavy loads. Unnecessarily high load could cause them to give way, which
could result in personal injury or damage to property, including damage to the
wheelchair.
15
User Manual LSR Kid
Safety rules and regulations
Safety rules and regulations
m WARNING!
Transport
The wheelchair must only be transported in vehicles approved for this purpose.
Carefully check that the wheelchair is properly secured. An inadequately
secured wheelchair could cause major damage and injury if it broke loose, both
to persons in the transport vehicle and to the vehicle and the wheelchair itself.
Use in motor vehicles forbidden
We recommend that users are NOT transported in any vehicle while seated
in the wheelchair. The only safe option is for the user to move to a seat in the
vehicle and to use the vehicle's seat belt system.
Do not sit in the wheelchair in a moving vehicle. In the event of an accident
or a sudden stop, the user could be thrown from the chair, resulting in serious
injuries.
The optional seat belt is solely designed to hold the user in place and offers no
protection in the event of an accident.
The sticker indicates that the wheelchair is not approved to use as a seat in
motor vehicles.
16
User Manual LSR Kid
Safety rules and regulations
Safety rules and regulations
m CAUTION!
EMC Requirements
The electronics of an power wheelchair can be affected by external electromagnetic fields (for example from mobile telephones). Similarly, the electronics
of the wheelchair itself can also emit electromagnetic fields that can affect the
immediate surroundings (for example certain alarm systems in businesses).
The limit values for Electromagnetic Compatibility (EMC) with respect to power
wheelchairs is set in the harmonized standards for the EU in the Medical
Devices Directive, No. 93/42/EEC.
Permobil LifeStand’s electronic wheelchair’s comply with these limit values.
m WARNING!
Flame resistance
The material components have been tested against flammability. Seat cushion
and back cushion have been tested according to European flammability testing. (EN1021-1:2006 and EN1021-2:2006). The control box has been tested
according to UL 94-VO.
Maintenance and service
Carry out only the servicing and maintenance activities indicated in this user
manual. All other service, alterations and changes to the wheelchair and the
vital systems of its accessories must be carried out by a competent service
engineer or a person suitably qualified to do so in an expert manner. In case
of doubt, always contact a qualified service engineer or Permobil.
Use only spare parts or accessories approved or recommended by Permobil.
All other use could lead to changes which might impair the functions and safety
of the wheelchair. It could also lead to the warranty for your wheelchair becoming invalid.
17
Safety rules and regulations
User Manual LSR Kid
m WARNING!
Damage to/breakdowns in the wheelchair and its accessories
If at any point you notice that the wheelchair and its various functions are not
behaving as expected or if you suspect something is wrong, stop using your
wheelchair as soon as possible, turn off the wheelchair and contact your mobility
aids center or Permobil for information.
It is extremely important that Permobil is informed if the wheelchair or its
accessories have been damaged during transport, during driving or for any
other reason as soon as possible after the damage has occurred. There could
be a risk that the wheelchair and its accessories can no longer be operated
safely and without danger.
Disposal
Used wheelchairs and batteries, or defect batteries must be disposed of
according to applicable local waste disposal regulations and in an environmentally friendly manner.
18
Safety rules and regulations
User Manual LSR Kid
WARNING!
Clamping points
In the following positions of the wheelchair there is an increased risk of entrapment. Please exercise particular caution here. Pay attention to the marked
areas on the gap between moving and stationary parts. Danger that lose items
of clothing or hands could become clamped.
19
User Manual LSR Kid
Design and function
Design & function
General
LSR Kid is a manual wheelchair for outdoor and indoor use. It is intended for kids
with physical disabilities. Its raising function allows the user greater freedom of
movement. We recommend gradual training in standing up under the guidance of a
physiotherapist before you use "LSR Kid" every day. You will gain the greatest benefit
in standing up if you regularly switch between a sitting and a standing position. This
alternation is simple with the LSR Kid wheelchair.
The wheelchair is equipped with armrests, footplates, anti-tip protection and
battery charger.
Overview
5
1
2
6
3
4
7
1.
2.
3.
4.
5. Back rest
6. Rear wheels
7. Front wheels
Armrest
Knee supports
Leg rest
Foot plate
20
User Manual LSR Kid
Design and function
Raising function
The electric raising function makes it possible for the user to stand up in their
wheelchair. This function is accessed from a control panel located on one armrest.
Stand-up function
21
User Manual LSR Kid
Design and function
Control panel for raising function
The control panel has two buttons to control the seat's raising function. The
control panel can be fitted to either armrest in the position that best suits the user.
There is a socket at the front of the control panel for connecting the accompanying battery charger.
Function keys
22
User Manual LSR Kid
Operation
Operation
General
LSR Kid is designed for use both indoors and outdoors. For use indoors, attention
must be paid when driving in narrow corridors, when passing through doors and
entrances and when traveling on elevators and ramps, etc. Remember that there
is a risk of crushing when using the electrical raising function.
Outdoors you must remember to travel very slowly on steep downhill slopes and
take great care on uneven surfaces, uphill slopes and sideways gradients. Always
observe a good safe distance when driving near edges and precipices.
We recommend that you practice in an environment in which you feel safe so
that you are very familiar with how the wheelchair and its accessories behave
in different situations before you start to use the wheelchair in public locations.
Armrests
The armrests can be folded backwards to facilitate when getting in and out of
the chair. See fig. below.
23
User Manual LSR Kid
Operation
Raising function
General
The wheelchair seat is operated via its
control panel. The control panel has
two buttons. Before using the raising
function, it is extremely important that
all the seat's settings are adapted to the
current user. More detailed information
on adjustments can be found on
pages 32-49.
Left button (Arrow forward)
This button is used to operate the raising function from sitting to standing
position, or to move from reclined to
sitting position.
Right button (Arrow backward)
This button is used to move from standing to sitting position, or to move from
sitting to a reclined position.
NOTE! The raising function will only
work when the knee support is correctly
mounted and the armrests are in raising
position. See page 26-27.
Control panel
m WARNING!
Use the raising function with
great care and be aware of the
danger of crushing.
Using the control panel, the position of the seat can be changed between
reclined, normal sitting and standing position.
24
User Manual LSR Kid
Operation
Raising function
m WARNING!
Make sure that the wheelchair is on a flat, horizontal surface, free of obstacles
or ground depressions.
Make sure the brakes are activated! If this is not the case, the wheelchair may
roll away, with the risk of personal injury.
Make sure that the knee supports are correctly secured. See page 26.
Make sure that the armrest is correctly secured in the raising position. See page 27.
During the activation of the electric function to reach the standing- or the relax
position, make sure to keep your arms on the armrests. You might trap your fingers
into the moving parts, especially around the armrest.
During the activation of the
electric function to reach the
standing- or the relax position,
make sure to keep your arms
on the armrests.
Raising
Press the right or left button, depending on whether the seat is to be raised to
the standing position or lowered to the normal or reclined position. To stop the
system, release the button. You can stop at any intermediate position. Once the
system has reached its end point, it will stop automatically.
m CAUTION!
Stress on the muscles may be relieved by taking regular rest periods.
Make sure that the coiled cable never wraps around the armrest, either in the
position for the armrest or the chest support, as it may be damaged when the
armrest swings round. If the cable is damaged due to being cut or squeezed,
this is not covered by the warranty.
25
User Manual LSR Kid
Operation
Raising function
Knee supports
Before raising may commence, the knee supports must be secured in the right position. The knee supports place pressure on the upper section of the shin when the
wheelchair mechanisms work together to raise the body to the standing position.
Securing the knee support
Position the knee supports into its bracket on the front of the seat. Make sure its
fully positioned into the bracket.
NOTE! If the knee support isn’t fully positioned the raising function will not work.
Remove the knee support
Remove the knee support by pulling
it strait out of its bracket.
m CAUTION!
The knee support may only be
removed in sitting position.
Mounting/removing the knee supports.
26
User Manual LSR Kid
Operation
Raising function
Armrest
Before raising may commence, the armrests must be secured in the right position. The armrests then provide support for the upper body during the raising
process and in the standing position.
Secure the armrests in the raising position
Lift the armrests and turn them inwards at the same time. With the outer angled
section of the armrests in the horizontal position, lower the armrests again so that
they are secured in the raising position.
NOTE! If the armrests aren’t correctly positioned in raising position the raising
function will not work.
Armrests in normal position.
Armrests in raising position.
m CAUTION!
Make sure that the coiled cable never wraps around the armrest, either in the
position for the armrest or the chest support, as it may be damaged when the
armrest swings round. If the cable is damaged due to being cut or squeezed,
this is not covered by the warranty.
27
Driving Rules
User Manual LSR Kid
Driving Rules
m WARNING!
To prevent tipping with personal injury and property damage as a result, it is advisable to reduce
the speed when turning, cornering and such manuevers.
Never drive rapidly or at full speed along narrow passages, on narrow sidewalks, etc. where an
incorrect maneuver or incorrect steering can cause an increased risk of accidents.
Keep in mind that driving across slopes will have an effect on the wheelchair and could make it
steer to the side. Never drive at full speed across slopes.
Driving over Obstacles
Driving over tall edges increases the risk of tipping over as well as the risk of
damage to the wheelchair.
Negotiating obstacles must always be done with great care. Negotiating obstacles may sometimes be facilitated by not running perpendicular towards the
Obstacle. Obstacles must not be negotiated with larger angle than 10°, ie. one
pivot wheel must not pass the obstacle more than 90 mm. before the other pivot
wheel, as this increases the risk of tipping.
m WARNING!
Negotiating obstacles must always be done with great care.
28
Driving Rules
User Manual LSR Kid
Driving Rules
Driving on Sideways Slopes
Driving on a sideways slope must always be performed with great care.
Avoid abrupt avoidance maneuvers and never maintain a speed higher than that
at which you can maneuver the wheelchair in a safe and secure manner.
When driving on sideways slopes with an uneven surface (for example
grass, gravel, sand, ice or snow) a great deal of extra care must be observed.
m WARNING!
Driving on a sideways slope must always be performed with great care.
29
Driving Rules
User Manual LSR Kid
Driving Rules
Driving downhill
You should always drive downhill at low speed and with great caution.
Avoid braking suddenly and sudden evasive maneuvers and never drive so fast
that you are unable to control the wheelchair safely without risks.
You should be extremely careful when driving downhill on an uneven surface (for example grass, gravel, sand, ice and snow).
m WARNING!
You should be extremely careful when driving downhill on an uneven surface (for example grass,
gravel, sand, ice and snow).
Always drive with great caution and at low speed.
30
Driving Rules
User Manual LSR Kid
Driving Rules
Driving uphill
You should always drive uphill with great caution.
Avoid sudden evasive maneuvers and never drive so fast that you are unable to
control the wheelchair safely without risks.
You should be extremely careful when driving uphill on an uneven surface
(for example grass, gravel, sand, ice and snow).
m WARNING!
You should be extremely careful when driving uphill on an uneven surface (for example grass,
gravel, sand, ice and snow).
Always drive with great caution and at low speed.
31
User Manual LSR Kid
Adjustment
Adjustment
Legrest and footplate
Height & angle
For the best sitting comfort and to achieve the correct position for standing up,
the distance between the footplate and the seat must be adjusted to a suitable
length. It is important that the seat cushion that the customer will then use is also
used when adjusting the height of the footplate.
The length of the legrest is then adjusted so that the user's thighs are parallel with the
seat frame, but a little higher at the front of the cushion. The result will then be suitable pressure on the thigh and bottom when sitting, as well as a suitable hip rotation
and extension in the standing position.
The leg rest length adjustment is carried out in 10 fixed stages. The same
screws are used to adjust the angle of the foot plate (to plus or minus 10
degrees). If further adjustment of the leg rest length is needed, the footplate
brackets can be turned up side down, which will enable the foot plate to be set
higher up. See page 33.
1. Remove the foot plate, which is attached by two screws on the left or right
side.
2. Fit the foot plate to the required hole configuration on the leg rest. Fit using
the upper screws.
3. Adjust the foot plate to the required angle and secure with the lower screws.
Adjustment of leg rest length
32
User Manual LSR Kid
Adjustment
Reversing the foot plate brackets
If further adjustment of the foot plate height is necessary, it is possible to reverse
the brackets, which will enable the foot plate to be set higher up.
1. Remove the foot plate, which is attached by four screws and nuts on the left
and right hand side. See fig. below.
2. Remove the foot plate brackets, which are attached by two screws and nuts
each. See fig. below.
3. Turn the foot plate brackets up side down and reattach them on the legrest.
See fig. below.
4. Reattach the footplate using the four screws and nuts. See fig. below.
Reversing the footplate brackets
33
Adjustment
User Manual LSR Kid
Knee supports
Distance and angle
1. Loosen the screws (A) holding the knee support pads in place.
2. Adjust the distance between the pads and their angle to the required position.
3. Secure in the required position by tightening the screws (A) again.
A
A
Adjustment of the distance between the knee supports and their angle.
34
Adjustment
User Manual LSR Kid
Depth
1. Loosen the screw (B) on the left and right hand side of the knee support.
2. Adjust the knee support to desired position.
3. Secure in the required position by tightening the screws (B) again.
Height
The height of the knee support is set by adjusting the rubber pads (C) on the left
and right hand side of the leg rest.
1. Loosen the nuts that secures the position of the rubber pads (C).
2. Adjust the rubber pads (C) to get required height on the knee support.
3. Secure in the required position by tightening the nuts again.
B
C
Adjustment of the depth and height.
35
User Manual LSR Kid
Adjustment
Seat depth
The seat depth can be adjusted in 7
fixed stages, from 24-36 cm. There
are two measurements required to
be able to adjust the seat depth
correctly:
•
•
The length of the thigh - the
length of the thigh in sitting position (from the backside to the front
of the knee. (Dimension "D" on
page one of the order form).
B
A
Seat depth - The measurement
from the front of the leg rest to
the plastic plug on the rear of
the seat frame.
1 2 3 4 5 6 7
C
Adjusting the seat depth.
1. Remove the screws (A) securing the setting for the depth of the seat frame
on the left and right hand side of the seat.
2. Remove the back rest hinge on the left and right hand side of the seat, they
are fitted with one screw each. Adjust the number of straps, see table below.
Fit the back rest hinge on the left and right hand side of the seat in the
desired position (C) using the intended screws and nuts. Adjust the depth
of the seat frame by counting how many holes (B) that are visible on the
inner tube, see table and figure below. Secure the required setting using the
screws previously removed.
Seat depth (measured from the front of
the leg rest to the plastic plug on the rear
of the seat frame)
Position
Visible holes (on the
seat frame inner tube)
Seat depth - 24 cm
1
0
Seat depth - 26 cm
2 std.
1
Seat depth - 28 cm
3
2
Seat depth - 30 cm
4
3
Seat depth - 32 cm
5
4
Seat depth - 34 cm
6
5
Seat depth - 36 cm
7
6
36
Straps
Qty.
3
4
5
User Manual LSR Kid
Adjustment
Center of gravity
Once the seat depth has been
adjusted, it may be necessary to
adjust the center of gravity. This is
done by moving the mounting for
the rear wheels in 7 fixed positions.
Adjusting the centre of gravity also
requires adjustment of the brakes.
See page 49.
1 2 3 4 5 6 7
1. Release the two screws and
nuts on the left and right side
of the chair that hold the rear
wheel mounting in place.
Secure the wheel mounting
using the two screws and nuts.
2. Return the wheel mounting to
the required position.
m CAUTION!
If the rear wheel mountings are moved forwards, the center of gravity moves
backwards, which means that the front section of the wheelchair will be lighter
and the wheelchair may more easily tip backwards.
If the rear wheel mountings are moved backwards, the center of gravity moves
forwards, which means that the front section of the wheelchair will be heavier
and the wheelchair will be more stable.
m WARNING!
Adjusting the centre of gravity also requires adjustment of the brakes. See page 49.
Adjusting the rear wheel mounting changes the center of gravity and driving
properties of the wheelchair. For this reason, particular attention should be paid
when the user then tries the chair for the first time.
Seat width
The seat width can be adjusted in 4 fixed stages, from 28-34 cm. This adjustment must only be performed by authorised technicians, contact your dealer or
Permobil LifeStand service centre.
37
User Manual LSR Kid
Adjustment
The height of the armrest
The height of the armrest can be adjusted in six fixed positions to provide the user
with optimal comfort. The straps on the backrest needs to be configured depending
on the position of the armrest and the height of the backrest. See page 45.
Adjustment
1. Loosen the two screws, washers and nuts holding the armrest on the left and
right hand side of the back rest frame, See fig. In some configurations, the push
handles are fixed with the same screws as the arm rests.
2. Configure the back rest straps, see page 45.
3. Refit the armrest to the required position and secure using the screws, washers and nuts. In some configurations, the push handles are fixed with the same
screws as the arm rests.
m WARNING!
Do not subject the armrests to load when adjusting them. Risk of crushing.
The armrest is attached using two screws.
38
Adjustment
User Manual LSR Kid
6
5
4
3
2
1
The height of the armrest can be adjusted in six fixed positions
to provide the user with optimal comfort. Here mounted in position 2.
39
User Manual LSR Kid
Adjustment
The length of the armrest
The length of the armrest can be adjusted in four fixed postions to provide the user
with optimal comfort.
Adjustment
1. Move the rubber of the armrest forward to get acces to the screw, see fig. below.
1. Loosen the screw holding the armrest, see fig. below.
2. Refit the armrest to the required hole configuration and secure using the screw,
see fig. below.
m WARNING!
Do not subject the armrests to load when adjusting them. Risk of crushing.
Adjusting the length of the armrest.
40
Adjustment
User Manual LSR Kid
Back rest angle
For optimal comfort, the back rest angle can be adjusted from -5° to +25°.
1. Undo the two screws on the left and right hand side that fixes the back rest angle.
2. Adjust the back rest to the required angle and secure by tightening the screws
again.
The angle of the back rest is secured using two screws on the left or right side.
m CAUTION!
When moving from a sitting to standing position, the selected back rest angle
can cause an undesirable effect. For example, it is possible that a straighter
back angle that works well in a sitting position may have a tendency to cause
a position that is inclined too far forward in a standing position.
Conversely, a reclined angle may cause a position that is too far inclined and
unstable in a standing position. This can be adjusted using the equalization
system, see page 46.
41
User Manual LSR Kid
Adjustment
Height of the Push handles/Back rest frame
For optimal comfort, the height of the push handles/back rest frame can be adjusted
in six fixed positions.
Adjustment
1. Undo the screw, washer and nut that fixes the push handles on the left and right
hand side of the back rest. Move the back rest straps upwards/downwards if
needed to get acces to the screws. In some configurations, the push handles are
fixed with the same screws as the arm rests.
2. Adjust the armrest height if needed and configure the back rest straps,
see page 45.
3. Remount the push handles into required position using the screws, washers
and nuts. In some configurations, the push handles are fixed with the same
screws as the arm rests.
m WARNING!
Do not subject the push handle to load when adjusting it. Risk of crushing.
The push handle is fitted with a screw, washer and nut on the left and right
hand side of the back rest frame. In some configurations, the push handles are
fixed with the same screws as the arm rests
42
Adjustment
User Manual LSR Kid
1
2
3
4
5
6
The height of the push handles/back rest frame
can be adjusted in six fixed positions. Here mounted in position 6.
43
User Manual LSR Kid
Adjustment
Height of the Back rest
For optimal comfort, the height of the back rest can be adjusted. The adjustment is
performed by mounting required number of straps on the back rest frame and
positioning the top strap at desired height. See fig. below and table on page 45.
The back rest straps should be configurated according to description on page
45. Adjustment of the armrest and the push handles might be needed, See page
38 and 42.
Self-threading screw
t
eigh
st h
k re
Bac
Configuration of the back rest straps
44
Adjustment
User Manual LSR Kid
Replacing/Reconfiguration of the backrest straps
The number of straps mounted below/above the armrest often needs to be reconfigured when the height of the armrest, back rest or push handles are adjusted. The
push handles and the armrests needs to be removed while replacing or configure
the backrest straps positioned underneath respectively. Position the straps in to the
desired positions. The top strap is secured with a self-threading screw on the left and
right hand side of the back rest frame. See fig. on page 44.
Armrest height
1
2
3
4
5
6
I (42 cm)
01/04
02/04
02/03
02/03
03/02
03/02
H (40 cm)
01/04
02/03
02/03
02/02
03/02
03/02
G (38 cm)
01/03
02/03
02/02
02/02
03/01
03/01
F (36 cm)
01/03
02/02
02/02
02/02
03/01
03/01
E (34 cm)
01/02
02/02
02/02
02/01
03/01
D (32 cm)
01/02
02/02
02/01
02/01
C (30 cm)
01/01
02/01
02/01
B (28 cm)
01/01
02/01
A (26 cm)
01/01
Backrest height
Straps below/above the armrest.
Straps below/above the armrest.
Straps below/above the armrest.
Straps below/above the armrest.
Straps below/above the armrest.
Straps below/above the armrest.
Straps below/above the armrest.
Straps below/above the armrest.
Straps below/above the armrest.
45
User Manual LSR Kid
Adjustment
Equalization system
When moving from a sitting to standing position, the selected back rest angle
can cause an undesirable effect. For example, it is possible that a straighter
back angle that works well in a sitting position may have a tendency to cause
a position that is inclined too far forward in a standing position. Conversely, a
reclined angle may cause a position that is too far inclined and unstable in a
standing position.
The 'equalization system' allows a more inclined or upright back rest angle in a
standing position compared with the back rest angle in a seating position.
The upper and lower seat frame and the back rest frame are all fitted to the back
joint attachment. The lower seat frame can be fitted in three different positions.
See fig.
46
User Manual LSR Kid
Adjustment
Position 1:To get a constant angle on the back rest when raising, fit the screw
to position 1.
Position 2: In order to get the back rest to recline a further 7° in the raised position,
fit the screw to position 2.
Position 3: In order to get the back rest to incline forward a further 6° in the raised
position, fit the screw to position 3.
Remove the screw holding it under the seat frame and replace in the required
position. Make sure that the wheelchair is both comfortable and secure in both
sitting and standing position. Adjust if necessary.
2
1
3
The lower seat frame can be fitted in three different positions.
47
User Manual LSR Kid
Adjustment
Anti-tip protection
The anti-tip protection is fitted to the rear of the wheelchair. It can prevent the
wheelchair from tipping over. Used correctly, they help the user to negotiate
obstacles, such as a pavement. Using the anti-tip protection is recommended in
all circumstances. However, it may sometimes be necessary to temporarily fold
up the anti-tip protection; for example, in order to raise the front wheels from the
ground in order to get over a curb or other obstacles.
Folding up the anti-tip protection
1. Press the lock button to release the anti-tip protection.
2. Turn the anti-tip protection upwards so that the wheels are in the upper position.
Turn the anti-tip protection down again as soon as possible.
Folding the anti-tip protection down
Turn the anti-tip protection downwards so that the wheels are in the lowest
position. Make sure that the lock button secures the anti-tip protection in this
position.
Anti-tip protection in up position.
Anti-tip protection in down
position.
m WARNING!
As the wheelchair may tip backwards when the anti-tip protection is not down,
it is extremely important that it is always down when the wheelchair is in use.
Using the wheelchair without having the anti-tip protection down may lead to the
wheelchair tipping, causing personal injury and damage to the wheelchair.
48
User Manual LSR Kid
Adjustment
Brakes
The brakes must be adjusted regularly. Adjustment is also required as soon as
the rear wheel attachments have been moved. With the rear wheels of 20” in position 7 (see page 37), the brackets of the brakes needs to be reversed.
Adjusting
1. Undo the two screws (A) holding the brake mechanism on the left and right
hand side of the chair. See fig.
2. Move the brake mechanisms along the chassis frames to the required position.
3. Tighten the two screws (A) on the left and right hand side of the chair. Make
sure the wheels are locked when the brakes are engaged. Perform the adjustment again if needed.
Reversing the bracket
1. Remove the brake and its bracket, they are fitted with four screws (A+B).
2. Turn the bracket 180° and refitt using the four screws (A+B).
3. Adjust the brakes according to description above.
m CAUTION!
The air pressure of the tire has a huge impact on the ability of the brake to lock
the wheel. Therefore make sure that the tires have the correct air pressure before
adjusting the brakes.
A
A
B
B
Standard position
Reversed position
The brake mechanism is attached by four screws. The bracket is reversed when
the rear wheels are 20” models and are mounted in position 7 (see page 37).
49
Transport
User Manual LSR Kid
Transport
The wheelchair must only be transported in a vehicle that is approved for such
purposes.
Check that the wheelchair is properly fastened and that the wheel locks are
engaged. When transporting the wheelchair in a vehicle, the wheelchair must
be locked into position by running fastening straps through the brackets in the
front and the back.
Secure the wheelchair according to the manufacturer of the vehicle restraint systems instructions. Always make sure that the fastening points on the transport
vehicle are well-anchored.
m WARNING!
Transport
The wheelchair can only be transported by vehicles that are designed for this
purpose. Ask the driver of the vehicle and make sure that the vehicle is suitable,
equipped and insured for a wheelchair user. A wheelchair is not built as a car
seat and can therefore cannot offer the same safety as a standard car seat, even
if it is securely fixed into the vehicle.
Check that the wheelchair is carefully secured and the wheel lock is not activated (the drive wheels of the wheelchair must be locked). The wheelchair can
be secured from the front or back with transport belts.
Use as seat in motor vehicles prohibited.
50
User Manual LSR Kid
Transport
Wheels
In order to reduce the total size of the wheelchair for transport or storage, the
wheels can easily be removed.
Removal
Press on the button in the center of the wheel and pull the wheel fully out.
Assembly
Press the button in the center of the wheel and push the wheel axle into the
wheel attachment until it stops and locks securely. Make sure that the wheel is
correctly secured before using the wheelchair.
m WARNING!
Make sure that the wheels are correctly secured before using the wheelchair.
51
User Manual LSR Kid
Transport
Back rest
In order to reduce the total size of
the wheelchair for transport or storage, the back rest can easily be
folded down.
Folding down the back rest
Undo the two locking pins for the
back rest joint by pulling on the cord
on the rear of the back rest and
carefully folding the back rest forward at the same time. See fig.
Unfolding the back rest
Carefully unfold the back rest until
the locking pins secure the back rest
in the fully unfolded position.
Release the two locking pins by pulling
the string on the back of the back rest
upwards.
52
Transport
User Manual LSR Kid
Lifting points
If two attendants need to lift the wheelchair, please follow the instructions below.
Make sure the wheelchair is in seated position, not in relaxed or standing position.
The two attendants has to be positioned on right and left hand side of the
wheelchair. With a firm grip with one hand on the back rest tube and the other on
the chassis frame, the wheelchair can be lifted in a safe manner.
53
Maintenance and repairs
User Manual LSR Kid
Maintenance and repairs
General
To ensure that your wheelchair works well, it is important for it to be used correctly
and regularly maintained (at least every 3 months). A well maintained wheelchair
lasts longer and has a lower risk of faults.
m CAUTION!
Some repairs may require tools that are not supplied with the wheelchair.
m WARNING!
Any unauthorized alterations to the wheelchair and its systems may lead to an
increased risk of accident.
All alterations to and interventions in the wheelchair's vital systems must be
performed by a competent service engineer. In case of doubt, always contact
a qualified Permobil service engineer.
54
User Manual LSR Kid
Maintenance and repairs
Batteries/storage
• Please note that a battery discharges itself and that a discharged battery can
burst when it is cold. If the wheelchair is to be stored unused for an extended
period of time, the batteries must always be charged once a month to avoid
damaging them.
• The output stage must be switched off during a storage period.
• The wheelchair must not be stored in areas subject to condensation (steam
or moisture on surfaces) for example, utility rooms or similar.
• The wheelchair may be stored in an unheated room. From the point of view
of corrosion, it is best for the room to be a few degrees warmer than the
surroundings as this keeps the room drier.
• The life of the battery depends entirely on regular charging.
Short-term storage
For the charging process to produce a battery with good capacity, the temperature in the storage room should not be lower than +5 degrees. If it is stored at
a temperature below +5 degrees, there is a higher risk that the battery has not
been fully charged when it comes to be used and also a higher risk of corrosion.
Long-term storage
The batteries may be stored in an unheated room but they should be charged at
least once a month for maintenance purposes.
m WARNING!
Be careful when using metal objects when working with batteries. A short-circuit
can easily cause an explosion. Always use safety gloves and safety goggles.
Battery replacement
If the number of “stand up cycles“ with a fully charged battery decreases by
50% or more, it might be necessary to replace the batteries. Please contact a
Permobil Life Stand dealer to have the batteries checked and if needed replaced.
Do not attempt to replace the batteries yourself, only a Permobil Life Stand
dealer is allowed to open the control box.
55
User Manual LSR Kid
Maintenance and repairs
Charging batteries
If the battery level falls too low, the control panel will emit an acoustic signal that
indicates that the batteries need charging. In that case, the battery has enough
power for a further 10 cycles. We recommend that the user return to sitting
position and charge the batteries before using this function again.
m CAUTION!
The batteries must be fully charged before using the wheelchair for the first time.
Note! Make sure the power module is switched on before connecting the charger.
1. Connect the charger cable to the control panel or the power module.
2. Connect the charger to a 230 volt wall socket. The light signal on the charger
is orange during charging. When the batteries are charged, a green light will
be displayed on the charger.
3. Once charging is complete, unplug the charger from the wall socket before
the cable is removed from the control panel/power module.
It takes between 4-5 hours to fully charge the batter.
Charger cable connected to the
control panel.
Charger connected to a
230 volt wall socket.
56
User Manual LSR Kid
Maintenance and repairs
Cleaning
Regular care and maintenance will prevent unnecessary wear and damage to your
wheelchair. Below is some general advice. For severe soiling of the upholstery or
damage to the surface finish, contact Permobil for information.
Upholstery, fabric/vinyl
For normal cleaning, wash the upholstery with lukewarm water and a mild nonabrasive soap. Use a soft cloth or brush. Before the surface dries, wipe off any
water/soap residues with a clean, dry cloth. This procedure may be repeated to
remove stubborn dirt or stains.
Metal surfaces
For normal cleaning it is best to use a soft cloth/sponge, hot water and a mild
detergent. Wipe down carefully with a cloth and water, and dry off.
Remove scuff marks from semi-matt surfaces with soft wax (follow manufacturer's
instructions).
Remove scuff marks and scratches from shiny surfaces using car polish,
either liquid or paste. After polishing, apply soft car wax to restore the original
surface gloss.
Plastics
For normal cleaning, wash plastic surfaces with a soft cloth, mild detergent and
hot water. Rinse thoroughly and dry with a soft cloth. Do not use solvents or
abrasive kitchen cleaners.
Control panel and Power Module
Use a soft, damp cloth with a mild detergent. Do not use solvents or abrasive
kitchen cleaners. The control panel and power module must not be rinsed with
water or any other liquid.
Checking the seat belts
If the wheelchair is equipped with a seat belt, the condition of the belt must be
checked regularly to ensure no damage or worn areas have developed.
m WARNING!
Never hose the wheelchair down as the electronics may be damaged. The
wheelchair must always be turned off when being cleaned.
57
User Manual LSR Kid
Maintenance and repairs
Wheels
Check at regular intervals that the wheelchair's tires have the correct tire pressure. The correct tire pressure provides
the best movement and comfort, and a
lower risk of puncture.Therefore check
regularly that the tires have a pressure
of 750 kPa. (7.5 bar).
Pumping tires with air
1. Unscrew and remove the plastic cap
on the tire valve.
2. Connect the compressed air nozzle
to the valve and adjust the tire
pressure to the correct level.
m WARNING!
The recommended tire pressure is 750
kPa (7.5 bar). Overfilling entails a risk of
explosion.
The incorrect tire pressure may result
in lower stability and maneuverability.
So check regularly that the tires have
the correct pressure.
58
Filling valve.
User Manual LSR Kid
Serial number label
Serial number label
Max user weight
Year of production
Code for
funding.
Seat width
Serial number
Model name
Serial number label
59
User Manual LSR Kid
Power Module
CB02 Power Module
The power module contains the control electronics of the standing-sitting function and the battery. The front has several connections and an On/Off switch.
During long time storage, always put the On/Off switch to “Off”.
For proper operation, avoid humid environments, strong sunlight, temperatures over
+50°C and below -20°C.
When charging the battery, always make sure the On/Off switch is in position “On”.
Emergency operation of seat functions
If standing-sitting function cannot be operated in the normal way because of a
fault other than discharged battery or a faulty adjustment device, the function can
be operated manually by moving the actuator plug from outlet no. 4 ”ACTUATOR”
into outlet no. 2 ”EMERGENCY”.
The seat will now automatically move down. When the user is in seated position, move the plug back from outlet no. 2 ”EMERGENCY” into outlet no. 4
”ACTUATOR”. If the plug is not removed from outlet no. 2 ”EMERGENCY”, the
seat will recline further into the relax position.
The specialist dealer must then be contacted to rectify the cause of the malfunction. Until it has been repaired by the specialist dealer, the electric function can
no longer be used.
CHARGER
ON/OFF Switch
EMERGENCY
CB02 Power Module.
60
User Manual LSR Kid
Recommended Seat Cushions
Recommended Seat Cushions
The setting of seat width and seat depth requires different sizes of seat cushions.
The table below shows recomended cushions.
Seat width
Seat Depth
24
26
28
30
32
34
36
28
28X25
28X25
28X28
28X28
28X32
28X32
28X32
32
N/A
N/A
28X32
28X32
32X32
32X32
32X36
30
34
28X25
N/A
28X25
N/A
28X28
28X32
28X28
28X32
61
28X32
32X32
28X32
32X32
32X32
32X36
User Manual LSR Kid
62
Technical specifications
User Manual LSR Kid
Technical specifications
General
Name................................................................................ LSR Kid
Dimensions and weight
Max. User Weight . ..........................................................
Seat width.........................................................................
Seat depth........................................................................
Seat angle .......................................................................
Maximum safe slope .......................................................
Total Width........................................................................
Total Length . ...................................................................
Total Height .....................................................................
Reversing width .............................................................
Weight .............................................................................
Mass of the heaviest part of the wheelchair ...................
50 Kg.
280/300/320/340 mm.
240/260/280/300/320/340/360 mm.
4,5°- 6°
8,5°
550 - 610 mm.
890 mm.
950 mm.
950 mm. (+/-25 mm.)
24 kg.
22 kg.
Wheels
Rear tire dimensions ....................................................... 20”x1”/22”x1”
Camber ........................................................................... 0º/6°
Rec. tire pressure . .......................................................... 750 kPa. (7.5 bar)
Batteries
Battery capacity................................................................ 24V, 2Ah.
Frame
Aluminum frame coated with corrosion protective colour.
ELECTRICAL SYSTEM CB02 Power Module:
Box: KYDEX (acrylic-polyvinyl chloride)
IP23
UL 94 - VO
Current 24V.
The maximum motor output current is limited to 8A. Operation mode: 10%, 2 min/18 min.
Battery
The wheelchair is factory equipped with maintenance-free AGM batteries.
12V 2Ah protected by 10A fuse.
Charger
Friwo Pb Charger
Type: FW 7218M/24
IP40
Class 2
Input: 220 – 240 V AC / 50-60 Hz / 250 mA / 25 VA
Output: 24 V DC/ 0,5 A / 12 VA
63
EN
Order no.: 205276-UK-0