1
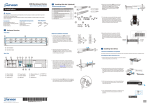
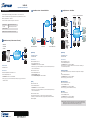
VMS2.4.5
QUICK INSTALLATION GUIDE
System Architecture
Multiple Servers + CMS Client
Standalone Server + Remote Web Client
The Video Management Software (VMS) operates in scalable client - server architecture. This
VI Server
architecture can be divided into three types: (1) Standalone Server (2) Standalone Server + Remote
Web Client (3) Multiple Servers + CMS Client.
CMS Domain Server
NVR
These are the hardware requirements for using PCs as Server or Client.
Server
Operating System
32~64 bit Windows XP or above
Hard Drive
SATA 7200 RPM, 500 GB or above
Ethernet Connection
NVR
Note: Please refer to VMS User Manual for more details.
Server
request
Standalone Server (Client-Server All-in-One)
response
NVR Server
Local Client
VI Server
Remote Web Client
NVR
NVR Server
No installation needed.
Use PC as Server
[NVR Server]
[NVR Server]
Use SMR/NVR as Server.
Use SMR/NVR as Server
No installation needed.
No installation needed.
Use PC as Server
Use PC as Server
Install the VMS/NVR Server on a PC:
Install the VMS/NVR Servers on PCs:
1. Insert the VMS/IPCAM product CD.
2. Click VMS Suite on the menu to start the installation.
3. Choose Advanced Setup to uncheck the VMS Client. The VI Server can also be unchecked, if you
don’t need video analytic functions.
2. Click VMS Suite on the menu to start the installation.
3. Choose Advanced Setup to uncheck the VMS Client. If you don’t need video analytic functions, the
VI Server can also be unchecked.
Install the Web Server on the PC:
Install both the VMS/NVR Server and VMS Client on a PC:
1. Insert the VMS/IPCAM product CD.
1. Insert the VMS/IPCAM product CD.
2. Click Browse CD/DVD in the menu.
2. Click VMS Suite on the menu to start the installation.
3. Double click WebServerSetup.exe to start the installation.
3. Choose Typical Setup. If you don’t need video analytic functions, Advanced Setup can be selected to
uncheck the VI Server.
CMS Client
Server
Remote Web Client
1. Insert the VMS/IPCAM product CD.
Use SMR as Server
CMS Client
[Client]
Install the VMS Client on PCs:
1. Insert the NVR/SMR product CD.
2. Click VMS Client on the menu to start the installation.
3. Choose Advanced Setup to uncheck the VMS Client. If you don’t need video analytic functions, the
VI Server can also be unchecked.
[VI Server] (Optional)
You can choose to install the VI Server only on a standalone PC to manage the video intelligence
data.
1. Insert the VMS/IPCAM product CD.
2. Click VMS Suite on the menu to start the installation.
3. Choose Advanced Setup to choose VI Server only.
[CMS Domain Server]
Install the CMS Domain Server on a PC:
1. Insert the NVR/SMR product CD
2. Click CMS Suite on the menu to start the installation.
3. Choose Advanced Setup to select the CMS Domain Server only.
[CMS Client]
Install the Web Client on the PCs:
Install the CMS Client on PCs:
Launch Microsoft Internet Explorer 7.0 (or above) and enter your VMS Server IP address +
1. Insert the NVR/SMR product CD.
2. Click CMS Suite on the menu to start the installation.
3. Choose Advanced Setup to select the CMS Client only.
“/webclient” in your web browser’s URL location, eg. http://172.18.6.9/webclient to download the
Web Client application.
Note:(1) Regarding CMS Domain Server and CMS Client, if you don't have Surveon SMR/NVR Series,
please contact your dealer for the CMS installation file. (2)The CMS Domain Server can also be
installed together with the CMS Client in the same PC by choosing Typical Setup.
© by Surveon Technology, Inc. All rights reserved.
1. Rule: A short description. For example, “east –fence intrusion detection” or “front entrance access control.”
2. Condition: Specifies triggering conditions such as Motion/Video loss/Sensor input/Clock Alarm, etc.
3. Action: Specifies the action to take when the alarm is triggered.
4. Schedule: Allows the user to schedule the application of specific Alarm rules. This is useful in cases such as
applying rules to non-office hours.
(Step 3 and 4 are for the remote client of NVR2000/SMR Series.)
Basic System Settings
3.Click the target drive first and then Settings.
In “Advanced Settings” dialogue, “General” tab, click Check.
Logging into VMS or CMS Client
To start the software, click to Programs > Surveon
VMS Suite > VMS Client or Programs >
Surveon CMS Suite > CMS Client under the
Windows Start menu. The software will prompt for
the following information:
VMS/NVR:
DAISYCHAN -172.18.7.91
Username:
admin
Search
4. Choose the RAID level, and then click Create Logical Drive
to create the RAID configuration.
Adding an Alarm Rule
1.
2.
3.
4.
Password:
Adding Network Cameras to the Server
Cancel
Login
• VMS/NVR or CMS – The IP address for the VMS/NVR or CMS Server. You can click Search button to
obtain it.
• Username – The username for the domain, which is always admin.
• Password – The password for the domain. Default password is admin.
Click Login after the password is entered.
Web Client
Cameras can be added to the Server in two ways: via an automatic
scan or by manually inputting the camera information.
To begin an automatic scan for cameras:
5 Setting up Live View
An important part of monitoring your surveillance network is to have the right views so that you will
have the optimum viewing angle to discern a situation.
The default view setting is 3x3.
1. Right-click the Server entry and select Scan for Cameras. The
cameras that can be added to the Server will be displayed. To add
a camera manually, select the Add Camera menu.
2. To add a camera to the system, check the box by the camera entry. Enter the username and password, and
press Apply Selected. Click OK to add the selected cameras to the Server.
Username:
Click the New button.
Enter a short description for the new rule in the Add Rule field.
Choose conditions and actions. Click the ...... button in the alarm field to set up a schedule for the rule.
To add a camera to the system, check the box by the camera entry. Enter the username and password, and
press Apply Selected. Click OK to add the selected cameras to the Server.
Setting up Live View
Scan for Cameras
Status: Scan Complete
Password:
Rescan
English
Language:
Camera Name
Login
Cancel
IP Address
Username
Password
Vendor
Model
Status
CAM2321
172.18.6.57
Admin
●●●●
CAM2321
New
CAM2320
172.18.6.147
Admin
●●●●
CAM2320
New
Storage Management
1. To access the information about the drives configured in your Server, highlight and click the
Storage Manager option under Server Settings.
Username: admin
Password:
You can also add a customized view to the VMS Client:
1. Right click on Views > Add View in the View Explorer window of the VMS, and choose the type of view
that you wish to add. The software responds by placing a blank template in the main viewing area.
●●●●
View Explorer
IP Camera Utility
Views
Alarm Rule Settings
Device Brower
VMS Client provides robust alarm handling features.
To access these features right-click the Server entry and then highlight and
click the Alarm Rule Settings option.
2. All available Logical Drives, as well as their sizes, free space, and status will appear. Click Edit to
set the log and location for saving the video recordings.
Add View
1+3 (4 Wide)
Manage View Sequence
1+5 (6 Wide)
Logout
NVR Settings
Auto Scan Camera
1+7 (8 Wide)
View
Manual Add Camera
You can combine the alarm trigger conditions with action items such as event
notification, video recording, and/or camera movements. Multiple alarm rules
can be created using the following elements:menu.
2+4 (6 Wide)
Recording Schedule
Alarm Rule Settings
2+8 (10 Wide)
Event log Viewer
Storage Manager
IO management
1x1 (1)
Configuration
E-map Explorer
Available(75%)9341m87GB
Alarm Rule Setting
Detail
Disk
Type
Logical RAID
Drive
Level
ATA
C
-
ATA
D
-
Drive
Stora
Enable Disabl
Rule
Conditions
Action
233
C
123
Disk Error, Gereral Motion Detection
Event log, Video Alarm Panel
233
D
OK
Cancel
2x2 (4)
2. From the Device Browser window, you can click and drag each camera into separate frames. The camera
output will be displayed in the frame.
Note: Dragging a camera into a frame that already has a camera assigned will cause the frame
to be reassigned to the new camera.
Set
Rule Template Defaults
Edit
Advanced Settings
Disk detention, join NVR Server disk allocation.
Schedule
1+8 (9 Wide)
Settings
New
Delete
Details
Close
Save
Close